始めに
投稿に対してコメントできる機能に関する備忘録です
前提
環境
Ruby 2.6系
Rails 5.2系
ライブラリ
devise
Slim
上記環境のRailsアプリ雛形
Railsアプリケーションセットアップして、deviseとSlimを導入する手順
↓コメント機能の実装後イメージ↓

実装
1.モデル設計
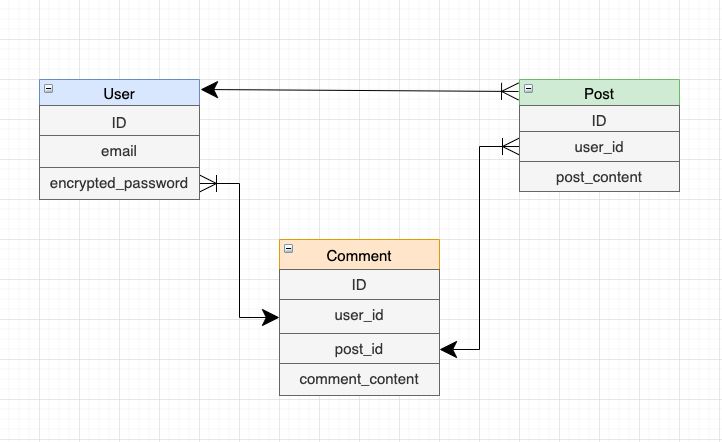
・UserとPostは、Userが多くのPostを持つ1対多の関係。
・Userは多くのCommentを持ち、Postも多くのCommentを持つことになる多対多の関係。
・中間テーブルを作成して1つのレコード毎に、コメントの所有者(user_id)・コメントを所有する投稿(post_id)・コメントの内容を格納するcomment_contentカラムを追加する。
2.モデル作成
$ rails g devise User

$ rails g model Post post_content:string user:references
$ rails g model Comment comment_content:string user:references post:references
・deviseを導入してるので、Userモデルはdeviseコマンドで作成。
・referencesを指定すると、マイグレーションファイルで自動的に外部キー(必須)を張ってくれる。
3.モデルとマイグレーションの確認と関連付け。
usersテーブル
db/migrate/[timestamps]_devise_create_users.rb
class DeviseCreateUsers < ActiveRecord::Migration[5.2]
def change
create_table :users do |t|
## Database authenticatable
t.string :email, null: false, default: ""
t.string :encrypted_password, null: false, default: ""
.
.
#<省略>
.
.
add_index :users, :email, unique: true
add_index :users, :reset_password_token, unique: true
end
end
>Userモデル

>```ruby:app/models/user.rb
class User < ApplicationRecord
  devise :database_authenticatable, :registerable,
         :recoverable, :rememberable, :validatable

  has_many :posts, dependent: :destroy
  has_many :comments  #User.commentsで、ユーザーの所有するコメントを取得できる。
end
postsテーブル
db/migrate/[timestamps]_create_posts.rb
class CreatePosts < ActiveRecord::Migration[5.2]
def change
create_table :posts do |t|
t.text :post_content
t.references :user, foreign_key: true
t.timestamps
end
end
end
>Postモデル

>```ruby:app/models/post.rb
class Post < ApplicationRecord
  belongs_to :user
  has_many :comments, dependent: :destroy  #Post.commentsで、投稿が所有するコメントw取得できる。
end
commentsテーブル
db/migrate/[timestamps]_create_comments.rb
class CreateComments < ActiveRecord::Migration[5.2]
def change
create_table :comments do |t|
t.text :comment_content
t.references :user, foreign_key: true
t.references :post, foreign_key: true
t.timestamps
end
end
end
>Commentモデル

>```ruby:app/models/comment.rb
class Comment < ApplicationRecord
  belongs_to :user  #Comment.userでコメントの所有者を取得
  belongs_to :post  #Comment.postでそのコメントがされた投稿を取得
end
4.コントローラ作成
$ rails g controller posts index show
$ rails g controller comments
4-1.postsコントローラの作成
class PostsController < ApplicationController

  #ユーザーのログイン状態を確かめる。indexはログインしてなくても閲覧可能にしてます。
  before_action :authenticate_user!, only: [:show, :create]

  def index
    @posts = current_user.posts.all  #投稿一覧を表示させるために全取得
    @post = current_user.posts.new   #投稿一覧画面で新規投稿を行うので、formのパラメータ用にPostオブジェクトを取得
  end

  def show
    @post = Post.find(params[:id])
    @comments = @post.comments  #投稿詳細に関連付けてあるコメントを全取得
    @comment = current_user.comments.new  #投稿詳細画面でコメントの投稿を行うので、formのパラメータ用にCommentオブジェクトを取得
  end


  def create
    @post = current_user.posts.new(post_params)
    if @post.save
      redirect_back(fallback_location: root_path)  #コメント送信後は、一つ前のページへリダイレクトさせる。
    else
      redirect_back(fallback_location: root_path)  #同上
    end
  end

  private
  def post_params
    params.require(:post).permit(:post_content)
  end
end
・current_userとして取得しているPostとCommentには全て、ログインユーザーのidが格納される。モデルファイルで行った関連付けと、deviseの導入を行ったので使用可能になっている。
4-2.commentsコントローラの作成
class CommentsController < ApplicationController

  def create
    @comment = current_user.comments.new(comment_params)
    if @comment.save
      redirect_back(fallback_location: root_path)  #コメント送信後は、一つ前のページへリダイレクトさせる。
    else
      redirect_back(fallback_location: root_path)  #同上
    end
  end

  private
  def comment_params
    params.require(:comment).permit(:comment_content, :post_id)  #formにてpost_idパラメータを送信して、コメントへpost_idを格納するようにする必要がある。
  end
end
5.ビューの作成
5-1.投稿一覧ビューの作成
h2 投稿する

= form_with model: @post do |f|
   = f.text_area :post_content, placeholder: '本文'
   = f.submit


h2 投稿一覧

- @posts.each do |post|
   = link_to post.post_content, post

= link_to 'ホーム', root_path
5-2.投稿詳細画面ビューの作成(コメント投稿フォームと、コメント一覧のビューも作成する)
h2 投稿詳細

= @post.post_content

h2 コメントをする

= form_with(model:[@post, @comment], method: :post) do |f|
  = f.text_area :comment_content
  = f.hidden_field :post_id, value: @post.id
  = f.submit 'コメントする'

h2 コメント一覧

- @comments.each do |comment|
  = comment.comment_content  #コメントの内容が表示される

= link_to 'ホーム', root_path
・model:[@post, @comment]ネストされたルーティングへアクセスするための記述。ちゃんと2つ引数を与えないと上手く送信されない。
・隠しinputフィールドで、post.idという値をpost_idというパラメータで送信している。Commentテーブルのpost_idに格納するため。
6.ルーティングの作成
Rails.application.routes.draw do
  devise_for :users  #deviseで作成されたユーザー認証用のルーティング

  root to: 'posts#index'  #ホーム画面は投稿一覧画面に設定

  resources :posts do  #postsコントローラへのルーティング
    resources :comments, only: [:create]  #commentsコントローラへのルーティング
  end
end
・commentsリソースをpostsリソース内にネストすることで、post_comments_pathなどのようにパスを指定できて便利。
以上で、コメント機能の実装は完了になります。