前回までのあらすじ
…あっ、今回特にないです。
TL;DR
画像参照系のアプリを作りたかったので、デバイスにあるファイル操作についての実装をサンプルプログラムに追記する形で解説していきます。
まとめると
- ライブラリ導入方法
- 端末のファイル操作(読み込み/書き込み)
あたりを書いています。
注意
この記事では Android Studio を利用した開発にフォーカスをあてています。
VS Code を利用した開発方法はほとんど書いていません。
あらかじめご了承ください。
注意その2
筆者は初期の頃の Dart こそ触れたことがありますが、ほとんど初心者の状態です。
なるべく正しい内容で記述を努めますが、誤りや理解不足による曖昧な記述があるかもしれません。
(そんなときは優しく教えてね ![]() )
)
今回のゴール
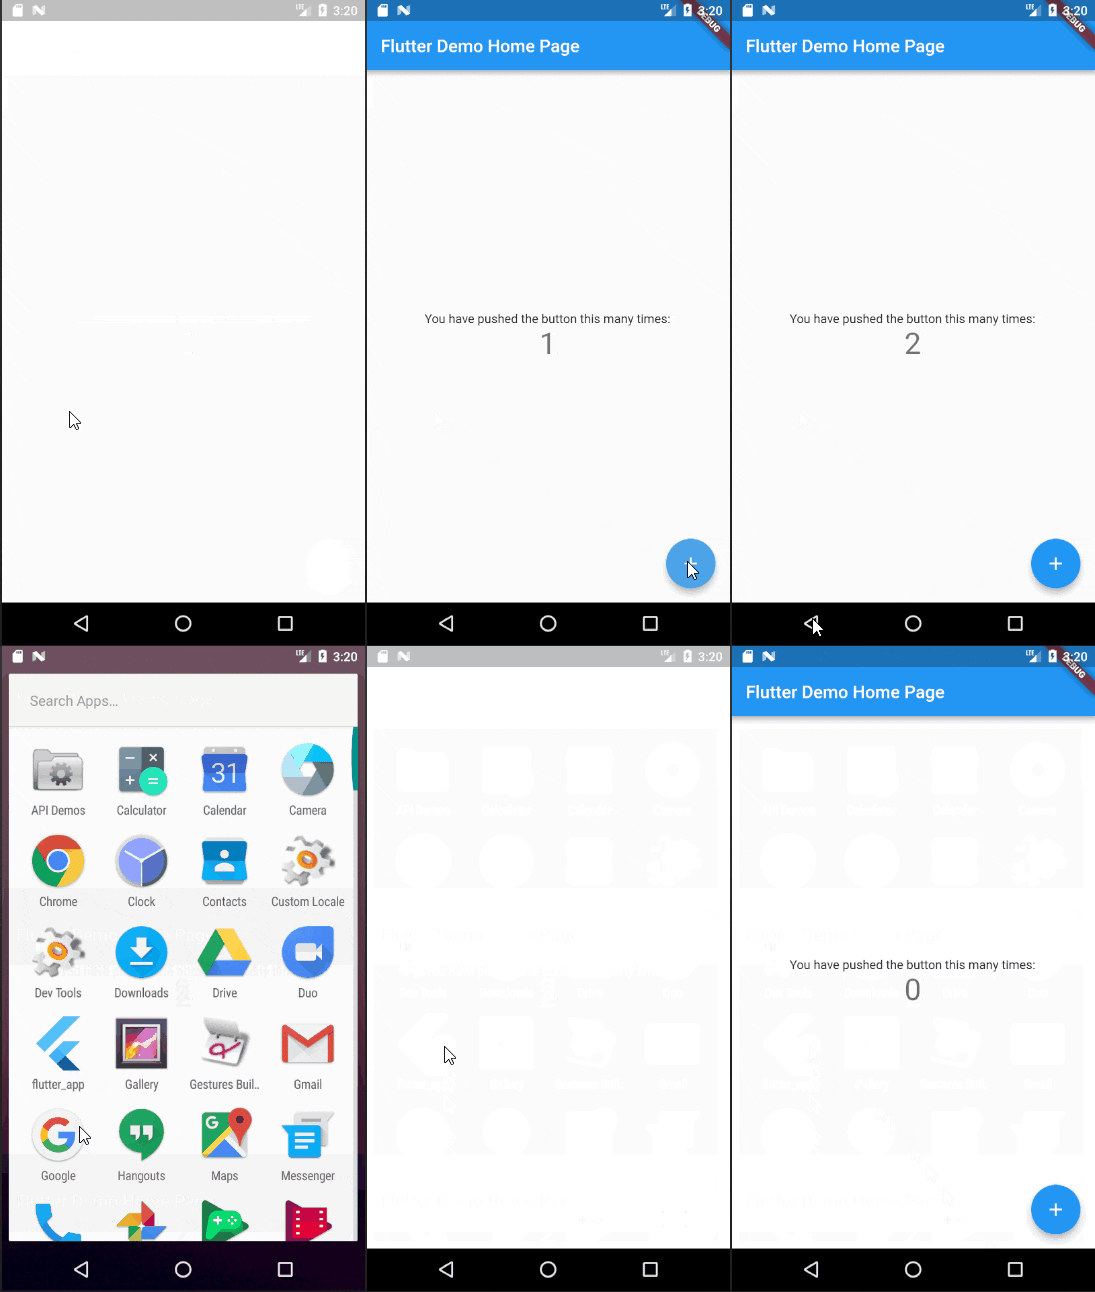
サンプルプログラムの状態では カウントした数値がアプリ起動のたびにリセットされている ものを、 デバイスにあるファイルにカウントした数値を書き込み&読み込むことで前回アプリ起動時のカウント値を引き継げる ようにします!
(上の動画はサンプルプログラムをそのまま動作したときのもの。起動のたびにカウントが 0 に戻っている)
Flutter を使ったデバイスアクセスの制限
Flutter はクロスプラットフォーム開発を前提としたフレームワークです。
Android でも iOS でも動くアプリケーションを作れるわけで、異なるそれぞれのプラットフォームで利用デバイスにアクセスするという機能を実装する場合、ネイティブアプリ開発の場合より制約が出てきます。
プラグインが必要
そもそも path_provider プラグインを導入する必要があります。
この path_provider プラグインと dart:io ライブラリを組み合わせることでプラットフォームに依存せずファイルアクセスが可能になります。
アクセスできるディレクトリが限られる
path_provider を利用してドキュメントディレクトリのパスを見つける場合に次のように書きます。
Future<String> get _localPath async {
  final directory = await getApplicationDocumentsDirectory();

  return directory.path;
}
パスなどを指定することなく getApplicationDocumentsDirectory() 関数を用いてディレクトリパス検索を行なっています。
getApplicationDocumentsDirectory() 関数ではアプリケーション専用のファイルを配置するディレクトリへのパスを返します。
「アプリケーション専用のファイルを配置するディレクトリ」というのは Android では AppData ディレクトリですし、 iOS では NSDocumentsDirectory API を用いた結果を返す感じです。
path_provider はその他にも関数を持っているので一覧化しておきます。
| 関数名 | 概要 |
|---|---|
| getApplicationDocumentsDirectory | アプリケーションがそのアプリケーション専用のファイルを配置するディレクトリへのパス。アプリケーション自体が削除された場合にのみ消去されます。 |
| getExternalStorageDirectory | アプリケーションが最上位ストレージにアクセスできるディレクトリへのパス。この機能は Android のみ利用可能なため、呼び出しの前に OS を判断する必要があります。 |
| getTemporaryDirectory | デバイスの一時ディレクトリへのパス。 |
このようになっていて、Android でも iOS でも動くアプリを作る場合は、アプリ専用ディレクトリか一時ディレクトリのみしか利用できません。
実装してみる
前回の記事 で解説したサンプルプログラムをベースに、デバイスへのファイルアクセス機能の実装を行なっていきます。
path_provider プラグインの導入
インストール
Flutter では pubspec.yaml というファイルを用いてパッケージ管理を行います。
( Pub 1 懐かしいな~)
dependencies:
  flutter:
    sdk: flutter

  # The following adds the Cupertino Icons font to your application.
  # Use with the CupertinoIcons class for iOS style icons.
  cupertino_icons: ^0.1.2

  # Use to access the local path.
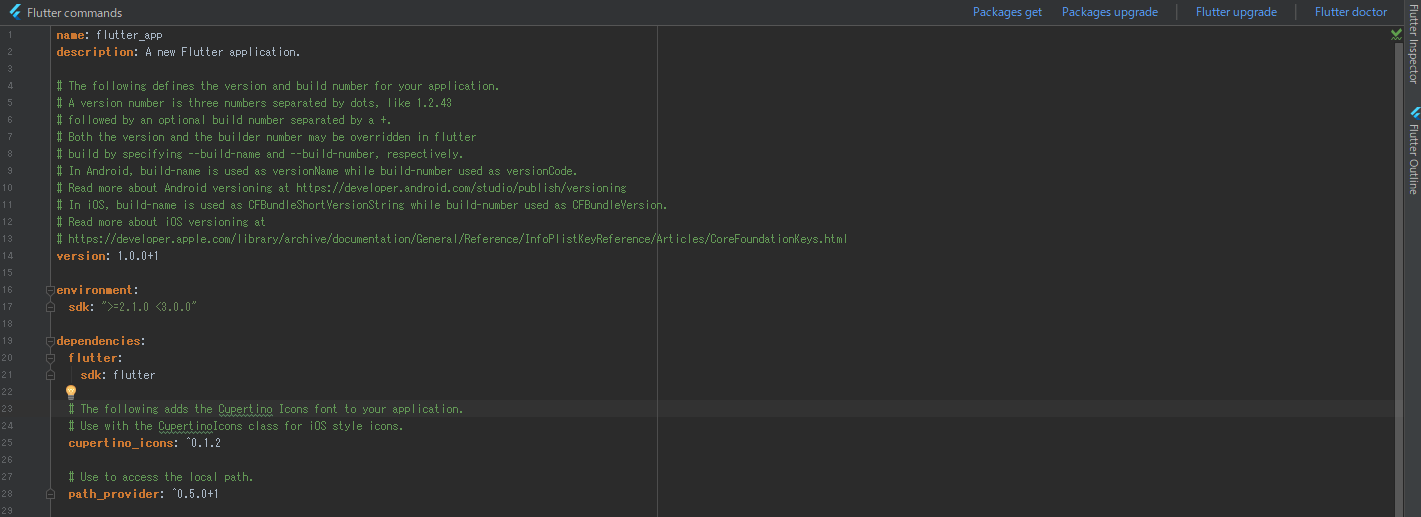
  path_provider: ^0.5.0+1
一番下の 1 行を追加しました。(コメント入れると 2 行)
サンプルプログラムに追記するとこんな感じになっていると思います。
Android Studio の場合だと右上に Packages get と出るので、そこをクリックするとパッケージをインストールしてくれます。
ちなみに、コマンドベースでは
$ flutter packages get
でもインストール可能です。
( VS Code ではこの方法なのかな?流石にコマンドパレットにあるか)
インポート
前回記事でも書きましたが、 Flutter でパッケージ利用する場合はインポート文が必要です。
import 'package:path_provider/path_provider.dart';
このように書くことで path_provider パッケージがコード内で利用可能になります。
デバイスアクセスするためのクラスを実装
path_provider パッケージを利用してデバイスのファイルを読み込んだり、書き込んだりするためのクラスを実装していきます。
わかりやすいように機能単位に分割しています。
デバイスのディレクトリパスの取得
これはすでにサンプルコードを載せていましたが、次のようになります。
Future<String> get _localPath async {
  final directory = await getApplicationDocumentsDirectory();
  return directory.path;
}
getApplicationDocumentsDirectory() 関数を利用してアプリケーション専用のディレクトリパスを返すアクセッサメソッドです。

Dart ならではの構文が含まれるので軽く補足 
-
Future:JavaScript でいうPromise。非同期処理の結果をラップして利用します。 -
get:いわゆるゲッター。Dart ではアクセッサメソッドを作るときにgetキーワードやputキーワードを使います。 -
_hoge:変数や関数の Prefix に_をつけるとプライベートなアクセスのみ出来る変数や関数になります。
ファイルオブジェクトの取得
Future<File> get _localFile async {
  final path = await _localPath;
  return File('$path/counter.txt');
}
_localPath でディレクトリパスを取得して、 そこにある counter.txt というファイルオブジェクトを返すアクセッサメソッドです。
エラーハンドリングは呼び出し元で行うのでここでは特に意識しなくて OK です。
読み込み用関数の作成
 Future<int> readCounter() async {
  try {
    final file = await _localFile;

    // Read the file
    String contents = await file.readAsString();

    return int.parse(contents);
  } catch (e) {
    // If encountering an error, return 0
    return 0;
  }
}
_localFile でファイルオブジェクトを取得して、 readAsString() でテキストファイルに書かれている文字列を取得します。
サンプルプログラムの例ではカウント値を保存するためにファイルを利用しているので、 int にパースして返却しています。
初回の処理でファイルが存在しないなどエラーが発生する場合は、カウント値を初期化( 0 )して返却しています。
書き込み用関数の作成
Future<File> writeCounter(int counter) async {
  final file = await _localFile;

  // Write the file
  return file.writeAsString('$counter');
}
_localFile でファイルオブジェクトを取得して、引数のカウント値をファイルに書き込んでいます。
クラス化する
class CounterStorage {

  Future<int> readCounter() async {
    try {
      final file = await _localFile;

      // Read the file
      String contents = await file.readAsString();

      return int.parse(contents);
    } catch (e) {
      // If encountering an error, return 0
      return 0;
    }
  }

  Future<File> writeCounter(int counter) async {
    final file = await _localFile;

    // Write the file
    return file.writeAsString('$counter');
  }

  Future<File> get _localFile async {
    final path = await _localPath;
    return File('$path/counter.txt');
  }

  Future<String> get _localPath async {
    final directory = await getApplicationDocumentsDirectory();
    return directory.path;
  }
}
こんな感じになります!
サンプルプログラム側(カウンター)の実装
作成した CounterStorage クラスを利用して、カウント値をクリアさせずファイルに保存するための実装をします。
CounterStorage のフィールド化
サンプルプログラム中でアプリのホーム画面を構成するためのウィジェットである MyHomePage クラス。
ここで CounterStorage が利用できるようにフィールド定義します。
class MyHomePage extends StatefulWidget {
  // 📝 Add to
  MyHomePage({Key key, this.title, this.storage}) : super(key: key);

  final String title;

  // 📝 Add to
  final CounterStorage storage;

  @override
  _MyHomePageState createState() => _MyHomePageState();
}
📝 Add to コメントが付いたところが追加した部分です。
フィールドとして CounterStorage を定義して、コンストラクターにも引数を追加しました。
あとはコンストラクター呼び出し元で初期化してやれば利用可能になります。
class MyApp extends StatelessWidget {
  @override
  Widget build(BuildContext context) {
    return MaterialApp(
      title: 'Flutter Demo',
      theme: ThemeData(
        primarySwatch: Colors.blue,
      ),
      home: MyHomePage(
          title: 'Flutter Demo Home Page',
          // 📝 Add to
          storage: CounterStorage()
      ),
    );
  }
}
State へのファイルアクセス処理の実装
class _MyHomePageState extends State<MyHomePage>  {

  // 📝 Update to
  int _counter;

  // 📝 Add to
  @override
  void initState() {
    super.initState();
    widget.storage.readCounter().then((int value) {
      setState(() {
        _counter = value;
      });
    });
  }

  void _incrementCounter() {
    setState(() {
      _counter++;
    });
    // 📝 Add to
    widget.storage.writeCounter(_counter);
  }

  // 略
}
カウント値の初期化部分
サンプルプログラムでは
int _counter = 0;
こうなっていました。
アプリ再起動時に前回カウント値を利用するためにファイルに書き込んだ値を利用するように変更しています。
フィールドの初期化は initState() を @override して行なっています。
widget.storage.readCounter().then((int value) {
  setState(() {
    _counter = value;
  });
});
State では親であるウィジェットに widget でアクセスでき、そのフィールドである storage 、つまり CounterStorage クラスの readCounter() 関数を使って前回カウント値をファイルから取得してセットしています。
カウント部分
void _incrementCounter() {
    setState(() {
      _counter++;
    });
    // 📝 Add to
    widget.storage.writeCounter(_counter);
  }
もともとあった処理に 1 文を追加しただけです。
CounterStorage クラスの writeCounter() 関数を使ってカウントアップしたカウント値をファイル書き込みしています。
全文公開
長いですが main.dart 全文を載せています。
詳細で説明していたときには省きましたが、 import 'dart:io'; のインポート文も必要です。
import 'dart:async';
// 📝 Add to
import 'dart:io';

import 'package:flutter/material.dart';
// 📝 Add to
import 'package:path_provider/path_provider.dart';

void main() => runApp(MyApp());

class MyApp extends StatelessWidget {
  @override
  Widget build(BuildContext context) {
    return MaterialApp(
      title: 'Flutter Demo',
      theme: ThemeData(
        primarySwatch: Colors.blue,
      ),
      home: MyHomePage(
          title: 'Flutter Demo Home Page',
          // 📝 Add to
          storage: CounterStorage()
      ),
    );
  }
}

class MyHomePage extends StatefulWidget {
  // 📝 Add to
  MyHomePage({Key key, this.title, this.storage}) : super(key: key);

  final String title;

  // 📝 Add to
  final CounterStorage storage;

  @override
  _MyHomePageState createState() => _MyHomePageState();
}

class _MyHomePageState extends State<MyHomePage>  {

  // 📝 Update to
  int _counter;

  // 📝 Add to
  @override
  void initState() {
    super.initState();
    widget.storage.readCounter().then((int value) {
      setState(() {
        _counter = value;
      });
    });
  }

  void _incrementCounter() {
    setState(() {
      _counter++;
    });
    // 📝 Add to
    widget.storage.writeCounter(_counter);
  }

  @override
  Widget build(BuildContext context)  {

    return Scaffold(
      appBar: AppBar(
        title: Text(widget.title),
      ),
      body: Center(
        child: Column(
          mainAxisAlignment: MainAxisAlignment.center,
          children: <Widget>[
            Text(
              'You have pushed the button this many times:',
            ),
            Text(
              '$_counter',
              style: Theme.of(context).textTheme.display1,
            ),
          ],
        ),
      ),
      floatingActionButton: FloatingActionButton(
        onPressed: _incrementCounter,
        tooltip: 'Increment',
        child: Icon(Icons.add),
      ), // This trailing comma makes auto-formatting nicer for build methods.
    );
  }
}

class CounterStorage {

  Future<int> readCounter() async {
    try {
      final file = await _localFile;

      // Read the file
      String contents = await file.readAsString();

      return int.parse(contents);
    } catch (e) {
      // If encountering an error, return 0
      return 0;
    }
  }

  Future<File> writeCounter(int counter) async {
    final file = await _localFile;

    // Write the file
    return file.writeAsString('$counter');
  }

  Future<File> get _localFile async {
    final path = await _localPath;
    return File('$path/counter.txt');
  }

  Future<String> get _localPath async {
    final directory = await getApplicationDocumentsDirectory();
    return directory.path;
  }
}
まとめ
path_provider パッケージの導入から、サンプルプログラムを利用したファイルアクセスの解説をしてきました。
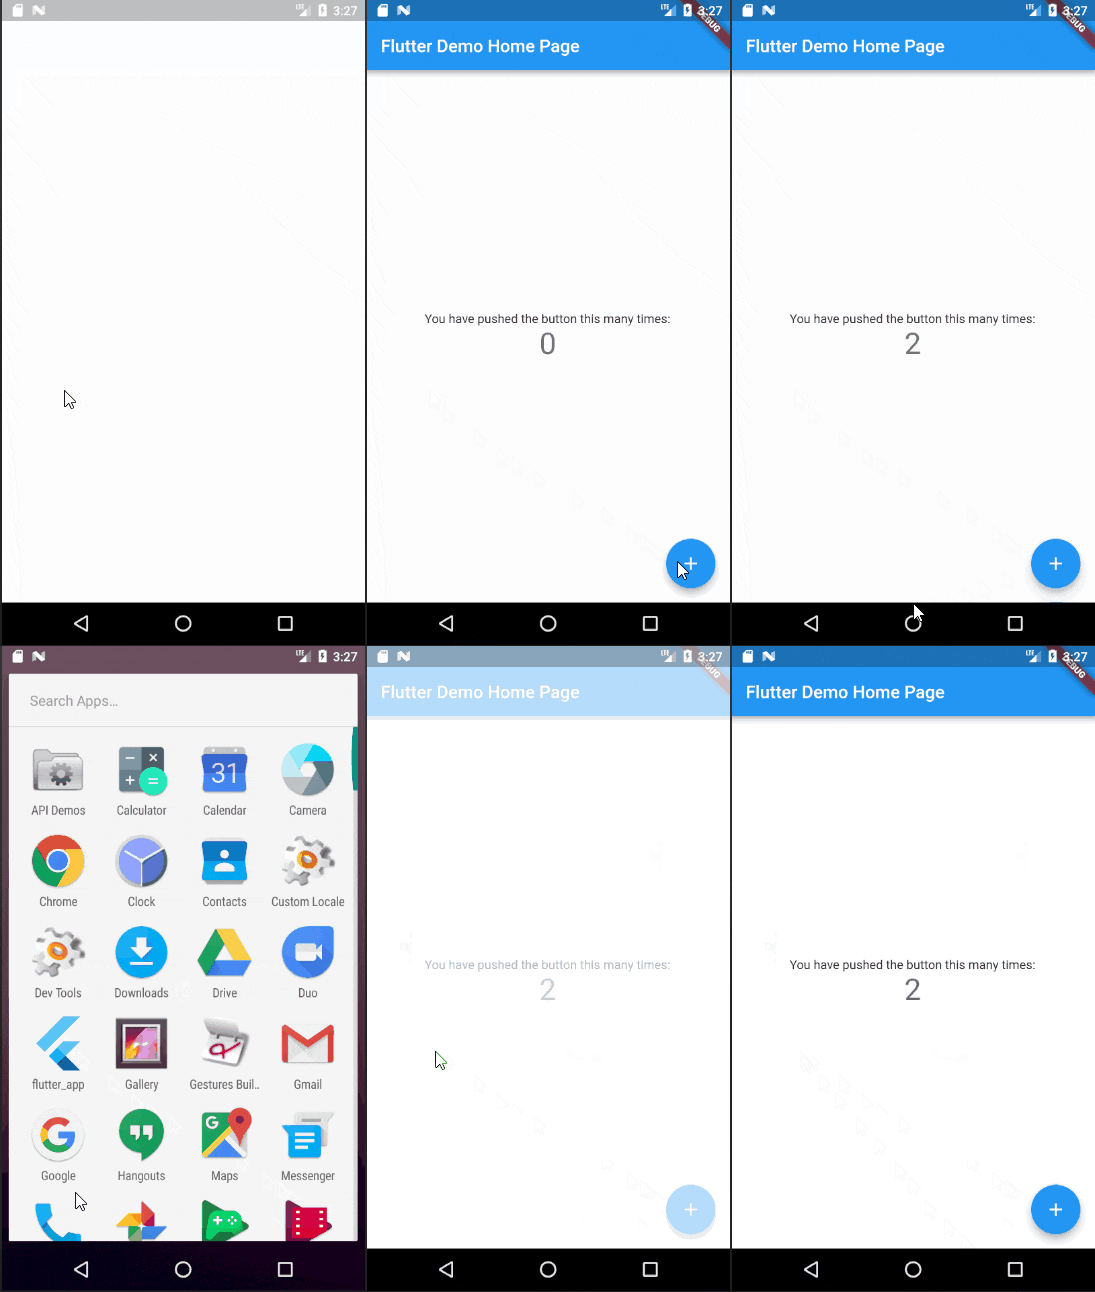
サンプルプログラムも無事にカウント値を引き継いでくれています!
クロスプラットフォーム開発ならではの制約はありますが、デバイスへのファイルアクセスは 公式が用意してくれているパッケージを利用するだけで出来る のでハードルは高くはないですよね ![]()
途中で出てきた Future などの構文を簡単に流してしまいましたが、別の機会でしっかりと記事にまとめれたらなと思っています。
おわりのおわり
kurararara『もう3月も終わりだなぁ』
kurararara『... 』
kurararara『ん?』
kurararara『…んぉおおあああぁッ!?』
kurararara『コンテスト間に合わねぇええッ!!』
\def\textlarge#1{%
  {\rm\Large #1}
}
$ \textlarge{Fin.}$
-
Pub とは Dart で採用されているパッケージ管理機能のこと。
pubコマンドを利用してパッケージの追加・更新や依存関係の解決を行うことが出来る。 ↩


