Android studioでtestCoverageEnabledフラグをtrueにしたら、createDebugCoverageReportという機能が使えます。
しかしcreateDebugCoverageReportを実行したら、全てのUnit test / Instrumented testのテストケースが実行されます。環境に依存するテストケース(Internet、周辺機器など)がFailになってしまいます。
本文は手動でカバレッジレポートの作成方法を説明します。
実行環境
・Android Studio 4.1.1
・compileSdkVersion 29
・Gradle version 6.5
jacoco.gradleの作成
appあるいはmoduleのbuild.gradleと同じフォルダーにjacoco.gradleを作成します。
apply plugin: 'jacoco'
jacoco {
    toolVersion = "0.8.4"
    reportsDir = file("$projectDir/reports")
}

task jacocoTestReport(type: JacocoReport) {
    group = "Reporting"
    description = "Generate Jacoco coverage reports after running tests."
    reports {
        xml.enabled = true
        html.enabled = true
    }
    def coverageClassDirectories = fileTree(
            dir: "$buildDir/intermediates/javac/debug/classes",
            excludes: ['**/R*.class',
                       '**/*$InjectAdapter.class',
                       '**/*$ModuleAdapter.class',
                       '**/*$ViewInjector*.class'
            ])

    def coverageSourceDirs = [
            "$buildDir/../src/main/java"
    ]

    def coverageExecutionData = files("$projectDir/reports/coverageEC/coverage.exec")

    getClassDirectories().setFrom(coverageClassDirectories)
    getSourceDirectories().setFrom(coverageSourceDirs)
    getExecutionData().setFrom(coverageExecutionData)
}
coverageExecutionData は自分好きな所に設定してください。
後で手動でcoverage.execをこっちにコピーして、Android studioでcoverage.execを読み込んでレポートを生成します。
build.gradleの設定
ファイルの上にjacoco.gradleのインポートを追加します。
apply from: "jacoco.gradle"
debugの所に「testCoverageEnabled = true」を追加します。
    buildTypes {
        //...
        debug {
            testCoverageEnabled = true
        }
    }
jacoco.gradleとbuild.gradleを変更したら一回「Sync Project with Gradle Files」を押してください。

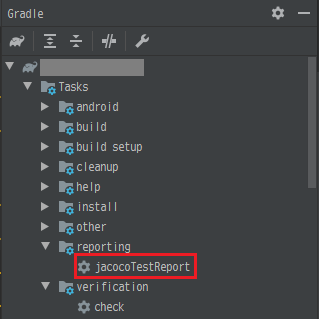
GradleウインドウにjacocoTestReportが現れたはずです。
後で使うので、今放っておいてください。

クラスJacocoUtilsの制作
Instrumentation testの所(Android studioのデフォルトテスト例ExampleInstrumentedTest.java同じフォルダー)にJacocoUtils.javaを作成します。
後でInstrumentation testのテストケースで使います。
package Example.package.name;

import android.content.Context;
import android.os.Environment;
import android.util.Log;

import java.io.File;
import java.io.FileOutputStream;
import java.io.IOException;
import java.io.OutputStream;

class JacocoUtils {
    static String TAG = "JacocoUtils";

    private static String DEFAULT_COVERAGE_FILE_PATH = "coverage.exec";

    /**
     * execファイルを生成する
     *
     * @param isnew execファイルを作り直すか。
     */
    public static void generateEcFile(Context context, boolean isnew) {
        Log.d(TAG, "カバレッジファイル生成: " + DEFAULT_COVERAGE_FILE_PATH);
        OutputStream out = null;
        File mCoverageFilePath = new File(context.getExternalFilesDir(Environment.DIRECTORY_DOCUMENTS),DEFAULT_COVERAGE_FILE_PATH);

        try {
            if (isnew && mCoverageFilePath.exists()) {
                Log.d(TAG, "旧execファイルを削除");
                mCoverageFilePath.delete();
            }
            if (!mCoverageFilePath.exists()) {
                mCoverageFilePath.createNewFile();
            }
            out = new FileOutputStream(mCoverageFilePath.getPath(), true);

            Object agent = Class.forName("org.jacoco.agent.rt.RT")
                    .getMethod("getAgent")
                    .invoke(null);

            out.write((byte[]) agent.getClass().getMethod("getExecutionData", boolean.class)
                    .invoke(agent, false));

        } catch (Exception e) {
            Log.e(TAG, "generateEcFile: " + e.getMessage());
        } finally {
            if (out == null)
                return;
            try {
                out.close();
            } catch (IOException e) {
                e.printStackTrace();
            }
        }
    }
}
ExampleInstrumentedTest.javaの変更
ExampleInstrumentedTest.javaにJacocoUtilsの使用を追加します。
テストが終わったらtearDownが実行されるので、必ずexecファイルが生成されます。
public class ExampleInstrumentedTest1{
    @After
    public void tearDown() throws Exception {
        Context appContext = InstrumentationRegistry.getInstrumentation().getTargetContext();
        JacocoUtils.generateEcFile(appContext, false);
    }

    @Test
    public void ExampleInstrumentedTest1 () {
        //Do something to test
    }
}
テストケースの実行
DebuggerのConsole画面でカバレッジファイル生成のメッセージが見えるはずです。

*もっとテストケースをしたらcoverage.execのサイズがだんだん増えていって、カバレッジも増えます。
Android機器からcoverage.execをコピーする
USBでAndroid機器をPCと接続して、
「[Android機器名]\内部共有ストレージ\Android\data\[package名]\files\Documents\coverage.exec」を
「[project名]\app\reports\coverageEC\」にコピーします。(存在しないフォルダーがあったら手動で生成)
カバレッジレポートの生成
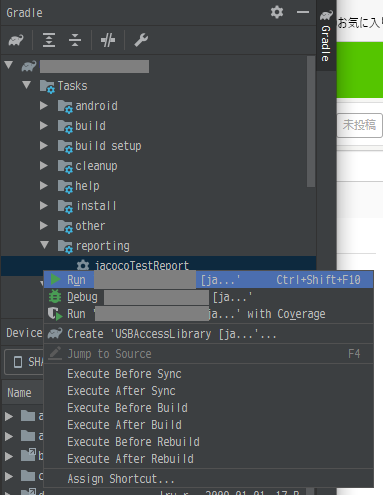
jacocoTestReportのRunを実行してください。

「[Project名]\app\reports\jacocoTestReport\html」でカバレッジレポートが生成されるはずです。


