はじめに
タイトル通り、インフラ初学者がオモチャにと購入した Raspberry Pi3 に Docker をインストールしてサンプルイメージ( hello-world )を起動するまでの内容となる。
Docker インストールについては先達の方々の記事が沢山あるが、自分自身の環境で行ったことの備忘録として、また作業の際につまづいたポイントについて同じ轍を踏まないように記事にする。
作業環境
- Rasppberry Pi3
- Ubuntu MATE 16.04.5 LTS ( GNU/Linux 4.4.38-v7+ armv7l )
- Docker CE ( 18.06.0~ce~3-0~ubuntu )
Docker のインストール
参考ページ
以下は本家のインストール手順である
このページの
- Uninstall old versions
- Install Docker CE
に沿ってインストール作業を行った。
1. Uninstall old versions
-
旧バージョンのアンインストール
$ sudo apt-get remove docker docker-engine docker.io
2. Install Docker CE -> Install using the repository
リポジトリの設定
-
パッケージの更新
$ sudo apt-get update -
HTTPS 経由でのパッケージのインストールを許可する
$ sudo apt-get install \ apt-transport-https \ ca-certificates \ curl \ software-properties-common -
Docker の GPG key を追加する
次のコマンドで GPG key を追加して
$ curl -fsSL https://download.docker.com/linux/ubuntu/gpg | sudo apt-key add -次のコマンドで検証を行う。
(基本、ここでエラーは発生しないはず。エラーが発生したら別途対応を調査する必要あり)$ sudo apt-key fingerprint 0EBFCD88 -
Docker の安定板リポジトリを apt パッケージに追加する
$ sudo add-apt-repository \
   "deb [arch=armhf] https://download.docker.com/linux/ubuntu \
   $(lsb_release -cs) \
   stable"
ここまでの手順でようやく apt-get での Docker インストールの準備が整った。
次は実際のインストール作業に入っていく。
リポジトリからのインストール
-
パッケージの更新
$ sudo apt-get update -
最新版をインストールする場合
$ sudo apt-get install docker-ce -
バージョンを指定してインストールする場合
次のコマンドでバージョンのリストを取得して
$ apt-cache madison docker-ce
 docker-ce | 18.06.0~ce~3-0~ubuntu | https://download.docker.com/linux/ubuntu xenial/stable armhf Packages
 docker-ce | 18.03.1~ce-0~ubuntu | https://download.docker.com/linux/ubuntu xenial/stable armhf Packages
 docker-ce | 18.03.0~ce-0~ubuntu | https://download.docker.com/linux/ubuntu xenial/stable armhf Packages
 docker-ce | 17.12.1~ce-0~ubuntu | https://download.docker.com/linux/ubuntu xenial/stable armhf Packages
 docker-ce | 17.12.0~ce-0~ubuntu | https://download.docker.com/linux/ubuntu xenial/stable armhf Packages
 docker-ce | 17.09.1~ce-0~ubuntu | https://download.docker.com/linux/ubuntu xenial/stable armhf Packages
 docker-ce | 17.09.0~ce-0~ubuntu | https://download.docker.com/linux/ubuntu xenial/stable armhf Packages
 docker-ce | 17.06.2~ce-0~ubuntu | https://download.docker.com/linux/ubuntu xenial/stable armhf Packages
 docker-ce | 17.06.1~ce-0~ubuntu | https://download.docker.com/linux/ubuntu xenial/stable armhf Packages
 docker-ce | 17.06.0~ce-0~ubuntu | https://download.docker.com/linux/ubuntu xenial/stable armhf Packages
 docker-ce | 17.03.2~ce-0~ubuntu-xenial | https://download.docker.com/linux/ubuntu xenial/stable armhf Packages
 docker-ce | 17.03.1~ce-0~ubuntu-xenial | https://download.docker.com/linux/ubuntu xenial/stable armhf Packages
 docker-ce | 17.03.0~ce-0~ubuntu-xenial | https://download.docker.com/linux/ubuntu xenial/stable armhf Packages
バージョンを指定してインストールを行う。
$ sudo apt-get install docker-ce=<VERSION><VERSION>は一つ前のコマンドでリストされたバージョンを指定する。18.06.0~ce~3-0~ubuntuを指定したければ$ sudo apt-get install docker-ce=18.06.0~ce~3-0~ubuntuとなる。
-
サンプル「hello-world」の起動
Docker が正常にインストールされていることを確認するために、サンプルイメージ
hello-worldを実行する。
この段階では「スーパーユーザ権限」での実行となる。$ sudo docker run hello-world実行結果の最初の数行に注目。
helo-worldのダウンロードと起動に成功Unable to find image 'hello-world:latest' locally latest: Pulling from library/hello-world ad0f38092cf2: Pull complete Digest: sha256:4b8ff392a12ed9ea17784bd3c9a8b1fa3299cac44aca35a85c90c5e3c7afacdc Status: Downloaded newer image for hello-world:latest Hello from Docker! This message shows that your installation appears to be working correctly. To generate this message, Docker took the following steps: 1. The Docker client contacted the Docker daemon. 2. The Docker daemon pulled the "hello-world" image from the Docker Hub. (arm32v7) 3. The Docker daemon created a new container from that image which runs the executable that produces the output you are currently reading. 4. The Docker daemon streamed that output to the Docker client, which sent it to your terminal. To try something more ambitious, you can run an Ubuntu container with: $ docker run -it ubuntu bash Share images, automate workflows, and more with a free Docker ID: https://hub.docker.com/ For more examples and ideas, visit: https://docs.docker.com/engine/userguide/ローカルに
hello-worldイメージが存在しないので (Unable to find image 'hello-world:latest' locallyの行 )latest: Pulling from library/hello-world ad0f38092cf2: Pull complete Digest: sha256:4b8ff392a12ed9ea17784bd3c9a8b1fa3299cac44aca35a85c90c5e3c7afacdc Status: Downloaded newer image for hello-world:latestで
hello-worldイメージをダウンロードしていることがわかる。
その後に出力されている内容はhello-workdイメージの実行結果。この通り
hello-worldイメージが実行されたことで Docker が正常にインストールされたことが確認できた。
3. 作業時の注意点
基本、上記の手順通り進めて行けば良いが 「 Install using the repository 」 の「4項」で注意が必要である。
( 本記事の「リポジトリの設定-Docker の安定板リポジトリを apt パッケージに追加する」が該当する )
今回の作業環境は前掲の通り 「 Raspberry Pi3 + Ubuntu MATE 」 となるので、下図の通り 「 armhf 」の内容を実行しなければならない。
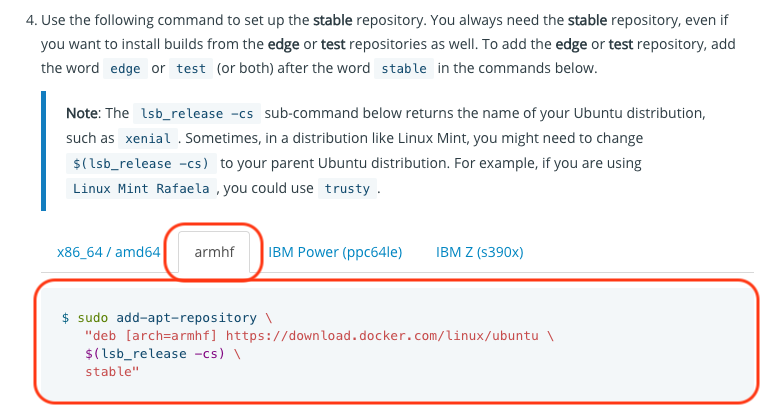
ここで異なるアーキテクチャの内容を実行すると後の工程のインストール作業でエラーとなる。
-
異なるアーキテクチャの内容を実行した際に発生したエラー
- パッケージのアップデート時
apt-getによるpackageのupgrade$ sudo apt-get update 〜〜省略〜〜 エラー:12 https://download.docker.com/linux/debian xenial/stable amd64 Packages 404 Not Found 〜〜省略〜〜 パッケージリストを読み込んでいます... 完了 〜〜省略〜〜 W: リポジトリ https://download.docker.com/linux/debian xenial Release には Release ファイルがありません。 N: このようなリポジトリから取得したデータは認証できないので、データの使用は潜在的に危険です。 N: リポジトリの作成とユーザ設定の詳細は、apt-secure(8) man ページを参照してください。 E: https://download.docker.com/linux/debian/dists/xenial/stable/binary-amd64/Packages の取得に失敗しました 404 Not Found E: いくつかのインデックスファイルのダウンロードに失敗しました。これらは無視されるか、古いものが代わりに使われます。 〜〜省略〜〜- Docekr インストール
apt-getによるdocker-ceのインストール$ sudo apt-get install --yes docker-ce パッケージリストを読み込んでいます... 完了 依存関係ツリーを作成しています 状態情報を読み取っています... 完了 パッケージ docker-ce は使用できませんが、別のパッケージから参照されます。 これは、パッケージが欠落しているか、廃止されたか、または別のソース からのみ利用可能であることを意味します。 E: パッケージ 'docker-ce' にはインストール候補がありません
4. 実施していない手順
次の内容については実施していないので本記事では扱わない。
- Install Docker CE
インストール後の作業( for linux )
Linux 環境で Docker のインストールを行った場合は次の作業も忘れずに実施する。
参考ページ
このページの
に沿って作業を行った。
1. Manage Docker as a non-root user
Docker の管理をスーパーユーザ以外のユーザで行うための手順を実施する。
この手順を踏むことで、カレントユーザが Docker の管理を行う権限を有することになる。
-
docker グループの追加
$ sudo groupadd docker -
カレントユーザを docker グループへ登録する
$ sudo usermod -aG docker $USER -
一旦ログアウトしてログインしなおす
-
sudo をつけないで docker を起動する
上記まででカレントユーザで Docker 管理を行えるようになっているので、その確認を行う。
sudo なしで Docker イメージを起動してみる。$ docker run hello-worlddocker イメージの起動に成功。
helo-worldが起動したHello from Docker! This message shows that your installation appears to be working correctly. To generate this message, Docker took the following steps: 1. The Docker client contacted the Docker daemon. 2. The Docker daemon pulled the "hello-world" image from the Docker Hub. (arm32v7) 3. The Docker daemon created a new container from that image which runs the executable that produces the output you are currently reading. 4. The Docker daemon streamed that output to the Docker client, which sent it to your terminal. To try something more ambitious, you can run an Ubuntu container with: $ docker run -it ubuntu bash Share images, automate workflows, and more with a free Docker ID: https://hub.docker.com/ For more examples and ideas, visit: https://docs.docker.com/engine/userguide/蛇足ながら。
今回はすでにhello-workdイメージが存在しているので、「リポジトリからのインストール-サンプル「hello-world」の起動」で実行した際に出力されていたUnable to find image 'hello-world:latest' locally latest: Pulling from library/hello-world ad0f38092cf2: Pull complete Digest: sha256:4b8ff392a12ed9ea17784bd3c9a8b1fa3299cac44aca35a85c90c5e3c7afacdc Status: Downloaded newer image for hello-world:latestが出力されていない。
2. Configure Docker to start on boot
続いて Docker の自動起動に関する設定を行う。
本家の手順通りに進めることで問題なく設定できるが、設定の際に自分の環境によって実行するコマンドが変わってくる。
- 本家の手順で示されている環境
- systemd
- upstart
- chkconfig
こちらの環境は systemd となるので、そこで行ったコマンドを実績として残しておく。
-
自動起動の有効/無効に関する設定
自動起動を有効にする場合は次のコマンドを実行する。
$ sudo systemctl enable docker自動実行を停止する場合は次のコマンドを実行する。
$ sudo systemctl disable docker
3. 実施していない手順
次の内容については実施していないので本記事では扱わない。
- Use a different storage engine
- Configure where the Docker daemon listens for connections
- Enable IPv6 on the Docker daemon
4. Troubleshooting
問題が発生した場合は次の項目にでトラブルシュートが用意されている。
状況に応じて確認したい。
- Kernel compatibility
- IP forwarding problems
- Specify DNS servers for Docker
- Allow access to the remote API through a firewall
まとめ
- 本家のインストール手順通りに進めれば問題なくインストールできる
- ただし自分の環境にあった内容で行わなければハマる
- 自分は 3. 作業時の注意点 で「 x86_64 / amd64 」の内容を実行していたせいでハマった
- ドキュメントはちゃんと読もう
- ( Linux環境の場合 ) グループの追加とユーザの登録でスーパーユーザにスイッチしなくても実行できる環境する
この記事では Docker のインストールとサンプルイメージの起動までしか行っていないので、今後は
- 実用的なイメージの導入と利用
- 自分の環境を Docker イメージとして作成
といったところまで踏み込んでいきたい。
補足
Docker インストール後、次のコマンドを実行することでも Docker が正常にインストールされ動作していることを確認できる。
$ docker version
下記のような結果が得られればOK。
Client:
 Version:           18.06.0-ce
 API version:       1.38
 Go version:        go1.10.3
 Git commit:        0ffa825
 Built:             Wed Jul 18 19:19:29 2018
 OS/Arch:           linux/arm
 Experimental:      false

Server:
 Engine:
  Version:          18.06.0-ce
  API version:      1.38 (minimum version 1.12)
  Go version:       go1.10.3
  Git commit:       0ffa825
  Built:            Wed Jul 18 19:15:15 2018
  OS/Arch:          linux/arm
  Experimental:     false