〜本記事でわかること〜
・VGG16の実装方法
1.はじめに
「わたしの備忘録」 兼 「初心者向け」の内容です。
・Deep Learningって分かんないけど、とにかく動かしたい!
・原理とかは後回し、実装方法だけ知りたい!
って方は、ぜひ読んでみてください!
(Qiitaの旧アカウントから持ってきました…)
2.動作環境
動作環境は以下の通り。
・Windows 10
・Google Colab
・TensorFlow ver.2.3
今回はGoogle Colabにて
コーディングしていくので、
OSとかは特に関係ないです。
ネット環境だけ整ってれば、とりあえずオーケー!
便利な時代になりました。
3.前準備
本記事で取り上げるVGG16というモデルは、
深層学習の中でも「画像の分類」が得意です。
なので、まずは皆さんに
自前のデータを用意してほしいんです。
わたしはマーベル作品が大好きなので、
「キャプテンアメリカ」
「アイアンマン」
「ハルク」
「ソー」
の画像を用意しました!
画像の枚数は適当でいいのですが、
手始めに各50枚ほど用意してみましょう。
用意できましたら、
VGG16が学習しやすいように
フォルダを作っていきます。
というわけで、
以下のようにフォルダを作ってください。
    image/
       ├ train/
       │    ├ captain/
       │    ├ ironman/
       │    ├ hulk/
       │    └ thor/
       │
       ├ valid/
       │    ├ captain/
       │    ├ ironman/
       │    ├ hulk/
       │    └ thor/
       │
       └ test/
            ├ captain/
            ├ ironman/
            ├ hulk/
            └ thor/
そうしましたら、
「train」・「valid」・「test」フォルダの
各「captain」・「ironman」・「hulk」・「thor」フォルダに
画像を入れていきます。
各ヒーローごとに50枚あるので、
「train」に30枚、「valid」に10枚、「test」に10枚
入れていきます。
なので、全体の画像配置は
train:150枚
valid: 50枚
test : 50枚
になりますね。
前準備はこれで終了。
4.実装
4−1 まずは、Google Driveへ
Google Colabでコーディングしていくのですが
そのためにも、まずGoogle Driveへ移動します。
みなさん、現代っ子のはずなので、
Googleアカウントは、さすがに持ってますよね??
(無ければこの際に作っちゃいましょ!)
Googleアカウントにログインできましたら、
Google Driveへアクセス。
先程作った「image」フォルダをアップロードします。
4−2 実際にコードを書いてみよう
現時点では、おそらくGoogle Colabが
インストールされていないと思うので、
下に示した図のようにインストールしていきます。
4−3 学習開始!
それでは、学習していきましょう。
まずは、Google DriveとGoogle Colabを接続します。
from google.colab import drive
drive.mount('/content/drive')
そして、VGG16のモデルを作成していきます。
import matplotlib
import numpy as np
%matplotlib inline
from tensorflow.python.keras.callbacks import TensorBoard
from tensorflow.python.keras.applications.vgg16 import VGG16

vgg16 = VGG16(include_top=False,
              input_shape=(224, 224, 3),
              weights='imagenet')
クラスの設定をします。
ここは皆さんの用意したデータによって変えてください。
import random
classes = ['captain', 'ironman', 'hulk', 'thor']
モデルの生成とコンパイルをします。
compileのパラメータに「loss」や「optimizer」や「metrics」がありますが
これらをイジることで、解きたいタスクを変えたり、学習を収束させやすくできます。
今回は以下の値で学習させていきましょう。
from tensorflow.python.keras.models import Sequential, Model
from tensorflow.python.keras.layers import Dense, Dropout, Flatten, GlobalAveragePooling2D
from tensorflow.keras.optimizers import SGD

def build_transfer_model(vgg16):
  model = Sequential(vgg16.layers)
  for layer in model.layers[:15]:
    layer.trainable = False
  model.add(Flatten())
  model.add(Dense(256, activation='relu'))
  model.add(Dropout(0.5))
  model.add(Dense(len(classes), activation='softmax'))
  return model

model = build_transfer_model(vgg16)

model.compile(loss='categorical_crossentropy',
              optimizer=SGD(lr=1e-5, momentum=0.9),
              metrics=['accuracy']
)
ジェネレータとイテレータを生成します。
カンタンに言うと、画像の拡張やスケール変換をしています。
この処理を挟むことで、1枚の画像からでも複数枚の画像を生成することができるのです。
人間の目で見れば、「ただ左右反転したり、斜めにしてみた画像じゃん?」ってなるんですが、
学習モデルにとっては、ピクセル単位で処理していくため、違う画像に見えるわけですね。
from tensorflow.python.keras.preprocessing.image import ImageDataGenerator
from tensorflow.python.keras.applications.vgg16 import preprocess_input

idg_train = ImageDataGenerator(rescale=1/255.,
                               shear_range=0.1,
                               zoom_range=0.1,
                               horizontal_flip=True,
                               preprocessing_function=preprocess_input
)

idg_valid = ImageDataGenerator(rescale=1/255.)

img_itr_train = idg_train.flow_from_directory(directory='/content/drive/My Drive/image/train/',
                                              target_size=(224, 224),
                                              color_mode='rgb',
                                              classes=classes,
                                              batch_size=1,
                                              class_mode='categorical',
                                              shuffle=True
)

img_itr_validation = idg_valid.flow_from_directory(directory='/content/drive/My Drive/image/valid/',
                                                   target_size=(224, 224),
                                                   color_mode='rgb',
                                                   classes=classes,
                                                   batch_size=1,
                                                   class_mode='categorical',
                                                   shuffle=True
)
モデル保存用のディレクトリの準備をします。
import os
from datetime import datetime

model_dir = os.path.join('/content/drive/My Drive/image/',
                         datetime.now().strftime('%y%m%d_%H%M')
)

os.makedirs(model_dir, exist_ok = True)
print('model_dir:', model_dir)

dir_weights = os.path.join(model_dir, 'weights')
os.makedirs(dir_weights, exist_ok = True)
学習の途中経過を保存したり、保存方法を設定します。
from tensorflow.python.keras.callbacks import CSVLogger, ModelCheckpoint
import math
file_name='vgg16_fine'
batch_size_train=1
batch_size_validation=1

steps_per_epoch=math.ceil(img_itr_train.samples/batch_size_train
)
validation_steps=math.ceil(img_itr_validation.samples/batch_size_validation
)

cp_filepath = os.path.join(dir_weights, 'ep_{epoch:02d}_ls_{loss:.1f}.h5')

cp = ModelCheckpoint(cp_filepath,
                     monitor='loss',
                     verbose=0,
                     save_best_only=False,
                     save_weights_only=True,
                     mode='auto',
                     save_freq=5
)
csv_filepath = os.path.join(model_dir, 'loss.csv')
csv = CSVLogger(csv_filepath, append=True)
そして、ついに学習です。「epochs」を50に設定しているので、学習回数は50回です。
※厳密には学習回数とepochは同じ意味ではないのですが、
今回は支障がないので名前を統一しています。
hist=model.fit_generator(
    img_itr_train,
    steps_per_epoch=steps_per_epoch,
    epochs=50,
    verbose=1,
    validation_data=img_itr_validation,
    validation_steps=validation_steps,
    shuffle=True,
    callbacks=[cp, csv]
)

model.save(file_name+'.h5')
コーディングが終わったので、
上からソースコードを実行していきます。
以下が途中経過の一例になります。
これが「Epoch 50/50」まで続きます。
それが学習終了の合図です。
Epoch 1/50
80/80 [==============================] - 18s 228ms/step - loss: 1.2106 - accuracy: 0.5000 - val_loss: 1.2738 - val_accuracy: 0.3500
Epoch 2/50
80/80 [==============================] - 22s 276ms/step - loss: 1.0407 - accuracy: 0.5875 - val_loss: 1.1765 - val_accuracy: 0.5000
Epoch 3/50
80/80 [==============================] - 34s 419ms/step - loss: 0.9078 - accuracy: 0.6375 - val_loss: 1.2011 - val_accuracy: 0.5500
Epoch 4/50
80/80 [==============================] - 31s 387ms/step - loss: 0.9747 - accuracy: 0.5625 - val_loss: 1.2541 - val_accuracy: 0.5000
4−4 結果は・・・??
さて、学習は終了しましたが、
まだ不完全です。
それもそのはず。
大学生に例えれば「講義」を受けて「課題」を
解いたにすぎないからです。
ある一定の評価(=単位)をもらうには、
「試験(テスト)」が残っています。
といわけで、次のコードを実行しましょう。
import matplotlib.pyplot as plt
from tensorflow.python.keras.preprocessing.image import load_img, img_to_array, array_to_img

idg_test = ImageDataGenerator(rescale=1.0/255)

img_itr_test = idg_test.flow_from_directory(directory='/content/drive/My Drive/image/test/',
                                            target_size=(224,224),
                                            batch_size=1,
                                            class_mode='categorical',
                                            shuffle=True
)

score=model.evaluate_generator(img_itr_test)
print('\n test loss:',score[0])
print('\n test_acc:',score[1])

plt.figure(figsize=(10,15))

for i in range(4):
  files=os.listdir('/content/drive/My Drive/image/test/' + classes[i] + '/')
  for j in range(5):
    temp_img=load_img('/content/drive/My Drive/image/test/' + classes[i] + '/' + files[j], target_size=(224,224))
    plt.subplot(4,5,i*5+j+1)
    plt.imshow(temp_img)
    temp_img_array=img_to_array(temp_img)
    temp_img_array=temp_img_array.astype('float32')/255.0
    temp_img_array=temp_img_array.reshape((1,224,224,3))
    img_pred=model.predict(temp_img_array)
    plt.title(str(classes[np.argmax(img_pred)]) + '\nPred:' + str(math.floor(np.max(img_pred)*100)) + "%")
    plt.xticks([]),plt.yticks([])

plt.show()
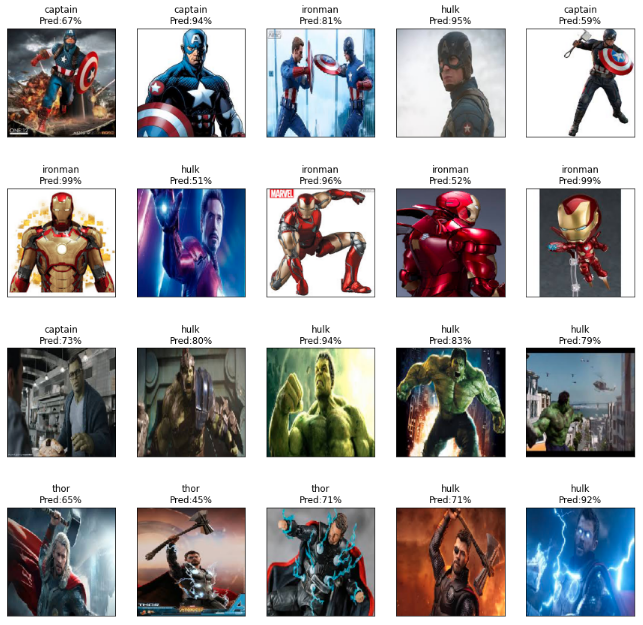
結果は、こんな感じ。
 test loss: 1.0708633661270142
 test_acc: 0.550000011920929
全体の精度にして、__55%__となりました。
まぁ、まずまずといったところでしょうか。
それではもっと詳しく見ていきます。
各画像の予測結果はこんな感じ。
うん、アイアンマンの正答率がいい感じ。
アイアンマンが好きな私としては嬉しい結果です〜♪
画像枚数を増やしたり、パラメータや学習回数などをいじれば
もっと精度は向上するでしょうが・・・
今日のところはお開きとしたいです。
5.おわりに
いかがでしたか??
原理などは一切説明しませんでしたが、
少しでもAIに関して興味をもってもらえると嬉しいです。
本記事では、VGG16の実装方法を紹介しましたが、
実はこのモデル、結構古いんですよね・・・。
(2015年に論文が執筆されています。詳しくはこちら。)
今は新しく精度の高いモデルも
たくさん出ているので、興味がある方は
ぜひ試してみてください!
では、よいAIライフを〜 ^^
