Triplet lossを使った異常検知を試してみました。オンラインのTriplet選択を使ったところ、Fashion-MNISTのブーツとスニーカーに対して、AUC=0.9066、推論時間1枚14msとなり、DOCの実装より若干高精度、9~10倍の高速化をすることができました。また、推論時のバッチサイズを大きくすることで、Google ColabのGPUインスタンスにおいて1枚あたりの推論時間1msを切ることができました。これはDOCのベースラインから140倍の高速化になります。
きっかけ
@shinmura0さんのこの記事が面白かったんで元の論文(DOC)を読んでみました。
ワイ「DOCって結局リファレンスやターゲット画像を同時に学習させたり、画像の近さや遠さを学習させたりしてるだけやん。かなりSiamese Networkに似てるし、顔認識のアルゴリズムでも行けるんじゃない?」
って思ったのがきっかけ。具体的にはFaceNetのTripletLossを使ってみた。FaceNetはもともと顔認識向けのアルゴリズムですが、設定的には異常検知でも使えます。
なぜ顔認識が異常検知に使えるのか
DOCの論文によると、(少なくともDOCの)異常検知は「実際に判定する異常画像をクラスとして学習させない」。なぜなら、どんな異常な画像が飛んでくるかわからないから異常だから。
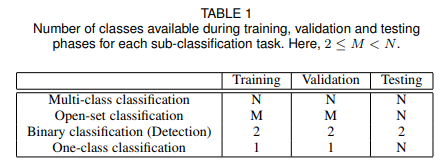
異常検知はここでいう「One-class Classification」にあたります。つまり、ネットワークに学習させるのは異常かどうかというフラグだけであって、Train/Valの学習時のクラス数は1となります。典型的な多クラス分類のソフトマックスならこのクラス数はNとなります。
実は、**Siamese Networkもよく考えてみるとこの「One-class Classification」**なのです。なぜなら、Siamese Networkを訓練するときは、クラス(人物)が同じかどうかしかの情報しか与えずに、結果、近い人物の画像を近くに、違う人物の画像を遠くにプロットさせるようにするからです。また、テスト時にはk-NNの発想を使えば、N個のクラスを判別することもできます。
実際、顔認識では訓練時に与えた人物というのは、テスト時には登場しません。ある人物を1つのクラスとして与えなくても、「似ているかどうか」の指標だけを学習させることで、訓練時には登場しない人物も判別することができるようになるのです。
実験設定
DOCの論文にある実験をTriplet Lossで再現してドヤ顔したかったのですが、論文に示されている「The 1001 Abnormal Objects Dataset」(元データはPASCALで、そこから異常画像を抽出したもの)のアノテーションが手に入らなくて再現できなかったので、@shinmura0さんの記事にあるFashion-MNISTを使った方法をやりました。@shinmura0さん当てつけみたいになってしまってごめんなさい。
| / | 訓練 | テスト |
|---|---|---|
| 他8クラス | 6000×8=48000枚を訓練 | 使わない |
| スニーカー | 6000枚を訓練+アンカー | 1000枚を正常画像とする |
| ブーツ | 使わない | 1000枚を異常画像とする |
簡単に言えば、ブーツ以外の画像を使って訓練させ、テスト時にはスニーカーを正常品、ブーツを異常品としてどれぐらい正常品/異常品を見分けられるかを確認するというものです。スコアはAUC(Area under the curve)を使います。
より正しく言えば、「他8クラスの画像」と「スニーカー」の画像は異なるクラスとして学習させます。直感的には、他8クラスの画像を異常品、スニーカーを正常品として訓練させます。そこから正常品・異常品の「距離」を学習していき、テスト時には「ブーツ」という未知の異常品をどれだけ見分けられますか?ということです。
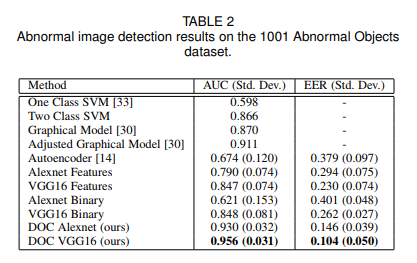
なら、正常品・異常品の二値分類つまり、binary crossentropyで訓練すればそもそもわかりやすいんじゃない?と思うかも知れませんがこれには反例があります。DOCの論文によると、
「Alexnet Binary/VGG16 Binary」というのがbinary crossentropyの結果です。DOCよりもAUCがかなり低いですよね。未知の異常画像に対する分類力が弱いのか、あるいは正常/異常のサンプル数のばらつきが大きすぎるために不均衡データの問題が起きているかがひとまず考えられます。
@shinmura0さんのDOCを使ったFashion-MNISTの異常検知だと、AUC=0.90だったので、この値を目指してみましょう。
損失関数はFaceNetのTripletLossを使います。距離関数はユークリッド距離を使い、$\alpha$は0.2を使いました。
$$\sum_i^N\max[d(x_i^a, x_i^p)-d(x_i^a, x_i^n)+\alpha, 0] $$
Tripletの生成はバッチ内で行うオンラインのTriplet生成を使います。詳しくはFaceNetの記事を見てください。2つの画像を同時に入れるよりも、損失関数内でTripletを生成したほうが計算効率が良いです。ただし、ネットワーク上で正常・異常をEnd-to-endに計算できなくなるので、GradCAMによる可視化が厳しくなります(というか多分無理?)。ただし、計算効率は悪いですがオフラインのTriplet生成を使うか、ソフトマックスに近いような顔認識のアルゴリズム(そういうのも最近開発されています)を使うとGradCAMが使えるようになるはずです。ただ、GradCAMは割と重いのでとりあえず考えないものとしてやってみました。
また、FaceNetではアンカー画像の埋め込み(Embedding)の特徴量が必要になり、これを参照として使うので、とりあえずは訓練のスニーカー画像6000枚全部を参照として使いました。この数は重ければ調整することもできます(後述)。
ネットワークはMobileNetV2を使います。訓練~推論までGoogle ColabのGPUインスタンスを使います。
結果
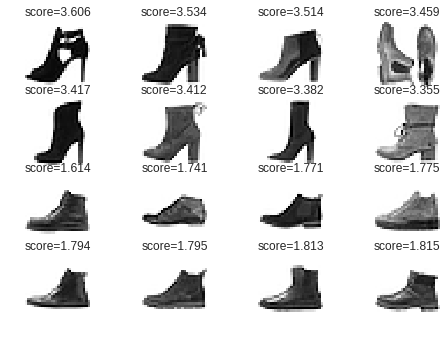
AUC=0.9066となり、DOCの実装を若干上回ることができました。
上2行がスニーカーに似ていないブーツ、下2行がスニーカーに酷似したブーツです。少しスコアが直感的ではないかもしれません。
あとは速度です。距離の判定は、すべてのアンカー画像に対して距離を計算し、最も小さくなる距離(k=1のk-NN)を使っています。アンカーの個数を6000、3000、1000、500、100、50と変えて、テスト画像2000枚をすべて判定したところ、
推論時のバッチサイズ1の場合
| アンカー画像数 | 2000枚の処理時間(s) | AUC | 1枚あたり(ms) |
|---|---|---|---|
| 6000 | 29.75 | 0.9066 | 14.87 |
| 3000 | 26.96 | 0.9015 | 13.48 |
| 1000 | 27.13 | 0.9148 | 13.57 |
| 500 | 28.71 | 0.9156 | 14.36 |
| 100 | 31.56 | 0.8966 | 15.78 |
| 50 | 27.60 | 0.9127 | 13.80 |
1枚あたり14msとDOCの実装を大幅に(9~10倍)程度高速化することができました! ちょっとこれはびっくりしました。
なぜここまで速くなったかというと、見ての通り処理時間のほとんどがMobileNetの推論に使われるので、アンカー画像のEmbeddingを事前にメモとして持っておけるからです。これはオンラインTripletのおかげです。つまり、推論時に1枚分しか計算しなくてよくなります。
また、アンカーの画像数を減らすと若干ROCが上がるので、k=1のk-NNをやめてもっと多くのサンプルを見たり、アンカーの画像数を500~1000枚ぐらいに減らすとあと1~2%はAUCは上がると思います。
上の表ではバッチサイズ1で計算してみましたが、バッチサイズ20で計算するとどうでしょう。イメージ的には20台同時に異常検知している感じです。もっと高速化できます。
推論時のバッチサイズ20の場合
| アンカー画像数 | 2000枚の処理時間(s) | AUC | 1枚あたり(ms) |
|---|---|---|---|
| 6000 | 2.15 | 0.9066 | 1.07 |
| 3000 | 1.94 | 0.9015 | 0.97 |
| 1000 | 1.89 | 0.9148 | 0.95 |
| 500 | 1.90 | 0.9156 | 0.95 |
| 100 | 1.86 | 0.8966 | 0.93 |
| 50 | 1.82 | 0.9127 | 0.91 |
ちょっとぉ!1ms切っちゃうの??? 多分こんなの機械側が追いつかないと思います。自分で書いてて言うのもあれだけどありえねぇ……
ワイ「これ製造業に売り込みに行こうかな」
ちなみにこれ、訓練も結構速いです。普通に54000枚画像回しているだけですが、20エポック目ぐらいにはほぼ損失が収束します。50エポックも回せば十分です。ColabのGPUで2時間もかかりませんでした。
まとめ
Triplet lossのオンラインTriple選択を使うとえらく高速な異常検知ができるということが確認できました。面白い論文を紹介してくださった@shinmura0さんどうもありがとうございました。
コード
import tensorflow as tf
from keras import layers
from keras.models import Model
import keras.backend as K
from keras.optimizers import SGD
from keras.applications import MobileNetV2
from keras.callbacks import LearningRateScheduler, ModelCheckpoint

from keras.datasets import fashion_mnist
import numpy as np
from tqdm import tqdm
from sklearn.metrics import euclidean_distances, roc_auc_score

def create_mobilenet_v2():
    input = layers.Input((28,28,1))
    x = layers.UpSampling2D(3)(input)
    model = MobileNetV2(include_top=False, input_tensor=x, weights=None, pooling="avg")
    x = model.layers[-1].output
    x = layers.Dense(128)(x)
    return Model(input, x)

# OnlineのTriplet選択
def triplet_loss(label, embeddings):
    # バッチ内のユークリッド距離
    x1 = tf.expand_dims(embeddings, axis=0)
    x2 = tf.expand_dims(embeddings, axis=1)
    euclidean = tf.reduce_sum((x1-x2)**2, axis=-1)

    # ラベルが等しいかの行列(labelの次元が128次元になるので[0]だけ取る)
    lb1 = tf.expand_dims(label[:, 0], axis=0)
    lb2 = tf.expand_dims(label[:, 0], axis=1)
    equal_mat = tf.equal(lb1, lb2)

    # positives
    positive_ind = tf.where(equal_mat)
    positive_dists = tf.gather_nd(euclidean, positive_ind)

    # negatives
    negative_ind = tf.where(tf.logical_not(equal_mat))
    negative_dists = tf.gather_nd(euclidean, negative_ind)

    # [P, N]
    positives = tf.expand_dims(positive_dists, axis=1)
    negatives = tf.expand_dims(negative_dists, axis=0)
    triplets = tf.maximum(positives - negatives + 0.2, 0.0) # Margin=0.2
    return tf.reduce_mean(triplets) # sumだと大きなりすぎてinfになるため

def load_data():
    (X_train, y_train), (X_test, y_test) = fashion_mnist.load_data()
    # スニーカー(7)=正常、ブーツ(9)=異常
    # 訓練画像 = X_trainのブーツ以外。ブーツ(異常画像)は訓練時には教えない
    train_masks = y_train != 9
    X_use_train = np.expand_dims(X_train[train_masks], axis=-1) # (54000, 28, 28, 1)
    y_use_train = (y_train[train_masks] == 7).astype(np.float32) # (54000,)

    # アンカー画像 = X_trainのスニーカー
    anchor_masks = y_use_train == 1.0
    X_anchor = X_use_train[anchor_masks] # (6000, 28, 28, 1)

    # テスト画像 = X_testのスニーカー(正常)とブーツ(異常)→これがどのぐらいの精度で分類できるか
    test_masks = np.logical_or(y_test==7, y_test==9)
    X_use_test = np.expand_dims(X_test[test_masks], axis=-1) # (2000, 28, 28, 1)
    y_use_test = (y_test[test_masks]==7).astype(np.float32) # (2000,)

    return (X_use_train, y_use_train), X_anchor, (X_use_test, y_use_test)

def step_decay(epoch):
    x = 1e-3
    if epoch >= 25: x /= 10.0
    if epoch >= 45: x /= 10.0
    return x


def train_generator(X, y_label, batch_size):
    while True:
        indices = np.random.permutation(X.shape[0])
        for i in range(len(indices)//batch_size):
            current_indices = indices[i*batch_size:(i+1)*batch_size]
            X_batch = X[current_indices] / 255.0
            y_batch = np.zeros((batch_size, 128), np.float32)
            y_batch[:,0] = y_label[current_indices]
            yield X_batch, y_batch

def train():
    (X_train, y_train), X_anchor, (X_test, y_test) = load_data()
    model = create_mobilenet_v2()
    model.compile(SGD(1e-3, 0.9), triplet_loss)

    # 訓練
    scheduler = LearningRateScheduler(step_decay)
    checkpoint = ModelCheckpoint("model.hdf5", monitor="loss", save_best_only=True, save_weights_only=True)
    batch_size = 128
    model.fit_generator(train_generator(X_train, y_train, batch_size), steps_per_epoch=X_train.shape[0]//batch_size,
                        callbacks=[checkpoint, scheduler], max_queue_size=1, epochs=50)

    # ベストのモデルを読み込む
    model.load_weights("model.hdf5")

    # embeddingを取る
    anchor_embeddings = model.predict(X_anchor/255.0, verbose=1) # スニーカー(正常)だけ
    test_embeddings = model.predict(X_test/255.0, verbose=1) # スニーカー+ブーツ(異常)
    # 距離行列
    dist_matrix = np.zeros((test_embeddings.shape[0], anchor_embeddings.shape[0]), np.float32)
    for i in range(dist_matrix.shape[0]):
        dist_matrix[i,:] = euclidean_distances(test_embeddings[i,:].reshape(1,-1),
                                               anchor_embeddings)[0]
    # 各アンカーに対して最小距離を取る
    min_dist = np.min(dist_matrix, axis=-1)

    # AUCスコア
    # y_testは正常かどうかのフラグ、距離は正常のほうが距離が小さいので、y_testは異常のほうを1とする
    auc = roc_auc_score(1.0-y_test, min_dist)
    print(auc)
    # 0.906577

    # 結果の表示
    plot_result(X_test, y_test, min_dist)

import matplotlib.pyplot as plt

def plot_result(test_images, y_test, dists):
    # スニーカーに似ていないブーツ
    far_boots_ind = np.argsort(dists)[::-1]
    i = 1
    for ind in far_boots_ind:
        if y_test[ind] == 1.0: continue # スニーカーを除外
        ax = plt.subplot(4,4,i)
        ax.imshow(test_images[ind,:,:,0])
        ax.axis("off")
        ax.set_title(f"score={dists[ind]:.04}")
        i += 1
        if i == 9: break
    # スニーカーに酷似したブーツ
    close_boots_ind = np.argsort(dists)
    for ind in close_boots_ind:
        if y_test[ind] == 1.0: continue # スニーカーを除外
        ax = plt.subplot(4,4,i)
        ax.imshow(test_images[ind,:,:,0])
        ax.axis("off")
        ax.set_title(f"score={dists[ind]:.04}")
        i += 1
        if i == 17: break
    plt.show()

import time

def speed_test(n_anchors):
    model = create_mobilenet_v2()
    model.load_weights("model.hdf5")
    (_, _), X_anchor, (X_test, y_test) = load_data()
    X_anchor = X_anchor[:n_anchors]
    anchor_embeddding = model.predict(X_anchor/255.0)

    pred_dist = []
    start_time = time.time()
    for i in range(X_test.shape[0]):
        embedding = model.predict(X_test[i:i+1]/255.0)
        dists = euclidean_distances(embedding, anchor_embeddding)[0]
        pred_dist.append(np.min(dists))
    elapsed = time.time() - start_time

    roc = roc_auc_score(1.0-y_test, np.array(pred_dist))
    print(f"n_anchors={n_anchors}, elapsed={elapsed}, roc={roc}")

def speed_test_with_batch(n_anchors):
    model = create_mobilenet_v2()
    model.load_weights("model.hdf5")
    (_, _), X_anchor, (X_test, y_test) = load_data()
    X_anchor = X_anchor[:n_anchors]
    anchor_embeddding = model.predict(X_anchor/255.0)

    pred_dist = np.zeros(X_test.shape[0], np.float32)
    start_time = time.time()
    for i in range(X_test.shape[0]//20):
        embedding = model.predict(X_test[i*20:(i+1)*20]/255.0, batch_size=20)
        dists = euclidean_distances(embedding, anchor_embeddding)
        pred_dist[i*20:(i+1)*20] = np.min(dists, axis=-1)
    elapsed = time.time() - start_time

    roc = roc_auc_score(1.0-y_test, pred_dist)
    print(f"n_anchors={n_anchors}, elapsed={elapsed}, roc={roc}, batch20")

if __name__ == "__main__":
    train()
    #for i in [6000, 3000, 1000, 500, 100, 50]:
    #    speed_test_with_batch(i)


