はじめに
iOSエンジニアの神武です。
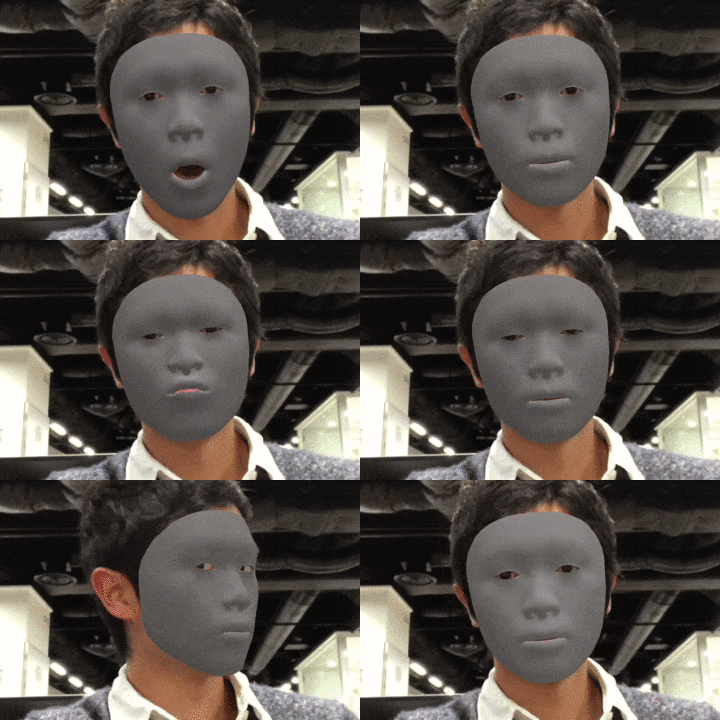
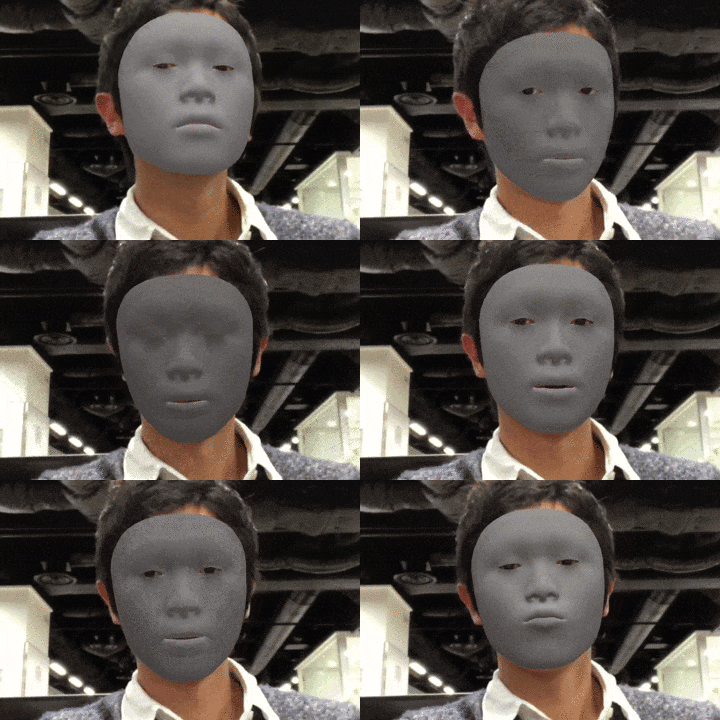
今回は、iPhoneXなど の Face Tracking with ARKit を利用して
をコメント多めで実装してみました
サンプルコードはapple公式に上がっているので
とにかく試したいiPhoneX所持者はこちらからどうぞ
Creating Face-Based AR Experiences
記事の参考も👆です
前準備
1.iPhoneXなどを購入💰します
2.プロジェクトを作ります
[ File > New > Project > Single View App ]
3.Main.storyboard に ARKit SceneKit View を貼り付け、ViewController と紐付けます
4.カメラ利用の許可を取るために、Info.plistに追加します
[ Privacy - Camera Usage Description ]
実装
ARKit provides a coarse 3D mesh geometry matching the size, shape, topology, and current facial expression of the user’s face. ARKit also provides the ARSCNFaceGeometry class, offering an easy way to visualize this mesh in SceneKit.
ARKitは、ユーザーの顔のサイズ、形状、トポロジー、および現在の表情に一致する、粗い3Dメッシュジオメトリを提供します。 ARKitはARSCNFaceGeometryクラスも提供しており、SceneKitでこのメッシュを簡単に可視化できます。
ということで可視化していきましょう
マスクの生成
顔の3Dマスクオブジェクトを生成します
class Mask: SCNNode, VirtualFaceContent {

    init(geometry: ARSCNFaceGeometry) {
        let material = geometry.firstMaterial //初期化
        material?.diffuse.contents = UIColor.gray //マスクの色
        material?.lightingModel = .physicallyBased //オブジェクトの照明のモデル

        super.init()
        self.geometry = geometry
    }

    required init?(coder aDecoder: NSCoder) {
        fatalError("\(#function) has not been implemented")
    }

    //ARアンカーがアップデートされた時に呼ぶ
    func update(withFaceAnchor anchor: ARFaceAnchor) {
        guard let faceGeometry = geometry as? ARSCNFaceGeometry else { return }
        faceGeometry.update(from: anchor.geometry)
    }
}
ARアンカーがアップデートされた時にマスクのアップデートが呼び出されるよう、VirtualFaceContentを定義して、エイリアスを追加します
protocol VirtualFaceContent {
    func update(withFaceAnchor: ARFaceAnchor)
}

typealias VirtualFaceNode = VirtualFaceContent & SCNNode
マスクにテクスチャを貼りたければ、マスクの色を設定している箇所を
material?.diffuse.contents = #imageLiteral(resourceName: "sample.png")
に変更すると良いです
更新
ARアンカーの設置 or 更新に応じて、先ほど生成したマスクを表示 or 更新します
class VirtualContentUpdater: NSObject, ARSCNViewDelegate {

    //表示 or 更新用
    var virtualFaceNode: VirtualFaceNode? {
        didSet {
            setupFaceNodeContent()
        }
    }
    //セッションを再起動する必要がないように保持用
    private var faceNode: SCNNode?

    private let serialQueue = DispatchQueue(label: "com.example.serial-queue")

    //マスクのセットアップ
    private func setupFaceNodeContent() {
        guard let faceNode = faceNode else { return }

        //全ての子ノードを消去
        for child in faceNode.childNodes {
            child.removeFromParentNode()
        }
        //新しいノードを追加
        if let content = virtualFaceNode {
            faceNode.addChildNode(content)
        }
    }

    //MARK: - ARSCNViewDelegate
    //新しいARアンカーが設置された時に呼び出される
    func renderer(_ renderer: SCNSceneRenderer, didAdd node: SCNNode, for anchor: ARAnchor) {
        faceNode = node
        serialQueue.async {
            self.setupFaceNodeContent()
        }
    }

    //ARアンカーが更新された時に呼び出される
    func renderer(_ renderer: SCNSceneRenderer, didUpdate node: SCNNode, for anchor: ARAnchor) {
        guard let faceAnchor = anchor as? ARFaceAnchor else { return }
        virtualFaceNode?.update(withFaceAnchor: faceAnchor) //マスクをアップデートする
    }
}
表示
ARSessionを開始してマスクを表示します
import UIKit
import ARKit
import SceneKit

class ViewController: UIViewController, ARSessionDelegate {

    @IBOutlet weak var sceneView: ARSCNView!

    var session: ARSession {
        return sceneView.session
    }

    let contentUpdater = VirtualContentUpdater()

    override func viewDidLoad() {
        super.viewDidLoad()

        sceneView.delegate = contentUpdater
        sceneView.session.delegate = self
        sceneView.automaticallyUpdatesLighting = true //シーンの照明を更新するかどうか

        contentUpdater.virtualFaceNode = createFaceNode()
    }

    override func viewDidAppear(_ animated: Bool) {
        super.viewDidAppear(animated)
        UIApplication.shared.isIdleTimerDisabled = true //デバイスの自動光調節をOFF
        startSession()
    }

    override func viewWillDisappear(_ animated: Bool) {
        super.viewWillDisappear(animated)
        session.pause() //セッション停止
    }

    //マスクを生成
    public func createFaceNode() -> VirtualFaceNode? {
        guard
            let device = sceneView.device,
            let geometry = ARSCNFaceGeometry(device : device) else {
            return nil
        }

        return Mask(geometry: geometry)
    }

    //セッション開始
    func startSession() {
        print("STARTING A NEW SESSION")
        guard ARFaceTrackingConfiguration.isSupported else { return } //ARFaceTrackingをサポートしているか
        let configuration = ARFaceTrackingConfiguration() //顔の追跡を実行するための設定
        configuration.isLightEstimationEnabled = true //オブジェクトにシーンのライティングを提供するか
        session.run(configuration, options: [.resetTracking, .removeExistingAnchors])
    }
}
ARセッションのデリゲートも実装しておきましょう
    //MARK: - ARSessionDelegat
    //エラーの時
    func session(_ session: ARSession, didFailWithError error: Error) {
        guard error is ARError else { return }
        print("SESSION ERROR")
    }
    //中断した時
    func sessionWasInterrupted(_ session: ARSession) {
        print("SESSION INTERRUPTED")
    }
    //中断再開した時
    func sessionInterruptionEnded(_ session: ARSession) {
        DispatchQueue.main.async {
            self.startSession() //セッション再開
        }
    }
おわりに
ARKitにはARFaceAnchor.BlendShapeLocationというユーザの表情の抽象的なモデルが52個提供されているので、2Dまたは3Dオブジェクトを制御して、オリジナルアニ文字を作ることもできるそうです
例 : 両目の瞬きと顎の位置の設定(サンプルコード参照)
var blendShapes: [ARFaceAnchor.BlendShapeLocation: Any] = [:] {
    didSet {
        guard
            let eyeBlinkLeft = blendShapes[.eyeBlinkLeft] as? Float,
            let eyeBlinkRight = blendShapes[.eyeBlinkRight] as? Float,
            let jawOpen = blendShapes[.jawOpen] as? Float else { return }
        eyeLeftNode.scale.z = 1 - eyeBlinkLeft
        eyeRightNode.scale.z = 1 - eyeBlinkRight
        jawNode.position.y = originalJawY - jawHeight * jawOpen
    }
}
漫画のキャラクターになりきれるアプリとか、そのうち作りたい
以上です、閲覧ありがとうございました🙏
アドベントカレンダー、次回の担当は日々大変お世話になっている、iOSエンジニアのkenmazさんです!
DeNA IPプラットフォーム事業部 「マンガボックス」 特に、サーバーサイドエンジニア wantedly !

