やりたいこと
react nativeでgoogleログインを行うこと。
利用プラグイン
react-native-google-signin
https://github.com/devfd/react-native-google-signin
手順
正式な手順
https://github.com/devfd/react-native-google-signin/blob/master/ios-guide.md#config
*正式な手順をベースに下記の手順で導入できた。
1.インストール
実行パス:/
(プロジェクトルート)
react-native install react-native-google-signin
2.Xcodeにframeworkを追加(cocoaPod利用)
実行パス:/ios
1.Podfile(pod設定ファイル)生成
*すでにPodfileがある場合は不要
pod init
2.Podfileに「pod 'Google/SignIn'」に追加
エラーとアラートが出ていたので必要最小限にした。
足りない点ありましたら、お手数ですがご指摘いただけると幸いです。
>修正後
target名は適宜変更する必要がある。
infi.plistのCFBundleDisplayNameと同じだと問題なかった。
# Uncomment the next line to define a global platform for your project
platform :ios, '9.0'

target 'login' do
    pod 'Google/SignIn'
end
!!注意!!
pot initで生成したPodfileをそのまま使うと下記の2点でエラーになる
- 「login-tvOSTests」が重複定義されているエラー
→重複しないように、重複している箇所を削除
>削除した重複していた設定
  target 'login-tvOSTests' do
    inherit! :search_paths
    # Pods for testing
  end
- ターゲットが見つからないっというアラート
→ターゲット設定のコメントアウト解除
>修正箇所
# platform :ios, '9.0'
>poy initで生成されたデフォルトの状態
# Uncomment the next line to define a global platform for your project
# platform :ios, '9.0'

target 'login' do
  # Uncomment the next line if you're using Swift or would like to use dynamic frameworks
  # use_frameworks!

  # Pods for login

  target 'login-tvOSTests' do
    inherit! :search_paths
    # Pods for testing
  end

  target 'loginTests' do
    inherit! :search_paths
    # Pods for testing
  end

end

target 'login-tvOS' do
  # Uncomment the next line if you're using Swift or would like to use dynamic frameworks
  # use_frameworks!

  # Pods for login-tvOS

  target 'login-tvOSTests' do
    inherit! :search_paths
    # Pods for testing
  end

end
3.インストールとアップデート
*アップデートは時間かかる。
pod install
pod update
3.「GoogleService-Info.plist」取得
下記の「Get a configuration file 」から、
手順に従い「GoogleService-Info.plist」を取得する。
https://developers.google.com/identity/sign-in/ios/sdk/
!!注意!!
「GoogleService-Info.plist」を/ios配下に配置して、xcodeのプロジェクトにドラックアンドドロップする。
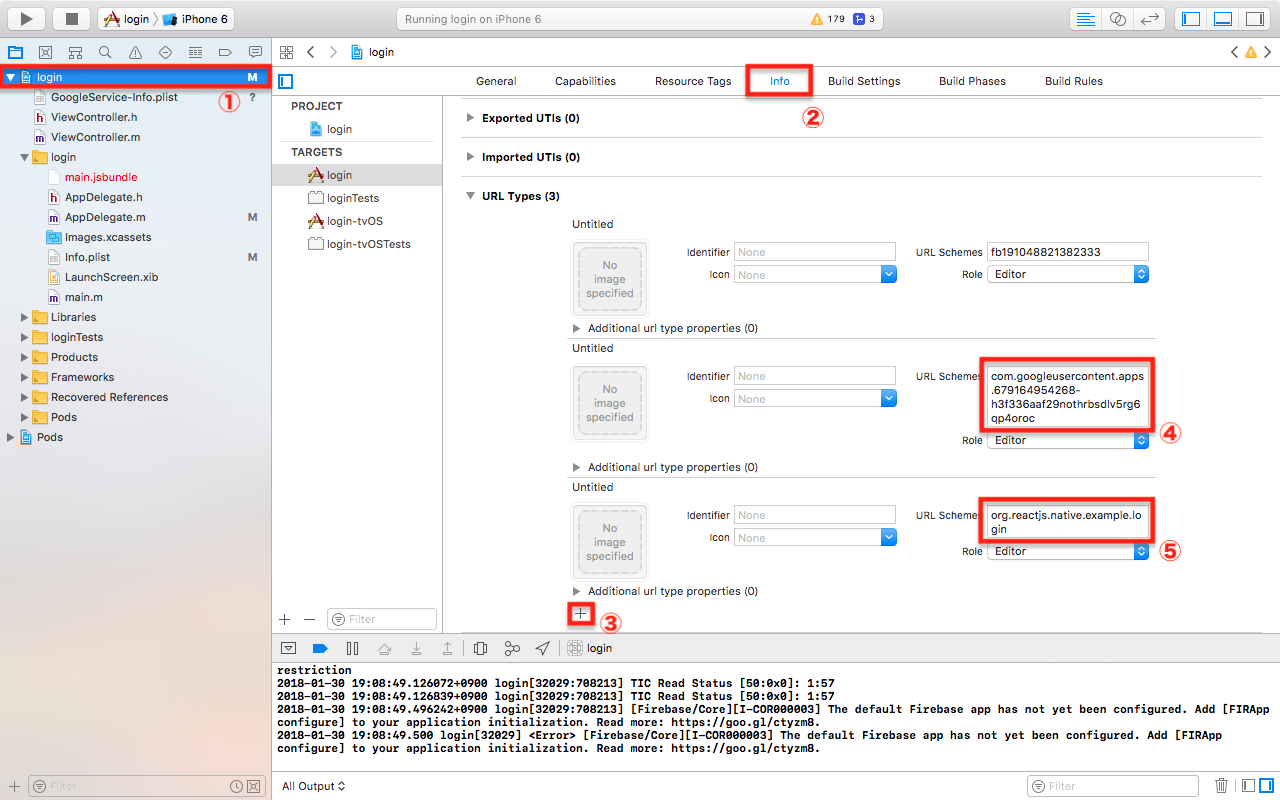
4.カスタムスキームの追加
カスタムスキーとは、外部アプリから当アプリに遷移するために、紐付けるURLを設定できる機能である。
おそらく、ログイン実行後に当アプリに戻るために使用していると思う。
Xcodeのプロジェクト/info/URL Typesから、
「+」ボタンを押してurl schemeに下記の文字列を追加する。
- REVERSED_CLIENT_ID (GoogleService-Info.plist)
- bundle id (GoogleService-Info.plist)
5. AppDelegate.m修正
// インポート
// add this line before @implementation AppDelegate
# import <RNGoogleSignin/RNGoogleSignin.h>

// 処理追加
// add this method before @end
- (BOOL)application:(UIApplication *)application openURL:(NSURL *)url
  sourceApplication:(NSString *)sourceApplication annotation:(id)annotation {

  return [RNGoogleSignin application:application openURL:url sourceApplication:sourceApplication annotation:annotation];
}
Only one openURL method can be defined, so if you have multiple listeners which should be defined (for instance if you have both Google and Facebook OAuth), you must combine them into a single function like so:
もし、facebookログインなども行いたい場合は、下記のように記述する。
openURLの定義が重複してしまうので、ifで分岐して列挙する。
- (BOOL)application:(UIApplication *)application openURL:(NSURL *)url
  sourceApplication:(NSString *)sourceApplication annotation:(id)annotation {

  return [[FBSDKApplicationDelegate sharedInstance] application:application
                                                        openURL:url
                                              sourceApplication:sourceApplication
                                                     annotation:annotation
         ]
         || [RNGoogleSignin application:application
                                openURL:url
                      sourceApplication:sourceApplication
                             annotation:annotation
            ];
}
6.ログインとログアウトの最小実装
パス:/app.js
/**
 * Sample React Native App
 * https://github.com/facebook/react-native
 * @flow
 */

import React, { Component } from 'react';

import {
  Platform,
  StyleSheet,
  Text,
  View
} from 'react-native';
import {GoogleSignin, GoogleSigninButton} from 'react-native-google-signin';

const instructions = Platform.select({
  ios: 'Press Cmd+R to reload,\n' +
    'Cmd+D or shake for dev menu',
  android: 'Double tap R on your keyboard to reload,\n' +
    'Shake or press menu button for dev menu',
});

export default class App extends Component {
  componentDidMount() {
    this._setupGoogleSignin();
  }
  async _setupGoogleSignin() {
    try {
      await GoogleSignin.hasPlayServices({ autoResolve: true });
      await GoogleSignin.configure({
        iosClientId: '679164954268-h3f336aaf29nothrbsdlv5rg6qp4oroc.apps.googleusercontent.com',
        webClientId: '679164954268-h3f336aaf29nothrbsdlv5rg6qp4oroc.apps.googleusercontent.com',
        offlineAccess: false
      });

      const user = await GoogleSignin.currentUserAsync();
      console.log(user);
      this.setState({user});
    }
    catch(err) {
      console.log("Google signin error", err.code, err.message);
    }
  }

  _signIn() {
    GoogleSignin.signIn()
      .then((user) => {
        console.log(user);
        this.setState({user: user});
      })
      .catch((err) => {
        console.log('WRONG SIGNIN', err);
      })
      .done();
  }

  _signOut() {
    GoogleSignin.revokeAccess().then(() => GoogleSignin.signOut()).then(() => {
      this.setState({user: null});
    })
      .done();
  }

  render() {
    return (
      <View style={styles.container}>
        <Text style={styles.welcome}>
          Welcome to React Native!
        </Text>
        <Text style={styles.instructions}>
          To get started, edit App.js
        </Text>
        <Text style={styles.instructions}>
          {instructions}
        </Text>
        <GoogleSigninButton
          style={{width: 212, height: 48}}
          size={GoogleSigninButton.Size.Standard}
          color={GoogleSigninButton.Color.Auto}
          onPress={this._signIn.bind(this)}
        />
      </View>
    );
  }
}

const styles = StyleSheet.create({
  container: {
    flex: 1,
    justifyContent: 'center',
    alignItems: 'center',
    backgroundColor: '#F5FCFF',
  },
  welcome: {
    fontSize: 20,
    textAlign: 'center',
    margin: 10,
  },
  instructions: {
    textAlign: 'center',
    color: '#333333',
    marginBottom: 5,
  },
});
参考サイト
公式ドキュメント
-
https://github.com/devfd/react-native-google-signin
公式ドキュメント(iOS設定手順)
https://github.com/devfd/react-native-google-signin/blob/master/ios-guide.md
公式ドキュメント(iOS SDK)
https://developers.google.com/identity/sign-in/ios/sdk/
公式ドキュメント(jsソース) -
https://github.com/devfd/react-native-google-signin/blob/master/example/index.ios.js
公式ドキュメント(動画) - https://developers.google.com/identity/sign-in/ios/start-integrating
動画で全体を解説