はじめに
本記事とはなんら関係ないことですが、あまり出回っていないことだけ記事にしたいと考えていたら全然投稿が進まなかったことを反省し、とりあえず簡単なことでも記事にしようと思いました。
さて、前々からブロックチェーンには興味があったので、よく聞くスマートコントラクトを自分でも書いてみました。
どのチェーンにしようか考えてみましたが、トランプ氏がETHを大量に保有しているらしく、Ethereumの活用が特に推進されるのではという浅い読みのもと、Ethereumに決めました。
今回はざっくり流れを追うことをメインとし、細かい用語や仕様の説明はあまりしません。
利用する言語と教材
-
Solidity
この言語は公式ドキュメントによると、Ethereumで動作するものらしいです。
Solidityはスマートコントラクトを扱えるオブジェクト指向の高級言語です。スマートコントラクトはEthereum内でアカウントの動作を制御するものです。
SolidityはC++、Python、JavaScriptを参考に、Ethereum Virtual Machine(EVM)の操作を目的に作られています。
とはいえ全く触ったことがない言語を使用して、全然知らない領域に手を出すため、何か教本になるようなものがないかと探すと、ちょうどいいものをMicrosoftが出していました。
せっかくなのでこちらの流れに沿って順々に進めていこうと思います。
前提条件については以下となっていますが、上3つ以外は大したことないので実行するだけならば障壁はあまりないと思われます。
- ブロックチェーンに関する基本的な知識
- Ethereum プラットフォームに関する知識
- Solidity プログラミング言語に関する知識
- ターミナルを使ってコマンドを実行したことがある
- Visual Studio Code がインストールされていること
- Python がインストールされていること
- Git がインストールされていること
- Node.js がインストールされている
Truffle
TruffleはEthereumチェーン用の開発フレームワークであり、今回の目的であるスマートコントラクトの開発、テスト、デプロイを簡素化するものです。
インストールはターミナルで以下を実行するだけです。
npm install -g truffle
Ganache
次はローカル開発環境として利用されるGanacheをインストールします。
npm install ganache --global
インストール後”ganache”と入力すると以下のように検証用にアカウントが10個作成される。
それぞれのアカウントが1000ETHも受け取っている(ほしい。。。)

VSCode拡張機能
以下の拡張機能をインストールすることによって、開発が楽になるらしいです。
この拡張機能を利用するにはNode.js, npm, Git, Truffle, Ganacheがインストールされている必要があります。
検証
プロジェクトの開始
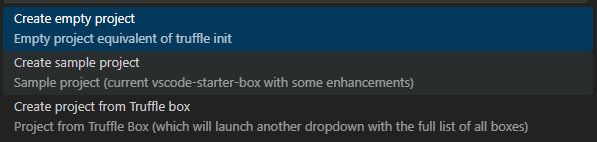
適当に作業用のディレクトリを作成、移動した後に、Ctrl+Shift+Pでコマンドマレットを開き、”Truffle: New Solidity Project”を選択します。
その後、いくつかの選択肢から”Create sample project”を選択します。
選択後、作業用ディレクトリに以下のようなファイルが作成されます。

コンパイルとデプロイ
次に、HelloBlockchain.solを右クリックし、”Build Contract”を実行します。
実行が正常に終了したら、HelloBlockchain.solを右クリックし、今度は”Deploy Contract”を実行します。

結果は、上記の画像のようになっており、それぞれは以下を示します。
- contract address
- スマートコントラクトがブロックチェーン上にデプロイされた後に、ETHネットワーク上で該当コントラクトを一意に識別するためのアドレス
- block number
- コントラクトがデプロイされたブロックの番号
- block timestamp
- コントラクトがデプロイされたブロックのタイムスタンプ
- account
- コントラクトのデプロイを行ったアカウントのアドレス
- balance
- デプロイ後の残高
- gas used
- コントラクトをデプロイする際に消費されたガスの量
- gas price
- 1単位あたりのガス代
- value sent
- コントラクトのデプロイ時に送信されたETHの量
- total cost
- コントラクトのデプロイにかかった総コスト
新規のスマートコントラクト作成
contractsディレクトリ下に新しくスマートコントラクトを記述した.solファイルを作成します。
例題に従って”Shipping.sol”を作成します。
pragma solidity >=0.4.25 <0.9.0;

contract Shipping {
    // Our predefined values for shipping listed as enums
    enum ShippingStatus { Pending, Shipped, Delivered }

    // Save enum ShippingStatus in variable status
    ShippingStatus private status;

    // Event to launch when package has arrived
    event LogNewAlert(string description);

    // This initializes our contract state (sets enum to Pending once the program starts)
    constructor() {
        status = ShippingStatus.Pending;
    }
    // Function to change to Shipped
    function Shipped() public {
        status = ShippingStatus.Shipped;
        emit LogNewAlert("Your package has been shipped");
    }

    // Function to change to Delivered
    function Delivered() public {
        status = ShippingStatus.Delivered;
        emit LogNewAlert("Your package has arrived");
    }

    // Function to get the status of the shipping
    function getStatus(ShippingStatus _status) internal pure returns (string memory) {
     // Check the current status and return the correct name
     if (ShippingStatus.Pending == _status) return "Pending";
     if (ShippingStatus.Shipped == _status) return "Shipped";
     if (ShippingStatus.Delivered == _status) return "Delivered";
    }

   // Get status of your shipped item
    function Status() public view returns (string memory) {
         ShippingStatus _status = status;
         return getStatus(_status);
    }
}
このコードはコントラクトが生成されたタイミングでコンストラクタによって、statusがPending(配送準備中)となり、出荷、配達完了でそれぞれstatuがShipped, Deliveredと変化するものになります。
作成したファイルを今までと同様にビルド、デプロイするのですが、先にコントラクトをデプロイするために必要となるjsファイルをmigrations/に作成しておく、ファイル名は例に倣って2_Shipping.jsとします。
const Shipping = artifacts.require("Shipping");

module.exports = function (deployer) {
  deployer.deploy(Shipping);
};
ファイル作成後、ビルドとデプロイを終わらせておきます。
テスト
テストはsolidityで行うより、javascriptで行うことが一般的のようです。
以下はテスト用のコードであり、目的は各ステータスが期待通りに帰ってくるのかを確かめるだけのものです。
const ShippingStatus= artifacts.require("./Shipping.sol");
contract('Shipping', () => {

  it("should return the status Pending", async ()=> {
    // Instance of our deployed contract
    const instance = await ShippingStatus.deployed();
    // Checking the initial status in our contract
    const status = await instance.Status();
    // Checking if the status is initially Pending as set in the constructor
    assert.equal(status, "Pending");
  });
it("should return the status Shipped", async ()=> {
// Instance of our deployed contract
    const instance = await ShippingStatus.deployed();

    // Calling the Shipped() function
    await instance.Shipped();

    // Checking the initial status in our contract
    const status = await instance.Status();

    // Checking if the status is Shipped
    assert.equal(status, "Shipped");
  });

    it("should return the status Delivered", async ()=> {

    // Instance of our deployed contract
    const instance = await ShippingStatus.deployed();

    // Calling the Shipped() function
    await instance.Delivered();

    // Checking the initial status in our contract
    const status = await instance.Status();

    // Checking if the status is Delivered
    assert.equal(status, "Delivered");
  });
});
テストを行うにあたって、まずは以下のライブラリをインストールします。
npm install truffle-assertions
あとはtruffle testを実行するだけです。
このコマンドを実行すると、testディレクトリにあるjsファイルが実行されます。
結果を確認すると新しく追加したShippingは問題なく稼働していることが分かります。

所感
ほとんど知らない状態からやってみましたが、環境構築含め結構簡単にできた印象です。
昨年秋のAI EXIPOに参加した際に聞いた話では、大手企業もブロックチェーン関係の事業に手を出し始めているようです。これから日本においてもweb3エンジニアの需要が出てくる可能性も高いため、これからちょこちょこ勉強していけたらなと思っています。