概要
Juliusは、京都大学とIPAが開発した音声認識エンジンです。ここでは、Node.js上で動くAPIやIoT連携など行うツールのNode-REDにJuliusを組み込んで使用する手順を紹介しています。
肝心のJuliusは、シェルスクリプトにまとめてしまい下記の順番で、execノードなどを使用して処理していきます。
- マイクで録音
- シェルスクリプトに録音結果を渡し認識結果をログファイルに出力
- ログファイルの出力結果をdebugノードで表示
Node-REDのインストール
ローカルPCに、Linuxを入れます。今回は、Ubuntu 16.04を使用しました。見た目がWindowsライクな環境で作業したい人は、UbuntuベースのZorin OS Lite を使うと良いでしょう。とてもそっくりです。
$ curl -sL https://deb.nodesource.com/setup_8.x | sudo -E bash -
$ sudo apt-get install -y nodejs
$ sudo npm install -g --unsafe-perm node-red

PCを再起動

$ node-red &
node-red をバックグラウンド起動。その後Enterキーを押す。
http://localhost:1880 にアクセスし、Node-REDのエディタを使用可能なユーザーを設定するなどのNode-RED初期設定を実施します。
Ubuntu使ってJuliusをインストール
まだ整理しないといけないですが、とりあえず動くということでざくっと。
/home/username 以下で実施しています。
ここでは、/home/user1 としましょう。ご利用環境に合わせて書き換えてください
下記のコマンドをすべて実行すると、Juliusは、/home/user1/recognition/julius にインストールされます。ここでは、Ubuntuを使用していますから、./configure時に、mictypeをalsaを指定する必要があります。(ZorinなどUbuntuベースのOSの場合も同様に必要です。)
$ sudo apt-get install libasound2-dev libesd0-dev libsndfile1-dev
$ mkdir recognition
$ cd recognition/
$ wget https://github.com/julius-speech/julius/archive/v4.4.2.1.tar.gz
$ tar zxvf v4.4.2.1.tar.gz
$ mv julius-4.4.2.1 julius
$ cd julius/
$ wget https://github.com/julius-speech/dictation-kit/archive/dictation-kit-v4.3.1.tar.gz
$ tar zxvf dictation-kit-v4.3.1.tar.gz
$ mv dictation-kit-dictation-kit-v4.3.1 julius-kits
$ rm dictation-kit-v4.3.1.tar.gz
$ wget https://github.com/julius-speech/grammar-kit/archive/v4.3.1.zip
$ unzip v4.3.1.zip
$ mv grammar-kit-4.3.1 julius-kits
$ rm v4.3.1.zip
$ ./configure --enable-words-int --with-mictype=alsa
$ make
$ sudo make install
$ sudo apt-get install sox
Juliusをバッチ処理的に実行するファイルリストを作る
マイクで録音したwav形式のファイルを、juliusに渡して音声認識されるのですが、バッチ処理的に処理させるには、-input file -filelist ファイル名 とする必要がありますので、-filelistオプションで使用する音声データの一覧ファイルを作成します。
$ nano list.txt
/home/user1/mono.wav

Ctrl +x を押し、yキーで保存
Node-REDで使用するシェルスクリプト(voice-recog.sh)を作成
ここで作成するシェルスクリプトは、マイクで録音した音声データを、Juliusで処理して音声認識結果をログファイルに出力するためのものです。
$ nano voice-recog.sh

# !/bin/bash

sox /home/user1/out.wav -c 1 -r 16000 /home/user1/mono.wav
julius -C /home/user1/recognition/julius/julius-kits/main.jconf -C /home/user1/recognition/julius/julius-kits/am-gmm.jconf -input file -filelist /home/user1/list.txt > /home/user1/log.txt
grep sentence1: /home/user1/log.txt | cut -c 13- > /home/user1/log_cut.txt

Ctrl +x を押し、yキーで保存
実行権限を追加
$ chmod a+x voice-recog.sh
./voice-recog.sh が実行されると、/home/user1/log_cut.txt に、Juliusの音声認識結果が出力されます。
Node-REDへの組み込み
ローカル環境にインストールしたNode-REDにアクセスし、下図のようになるように組み込んでいきます。

最初は、timestampノードことinject node です。一通り動作確認を終えたら定期実行するように設定すると良いでしょう。
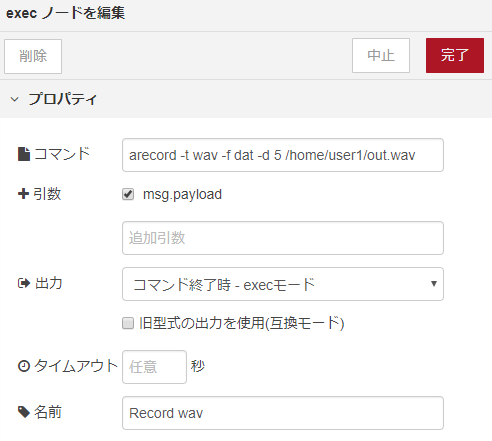
Record wav ノードは、execノードで出来ています。マイクで音声を録音する役割があります。

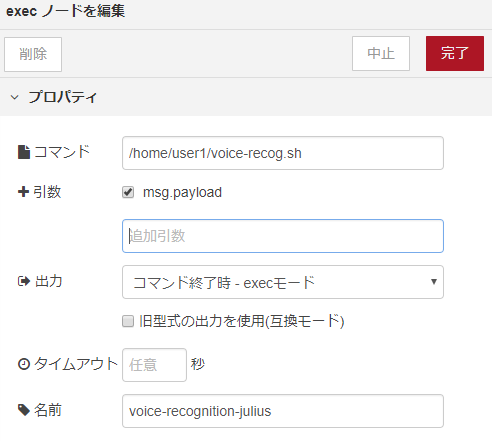
voice-recognition-julius ノードも、execノードで出来ています。録音した音声データを用いて、先ほどのシェルスクリプトを実行する役割があります。

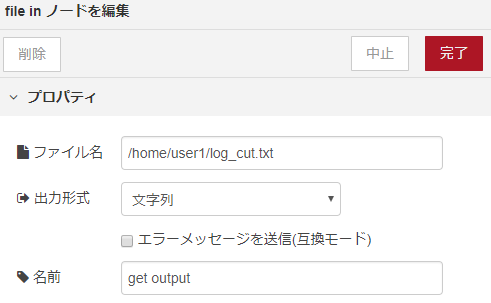
get-outputノードは、file inノードで出来ています。シェルスクリプトの実行結果のログファイルを呼び出す役割があります。

で最後にdebugノードをつなげて、画面右上の「デプロイ」をクリックし、inject nodeを実行し、一通り動くか確認します。デバッグ結果に音声認識結果が表示されるはずです。
まとめ
音声認識用の独自辞書なしに実行しますと、意図したとおりに認識されないことが多いので、実際にJuliusを使用する場合は、独自辞書を作成し、シェルスクリプト(voice-recog.sh)内の julius -C の際に独自辞書を読み込むように設定する必要があります。
ともあれ、Node-RED上でJuliusを用いた音声認識による音声のテキスト変換については動作確認できました。