やること
とある消臭繊維を試すために、室内の臭いを数値化する必要がありまして、臭いの値をクラウド上のデータベースに格納するまでを開発しました。
使ったもの
| 部品名 | 取り扱い先 |
|---|---|
| ブレッドボード | https://www.switch-science.com/catalog/3499/ |
| ジャンパーワイヤ | http://akizukidenshi.com/catalog/g/gP-00288/ |
| What's Next Pink | https://www.switch-science.com/catalog/3525/ |
| MiCS5524搭載 ガスセンサモジュール | https://www.switch-science.com/catalog/2837/ |
| Rapsberry Pi Zero WH | https://www.switch-science.com/catalog/3646/ |
| USB microBタイプとAタイプ 変換アダプタ | https://www.amazon.co.jp/dp/B076QFV653/ref=cm_sw_r_tw_dp_U_x_ITlNDb4A3MME3 |
その他、「USBケーブル USB2.0 A-microBタイプ」とUSB対応のACアダプタまたはモバイルバッテリーを用意します。
配線
各部品は、以下のように配線します。
| What's Next Pink | MiCS5524搭載 ガスセンサモジュール |
|---|---|
| 5V | 5V |
| GND | GND |
| A0 | AOUT |
「What's Next Pink」は、Arduino Micro互換ボードなので、配線図では、Arduino Microの画像を使用しています。
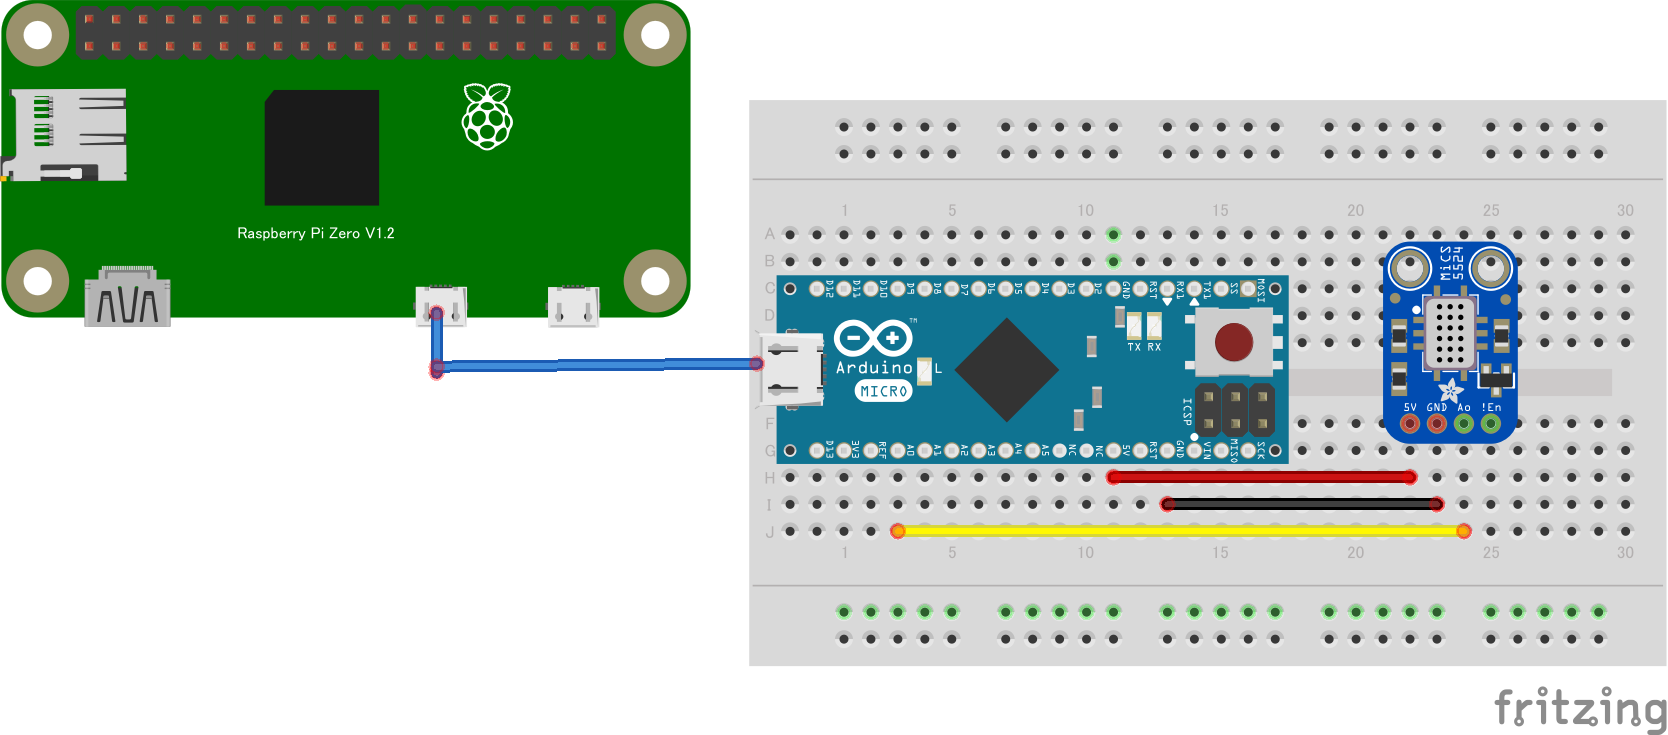
「What's Next Pink」のUSB microBタイプに、「USB microBタイプとAタイプ 変換アダプタ」を接続し、さらに「USBケーブル USB2.0 A-microBタイプ」を用いて、Raspberry Pi Zero WHと接続します。Raspberry Pi Zero WHは、USB対応のACアダプタもしくはモバイルバッテリーに接続します。
実機は、以下のようになります。

「What's Next Pink」への書き込み
「What's Next Pink」には、Arduino IDEから下記のコードを配置しています。1分ごとにガスセンサーモジュールの値を取得し、出力するシンプルな内容です。
void setup() {
  Serial.begin(115200);
  Serial.println("MiCS-5524_connect");
}

void loop() {
  int reading = analogRead(A0);
  Serial.println(reading);
  delay(60000);
}
クラウドに転送するための準備
ガスセンサーモジュールで取得した値をクラウドに転送するために、以下のコマンドを用いて必要なソフトウェアをインストールします。
Raspberry PiにSSH接続して作業します。
CUとNode-REDのインストール
cuは、Linux環境やRaspberry Pi環境で、シリアル通信を可能にします。「What's Next Pink」とRaspberry Pi Zero WHは、互いにUSB接続しているため、USBシリアル通信が可能になっています。
Node-REDのインストールは公式の手順を採用しているため下記の参考先とは異なりますが、「What's Next Pink」とRaspberry Pi Zero WHの接続について参考にしています。
【参考記事】
ArduinoとRaspberryPiをUSBケーブルで接続してNode-REDで値を読み込む
Node-REDのインストール
公式の手順に従って、Raspberry Pi Zero WH上にNode-REDをインストールします。
$ bash <(curl -sL https://raw.githubusercontent.com/node-red/linux-installers/master/deb/update-nodejs-and-nodered)
$ sudo systemctl enable nodered.service
$ sudo reboot
再起動し、Node-REDが起動するか確認します。
Webブラウザを開き、Raspberry Pi Zero WHに割当られたIPアドレス(xxx.xxx.xxx.xxx)で、http://xxx.xxx.xxx.xxx:1880 にアクセスします。
Node-REDでセンサーで計測した値を取得、保存
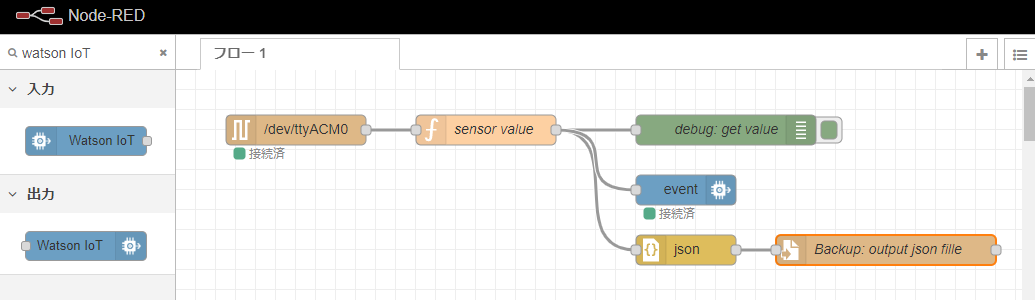
下記のフローをインポートします。Node-REDでは、センサーや業務アプリケーションからデータを受け取り、処理、出力するまでの一連の流れをまとめたものを「フロー」と言います。
サンプルフローをインポートします。インポートは、Node-REDの画面右上の「三」>>「読み込み」の順にクリックしまして、下記を貼り付け、「読み込み」ボタンをクリックします。
[{"id":"f9a54fc0.87c4b","type":"tab","label":"フロー 2","disabled":false,"info":""},{"id":"bd0a00e7.70c87","type":"serial in","z":"f9a54fc0.87c4b","name":"","serial":"cf25e845.be3018","x":110,"y":40,"wires":[["12a526ad.01f2b9"]]},{"id":"12a526ad.01f2b9","type":"function","z":"f9a54fc0.87c4b","name":"sensor value","func":"var dt = new Date(); // 当日\nvar year = dt.getFullYear();\nvar month = dt.getMonth()+1;\nvar day = dt.getDate();\nvar hour = dt.getHours();\nvar minute = dt.getMinutes();\nvar second = dt.getSeconds();\nvar date = year+\"-\"+month+\"-\"+day+\"-\"+hour+\":\"+minute+\":\"+second;\nvar ss = msg.payload;\nvar sensor = Number(ss.slice(0,-1));\nmsg.payload = {\n ppm:sensor,\n date:date\n}\nreturn msg;","outputs":1,"noerr":0,"x":300,"y":40,"wires":[["6839918f.c5869","e08afd9a.22de7"]]},{"id":"6839918f.c5869","type":"debug","z":"f9a54fc0.87c4b","name":"debug: get value","active":true,"tosidebar":true,"console":false,"tostatus":false,"complete":"payload","targetType":"msg","x":540,"y":40,"wires":[]},{"id":"e08afd9a.22de7","type":"json","z":"f9a54fc0.87c4b","name":"","property":"payload","action":"str","pretty":false,"x":500,"y":140,"wires":[["8e4b1e57.58b3"]]},{"id":"8e4b1e57.58b3","type":"file","z":"f9a54fc0.87c4b","name":"Backup: output json fille","filename":"/home/pi/arduino-data.json","appendNewline":true,"createDir":true,"overwriteFile":"false","encoding":"utf8","x":710,"y":140,"wires":[[]]},{"id":"cf25e845.be3018","type":"serial-port","z":"","serialport":"/dev/ttyACM0","serialbaud":"115200","databits":"8","parity":"none","stopbits":"1","waitfor":"","newline":"\\n","bin":"false","out":"char","addchar":"","responsetimeout":"10000"}]
読み込み後は、下図のようになりますので、画面右上の「デプロイ」ボタンをクリックします。

1分ごとにガスセンサーモジュールで計測した値が、Raspberry Pi Zero WH内の「/home/pi/arduino-data.json」に蓄積されます。
後編に向けて
これで、センサー側の準備は整いましたので、後編では、クラウド上のデータベースに転送し、蓄積する手順について説明します。
そのため、下記を準備しておきます。
「node-red-contrib-ibm-watson-iot」ノード追加
Raspberry Pi Zero WH上のNode-REDに、画面右上の「三」>>「パレットの管理」>>「ノードを追加」の順にクリックし、「node-red-contrib-ibm-watson-iot」を検索し、「ノードを追加」ボタンをクリックします。
これで、Node-RED上で「出力」のWatson IoTノードを使用することができます。
下図のように「出力」のWatson IoTノードを配置します。
IBM Cloud ライトアカウントの取得
Rapsberry Pi Zero WHにインストールしたNode-REDを介して、クラウド上のデータベースに送るため、本番利用で無料で使えるクラウドデータベースを使用するため、IBM Cloud ライトアカウントを取得し、アカウント取得後、IBM Cloudにhttps://cloud.ibm.com/login からログインし、「カタログ」から、下記のサービスを有効化します。
| カテゴリ | サービス名 |
|---|---|
| スターター・キット | Node-RED Starter |
| IoT | Internet of Things Platform |