はじめに
こちらのプラグインを使用
このプラグインを使うと、現段階(2019/12月)ではApple Storeから警告がきます!!
どんな感じの警告かと言うと、これ。
TMS-90809: Deprecated API Usage - Apple will stop accepting submissions of apps that use UIWebView APIs . See https://developer.apple.com/documentation/uikit/uiwebview for more information.
ionic capacitorのAdMobプラグインを使う(capacitor-admob)の記事でも同じ事を書いたが、内容としては**「廃止予定のUIWebViewが含まれているよ〜!!」**って警告である。
いずれは解消されると思うが、あくまで私が試した時はこの警告が来たよ〜って事だけ、ご了承ください。
前提条件
・FirebaseコンソールのAuthenticationで、Googleアカウントでのログインを有効にしている

・Firebaseコンソールから、GoogleService-Info.plistを作成している
→FirebaseコンソールからプロジェクトにiOSとAndroidを追加して、アプリを登録する事でゲット。
 こんなボタンがどこかにあるかと。これを押すとiOSもAndroidも追加できる。
プラグインのインストール
npm i --save @codetrix-studio/capacitor-google-auth
npx cap update
もしAngularFireをまだIonicプロジェクトに入れていなければ、入れておこう。
npm install firebase @angular/fire --save
AngularFire は Angular から Firebase を利用するときの公式のライブラリーです。AngularFire は npm で Angular プロジェクトにインストールできます。
AngularFire を用いると Firebase の Authentication、Firestore、Storage といった基本機能を Angular で簡単に利用することが可能になります。
こちらより引用。
iOSでの設定
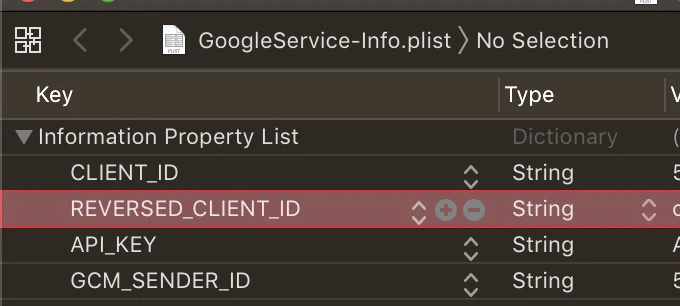
GoogleService-Info.plistからREVERSED_CLIENT_IDをまずは確認。
com.googleusercontent.apps.****となっている。
次にXcodeを開く。
npx cap open ios
XcodeからInfo.plistを開く。

その中のURL types>Item0>URL Schemesの所に、先ほど確認したREVERSED_CLIENT_IDを入れましょう。

もしこれでうまくいかない場合、Info.plistを別のエディタ(Sublimeとか)で開き、こちらのデモから以下の部分をコピペして置き換えてみてください。
<array>
  <dict>
    <key>CFBundleURLName</key>
    <string>com.getcapacitor.capacitor</string>
    <key>CFBundleURLSchemes</key>
    <array>
      <string>capacitor</string>
      <string>com.googleusercontent.apps.****</string>
    </array>
  </dict>
</array>
私の場合、ずっと「正しいCLIENT_IDが設定されていないよ!!」っと言われていて、上記の部分をコピーして置き換えると、正常に動いてくれました。。。
Androidでの設定
FirebaseコンソールのAuthenticationのGoogleから、Web Client IDを確認
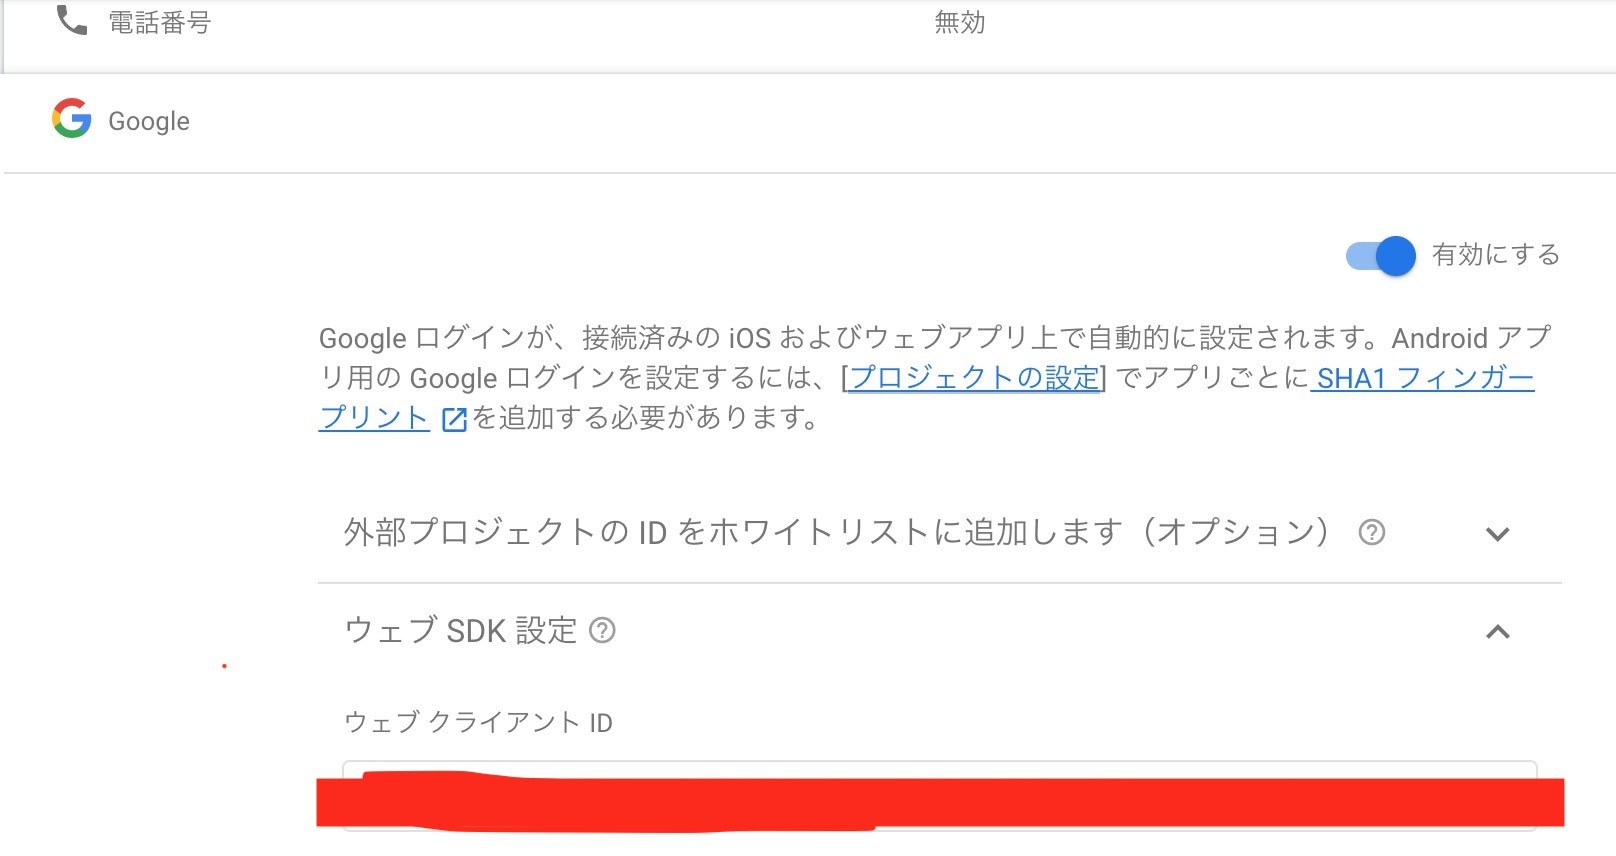
Ionicプロジェクトのandroidフォルダから、app>src>main>res>valuesstrings.xmlを開き、Web Client IDを設定する。
<resources>
  <string name="server_client_id">Your Web Client ID</string>
</resources>
次に
app>src>main>java>**>**>MainActivity.javaに以下を追加
(公式ではMainActivity.onCreateになっているがそんなファイルな無かったし、普段プラグインを登録するのはいつもMainActivity.javaなので、間違いと思われる。。)
this.init(savedInstanceState, new ArrayList<Class<? extends Plugin>>() {{
  add(GoogleAuth.class); // 追加
}});
capacitor.config.jsonの設定
plugins以下を追加。
{
  "appId": "com.googleLogin.app",
  "appName": "googleLogin",
  "bundledWebRuntime": false,
  "npmClient": "npm",
  "webDir": "www",
  "plugins": {
    "GoogleAuth": {
      "scopes": [
        "profile",
        "email"
      ],
      "serverClientId": "Your Web Client ID"
    }
  }
}
index.htmlの設定
head内に以下を追加
<meta name="google-signin-client_id" content="Your Web Client ID">
これで全ての設定は終わり・・・。長かった〜![]()
home.page.ts
実装したいページの.tsファイルに以下を追加。
import { Router } from '@angular/router';
import { AngularFireAuth } from '@angular/fire/auth';
import { NativeStorage } from '@ionic-native/native-storage/ngx';
import { ToastController, AlertController } from '@ionic/angular';
import { LoadingController } from '@ionic/angular';
import { auth } from 'firebase/app';
import '@codetrix-studio/capacitor-google-auth';
import { Plugins } from '@capacitor/core';
const { GoogleAuth } = Plugins;

@Component({
  selector: 'app-home',
  templateUrl: 'home.page.html',
  styleUrls: ['home.page.scss']
})

constructor(
    private router: Router,
    private toastCtrl: ToastController,
    private loadingCtrl: LoadingController,
    private nativeStorage: NativeStorage,
    private afAuth: AngularFireAuth,
    private alertCtrl: AlertController
  ) {}

  ngOnInit() {}

 async googleLogin() {
    const loading = await this.loadingCtrl.create({
      message: 'ログイン中です'
    });
    this.presentLoading(loading);
    await Plugins.GoogleAuth.signIn()
      .then(async googleUser => {
        const credential = auth.GoogleAuthProvider.credential(
          googleUser.authentication.idToken
        );
        this.afAuth.auth.signInWithCredential(credential)
        .then(() => {
            this.afAuth.auth.onAuthStateChanged(user => {
              if (user != null) {
                this.nativeStorage.setItem('user_data', {
                  uid: user.uid,
                  name: user.displayName,
                  email: user.email
                });
              }
            });
            console.log('Googleログイン成功');
            this.router.navigateByUrl('/profile')
            .then(async () => {
            loading.dismiss();
            const toast = await this.toastCtrl.create({
              message: `${googleUser.name}さん、こんにちは!`,
              duration: 3000,
              position: 'middle',
              cssClass: 'my-toast'
            });
            await toast.present();
          });
          });
      })
      .catch(error => {
        console.log('Googleログイン失敗したーー〜ー');
        console.log(error);
        const code = error.code;
        const header = 'ログイン失敗';
        let message = 'エラーが発生しました。もう一度お試しください。。。';
        if (code === 'auth/network-request-failed') {
          message = '接続に失敗しました。もう一度お試しください。。';
        }
        this.showAlert(header, message);
        this.router.navigateByUrl('/home');
      });
  }

  private showAlert(header: string, message: string) {
    this.alertCtrl
      .create({
        header: header,
        message: message,
        buttons: ['OK']
      })
      .then(alertEl => alertEl.present());
  }
Ionic + Firebaseで記録するカレンダーアプリを作る その3 Firebaseにイベントを追加し取得
上記の記事にてAngularFireAuthの導入方法も記載されているので、もしまだの人はその辺を参考に。
また、ログイン時に**nativeStorageへの保存も、ついでにしときます。**もし不要なら、その部分は消しといてくださいね〜。
Ionic + Firebaseで記録するカレンダーアプリを作る その9 オートログイン ストレージにユーザーデータを保存
ちなみに、**nativeStorageへの保存はオートログインに使えます。**気になる人は、上記の記事を参考に〜。
home.page.htmlにボタンを設置
 <ion-button (click)="googleLogin()" seize="large" expand="block">
            Googleでログイン
          </ion-button>
ログアウト処理
ログアウトの前にはアラートをつけたほうが良いかな〜っと思い。。
任意のページにログアウトボタンを作って、これを実装すればOK!
import { NativeStorage } from '@ionic-native/native-storage/ngx';
import { ToastController, AlertController } from '@ionic/angular';
import { Router } from '@angular/router';
import { Plugins } from '@capacitor/core';
const { GoogleAuth } = Plugins;

constructor(
    private router: Router,
    private toastCtrl: ToastController,
    private nativeStorage: NativeStorage,
    private alertCtrl: AlertController
) { }

async logout() {
    const alert = await this.alertCtrl.create({
      header: 'ログアウトしますか?',
      message: '再度ログインするのは面倒ではありませんか?',
      buttons: [
        {
          text: 'キャンセル',
          role: 'cancel',
          handler: blah => {
            console.log('Confirm Cancel: blah');
          }
        },
        {
          text: 'ログアウト',
          cssClass: 'cancel-button',
          handler: async () => {
            GoogleAuth.signOut()
              .then(async () => {
              this.nativeStorage.remove('user_data');
              const toast = await this.toastCtrl.create({
                message: 'ログアウトしました',
                duration: 2000,
                cssClass: 'my-toast'
              });
              await toast.present();
            });
            this.router.navigateByUrl('/home');
          }
        }
      ]
    });
    await alert.present();
  }
最後に
UIWebViewの件で発生する警告が、早くなくなれば良いね、、、。