仮想マシンのネットワーク構築
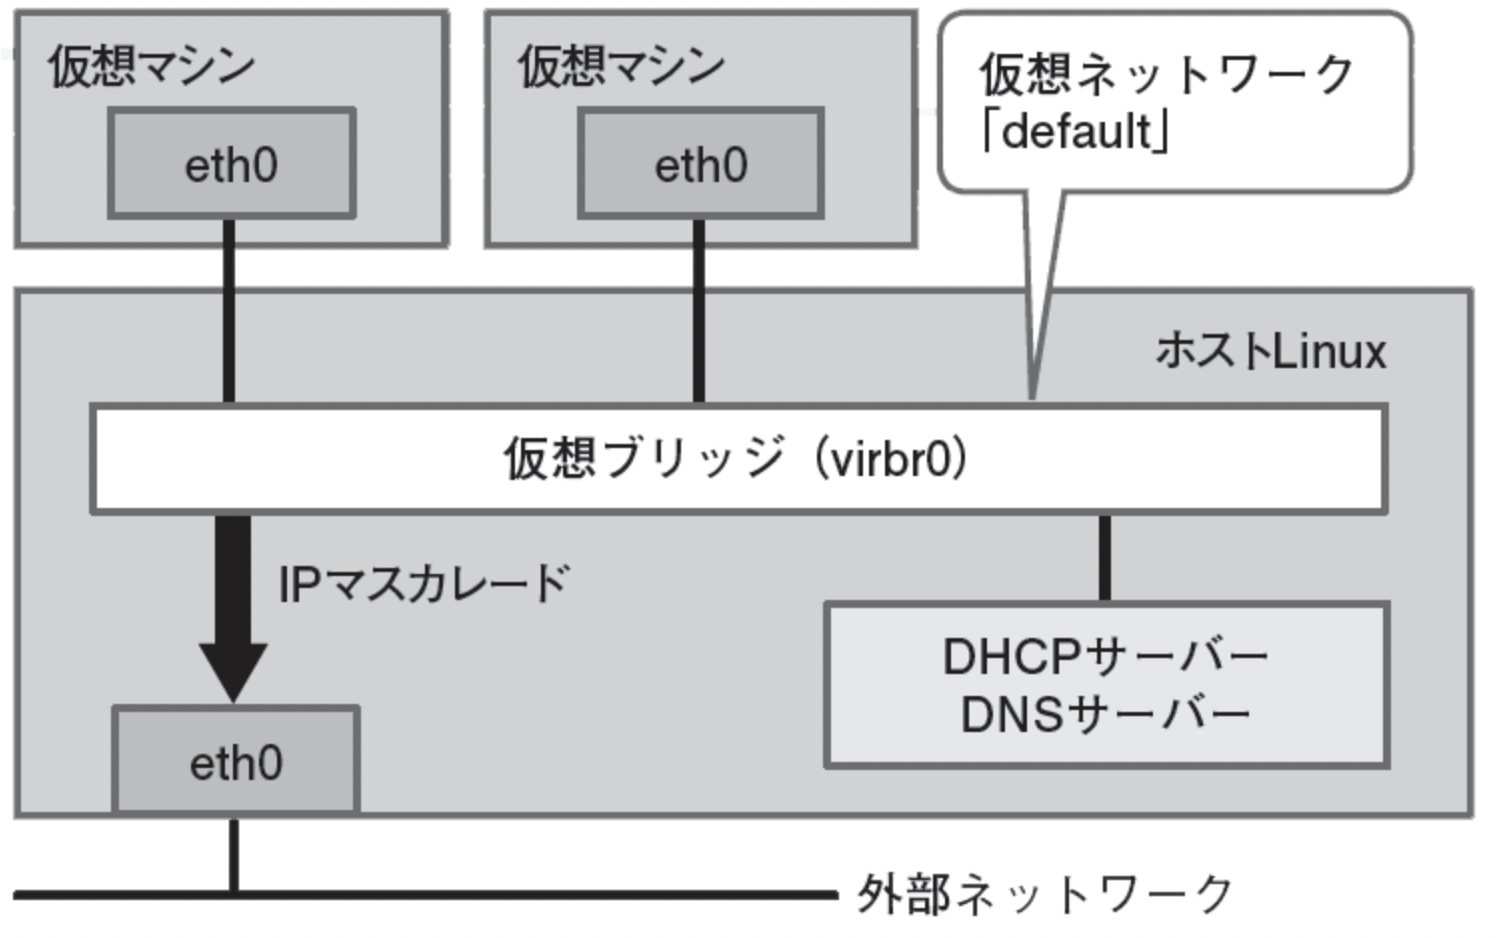
今回作成するネットワークは以下のような構成とする。

(引用:https://xtech.nikkei.com/it/article/COLUMN/20131118/518647/)
virt-installによるvmの作成
sudo apt update
sudo apt install qemu-kvm libvirt-daemon-system
sudo usermod -aG kvm {USER}
sudo usermod -aG libvirt {USER}
再起動
virt-install \
--name test-node \
--description "This is the test node" \
--ram 4096 \
--disk path=/var/lib/libvirt/images/node-test.img,size=10 \
--vcpus 2 \
--os-variant  ubuntu22.04 \
--network default \
--location /home/{USER}/RINKO/ubuntu-22.04.4-live-server-amd64.iso,initrd=casper/initrd,kernel=casper/vmlinuz \
--graphics none \
--console pty,target_type=serial \
--extra-args console=ttyS0,115200n8
virbr0の設定変更
virsh net-edit default
設定を編集
<network>
  <name>default</name>
  <uuid>d5e58ece-d152-4a87-a768-4339b82940d5</uuid>
  <forward mode='nat'/>
  <bridge name='virbr0' stp='on' delay='0'/>
  <mac address='52:54:00:3b:67:93'/>
  <ip address='192.168.1.1' netmask='255.255.255.0'>
    <dhcp>
      <range start='192.168.1.2' end='192.168.1.254'/>
    </dhcp>
  </ip>
</network>
defaultネットワークの再起動
virsh net-destroy default
virsh net-start default
ゲストマシンのIPアドレス設定
/etc/netplanを編集
network:
  version: 2
  renderer: networkd
  ethernets:
    enp1s0:
      dhcp4: no
      addresses: [192.168.1.2/24]
      routes:
      - to: default
        via: 192.168.1.1
      nameservers:
        addresses: [192.168.1.100, 8.8.8.8]
もとあったyamlファイルを削除もしくは.bakに変更
sudo chmod 600 <file name>
sudo netplan apply
以上で最初に示した画像のようなネットワークを作ることができる。
裏で動いているIPテーブルの話
この環境でNATはホストマシンで実行されている
$ sudo iptables -t nat -L -v
Chain LIBVIRT_PRT (1 references)
 pkts bytes target     prot opt in     out     source               destination
    7   486 RETURN     all  --  any    any     192.168.1.0/24       base-address.mcast.net/24
    0     0 RETURN     all  --  any    any     192.168.1.0/24       255.255.255.255
    1    60 MASQUERADE  tcp  --  any    any     192.168.1.0/24      !192.168.1.0/24       masq ports: 1024-65535
    6   456 MASQUERADE  udp  --  any    any     192.168.1.0/24      !192.168.1.0/24       masq ports: 1024-65535
    1    84 MASQUERADE  all  --  any    any     192.168.1.0/24      !192.168.1.0/24
libvirt は、仮想ネットワークを作成する際に、VM から外部ネットワークへの通信を可能にするために、IP マスカレード(一種の NAT)を設定します。
iptables -t nat -A POSTROUTING -o eth0 -j MASQUERADE
VMの削除(おまけ)
virsh undefine test-node --remove-all-storage
ゲストマシンをDNS登録
これはLDAP over TLSを使用するのに必要
LDAP over TLSはSSSDを利用するのに必要
SSSD以外でユーザ情報の共有認証を行う場合は必要ないかもしれない
ドキュメントや最初の画像によるとvirth0にデフォルトのDNSが付いてそうだがその設定方法がどうしてもわからなかったため、もう一台DNS用のVMを用意してDNSを設定した。その記事は以下。
ローカルDNSを設置する