はじめに
以前、Intelが提供する顔検出・顔分析モデルの紹介をしました。今回は同じくIntel が提供している face re-identification (以下、顔再識別)モデル を紹介します。
このモデルは入力した顔画像の特徴を抽出します。特徴はベクトルで表現されるので、比較したい顔とのコサイン類似度を求めることで「似てる度」が数値化できます。
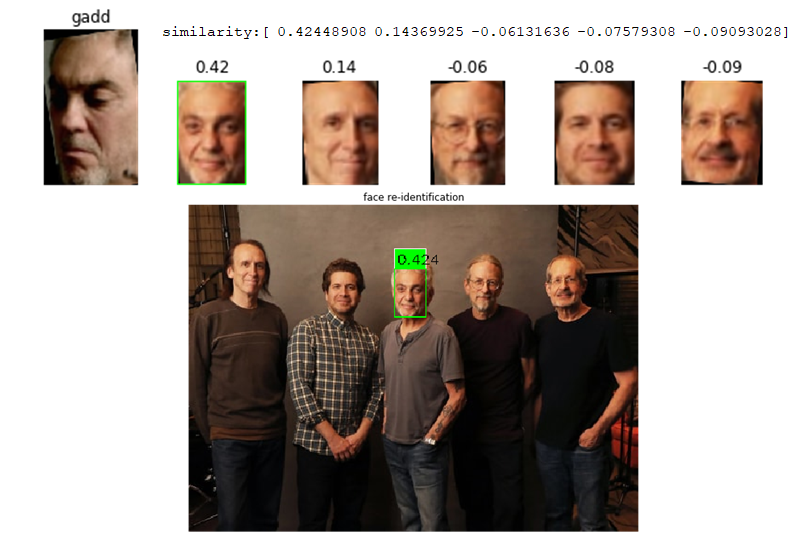
下はスティーブ・ガット様を別画像から検索した例です。ターゲットとするのは左の顔画像(「gadd」ラベル)で5人が写っている画像から識別しました。
ターゲット画像が正面の顔でないにもかかわらず(少し横向き)、他の人より高い類似度で識別できています。またその差を見ても僅差ではないのでしっかり区別できていると思います。
環境
- Windows 10
- Python 3.6
- OpenVINO Toolkit 2018 R5
モデルの概要
Interlが提供するOpenVINO用の学習済みモデルは GitHub で公開されています。以下は、face re-identification の説明からの抜粋です。
| model | input name:shape | oput name: shape |
|---|---|---|
| face-reidentification-retail-0095 | '0': (1, 3, 128, 128) | '658': (1, 256, 1, 1) |
- モデルの出力は(入力画像の)行ベクトルを含む
- 異なる画像から生成されるベクトルのコサイン距離(類似度)は同程度
The net outputs a blob with the shape [1, 256, 1, 1], containing a row-vector of 256 floating point values. Outputs on different images are comparable in cosine distance.
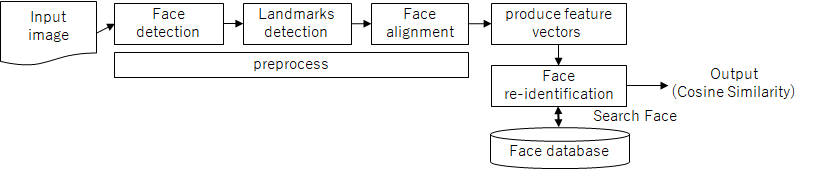
処理の概要
以下の2ステップで顔の「似てる度」を判断します。顔の特徴を生成するには、ランドマーク検出、顔の回転といった前処理が必要です。
1. 顔登録
顔の特徴を抽出しデータベース(この記事ではファイル)に保存します。

2. 顔再識別
インプット画像(または動画)から検出される各顔の特徴をデータベースに保存した顔と照合し、コサイン類似度を出力します。特徴抽出のプロセスは登録と同じです。
| 概要 | 説明 |
|---|---|
| 顔検出 | 顔検出モデルで顔部分を切り出し |
| ランドマーク検出 | ランドマーク検出モデルで目の位置を取得 |
| 顔画像の回転 | 画像を回転 |
| 顔の特徴抽出 | 顔再認識モデルで特徴ベクトルを抽出 |
| 顔データの登録 | 登録する顔と特徴ベクトルを保存 |
| 顔再識別 | 事前に登録した顔とのコサイン類似度を取得 |
処理の詳細
コードは jupyter notebook で実行したものからの抜粋です。全体のnotebook は Gist に上げました。
顔検出
テストで使った画像は "how-old.net"1 のものです。
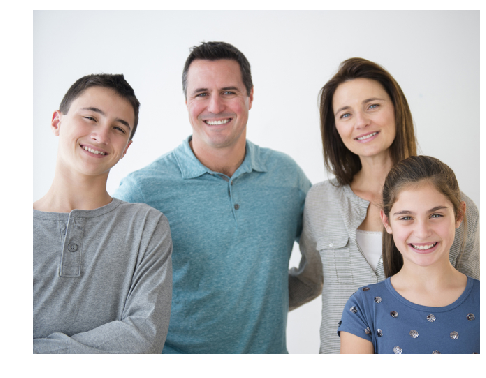
テスト画像の表示
%matplotlib inline
import requests
from PIL import Image
from io import BytesIO
import numpy as np
import matplotlib.pyplot as plt
import os
from openvino.inference_engine import IENetwork, IEPlugin

# plot setting
rows = 6
columns = 6

# Read Image
#image = "https://www.how-old.net/Images/faces2/main001.jpg"
image = "https://web.archive.org/web/20200702202608if_/https://www.how-old.net/Images/faces2/main001.jpg"

frame = get_frame(image)
frame_h, frame_w = frame.shape[:2]
init_frame = frame.copy()

print("frame_h, frame_w:{}".format(frame.shape[:2]))
plt.figure(figsize=(8, 8))
plt.imshow(frame)
plt.show()
入力画像から顔を検出して切り出します。モデルは face-detection-adas-00012 を使用しました。
コード内の face_frames に顔画像を格納します。

# 1. Plugin initialization for specified device and load extensions library if specified
device = "CPU"
fp_path = "./IR/FP32/" if device == "CPU" else "./IR/FP16/"
plugin = IEPlugin(device=device, plugin_dirs=None)
if device == "CPU":
    plugin.add_cpu_extension("./cpu_extension.dll")

# 2.Read IR
model_xml = fp_path + "face-detection-adas-0001.xml"
model_bin = os.path.splitext(model_xml)[0] + ".bin"
net = IENetwork(model=model_xml, weights=model_bin)

# 3. Configure input & output
input_blob = next(iter(net.inputs))
out_blob = next(iter(net.outputs))
n, c, h, w = net.inputs[input_blob].shape
print("input:{}\noutput:{}".format(net.inputs,net.outputs))
print("input.shape:{}\noutput.shape:{}".format(
    net.inputs[input_blob].shape, net.outputs[out_blob].shape))

# 4. Load Model
exec_net = plugin.load(network=net, num_requests=2)

# 5. Create Async Request
in_frame = cv2.resize(frame, (w, h))
in_frame = in_frame.transpose((2, 0, 1))
in_frame = in_frame.reshape((n, c, h, w))
exec_net.start_async(request_id=0, inputs={input_blob: in_frame}) # res's shape: [1, 1, 200, 7]

# 6. Receive Async Request
if exec_net.requests[0].wait(-1) == 0:
    res = exec_net.requests[0].outputs[out_blob]
    # prob threshold : 0.5
    faces = res[0][:, np.where(res[0][0][:, 2] > 0.5)]

# 7. draw faces
frame = init_frame.copy()
face_frames = []

for face_id, face in enumerate(faces[0][0]):
    box = face[3:7] * np.array([frame_w, frame_h, frame_w, frame_h])
    (xmin, ymin, xmax, ymax) = box.astype("int")
    face_frame = frame[ymin:ymax, xmin:xmax]
    face_frames.append(face_frame)
    ax = plt.subplot(rows, columns, face_id + 1)
    ax.set_title("face_id:{}".format(face_id))
    plt.imshow(face_frame)
    face_id += 1
plt.show()
顔画像の整列
このモデルは「顔が正面を向いて整列されている場合に最良の結果を出す」とのことなので、顔が水平になるように画像を回転させます。
The model achieves the best results if an input face is frontally oriented and aligned.
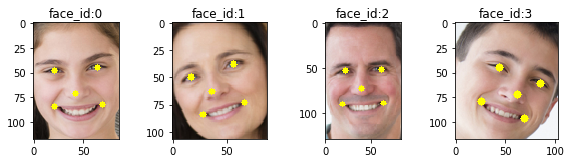
はじめに、ランドマークモデル landmarks-regression-retail-0009 で顔のランドマークを検出します。コード内の facila_landmarks に各顔のランドマークを格納します。
ランドマーク検出
# 1.Read IR
model_xml = fp_path + "landmarks-regression-retail-0009.xml"
model_bin = os.path.splitext(model_xml)[0] + ".bin"
net = IENetwork(model=model_xml, weights=model_bin)

# 2. Configure input & putput
input_blob = next(iter(net.inputs))
out_blob = next(iter(net.outputs))
n, c, h, w = net.inputs[input_blob].shape
print("input:{}\noutput:{}".format(net.inputs,net.outputs))
print("input.shape:{}\noutput.shape:{}".format(
    net.inputs[input_blob].shape, net.outputs[out_blob].shape))

# 3. Load Model
exec_net = plugin.load(network=net, num_requests=2)

# 4. Create Async Request

# create ndarray (face_count, 5, 2) : shape of landmarks matrix (5, 2)

facial_landmarks = np.zeros((faces.shape[2], 5, 2))

for face_id, face_frame in enumerate(face_frames):
    in_frame = cv2.resize(face_frame, (w, h))
    in_frame = in_frame.transpose((2, 0, 1))
    in_frame = in_frame.reshape((n, c, h, w))
    exec_net.start_async(request_id=0 ,inputs={input_blob: in_frame})

    # 5. Get Response
    if exec_net.requests[0].wait(-1) == 0:
        res = exec_net.requests[0].outputs[out_blob].reshape(1, 10)[0]

        # 6. draw Response
        lm_face = face_frame.copy()
        for i in range(res.size // 2):
            normed_x = res[2 * i]
            normed_y = res[2 * i + 1]
            x_lm = lm_face.shape[1] * normed_x
            y_lm = lm_face.shape[0] * normed_y
            cv2.circle(lm_face, (int(x_lm), int(y_lm)), 1 + int(0.03 * lm_face.shape[1]), (255, 255, 0), -1)
            facial_landmarks[face_id][i] = (x_lm, y_lm)
        ax = plt.subplot(rows, columns, face_id + 1)
        ax.set_title("face_id:{}".format(face_id))
        plt.imshow(lm_face)
    plt.show()
次に顔を回転させます。
画像を回転するコードはこちらのサイト(Face Alignment with OpenCV and Python)を参考にしました。
def align_face(face_frame, landmarks):

    left_eye, right_eye, tip_of_nose, left_lip, right_lip = landmarks
    # compute the angle between the eye centroids
    dy = right_eye[1] - left_eye[1]
    dx = right_eye[0] - left_eye[0]
    angle = np.arctan2(dy, dx) * 180 / np.pi

    # center of face_frame
    center = (face_frame.shape[0] // 2, face_frame.shape[1] // 2)
    h, w, c = face_frame.shape

    # grab the rotation matrix for rotating and scaling the face
    M = cv2.getRotationMatrix2D(center, angle, scale=1.0)
    aligned_face = cv2.warpAffine(face_frame, M, (w, h))

    return aligned_face
右目と左目の座標(ランドマーク)から回転する角度 angle を求めます。この角度と顔画像の中央 center から getRotationMatrix2D で変換行列(M)を取得します。最後にアフィン変換で画像を回転し、整列させた顔(aligned_face)を取得します。scale=1.0 はスケーリングなしです。
上下の画像と比べると少年の顔が回転していることが分かるかと思います。
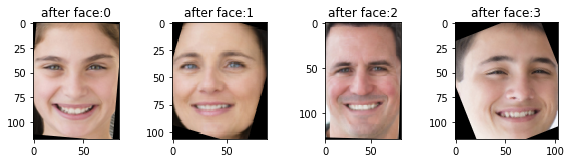
各顔を整列した画像を alinged_faces に格納します。
# display aligned faces
aligned_faces = []

plt.figure()
for face_id, face_frame in enumerate(face_frames):
    aligned_face = face_frame.copy()
    aligned_face = align_face(aligned_face, facial_landmarks[face_id])
    aligned_faces.append(aligned_face)
    ax = plt.subplot(rows, columns, face_id + 1)
    ax.set_title("after face:{}".format(face_id))
    plt.imshow(aligned_face)
plt.show()
顔の特徴抽出
整列した顔から特徴を抽出します。 ここで face re-identification モデルを使います。
feature_vecs に各顔の特徴ベクトルを格納します。
顔の特徴抽出
# 1.Read IR
model_xml = fp_path + "face-reidentification-retail-0095.xml"
model_bin = os.path.splitext(model_xml)[0] + ".bin"
net = IENetwork(model=model_xml, weights=model_bin)

# 2. Configure input & putput
input_blob = next(iter(net.inputs))
out_blob = next(iter(net.outputs))
n, c, h, w = net.inputs[input_blob].shape
print("input:{}\noutput:{}".format(net.inputs,net.outputs))
print("input.shape:{}\noutput.shape:{}".format(
    net.inputs[input_blob].shape, net.outputs[out_blob].shape))

# 3. Load Model
exec_net = plugin.load(network=net, num_requests=2)

# 4. Create Async Request per faces
frame = init_frame.copy()
feature_vecs = np.zeros((faces.shape[2], 256))

for face_id, aligned_face in enumerate(aligned_faces):
    in_frame = cv2.resize(aligned_face, (w, h))
    in_frame = in_frame.transpose((2, 0, 1))
    in_frame = in_frame.reshape((n, c, h, w))
    exec_net.start_async(request_id=0 ,inputs={input_blob: in_frame})

    # 5. Get reponse and store feature vector of faces
    if exec_net.requests[0].wait(-1) == 0:
        res = exec_net.requests[0].outputs[out_blob]
        # save feature vectors of faces
        feature_vecs[face_id] = res[0].reshape(res.shape[1],)

feature_vecs
1つの顔をインプットとしてモデルが出力する形状は (1, 256, 1, 1) です。特徴ベクトルは '256' の部分です。下の例では4つの顔分の特徴ベクトルが取得できています。
input.shape:[1, 3, 128, 128]
output.shape:[1, 256, 1, 1]
array([[-0.28391176,  1.68580139, -1.2695694 , ..., -0.93805808,
         1.00111139, -1.26974821],
       [ 1.17788363,  0.19985002,  0.87691581, ...,  0.0649465 ,
         0.84698588, -0.03355204],
       [-0.15202463, -0.3082023 , -0.61479342, ...,  0.41253915,
        -0.5352481 , -1.02018821],
       [ 0.41510206,  0.50227839,  1.35448647, ..., -0.92287517,
         0.60579699, -0.57448816]])
特徴の保存
後で使えるように取得した特徴ベクトル feature_vecs と回転済みの顔画像 alinged_faces をラベルを付けてファイルに保存しておきます。
face_vecs_file = 'face_vecs.gz'
face_pics_file = 'face_pics.gz'

label = ['girl', 'mother', 'father', 'boy']

def create(feature_vecs, aligned_faces, label):
    # ordered dict (need python 3.6+)
    face_vecs = {}
    face_pics = {}
    for face_id, feature_vec in enumerate(feature_vecs):
        face_vecs[label[face_id]] = feature_vec
    with open(face_vecs_file, 'wb') as f:
        joblib.dump(face_vecs, f, compress='gzip')

    for face_id, aligned_face in enumerate(aligned_faces):
        face_pics[label[face_id]] = aligned_face
    with open(face_pics_file, 'wb') as f:
        joblib.dump(face_pics, f, compress='gzip')
顔の再認識
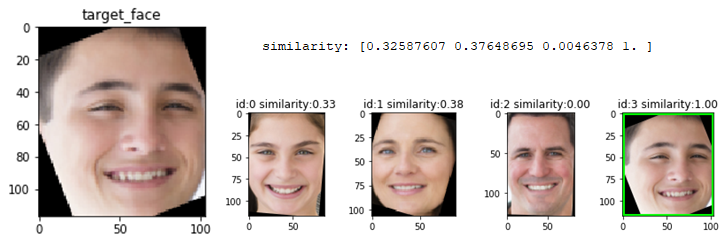
検出したい顔画像の特徴ベクトルをファイルから再度取得します。ここでは少年の顔を元にして家族の類似度を比較してみます。
類似度の出力
# load face pictures
pics_file = 'face_pics.gz'
with open(pics_file, 'rb') as f:
    face_pics = joblib.load(f)

# load feature_vectors
vecs_file = 'face_vecs.gz'
with open(vecs_file, 'rb') as f:
    face_vecs = joblib.load(f)

target_face = face_pics['boy']
plt.figure(figsize=(3,3))
plt.title("target_face")
plt.imshow(target_face)
plt.show()

# get feature vector of target face, which is not aligned face (not be aligned)
target_vec = face_vecs['boy']

similarity = cos_similarity(target_vec, feature_vecs)
print("similarity: {}".format(similarity))
# display similarity
for face_id, aligned_face in enumerate(aligned_faces):
    face_tmp = aligned_face.copy()
    if face_id == similarity.argmax():
        cv2.rectangle(face_tmp, (0, 0), (face_tmp.shape[1], face_tmp.shape[0]), (0, 255, 0), 3)
    ax = plt.subplot(rows, columns, face_id + 1)
    ax.set_title("id:{} similarity:{:.2f}".format(face_id, similarity[face_id]))
    plt.imshow(face_tmp)
plt.show()

similarity
コサイン類似度は以下のコードで求められます。X には検出対象とする顔のベクトル(target_vec)、Y には比較する各顔のベクトル(feature_vecs)をそれぞれを行列の形状にして渡します。各顔との類似度をまとめて計算するようにしました。
def cos_similarity(X, Y):
    Y = Y.T
    # (1, 256) x (256, n) = (1, n)
    return np.dot(X, Y)/(np.linalg.norm(X) * np.linalg.norm(Y, axis=0))
4つの顔分の類似度が出力されるので、argmax() で最大値のインデックスを取得して顔データを紐づけます。
array([0.32587607, 0.37648695, 0.0046378 , 1. ])
結果です。
少年自身の画像は同じものを比較しているのでコサイン類似度は 1 となります。一方で他の顔の類似度を見ると数値は 0.33 , 0.38 で人間の目の直感とも懸け離れていないように思います。それなりに識別できていると言えるのではないでしょうか。
まとめ
検出した顔から さらに「誰か」を識別するには検出対象の画像を学習してモデルを作成する必要があり敷居が高いと思っていました。OpenVINOの顔再識別(face-reidentification)モデルを使うと、学習済みのモデルから顔の特徴が抽出できるので機械学習の初学者でも顔識別に活用できそうです。
今回は入力は画像でしたが次回は動画をインプットにして顔識別デモアプリを作ってみたいと思います。