はじめに
Intel が 提供する OpenVINO Tool Kit をインストールすると様々な 画像認識系のディープラーニング(CNN)のデモが利用できます。
お手本となる顔検出・分析 の内容は以下のIntel のサイトで紹介されています。
このチュートリアルでは、顔検出と顔分析(年齢/性別、感情認識と頭部の向き推定)について書かれています。
本記事では リアルタイムでの顔検出デモ ( interactive_face_detecion )を真似て、Jupyter Lab(notebook) で 各モデルを確認した内容をまとめます。
使用したJupyter notebook は、Gistに上げました。全体は notebook をご覧ください。notebook の image_url の部分を変えれば他の画像でも試すことができます。
注: OpenVINO Toolkit 2022.1 から API の使い方が変わりました。 本記事の内容は notebook は OpenVINO Toolkit 2022 で動作します。(2022.9.26)
Jupyter Lab 環境の準備
本記事の 実行環境です。
- Python 3.9+
- OpenVINO Toolkit 2022.2
- Ubuntu 20.04.4 LTS on WSL2
- jupyterlab 3.4.2
以下の記事を参考に OpenVINO 用の kernel 環境を作成します。(すでに環境がある方は読み飛ばしてください。)
Jupyter Lab インストール
JupyterLab 環境 は 各notebook 共通で使いたいので --user オプションを付けて、ホームディレクトリ配下(~/.local/) にインストールします。
$ python3 -m pip install jupyterlab --user
ブラウザ連携
JupyterLab を起動してもブラウザが連動して起動しない場合、設定ファイルに c.NotebookApp.use_redirect_file = False を追加します。
$ jupyter lab --generate-config
設定ファイルに に下の項目を追加します。
$ vi ~/.jupyter/jupyter_lab_config.py
#  Disabling this setting to False will disable this behavior, allowing the
#  browser to launch by using a URL and visible token (as before).
#  Default: True
# c.ServerApp.use_redirect_file = True
c.ServerApp.use_redirect_file = False
JupyterLab がブラウザと連動して起動すれば OK です。
$ jupyter lab
OpenVINO インストール
公式サイトを参考に OpenVINO をインストールします。
$ mkdir openvino_2022.2
$ cd openvino_2022.2
$ python3 -m venv openvino_env
$ source openvino_env/bin/activate
(openvino_env) $ python -m pip install --upgrade pip
(openvino_env) $ pip install openvino-dev==2022.2
OpenVINO IR モデルのダウンロード
使用するモデルを model ディレクトリ配下に ダウンロードします。
(openvino_env) $ mkdir model
(openvino_env) $ omz_downloader --name age-gender-recognition-retail-0013 -o model
(openvino_env) $ omz_downloader --name head-pose-estimation-adas-0001 -o model
(openvino_env) $ omz_downloader --name emotions-recognition-retail-0003 -o model
(openvino_env) $ omz_downloader --name facial-landmarks-35-adas-0002 -o model
ダウンロードしたモデルを notebook で使いやすい場所にコピーします(任意)
(openvino_env) $ mkdir -p notebooks/face_detection_demo/model
(openvino_env) $ cd notebooks/face_detection_demo/
(openvino_env) $ cp model/intel/face-detection-adas-0001/FP16-INT8/face-detection-adas-0001.* ./model/
(openvino_env) $ cp model/intel/age-gender-recognition-retail-0013/FP16-INT8/age-gender-recognition-retail-0013.* ./model/
(openvino_env) $ cp model/intel/head-pose-estimation-adas-0001/FP16-INT8/head-pose-estimation-adas-0001.* ./model/
(openvino_env) $ cp model/intel/emotions-recognition-retail-0003/FP16-INT8/emotions-recognition-retail-0003.* ./model/
(openvino_env) $ cp model/intel/facial-landmarks-35-adas-0002/FP16-INT8/facial-landmarks-35-adas-0002.*  ./model/

(openvino_env) $ ls -1 model/
age-gender-recognition-retail-0013.bin
age-gender-recognition-retail-0013.xml
emotions-recognition-retail-0003.bin
emotions-recognition-retail-0003.xml
face-detection-adas-0001.bin
face-detection-adas-0001.xml
facial-landmarks-35-adas-0002.bin
facial-landmarks-35-adas-0002.xml
head-pose-estimation-adas-0001.bin
head-pose-estimation-adas-0001.xml
IPython Kernel のインストール
OpenVINO をインストールした 仮想環境(venv) で ipykernel をインストールします。
(openvino_env) $ pip install ipykernel
(openvino_env) $ ipython kernel install --user --name openvino_2022.2
(openvino_env) $ jupyter kernelspec list
Available kernels:
  openvino_2022.2    /home/ubuntu/.local/share/jupyter/kernels/openvino_2022.2
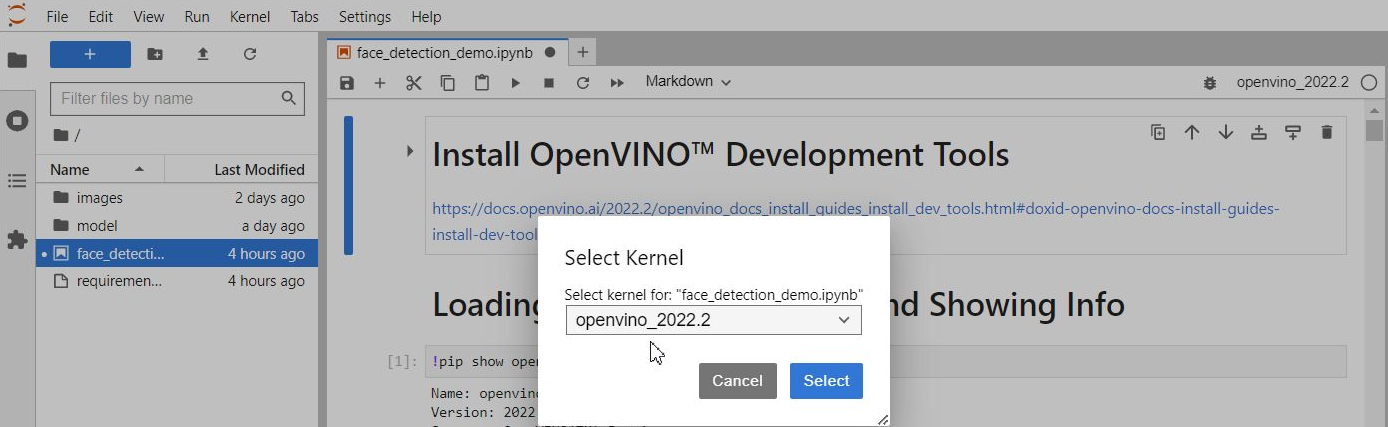
Jupyter Lab を起動して 作成した Kernel を選択します。
(openvino_env) $ jupyter lab
これで実行環境ができました。
使用モデル
使用モデルの一覧です。説明は Github 公式リポジトリ からの転記です。
Models
| model | input name: shape | output name: shape |
|---|---|---|
| face-detection-adas-0001 |
data: [1, 3, 384, 672] An input image in the format [BxCxHxW] Expected color order is BGR. |
detection_out:[1, 1, 200, 7] format: [image_id, label, conf, x_min, y_min, x_max, y_max] |
| age-gender-recognition-retail-0013 |
data: [1, 3, 62, 62] |
fc3_a: [1, 1, 1, 1] Estimated age divided by 100. prob: [1, 2, 1, 1] Softmax output across 2 type classes [female, male] |
| emotions-recognition-retail-0003 |
data: [1, 3, 64, 64] |
prob_emotion: [1, 5, 1, 1] Softmax output across five emotions ('neutral', 'happy', 'sad', 'surprise', 'anger'). |
| head-pose-estimation-adas-0001 |
data: [1, 3, 60, 60] |
(Inference Engine format) angle_y_fc: [1, 1] angle_p_fc: [1, 1] angle_r_fc: [1, 1] Supported ranges YAW [-90,90], PITCH [-70,70], ROLL [-70,70] |
| facial-landmarks-35-adas-0002 |
data shape:[1, 3, 60, 60] |
align_fc3: [1, 70] 70 floating point values for 35 landmarks' normed coordinates in the form (x0, y0, x1, y1, ..., x34, y34). |
顔検出・分析モデルの紹介
デモで使用されている顔検出・分析の実行結果を紹介します。
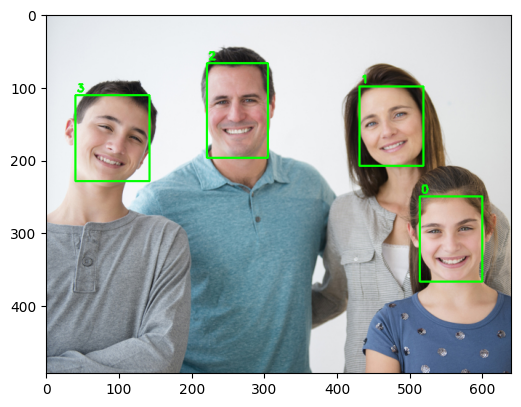
Face Detection
まずはベースとなる顔検出です。

以下は、Pythonで OpenVINOの 推論エンジン(Inference Engine) を使う時の処理の流れです。これは他のモデルも共通です。
- Load a Model
- Set up input and output
- Load an image
- Do inference
- Show result
1. Load a Model
OpenVINO のモデル(IR) を 読み込みます。
from openvino.runtime import Core

ie = Core()
model = ie.read_model(model="model/face-detection-adas-0001.xml")
compiled_model = ie.compile_model(model=model, device_name="CPU")
IR(intermediate representation)とは
Caffe*, TensorFlow* などの一般的なフレームワークで作成した学習済みモデルを OpenVINO の推論エンジン用にコンバートした「中間表現フォーマット」(xml,bin)です。

2. Set up input and output
モデルの Input / Output の情報を取得します。 使用モデル の表に記載した face-detection-adas-0001 の Input / Output と一致していることが分かります。
input_layer = compiled_model.inputs
output_layer = compiled_model.outputs
print(f"input_layer:{input_layer} \noutput_layer:{output_layer}")

# 出力
input_layer:[<ConstOutput: names[data] shape{1,3,384,672} type: f32>]
output_layer:[<ConstOutput: names[detection_out] shape{1,1,200,7} type: f32>]
3. Load an image
テストで使用する画像を読み込み、推論で使用する画像を input_layer の形に編集して input_image に格納します。
import cv2
import numpy as np
import matplotlib.pyplot as plt
import urllib.request
from PIL import Image
from io import BytesIO

# The model expects images in RGB format.

# Read Local Image
#image_org = cv2.cvtColor(cv2.imread(filename="images/main001.jpg"), code=cv2.COLOR_BGR2RGB)

# Read Image from web
image_url = "https://web.archive.org/web/20200702202608if_/https://www.how-old.net/Images/faces2/main001.jpg"

with urllib.request.urlopen(image_url) as response:
    image_org = response.read()
    image_org = np.array(Image.open(BytesIO(image_org)))

# Resize to display image shape
scale = 640 / image_org.shape[1]
image = cv2.resize(image_org, dsize=None, fx=scale, fy=scale)
image_h, image_w = image.shape[:2]
print(f"image_h:{image_h}, image_w:{image_w}")

# Resize to input image shape
n, c, h, w = input_layer[0].shape
input_image = cv2.resize(src=image, dsize=(w, h))

# Reshape to model input shape
n, c, h, w = input_layer[0].shape
input_image = input_image.transpose((2, 0, 1))
input_image = input_image.reshape((n, c, h, w))
print(f"input_image shape:{input_image.shape}")

plt.figure(figsize=(6, 6))
# テスト画像の表示
plt.imshow(image)
入力用画像を編集している部分の抜粋です。n, c, h ,w は、 それぞれ number of batch size, number of channels, image height, image width です。
# Resize to input image shape
n, c, h, w = input_layer[0].shape
input_image = cv2.resize(src=image, dsize=(w, h))

# Reshape to model input shape
n, c, h, w = input_layer[0].shape
input_image = input_image.transpose((2, 0, 1))
input_image = input_image.reshape((n, c, h, w))
オリジナルの画像 (大きいので表示用に 幅 640 にリサイズ)

4. Do inference
推論を実行します。結果が face-detection-adas-0001 の Output の形状になります。
result = compiled_model([input_image])[output_layer[0]]
result.shape

# 出力
(1, 1, 200, 7)
または、create_infer_request() でリクエストを作成し、infer メソッドを実行する方法もあります。これまでのOpenVINOに慣れている方はこちらの方が親しみやすいかもしれません。
request = compiled_model.create_infer_request()
request.infer(inputs={input_layer[0].any_name: input_image})
result = request.get_output_tensor(output_layer[0].index).data
result.shape

# 出力
(1, 1, 200, 7)
5. Show result
検出した結果を描画します。「顔」として検出する閾値を指定します。ここでは 0.5 としました。
# Get faces whose confidence is above 0.5
faces = result[0][0][np.where(result[0][0][:,2] > 0.5)]

image_copy = image.copy()
for i, face in enumerate(faces):
    box = face[3:7] * np.array([image_w, image_h, image_w, image_h])
    xmin, ymin, xmax, ymax = box.astype("int")
    cv2.rectangle(image_copy, (xmin, ymin), (xmax, ymax), (0, 255, 0), 2)
    cv2.putText(image_copy, str(i), (xmin + 2, ymin - 5), cv2.FONT_HERSHEY_SIMPLEX, 0.5, (0, 255, 0), 2)
plt.figure(figsize=(6, 6))
plt.imshow(image_copy)
faces # 4 x 7 ndarray
出力フォーマットは [image_id, label, conf, x_min, y_min, x_max, y_max] です。3列目の数値が「顔」の信頼度です。上で指定した 0.5 より大きい行が取得されます。(4つの顔が検出されたので4行)
# 出力
array([[0.        , 1.        , 0.99999523, 0.80398923, 0.50733805,
        0.9389928 , 0.74600077],
       [0.        , 1.        , 0.99998367, 0.67425656, 0.2024467 ,
        0.8111414 , 0.4219575 ],
       [0.        , 1.        , 0.9999738 , 0.34559003, 0.13728912,
        0.4768977 , 0.39996862],
       [0.        , 1.        , 0.9988494 , 0.06251555, 0.22709548,
        0.2223663 , 0.46526188]], dtype=float32)
検出した顔(faces)はさらに、Age/Gender, Emotions, Head pose , Facial landmark で使用します。アプリケーションで使う場合には、Face Detection で検出した顔ごとに各種分析を処理します。
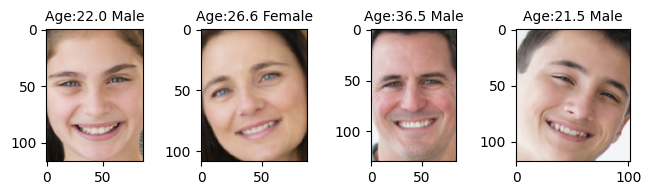
Age/Gender Recognition
このモデルの制限として、認識できる年齢の幅は 18 - 75 で、training set に子供は含んでいないとのこと。なので下の画像のお子様の年齢/性別はうまく判定されていません。また、大人でも年齢は6-7才若く予想されるように思います。
The network is able to recognize age of people in [18, 75] years old range, it is not applicable for children since their faces were not in the training set.
Age/Gender は アウトプットが複数あるので output_layers から prob (Gender), fc3_a (Age) を取得します。
# Age/Gender Recognition
plt.rcParams['figure.figsize'] = (12.0, 12.0)
label = ('Female', 'Male')

# 1. Loading a model
ie = Core()
model = ie.read_model(model="model/age-gender-recognition-retail-0013.xml")
compiled_model = ie.compile_model(model=model, device_name="CPU")

# 2. Set up input and output
input_layer = compiled_model.inputs
output_layers = compiled_model.outputs
prob = output_layers[0]  # Gender
fc3_a = output_layers[1] # Age
print(f"input_layer: {input_layer}")
print(f"output_layers: {output_layers}")
n, c, h, w = input_layer[0].shape

# 4. Do inference per detected faces
image_copy = image.copy()
for i, face in enumerate(faces):
    # Get a face's bbox
    box = face[3:7] * np.array([image_w, image_h, image_w, image_h])
    xmin, ymin, xmax, ymax = box.astype("int")
    face_box = image_copy[ymin:ymax, xmin:xmax]

    # Resize to input image shape
    input_image = cv2.resize(src=face_box, dsize=(w, h))

    # Reshape to model input shape
    input_image = input_image.transpose((2, 0, 1))
    input_image = input_image.reshape((n, c, h, w))
    result = compiled_model([input_image])

    # Get result
    gender = label[np.argmax(result[prob].squeeze())]
    age = result[fc3_a].squeeze() * 100

    # 5.Show Result
    ax = plt.subplot(6, 6, i + 1)
    ax.set_title(f"Age:{age:.1f} {gender}", fontsize=10)
    plt.imshow(face_box)

# 結果のサンプル表示
result[prob]
1つの顔につき、prob(ここでは性別)のアウトプットの形は [1, 2, 1, 1] です。左から2つ目の配列に Female, Male のパーセンテージが入っています。
# 出力
input_layer: [<ConstOutput: names[data] shape{1,3,62,62} type: f32>]
output_layers: [<ConstOutput: names[prob] shape{1,2,1,1} type: f32>, <ConstOutput: names[fc3_a, age_conv3] shape{1,1,1,1} type: f32>]
array([[[[0.10079922]],

        [[0.8992008 ]]]], dtype=float32)
出力ラベルから確率が最大値であるインデックスの値を取得すれば性別が判定できます。(上の例では、0.8992008 が大きいので2番目のラベル "Male" を得ます。)
# Age/Gender Recognition
label = ('Female', 'Male')
..
    # Get result
    gender = label[np.argmax(result[prob].squeeze())]
Emotion recognition
みんな happy ですが、他の表情も割と正確に判断してくれます。

Emotion では out_layers から prob_emotion の key を取得します。
# Emotion Recognition
plt.rcParams['figure.figsize'] = (12.0, 12.0)
label = ('neutral', 'happy', 'sad', 'surprise', 'anger')

# 1. Loading a model
ie = Core()
model = ie.read_model(model="model/emotions-recognition-retail-0003.xml")
compiled_model = ie.compile_model(model=model, device_name="CPU")

# 2. Set up input and output
input_layer = compiled_model.inputs
output_layer = compiled_model.outputs
prob_emotion = output_layer[0]  # Emotion
print(f"input_layer: {input_layer}")
print(f"output_layers: {output_layer}")
n, c, h, w = input_layer[0].shape

# 4. Do inference per detected faces
image_copy = image.copy()
for i, face in enumerate(faces):
    # Get a face's bbox
    box = face[3:7] * np.array([image_w, image_h, image_w, image_h])
    xmin, ymin, xmax, ymax = box.astype("int")
    face_box = image_copy[ymin:ymax, xmin:xmax]

    # Resize to input image shape
    input_image = cv2.resize(src=face_box, dsize=(w, h))

    # Reshape to model input shape
    input_image = input_image.transpose((2, 0, 1))
    input_image = input_image.reshape((n, c, h, w))
    result = compiled_model([input_image])
    # Get result
    emotion = label[np.argmax(result[prob_emotion].squeeze())]
    prob = np.max(result[prob_emotion].squeeze())
    # 5.Show Result
    ax = plt.subplot(6, 6, i + 1)
    ax.set_title(f"{emotion} {prob:.3f}", fontsize=10)
    plt.imshow(face_box)

# 結果のサンプル表示
result[prob_emotion]
ラベルは、順に ['neutral', 'happy', 'sad', 'surprise', 'anger'] です。
# 出力
input_layer: [<ConstOutput: names[data] shape{1,3,64,64} type: f32>]
output_layers: [<ConstOutput: names[prob_emotion] shape{1,5,1,1} type: f32>]
array([[[[7.6009257e-04]],

        [[9.8927796e-01]],

        [[9.2245573e-03]],

        [[4.9673329e-04]],

        [[2.4072983e-04]]]], dtype=float32)
同様に 最大値のラベル "happy" を得ます。
# Emotion Recognition
label = ('neutral', 'happy', 'sad', 'surprise', 'anger')
..
    # Get result
    emotion = label[np.argmax(result[prob_emotion].squeeze())]
..
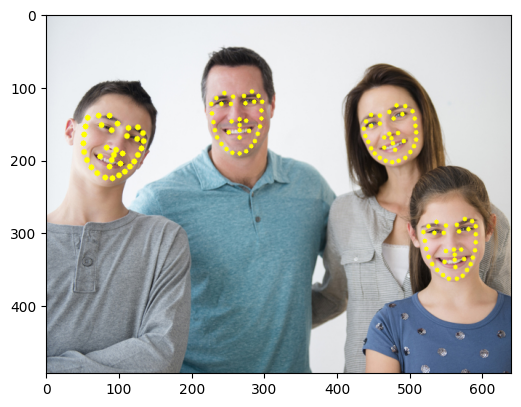
Facial Landmarks Recognission
目を閉じたのが分かれば、居眠り判定に使えそうですが検出点が足りず変化なしでした。
Facial Landmarks では out_layers から align_fc3 の key を取得します。
# Facial Landmark Detection
plt.rcParams['figure.figsize'] = (12.0, 12.0)

# 1. Loading a model
ie = Core()
model = ie.read_model(model="model/facial-landmarks-35-adas-0002.xml")
compiled_model = ie.compile_model(model=model, device_name="CPU")

# 2. Set up input and output
input_layer = compiled_model.inputs
output_layer = compiled_model.outputs
align_fc3 = output_layer[0]
print(f"input_layer: {input_layer}")
print(f"output_layers: {output_layer}")
n, c, h, w = input_layer[0].shape

# 4. Do inference per detected faces
image_copy = image.copy()
for i, face in enumerate(faces):
    # Get a face's bbox
    box = face[3:7] * np.array([image_w, image_h, image_w, image_h])
    xmin, ymin, xmax, ymax = box.astype("int")
    face_box = image_copy[ymin:ymax, xmin:xmax]

    # Resize to input image shape
    input_image = cv2.resize(src=face_box, dsize=(w, h))

    # Reshape to model input shape
    input_image = input_image.transpose((2, 0, 1))
    input_image = input_image.reshape((n, c, h, w))
    result = compiled_model([input_image])
    # Get result
    normed_landmarks = result[align_fc3][0]
    for i in range(int(normed_landmarks.size / 2)):
        normed_x = normed_landmarks[2 * i]
        normed_y = normed_landmarks[2 * i + 1]
        x_lm = xmin + face_box.shape[1] * normed_x
        y_lm = ymin + face_box.shape[0] * normed_y
        cv2.circle(image_copy, (int(x_lm), int(y_lm)), 1 + int(0.03 * face_box.shape[1]), (255, 255, 0), -1)
plt.figure(figsize=(6, 6))
plt.imshow(image_copy)

# 結果のサンプル表示
normed_landmarks
(x0, y0, x1, y1, ..., x34, y34)というように 顔の特徴を表す35コの座標 (x, y) が返ってきます。値は 0 - 1 の範囲で正規化されています。
# 出力
input_layer: [<ConstOutput: names[data] shape{1,3,60,60} type: f32>]
output_layers: [<ConstOutput: names[align_fc3] shape{1,70} type: f32>]
array([0.49837413, 0.41047296, 0.36257276, 0.34958667, 0.70422363,
       0.48217914, 0.834005  , 0.5128435 , 0.5579182 , 0.6440658 ,
       0.5255064 , 0.69698477, 0.42582867, 0.617353  , 0.6377679 ,
       0.68521684, 0.33553782, 0.7179825 , 0.6139445 , 0.80498374,
       0.49841082, 0.7586072 , 0.46541312, 0.8307827 , 0.32270467,
       0.23877385, 0.4651159 , 0.23925284, 0.57116073, 0.33383122,
       0.72153795, 0.38806415, 0.8437623 , 0.37874615, 0.92126715,
       0.44557714, 0.17030177, 0.2658799 , 0.13871746, 0.3664346 ,
       0.11845756, 0.4654323 , 0.1095866 , 0.5648068 , 0.11987923,
       0.66276616, 0.15920092, 0.75712526, 0.22095738, 0.84140813,
       0.29810706, 0.91506535, 0.4066825 , 0.96512216, 0.50735074,
       0.96622384, 0.5943423 , 0.9334938 , 0.6735205 , 0.89078903,
       0.74336547, 0.8371857 , 0.8018566 , 0.77167094, 0.85100955,
       0.69887215, 0.8928467 , 0.621648  , 0.9298038 , 0.53473717],
      dtype=float32)
この結果に 検出した顔フレームの width, height を掛けて、さらに顔フレームの左上(xmin, ymin)の位置をそれぞれ足すことでフレーム全体における点の座標(x,y)を取得することができます。
# 処理部分の抜粋
    # Get result
    normed_landmarks = result[align_fc3][0]
    for i in range(int(normed_landmarks.size / 2)):
        normed_x = normed_landmarks[2 * i]
        normed_y = normed_landmarks[2 * i + 1]
        x_lm = xmin + face_box.shape[1] * normed_x
        y_lm = ymin + face_box.shape[0] * normed_y
        cv2.circle(image_copy, (int(x_lm), int(y_lm)), 1 + int(0.03 * face_box.shape[1]), (255, 255, 0), -1)
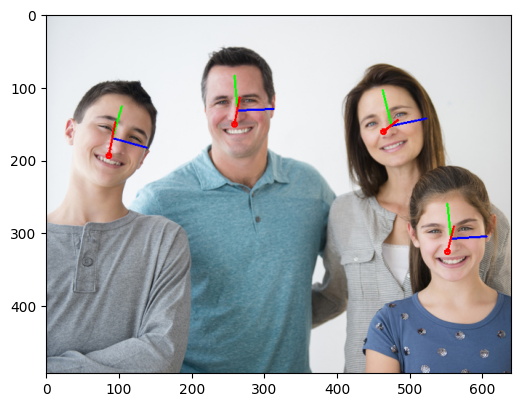
Head Pose Estimation
頭の向きを3Dの軸で描画します。Raspberry Pi を利用すれば、わき見運転検知に使えるでしょうか。
Head Post Estimation は苦労しました。モデルのOutputから最終的な描画までの過程が難解だったためです。結局は理解できていないので詳しい説明はできないのですが、ポイントをいくつか記載します。(お手本のC++ の処理をそのままpythonで書いたつもりですが間違いがあるかもしれません。)
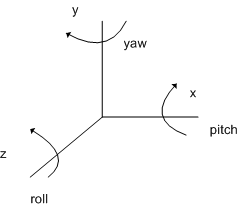
- Outputs は、yaw, pitch, roll(軸に対する角度)で、yaw(首の左右の動き), pitch(上下の動き), roll(首をかしげる動き)に相当します。この角度に対応する軸(X, Y ,Z)にどれが対応するのか分からず混乱しましたが、お手本のプログラムと描画結果を合わせると以下の図のイメージになると思います。
- 回転行列(Rotation matrix) の積を求める際は順番が重要 (Rz, Ry, Rxの順)です。
- 回転行列積(R)の計算では numpy と opencv で行列積の求め方の違いに嵌まりました。C++ と Python の違いについては、以下を参考にしました。
# 回転行列も求める部分の抜粋
def draw_axes(image, face_center, yaw, pitch, roll, scale, focal_length):
    yaw   *= np.pi / 180.0
    pitch *= np.pi / 180.0
    roll  *= np.pi / 180.0

    cx = int(face_center[0])
    cy = int(face_center[1])
    Rx = np.array([[1,                0,                                0],
                   [0,                math.cos(pitch),   -math.sin(pitch)],
                   [0,                math.sin(pitch),    math.cos(pitch)]])
    Ry = np.array([[math.cos(yaw),    0,                   -math.sin(yaw)],
                   [0,                1,                                0],
                   [math.sin(yaw),    0,                    math.cos(yaw)]])
    Rz = np.array([[math.cos(roll),   -math.sin(roll),                  0],
                   [math.sin(roll),   math.cos(roll),                   0],
                   [0,                0,                                1]])

    R = Rz @ Ry @ Rx
...
Head Pose Estimation では out_layers から fc_r(roll), fc_p(pitch), fc_y(yaw) の key を取得します。
# Head Pose Estimation
plt.rcParams['figure.figsize'] = (12.0, 12.0)

# 1. Loading a model
ie = Core()
model = ie.read_model(model="model/head-pose-estimation-adas-0001.xml")
compiled_model = ie.compile_model(model=model, device_name="CPU")

# 2. Set up input and output
input_layer = compiled_model.inputs
output_layers = compiled_model.outputs
fc_r = output_layers[0] # roll:  Axis of rotation: z
fc_p = output_layers[1] # pitch: Axis of rotation: x
fc_y = output_layers[2] # yaw:   Axis of rotation: y
print(f"input_layer: {input_layer}")
print(f"output_layers: {output_layers}")
n, c, h, w = input_layer[0].shape

# 4. Do inference per detected faces
scale = 50
focal_length = 950.0
image_copy = image.copy()

for i, face in enumerate(faces):
    # Get a face's bbox
    box = face[3:7] * np.array([image_w, image_h, image_w, image_h])
    xmin, ymin, xmax, ymax = box.astype("int")
    face_box = image_copy[ymin:ymax, xmin:xmax]

    # Resize to input image shape
    input_image = cv2.resize(src=face_box, dsize=(w, h))

    # Reshape to model input shape
    input_image = input_image.transpose((2, 0, 1))
    input_image = input_image.reshape((n, c, h, w))
    result = compiled_model([input_image])

    # Each output contains one float value that represents value in Tait-Bryan angles (yaw, pitсh or roll).
    yaw = result[fc_y][0]
    pitch = result[fc_p][0]
    roll = result[fc_r][0]
    #print(f"yaw:{yaw}, pitch:{pitch}, roll:{roll}")
    face_center = (xmin + face_box.shape[1] / 2, ymin + face_box.shape[0] / 2, 0)
    image_copy = draw_axes(image_copy, face_center, yaw, pitch, roll, scale, focal_length)

plt.figure(figsize=(6, 6))
plt.imshow(image_copy)
Pythonでの実装
前置きが長くなりました。以上を踏まえ Jupyter notebook で各モデルを確認しつつ最終的にできたのがこれです。WebUIでボタンで各モデルを切り替えるようにしています。
まとめ・感想
顔検出・分析デモについて一応理解できたと思います。汎用的なモデルですが、アイデア次第で安全運転支援や表情によるイベント操作など何かに利用できるような気がします。
また、Pythonでの実装にあたり推論モデル毎にデバイス指定ができること、推論結果を用いてさらに推論させる方法が分かりました。
次はこの仕組みを利用してドローン(Tello) のストリーミングキャプチャで顔検出・分析をやってみます。