はじめに
OpenVINO Toolkit R5 から NCS2(Neural Compute Stick2) でも Raspberry Piがサポートされました。
Windows10 用に NCS2 を買ったものの、CPUの方がパフォーマンスが良いという残念な結果だったので、今回の Raspberry Pi (ARM )サポートによって NCS2の使い道ができました。Thank you so much , Intel さん
Release Note
https://software.intel.com/en-us/openvino-toolkit
Supports Raspberry Pi* hardware as a host for the Intel Movidius Neural Compute Stick 2 (preview).
OpenVINO や NCS2 については以下の投稿を参考にさせていただきました。
-
AIを始めよう!OpenVINOで使うモデルを整備するAIを始めよう!OpenVINOのインストールからデモの実行まで[R4対応]
https://qiita.com/ammo0613/items/a9bb3b7f20dc02a8d758#_reference-e24e4f15efa6a002463e -
LattePanda Alpha 864 (OS付属無し) にUbuntu16.04+OpenVINOを導入してNeural Compute Stick(NCS1) と Neural Compute Stick 2(NCS2) で爆速Semantic Segmentationを楽しむ
https://qiita.com/PINTO/items/5ac8f4395e190d06cfab
Installation Steps
NCS2を使うための Raspberry Pi でのセットアップは 非常に簡単です。インストールガイドに従ってインストールします。
Install the Intel® Distribution of OpenVINO™ Toolkit for Raspbian* OS
https://software.intel.com/en-us/articles/OpenVINO-Install-Raspberrypi
Raspbian* 9 OS (Stretch) 以降のサポートとなります。
This guide applies to 32-bit Raspbian* 9 OS, which is an official OS for Raspberry Pi* boards.
Environment
- Raspberry Pi 3B
- Raspbian Stretch with desktop (2018-11-13-raspbian-stretch)
- OpenVINO Toolkit 2018 R5 (l_openvino_toolkit_ie_p_2018.5.445.tgz)
cmake は個別でインストールする必要がありましたが、OpenCV など 必要ライブラリはパッケージに含まれているので "setupvars.sh" を実行して環境変数をセットするのみです。
$ source inference_engine_vpu_arm/bin/setupvars.sh
[setupvars.sh] OpenVINO environment initialized
$ python3
Python 3.5.3 (default, Sep 27 2018, 17:25:39)
[GCC 6.3.0 20170516] on linux
Type "help", "copyright", "credits" or "license" for more information.
>>> import cv2
>>> cv2.__version__
'4.0.1-openvino'
サンプルコードを試す
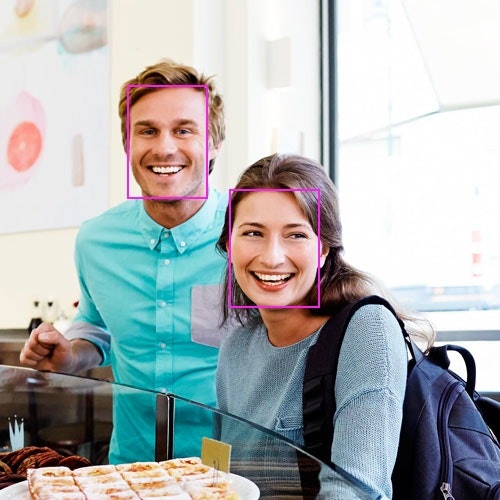
物体検出のサンプル(顔検出)で動作を確認します。
Build and Run Object Detection Sample
$ cd ~/inference_engine_vpu_arm/deployment_tools/inference_engine/samples
$ mkdir build && cd build
$ cmake .. -DCMAKE_BUILD_TYPE=Release -DCMAKE_CXX_FLAGS="-march=armv7-a"
$ make -j2 object_detection_sample_ssd
$ cd ~/inference_engine_vpu_arm/deployment_tools/inference_engine/samples/build
$ file  ./armv7l/Release/object_detection_sample_ssd
./armv7l/Release/object_detection_sample_ssd: ELF 32-bit LSB executable, ARM, EABI5 version 1 (GNU/Linux), dynamically linked, interpreter /lib/ld-linux-armhf.so.3
トレーニング済みの顔検出モデルをダウンロード
$ wget --no-check-certificate https://download.01.org/openvinotoolkit/2018_R4/open_model_zoo/face-detection-adas-0001/FP16/face-detection-adas-0001.bin
$ wget --no-check-certificate https://download.01.org/openvinotoolkit/2018_R4/open_model_zoo/face-detection-adas-0001/FP16/face-detection-adas-0001.xml
-d オプションに MYRIAD を指定して サンプルを実行
$ cd ~/inference_engine_vpu_arm/deployment_tools/inference_engine/samples/build
$ wget https://www.how-old.net/Images/faces2/main007.jpg
$ ./armv7l/Release/object_detection_sample_ssd -m face-detection-adas-0001.xml -d MYRIAD -i main007.jpg
[ INFO ] InferenceEngine:
        API version ............ 1.4
        Build .................. 19154
Parsing input parameters
[ INFO ] Files were added: 1
[ INFO ]     /home/pi/main007.jpg
[ INFO ] Loading plugin

        API version ............ 1.5
        Build .................. 19154
        Description ....... myriadPlugin
[ INFO ] Loading network files:
        face-detection-adas-0001.xml
        face-detection-adas-0001.bin
.
.
[ INFO ] Image out_0.bmp created!

total inference time: 156.057
Average running time of one iteration: 156.057 ms

Throughput: 6.4079 FPS

[ INFO ] Execution successful
- Output画像 (out_0.bmp)
Python のサンプルコードを試す
次にOpenVINOに付属のPythonのサンプルコードで 物体検出のデモを試します。
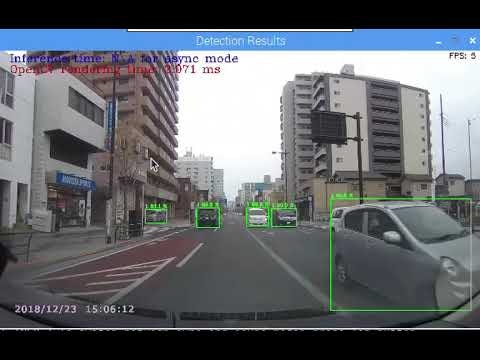
object_detection_demo_ssd_async
ドライブレコーダーの映像で車の検出をテストしました。
$ cd /home/pi/inference_engine_vpu_arm/deployment_tools/inference_engine/samples/python_samples
$ wget --no-check-certificate https://download.01.org/openvinotoolkit/2018_R4/open_model_zoo/vehicle-detection-adas-0002/FP16/vehicle-detection-adas-0002.bin
$ wget --no-check-certificate https://download.01.org/openvinotoolkit/2018_R4/open_model_zoo/vehicle-detection-adas-0002/FP16/vehicle-detection-adas-0002.xml
$ python3 object_detection_demo_ssd_async.py -i <cam>|<video file> -d MYRIAD -m ./vehicle-detection-adas-0002.xml
画面右上の "FPS" がフレームレートです。非同期モードでも 5 ~ 6 FPS なので遅いです。ちなみに、Windows10 PC(Core i7-6500U) だと 23 ~ 26 FPS でした。
同期モードへの切り替え時にスクリプトが終了してしまう場合
サンプルコードでは、Tab キーで 同期 / 非同期モードを切り替えることができますが、同期モードへ切り替え時にプロセスが強制終了してしまいます。理由はよく分からないのですが、CURRENTリスエストの完了を待たずに同じ cur_request_id で リクエストを投げ他タイミングで止まっているようでした。リクエスト(exec_net.start_async)を投げる前に、cur_request_id の処理完了チェックを追加することで回避できると思います。
修正箇所(##):
        if is_async_mode:
            in_frame = cv2.resize(next_frame, (w, h))
            in_frame = in_frame.transpose((2, 0, 1))  # Change data layout from HWC to CHW
            in_frame = in_frame.reshape((n, c, h, w))
            exec_net.start_async(request_id=next_request_id, inputs={input_blob: in_frame})
        else:
            in_frame = cv2.resize(frame, (w, h))
            in_frame = in_frame.transpose((2, 0, 1))  # Change data layout from HWC to CHW
            in_frame = in_frame.reshape((n, c, h, w))
            ## start async request if CURRENT request has been completed.
            if exec_net.requests[cur_request_id].wait(-1) == 0: ## insert this line
                exec_net.start_async(request_id=cur_request_id, inputs={input_blob: in_frame})
        if exec_net.requests[cur_request_id].wait(-1) == 0:
            inf_end = time.time()
            det_time = inf_end - inf_start
classification_sample
公式ドキュメントのclassification のサンプルを試します。
https://software.intel.com/en-us/articles/run-intel-openvino-models-on-intel-neural-compute-stick-2
上記サイトの例では、結果がClass IDで表示されるため、以下のフォーラムの情報を参考に googlenet-v1 モデルを使いました。ラベルは http://dl.caffe.berkeleyvision.org/caffe_ilsvrc12.tar.gz をダウンロードして、その中にある synset_words.txt を googlenet-v1.labels にRename したものです。
参考:classification_sample labels file
https://software.intel.com/en-us/forums/computer-vision/topic/796906
※ NCS2(MYRIAD plugin) 用の IR は、別の環境 (Windows10 OpenVINO Tool Kit R4) 上で用意しました。
> cd c:\Intel\computer_vision_sdk\deployment_tools\model_downloader
> python downloader.py --name googlenet-v1
> cd c:\Intel\computer_vision_sdk\deployment_tools\model_downloader\classification\googlenet\v1\caffe
> python C:\Intel\computer_vision_sdk\deployment_tools\model_optimizer\mo.py --data_type FP16 --input_model googlenet-v1.caffemodel --input_proto googlenet-v1.prototxt
> dir C:\Intel\computer_vision_sdk_2018.4.420\deployment_tools\model_downloader\classification\googlenet\v1\caffe
2018/12/17  20:15    <DIR>          .
2018/12/17  20:15    <DIR>          ..
2018/12/21  23:05        13,997,104 googlenet-v1.bin
2018/12/21  23:04        53,533,754 googlenet-v1.caffemodel
2014/04/09  06:47            31,675 googlenet-v1.labels
2018/12/21  23:05            22,452 googlenet-v1.mapping
2018/12/21  23:04            38,018 googlenet-v1.prototxt
2018/12/21  23:05            84,894 googlenet-v1.xml
-
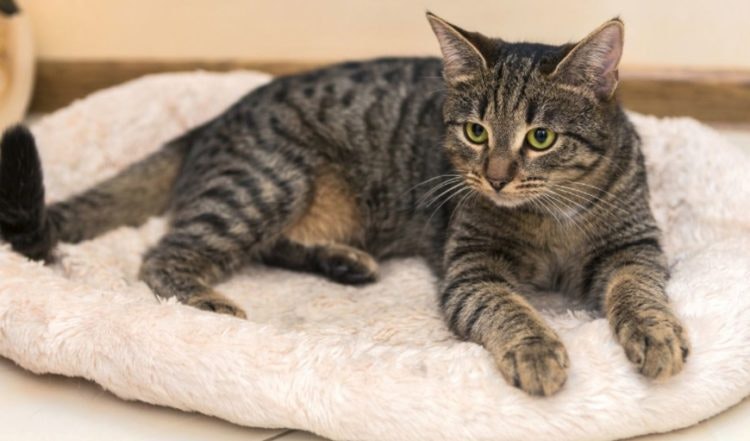
Input image (Mackerel-tabby-750x441.jpg)
-
sample 実行
$ cd ~/inference_engine_vpu_arm/deployment_tools/inference_engine/samples/python_samples
$ wget https://vignette.wikia.nocookie.net/all-new-animals/images/0/04/Mackerel-tabby-750x441.jpg
$ python3 classification_sample.py -m classification/googlenet/v1/caffe/FP16/googlenet-v1.xml -i Mackerel-tabby-750x441.jpg -d MYRIAD --labels classification/googlenet/v1/caffe/FP16/googlenet-v1.labels
- Output
tabby cat のラベルが確認できました。
[ INFO ] Loading network files:
        classification/googlenet/v1/caffe/FP16/googlenet-v1.xml
        classification/googlenet/v1/caffe/FP16/googlenet-v1.bin
[ INFO ] Preparing input blobs
[ WARNING ] Image Mackerel-tabby-750x441.jpg is resized from (441, 750) to (224, 224)
[ INFO ] Batch size is 1
[ INFO ] Loading model to the plugin
[ INFO ] Starting inference (1 iterations)
[ INFO ] Average running time of one iteration: 44.434547424316406 ms
[ INFO ] Processing output blob
[ INFO ] Top 10 results:
Image Mackerel-tabby-750x441.jpg

0.4746094 label tabby, tabby cat
0.2138672 label Egyptian cat
0.2073975 label tiger cat
0.0484924 label lynx, catamount
0.0054474 label remote control, remote
0.0034828 label carton
0.0033722 label paper towel
0.0027084 label Persian cat
0.0022774 label quilt, comforter, comfort, puff
0.0022163 label mouse, computer mouse
まとめ(感想)
NCS2 は Raspberry Pi で問題なく動作しました。(勢いで買ってしまったNCS2が無駄にならなくてよかった。。)
私のようなディープラーニング初心者でも、OpenVINO を使ってトレーニング済みモデルの推論を簡単に試すことができたのは正直感動でした。
次回 Deep Learning on NCS2 with Raspberry Pi (2) は MobileNet-SSD で複数のクラスのリアルタイムの物体検出をやってみたいと思います。