はじめに
この記事は2020年6月18日にIoTLTでプレゼンしたシステムの一部抜粋記事です。
システムの技術要素ごとに3つに分けて書きます。
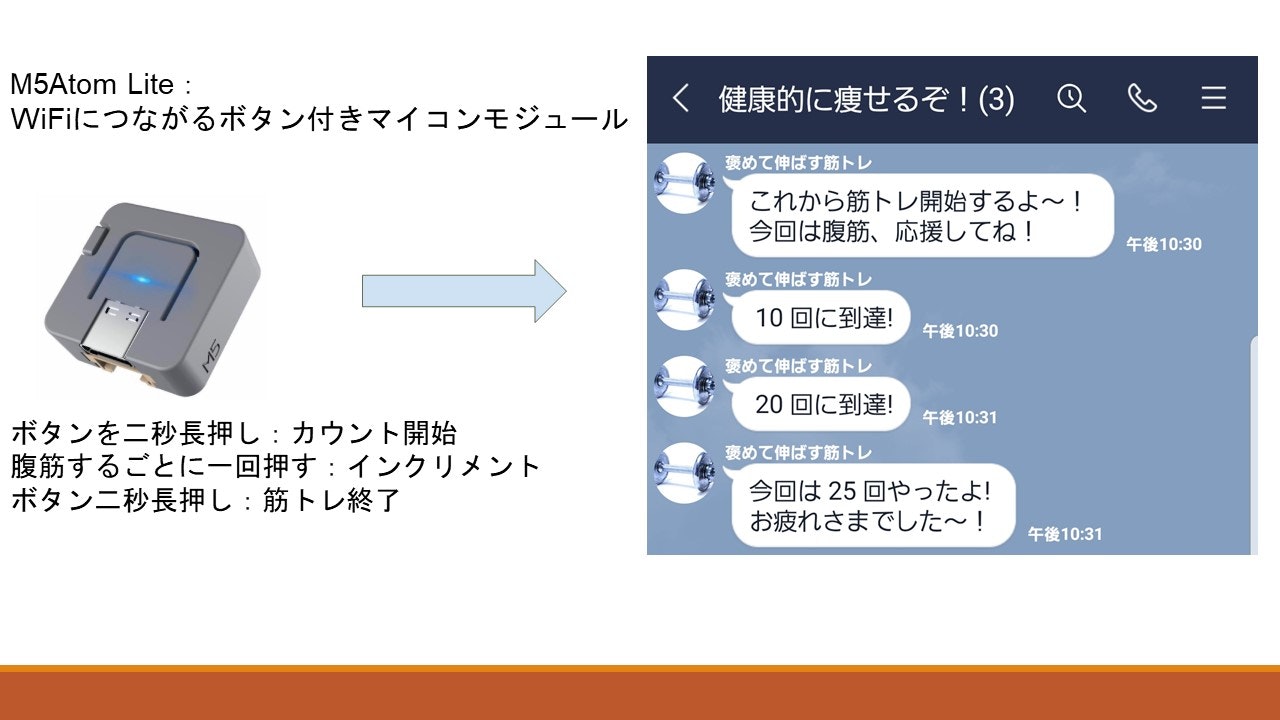
こちらがその時のプレゼンスライドです。(記事書くのに時間かかってしまいました(-_-;))
https://speakerdeck.com/maepu/yuan-ge-dejia-nijin-torewoying-yuan-sitemorau
概要
最近、ストレスのせいか暴飲暴食で太ってしまいました。そこで痩せたいと思い、筋トレを始めました。しかし長続きせずということで、嫁に応援してもらおうと思いました。
しかしながら、嫁は里帰り出産のため沖縄に...。
ということで、遠隔で嫁が筋トレを応援してくれるシステムを作ってみました!
こちらがのデモです。
https://www.youtube.com/watch?v=ufq9XtmmxMs
レシピ
開発環境
- M5Atom Lite
- Arduino IDE ver1.8.12
- Node-RED ver1.0.4
- Node.js v10.15.3
システム構成
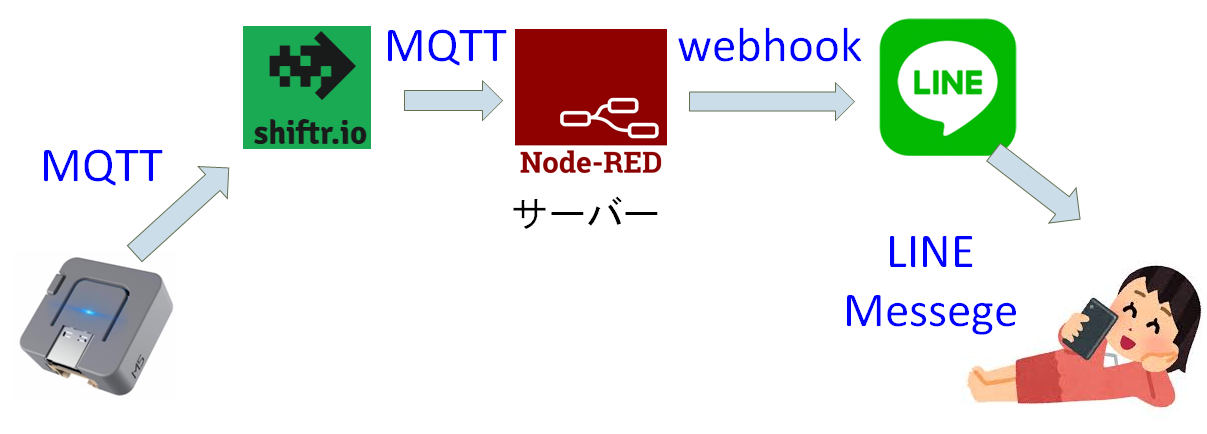
システム構成は次のようになっています。M5Atomのボタンを押したイベントが発生すると、MQTT通信でNode-REDにデータが送られます。MQTT通信をしている間に「Shiftr.io」というものがあります。これはMQTT通信を管理するサーバーです。無料で理想することができます。
MQTTで送られてきたデータは、Node-REDで作成したフローによりMQTT通信のメッセージからLINE Messageに変換していてます。
LINE botは使用したいグループLINEに招待して使います。筋トレが開始された時と、10回ごと、終了時にメッセージを送ります。
M5Atom Lite
M5Atom Liteの主な処理は、ボタンのイベントに応じて、データの送信とカウントアップ等を行っています。動作しているプログラムは次の通りです。
# include "M5Atom.h"
# include <WiFi.h>
# include <PubSubClient.h> // MQTTのライブラリ

WiFiClient client;
PubSubClient mqttClient(client);

// Wi-Fi定義
char *ssid = "SSID";            // Wi-FiのSSID
char *password = "PASS";        // Wi-Fiのパスワード

// MQTT ブローカの設定定義
const char *endpoint = "broker.shiftr.io";    shiftr.ioを利用する場合
const int port = 1883;          // MQTT のポート番号
char *deviceID = "M5Atom";      // デバイスID
char *userName = "認証名";              // MQTTブローカ認証ユーザ名
char *userPass = "認証パスワード";      // MQTTブローカ認証パスワード
char *pubTopic1 = "/start";          // メッセージを知らせるトピック
char *pubTopic2 = "/end";          // メッセージを知らせるトピック
char *pubTopic3 = "/count";          // メッセージを知らせるトピック
char *subTopic = "/sub";          // メッセージを待つトピック

typedef enum {
  AIDLE = 0,
  SUB_AIDLE,
  RUN,
  SUB_RUN,
}STATE;

char pubMessage[128];

uint8_t DisBuff[2 + 5 * 5 * 3];

char main_state = AIDLE;
unsigned int count = 0;

void setBuff(uint8_t Rdata, uint8_t Gdata, uint8_t Bdata)
{
    DisBuff[0] = 0x05;
    DisBuff[1] = 0x05;
    for (int i = 0; i < 25; i++)
    {
        DisBuff[2 + i * 3 + 0] = Rdata;
        DisBuff[2 + i * 3 + 1] = Gdata;
        DisBuff[2 + i * 3 + 2] = Bdata;
    }
}

// MQTTの接続チェック
void mqttLoop() {
    if (!mqttClient.connected()) {
        connectMQTT();
    }
    mqttClient.loop();
}

// MQTT接続時の処理
void connectMQTT() {
  mqttClient.setServer(endpoint, port);
  mqttClient.setCallback(mqttCallback);
  while (!mqttClient.connected()) {
      if (mqttClient.connect(deviceID,userName,userPass)) {
          Serial.println("MQTT Connected.");
          int qos = 0;
          mqttClient.subscribe(subTopic, qos);
          Serial.println("Subscribed.");
      } else {
          Serial.print("Failed. Error state=");
          Serial.print(mqttClient.state());
          // Wait 5 seconds before retrying
          delay(5000);
      }
  }
}

void setup()
{
    main_state = AIDLE;
    count = 0;

    M5.begin(true, false, true);
    Serial.begin(115200);

    delay(10);
    setBuff(0x00, 0x00, 0x40);
    M5.dis.displaybuff(DisBuff);

    // Wi-Fi設定
    WiFi.begin(ssid, password);  //  Wi-Fi APに接続
    while (WiFi.status() != WL_CONNECTED) {  //  Wi-Fi AP接続待ち
        delay(500);
        Serial.print(".");
    }
    Serial.print("WiFi connected\r\nIP address: ");
    Serial.println(WiFi.localIP());

    // connect MQTT
    mqttClient.setServer(endpoint, port);
    mqttClient.setCallback(mqttCallback);
    connectMQTT();
    Serial.println("MQTT connected");

    Serial.println("Start my program");
}

void loop()
{
    // ステートマシン
    // ボタンを2秒長押ししたとき
    if(M5.Btn.pressedFor(2000)){
     // Serial.println("Button press");
      switch(main_state){
        case AIDLE :
          main_state = SUB_AIDLE;
          Serial.println("Change to SUB_AIDLE");
          break;
         case RUN :
          main_state = SUB_RUN;
          Serial.println("Change to SUB_AIDLE");
          break;
      }
    }
    // ボタンを離したとき
    else if(M5.Btn.wasReleased()){
      switch(main_state){
        case SUB_AIDLE :
          main_state = RUN;
          setBuff(0x00, 0x40, 0x00);
          Serial.println("Change to RUN");
          // MQTT 送信
          sprintf(pubMessage, "start");
          mqttClient.publish(pubTopic1, pubMessage);
          break;
        case RUN :
          count++;
          if((count%10 == 0) && (count > 0)){
            sprintf(pubMessage, "%d",count);
            mqttClient.publish(pubTopic3, pubMessage);
          }
          Serial.printf("count = %d\n",count);
          break;
        case SUB_RUN :
          main_state = AIDLE;
          setBuff(0x00, 0x00, 0x40);
          Serial.println("Change to AIDLE");

          // MQTT 送信
          sprintf(pubMessage, "%d", count);
          mqttClient.publish(pubTopic2, pubMessage);

          count = 0;
          break;
      }
    }

    mqttLoop();

    M5.dis.displaybuff(DisBuff);
    delay(50);
    M5.update();
}

// MQTTで何かメッセージを受け取った場合(今回は未使用)
void mqttCallback (char* topic, byte* payload, unsigned int length) {
    String str = "";

    Serial.print("Received. topic=");
    Serial.println(topic);
    for (int i = 0; i < length; i++) {
        Serial.print((char)payload[i]);
        str += (char)payload[i];
    }
    Serial.print("\n");
    Serial.println("recive message");
}
ソースコードから一部抜粋します。
次の行では、「ボタンを2秒長押しした」のイベント処理です。2秒長押しすると1度この処理に入ります。ここで、筋トレの開始と終了処理をしています。
if(M5.Btn.pressedFor(2000)){
次の行では、「ボタンを離した」のイベントです。ボタンを離したときに1度この処理を行います。ここでカウント処理をしています。
else if(M5.Btn.wasReleased()){
次回
Node-REDの説明をしてきます!

