概要
Aidemy アドベントカレンダー17日目担当の @km42428 です。
今回は、Dockerで簡易版Aidemyをつくってみようシリーズのその3です。
前回はフロントエンドを作成したので、今回はバックエンドを作成します。
ちなみに、前回までのリンクは以下です。
Dockerで簡易版Aidemyをつくってみよう (その1) ~全体構成とDockerのセットアップ~
https://qiita.com/km42428/items/4e4653aa0e813282986b
Dockerで簡易版Aidemyをつくってみよう (その2) ~React.jsによるフロントエンド~
https://qiita.com/km42428/items/989dac5e7450501c452d
今回の目標
今回はエクササイズデータを渡すAPIを作成し、その2で作成したWebページから呼び出して値を表示して見ましょう。
そして、前回同様 docker-compose コマンドを利用し、フロントエンド・バックエンドを一発で起動できるようにするのが目標です。
バックエンドはNode.jsのバックエンドライブラリである Express を使います。
ソースは以下に公開しています。
https://github.com/km42428/aidemy-simple-pack/tree/backend
今回の記事は backend ブランチで動作しています。
masterブランチは適宜更新しているので、この記事と同じ動作をさせたい場合は、
以下のコマンドを入力してください。
※自分の作業ブランチは適宜書き換えてください。
# クローン
$ git clone https://github.com/km42428/aidemy-simple-pack.git

# リモートのfrontendブランチにチェックアウト
$ git fetch && git checkout origin/backend

# ローカルの自分の作業ブランチにチェックアウト
$ git checkout -b {自分の作業ブランチ}
APIの構成
APIは以下のような構成を考えます。
| メソッド | パス | 内容 |
|---|---|---|
| GET | / | 生存確認 ({}を返すのみ) |
| GET | /exercises | エクササイズ全てを取得する |
| GET | /exercises/:exerciseId | 特定の一つのエクササイズを取得する |
事前準備
バックエンドの挙動をローカルで確認するには、
node と npm を事前にインストールする必要があります。
インストール手順については、前の記事にまとめているのでそちらをご覧ください。
https://qiita.com/km42428/items/989dac5e7450501c452d#%E4%BA%8B%E5%89%8D%E6%BA%96%E5%82%99
※ 今回の最終目的もDockerを使って環境開発不要で起動することです。
なので、環境開発なんてしたくないやいっ!という方は、
ソースをcloneした上で、Dockerによる操作からお読みください。
ローカルのでの開発
バックエンドフォルダを作成・移動
前回記事のフロントエンドと合わせて挙動を確認したい場合は、
前回のaidemy-frontend フォルダと同じ階層で作業してください。
バックエンドのフォルダ名は aidemy-backend とします。
mkdir aidemy-backend && cd $_
後ろの cd $_ で作成したフォルダに移動できます。
npm の有効化を行う
以下のコマンドで npm コマンドの初期化を行います。
npm init
以下のような設問が出てきますが、全てEnterでOKです
This utility will walk you through creating a package.json file.
It only covers the most common items, and tries to guess sensible defaults.

See `npm help json` for definitive documentation on these fields
and exactly what they do.

Use `npm install <pkg>` afterwards to install a package and
save it as a dependency in the package.json file.

Press ^C at any time to quit.
package name: (aidemy-backend)
version: (1.0.0)
description:
entry point: (index.js)
test command:
git repository:
keywords:
author:
license: (ISC)
About to write to /Users/XXXXXXXX/aidemy-simple-pack/aidemy-backend/package.json:

{
  "name": "aidemy-backend",
  "version": "1.0.0",
  "description": "",
  "main": "index.js",
  "scripts": {
    "test": "echo \"Error: no test specified\" && exit 1"
  },
  "author": "",
  "license": "ISC"
}


Is this ok? (yes)
実行が終わると、
package.jsonが生成されています
.gitignore の作成
npm init が終わると、 node_modules というフォルダが作成されます。
こちらはnpmで用いるモジュール等が大量に入っています。
モジュールの情報は package.jsonのdependencies にも入っていて、
もし他の人とソースをgitで共有する場合、 npm install コマンドを入力すると同様の node_modules が作成されます。
なので、このフォルダ自体は共有不要なのでgitで履歴に反映されないように .gitignore ファイルを作成します。
aidemy-backend 直下に.gitignoreを作成します
touch .gitignore
.gitignoreを編集します。
node_modules/
必要なモジュールのインストール
npm install express body-parser
APIの作成
aidemy-backend 直下にindex.jsを作成します
touch index.js
実際にAPIを記述していきましょう。
// 必要なパッケージの読み込み
var express = require("express");
var app = express();
var bodyParser = require("body-parser");
app.use(bodyParser.urlencoded({ extended: true }));
app.use(bodyParser.json());

app.use((req, res, next) => {
  res.header("Access-Control-Allow-Origin", "*");
  res.header(
    "Access-Control-Allow-Headers",
    "Origin, X-Requested-With, Content-Type, Accept"
  );
  res.header(
    "Access-Control-Allow-Methods",
    "GET, POST, PUT, PATCH, DELETE, HEAD, OPTIONS"
  );
  next();
});

// expressでAPIサーバを使うための準備
var router = express.Router();

// エクササイズマスターデータ
const exercises = [
  {
    exerciseId: "exercise1",
    title: "1. Hello world",
    script: "# Hello worldを出力しましょう\n",
    answer: "# Hello worldを出力しましょう\nprint('Hello world')"
  },
  {
    exerciseId: "exercise2",
    title: "2. コメントの入力",
    script: "# 3 + 5 の結果を出力しましょう\n",
    answer: "# 3 + 5 の結果を出力しましょう\nprint(3 + 5)"
  }
];

/**
 * 特定のエクササイズを抽出する関数
 * @param exerciseId - エクササイズID
 * */
function getExercise(exerciseId) {
  return exercises.find(el => {
    return el.exerciseId === exerciseId;
  });
}

/* -------- 以下にAPIを記述 -------- */

router.route("/").get(async function(_req, res) {
  res.json({});
});
router.route("/exercises").get(async function(_req, res) {
  if (!exercises) {
    res.status(404).json({
      code: 404,
      msg: "Exercises not found"
    });
  }
  res.json(exercises);
});
router.route("/exercises/:exerciseId").get(async function(req, res) {
  console.log(req.params);
  const exercise = getExercise(req.params.exerciseId);
  if (!exercise) {
    res.status(404).json({
      code: 404,
      msg: "Exercise not found"
    });
  }
  res.json(exercise);
});

/* -------- 以上にAPIを記述 -------- */

// ルーティング登録
app.use("/v1", router);

// port4000番で出力を受ける
app.listen(4000);
package.jsonの編集
package.jsonを1行加えます。
{
  "scripts": {
    "test": "echo \"Error: no test specified\" && exit 1",
+   "serve": "node index.js"
  }
}
動作確認
起動
以下のコマンドで起動します。
npm run serve
出力確認
こちらに、動作確認に便利な Postman についてまとめられた記事を紹介します。
https://qiita.com/zaburo/items/16ac4189d0d1c35e26d1
かなり便利なので入れておきましょう。
以下の画像のように、GETメソッドで右の欄にURLを書いてSendを押せば、APIの動作確認ができます。
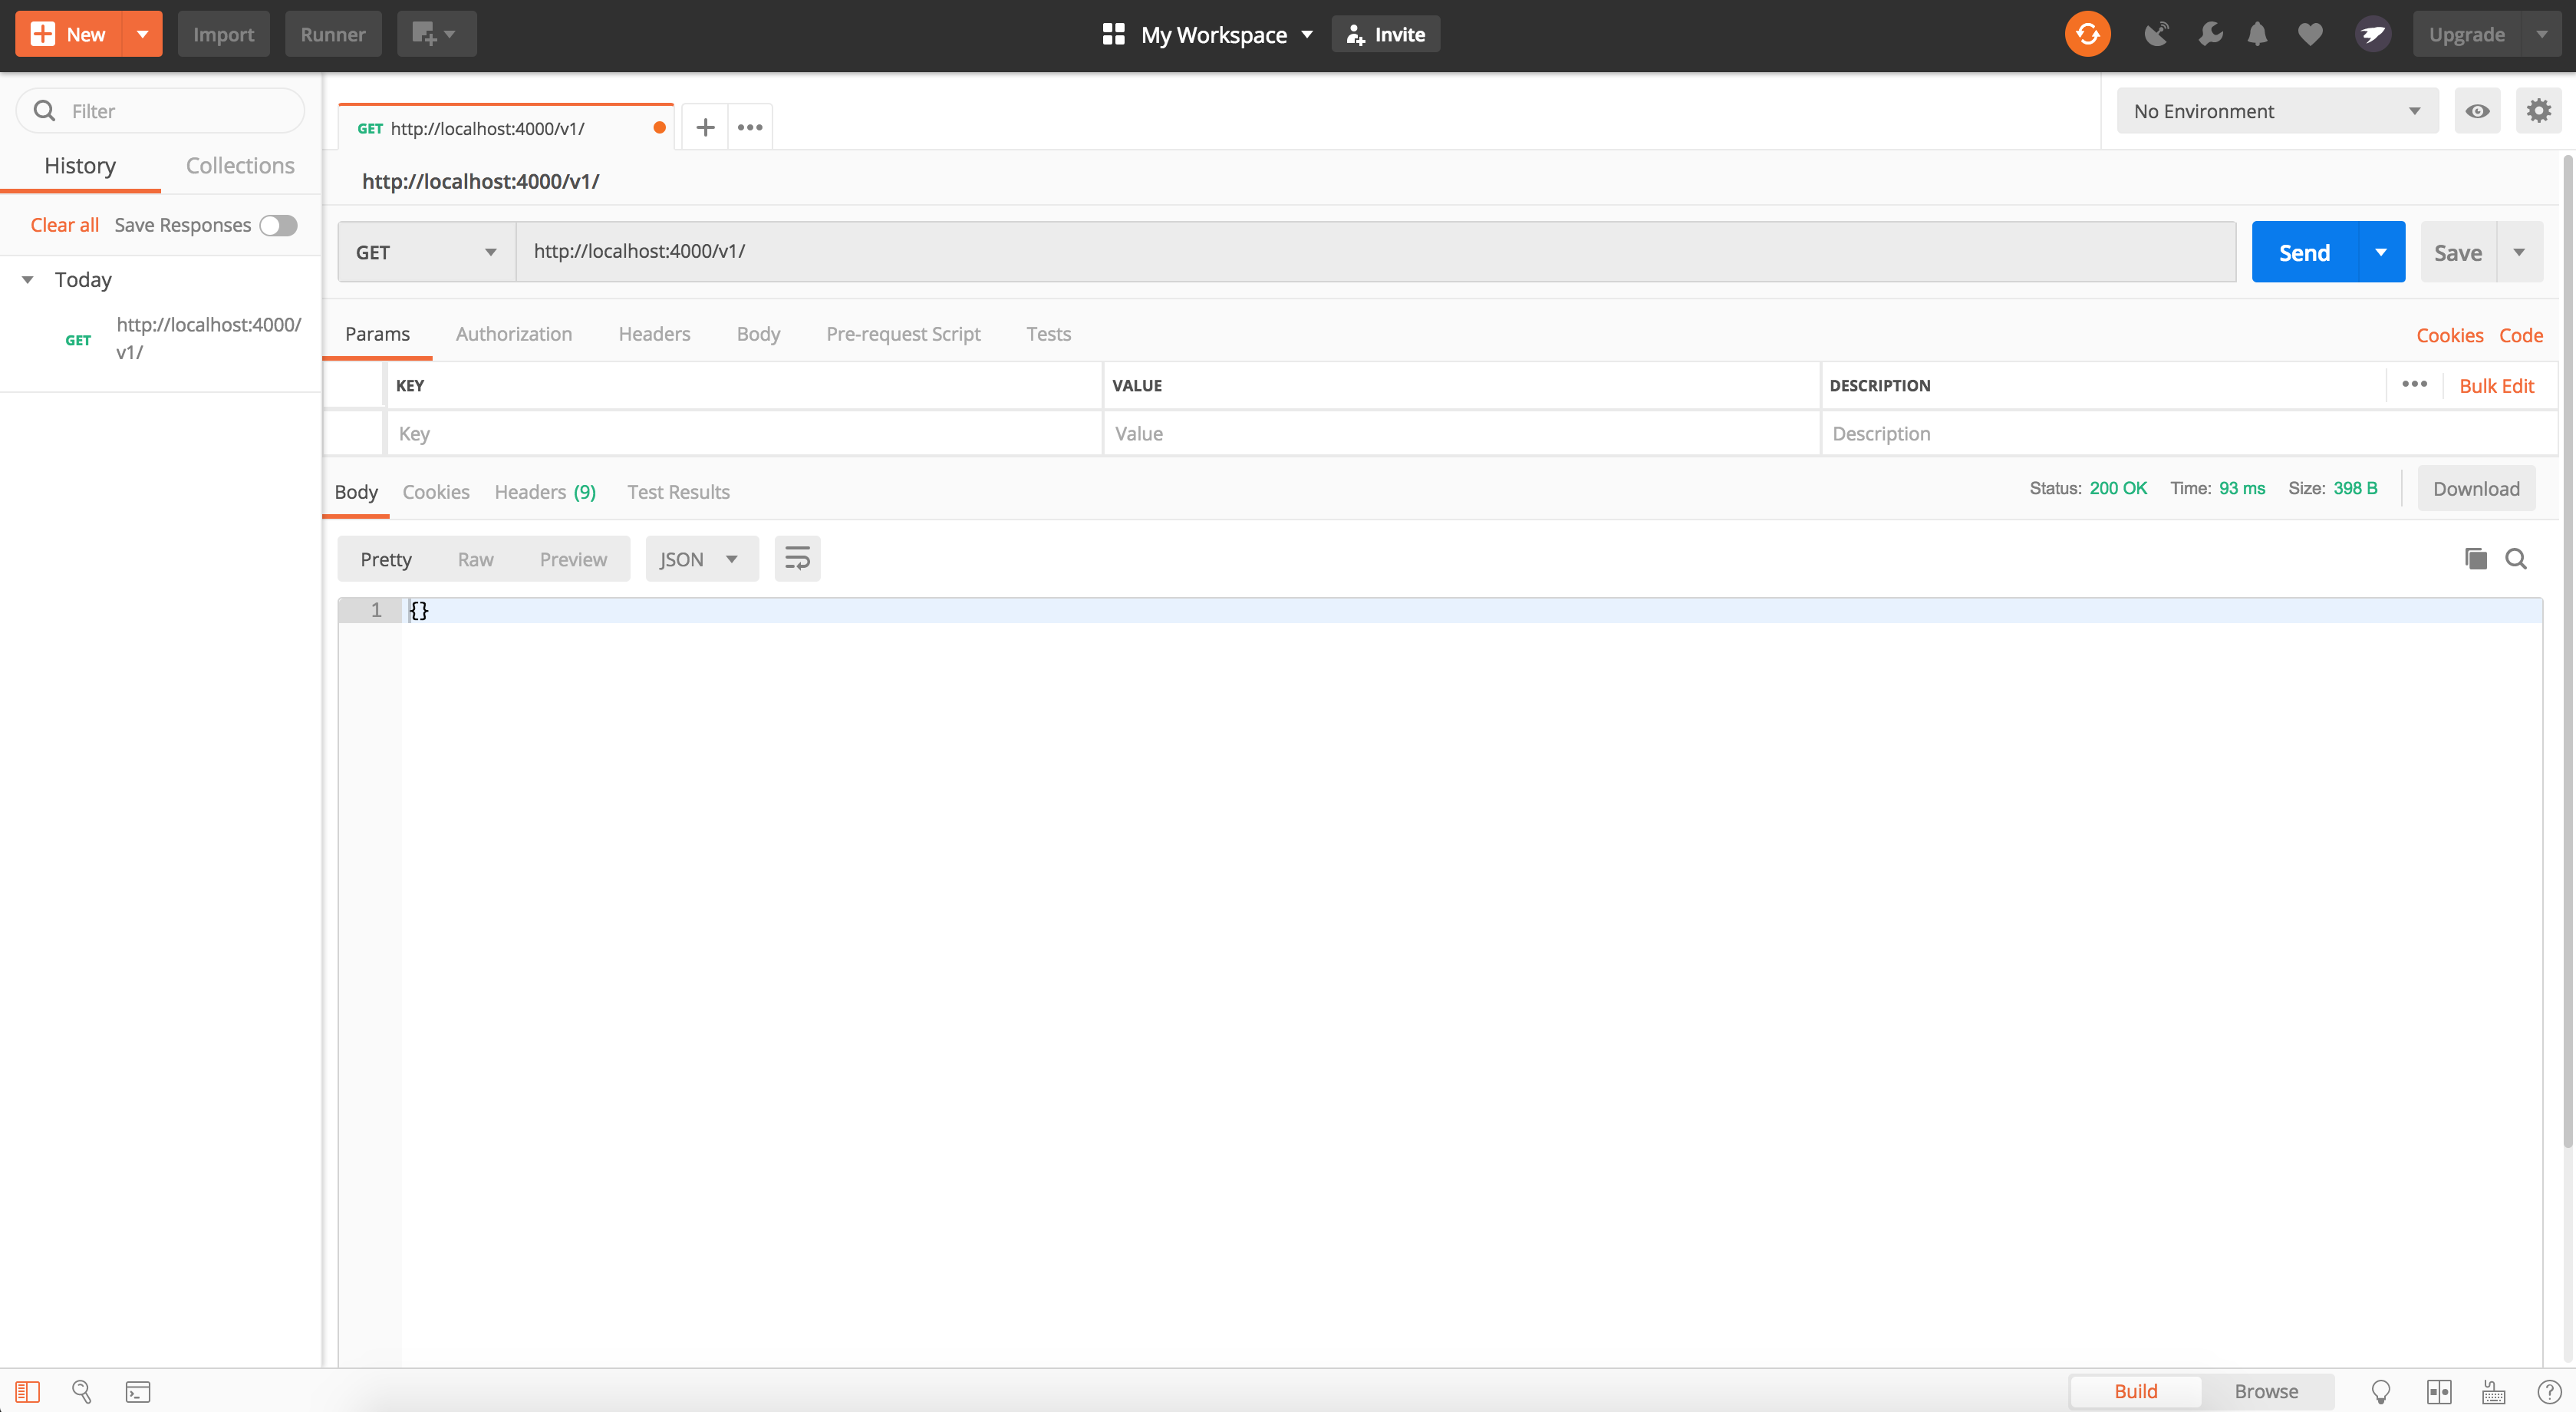
GETメソッドであれば、ブラウザのURL欄に貼り付けても動きます。
URL
http://localhost:4000/v1/
出力
{}
URL
http://localhost:4000/v1/exercises
出力
[
  {
    "exerciseId": "exercise1",
    "title": "1. Hello world",
    "script": "# Hello worldを出力しましょう\n",
    "answer": "# Hello worldを出力しましょう\nprint('Hello world')"
  },
  {
    "exerciseId": "exercise2",
    "title": "2. コメントの入力",
    "script": "# 3 + 5 の結果を出力しましょう\n",
    "answer": "# 3 + 5 の結果を出力しましょう\nprint(3 + 5)"
  }
]
URL
http://localhost:4000/v1/exercises/exercise1
出力
{
  "exerciseId": "exercise1",
  "title": "1. Hello world",
  "script": "# Hello worldを出力しましょう\n",
  "answer": "# Hello worldを出力しましょう\nprint('Hello world')"
}
URL
http://localhost:4000/v1/exercises/wrongid
出力
{
  "code": 404,
  "msg": "Exercise not found"
}
フロントエンドの設定
前回の記事ではエクササイズ情報を aidemy-frontend内に記述していました。
これを、今作成した aidemy-backend から参照するようにします。
必要なモジュールをinstallする
今回は axios というモジュールを使います。
axios はnode.jsでhttpリクエストを行うツールです。
公式ドキュメントは以下です。
https://github.com/axios/axios
npm install axios
axiosでAPIを叩く準備
axiosをimportし、apiのurlも変数に入れます。
  import React, { Component } from "react";
  import { BrowserRouter, Route, Link } from "react-router-dom";
  import AceEditor from "react-ace";
  import "brace/mode/python";
  import "brace/snippets/python";
  import "brace/theme/tomorrow";
+ import axios from "axios";

+ const apiUrl = "http://localhost:4000/v1";
フロントエンドのマスターデータをコメントアウト
バックエンドからエクササイズ情報を取得するので、フロントエンドの記述はコメントアウトします。
複数行コメントアウトは /* */ で囲めば大丈夫です。
/*
// マスターデータ
const exercises = [
  {
    exerciseId: "exercise1",
    title: "1. Hello world",
    script: "# Hello worldを出力しましょう\n"
  },
  {
    exerciseId: "exercise2",
    title: "2. コメントの入力",
    script: "# 3 + 5 の結果を出力しましょう\n"
  }
];

function getExercise(exerciseId) {
  return exercises.find(el => {
    return el.exerciseId === exerciseId;
  });
}
*/
エクササイズ情報をAPI取得する
axios を使って、API経由でエクササイズを取得します。
// exerciseの一覧
class Exercises extends Component {
  constructor() {
    super();
    this.state = {
      exercises: []
    };
  }

  // コンポーネントのレンダリングが終了したら呼び出される
- componentDidMount() {
-   this.setState({
-     exercises
-   });
- }
+ async componentDidMount() {
+   const exercises = (await axios.get(`${apiUrl}/exercises/`)).data;
+   // APIにアクセスできない場合に備えて条件分岐
+   if (!exercises) {
+     this.setState({
+       exercises: []
+     });
+     return;
+   }
+   this.setState({
+     exercises
+   });
+ }

  // 実際の表示部分
  render() {
    ...
  }
}

// 特定のexerciseの演習部分
class Exercise extends Component {
  constructor() {
    super();
    this.state = {
      exerciseId: "",
      title: "",
      script: ""
    };
    this.onChange = this.onChange.bind(this); // はじめにonChangeをthisにbindしておく
  }

  // コンポーネントのレンダリングが終了したら呼び出される
  async componentDidMount() {
-   const exercise = getExercise(this.props.match.params.id);
+   const exercise = (await axios.get(`${apiUrl}/exercises/${this.props.match.params.id}`)).data;
    if (exercise) {
      this.setState({
        exerciseId: exercise.exerciseId,
        title: exercise.title,
        script: exercise.script
      });
      return;
    }
    this.setState({
      exerciseId: "",
      title: "",
      script: ""
    });
  }
  ...
これでWEBページに値が表示されるはずです。
aidemy-frontend, aidemy-backend どちらも起動させて挙動を見てみてください。
Chromeを使っている場合は、右クリックで検証 > Network より、APIから値を取得しているのを確認できます。
Dockerによる操作
docker-compose で動作するために
aidemy-backendフォルダ内にDockerfileを配置
 ├ aidemy-backend/
 │ └ Dockerfile # 新規追加
 └ aidemy-frontend/
    └ Dockerfile
Dockerfileを記述
FROM node:8
WORKDIR /usr/src/app
COPY . .
RUN npm install
CMD npm run serve
aidemy-backendフォルダと同じ階層にdocker-compose.yml 配置
 ├ aidemy-backend/
 │ └ Dockerfile
 ├ aidemy-frontend/
 │ └ Dockerfile
 └ docker-compose.yml
docker-compose.ymlを記述
version: "3"
services:
  aidemy-frontend:
    build: ./aidemy-frontend
    image: aidemy-frontend
    environment:
      - ENV
    ports:
      - 5000:5000
  aidemy-backend:
    build: ./aidemy-backend
    image: aidemy-backend
    environment:
      - ENV
    ports:
      - 4000:4000
docker-composeによる起動
前回同様にdocker-composeで起動します
docker imageの作成
docker-compose build
フォアグラウンドでの起動
docker-compose up
http://localhost:8080 で動作すればOK
※バックグラウンドでの起動
docker-compose up -d
※バックグラウンドで起動したプロセスの終了
docker-compose down
今回は以上になります。
Dockerの使い方には慣れてきたでしょうか?
次回は12/19にデータベースを開発していきます!