simple_form
フォーム作成に手間が少なくなるsimple_formを使っている人は多いと思います。
まずsimple_formを使ってViewをDRYにする方法です。
準備
インストール
gem 'simple_form' # 必須
gem 'twitter-bootstrap-rails', :git => 'git://github.com/seyhunak/twitter-bootstrap-rails.git', :branch => "bootstrap3" # TwitterBootstrap本体
gem 'less-rails' # TwitterBootstrapを使うのに必要
gem 'therubyracer' # TwitterBootstrapを使うのに必要
gem 'slim-rails' # slimを使いたい
# プロジェクトのルートに移動
$ cd project_home
# gemインストール
$ bundle install
# TwitterBootstrapインストール
$ rails g bootstrap:install less
# レイアウトを作成
$ rails g bootstrap:layout application fluid
# simple_formインストール
$ rails generate simple_form:install --bootstrap
# サンプルのBookモデルを作成
$ rails g scaffold Book title:string author:string review:integer description:text
# DBを作成
$ rake db:migrate
# 作成されたBook関連のviewにTwitterBootstrapを適用する
$ rails g bootstrap:themed Books
日本語化とテキストの共通化
まずは日本語化
config.i18n.default_locale = :ja # 追加
日本語化ファイルを追加
- config/locales/ja.yml
https://github.com/svenfuchs/rails-i18n/blob/master/rails/locale/ja.yml - config/locales/ja.bootstrap.yml
https://github.com/heartrails/rails4-example/blob/master/config/locales/ja.bootstrap.yml - config/locales/simple_form.ja.yml
https://github.com/MiraitSystems/enju_trunk/blob/master/config/locales/simple_form.ja.yml
日本語化するときにこちらも役立つ
http://qiita.com/yujiym/items/b32c1a788aaa34eb8089
http://qiita.com/yshr04hrk/items/cb7b81c104321f660661
http://morizyun.github.io/blog/i18n-english-rails-ruby-many-languages/
共通化
モデルのカラム名やモデル名を共通化を行うのに、locales.ymlを使用する。
ただ、作成したBookの一覧と追加画面を見てみると名称が統一されていない。
日本語化を行うと以下のように修正画面のラベルは日本語化されている。

一覧画面を見てみると日本語化したはずのカラム名が英語で表示されている。

ここでindex.html.slimのソースを見てみる。
table class="table table-striped"
  thead
    tr
      th=model_class.human_attribute_name(:id)
      th=model_class.human_attribute_name(:title)
      th=model_class.human_attribute_name(:author)
      th=model_class.human_attribute_name(:review)
      th=model_class.human_attribute_name(:desc)
      th=model_class.human_attribute_name(:created_at)
      th=t '.actions', :default => t("helpers.actions")
フォームのラベル部分がきちっと日本語になっているのはconfig/locales/simple_form.ja.ymlの
labels: => book: => id: の値を参照しているからで、一覧はこの値を見ていないため英語で表示されてしまう。
そのため、一覧のタイトルもここの値を見るように下記のように変更する。
table class="table table-striped"
  thead
    tr
      th=t 'simple_form.labels.book.id'
      th=t 'simple_form.labels.book.title'
      th=t 'simple_form.labels.book.author'
      th=t 'simple_form.labels.book.review'
      th=t 'simple_form.labels.book.desc'
      th=t 'simple_form.labels.defaults.created_at'
tメソッドの説明は下記の通り。
http://morizyun.github.io/blog/i18n-english-rails-ruby-many-languages
カスタムインプット
バリデーションのためのHTMLのオプションや、入力のためのヒントメッセージ、プレースホルダを毎度viewに記述するのはDRYの流儀に反する。
そんなときに使用するのがカスタムインプット
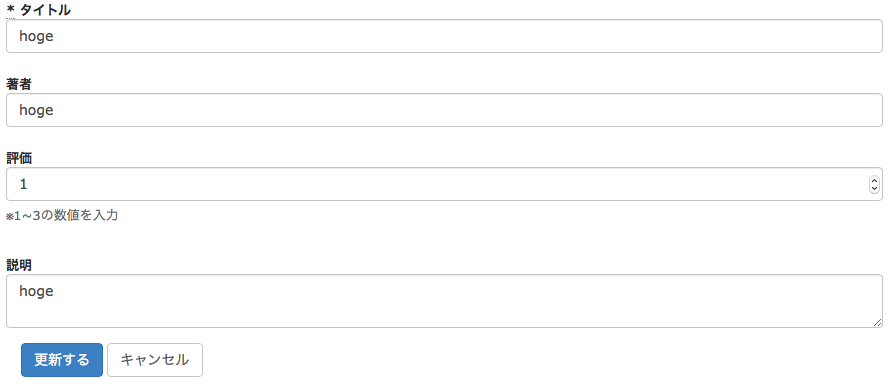
モデルに指定している入力制限(1~5の範囲の値)のみを許可する入力項目をカスタムインプットで作成する
- モデルにバリデーションを作成
class Book < ActiveRecord::Base
  validates :review, numericality: {
                      only_integer: true,
                      greater_than_or_equal_to: 1,
                      less_than_or_equal_to: 3 }
end
- app/inputsディレクトリを作成
- inputs/review_input.rbを作成
class ReviewInput < SimpleForm::Inputs::NumericInput
  def input
    # クラスを追加
    input_html_classes.push('review form-control')
    # inputタグのオプションにminとmaxが設定される
    min, max = %i(min max).collect {|sym| input_html_options[sym] }
    # テキストボックスの下に入力のヒントが表示される
    options.merge!(hint: "※#{min}~#{max}の数値を入力")
    super
  end
end
= simple_form_for @book, :html => { :class => "form-horizontal" } do |f|
  = f.input :title
  = f.input :author
  \ as: :カスタムインプット名
  = f.input :review, as: :review
  = f.input :desc
  = f.button :submit, :class => 'btn-primary'
  = link_to t('.cancel', :default => t("helpers.links.cancel")), books_path, :class => 'btn btn-default'
実行してみると以下のようになる
これでもしモデルのバリデーションのmin maxが変更されたときにview側も変更せずに済む。
カスタムインプットの作り方は以下が参考になる
http://www.ohmyenter.com/?p=214
https://github.com/plataformatec/simple_form/wiki/Custom-inputs-examples
同様にフォーム単位で作成できるカスタムフォームがある
https://github.com/plataformatec/simple_form
yieldとcontent_for
TwitterBootstrapをインストールしてレイアウトを作成するとlayouts/application.html.slimは以下のようになっている
doctype html
html lang="en"
  head
    # 省略
  body
    # ヘッダー
    .navbar.navbar-default.navbar-static-top
        .container
          button.navbar-toggle type="button" data-toggle="collapse" data-target=".navbar-responsive-collapse"
            span.icon-bar
            span.icon-bar
            span.icon-bar
          a.navbar-brand href="#"Book
          .navbar-collapse.collapse.navbar-responsive-collapse
            ul.nav.navbar-nav
              li= link_to "Link 1", "/path1"
              li= link_to "Link 2", "/path2"
              li= link_to "Link 3", "/path3"

    .container
      .row
        .col-lg-9
          = bootstrap_flash
          # コンテンツ出力
          = yield
        # サイドバー
        .col-lg-3
          .well.sidebar-nav
            h3 Sidebar
            ul.nav.nav-list
              li.nav-header Sidebar
              li= link_to "Link 1", "/path1"
              li= link_to "Link 2", "/path2"
              li= link_to "Link 3", "/path3"
      # フッター
      footer
        p © Company 2015
すべての画面で同様のレイアウトでヘッダー サイドバー フッターを表示するのであればこれでも問題ないが、画面によってヘッダーのデザインを変えたりサイドバーを表示しなかったりする場合これでは問題がある。
そんなときにyieldとcontent_forを使うとレイアウトの出しわけを容易に行うことができる。
yield
ブロックつきメソッドでブロックを呼び出すときに使用する。
viewで使用するときはcontent_forで定義されたブロックを呼び出すときに使用するくらいに認識しておけば今回は大丈夫かと思います。
content_for
ブロックをレイアウトファイルに渡すことができる。
# ブロックの作成
content_for :ラベル名 do
  # 行いたい処理
end

# ブロックの呼び出し
yield :ラベル名
yieldとcontent_forを使用してレイアウトを作成する
- content_for :head do
  = stylesheet_link_tag "application", :media => "all", "data-turbolinks-track" => true
  = javascript_include_tag "application", "data-turbolinks-track" => true
- content_for :favicon, favicon_link_tag

= render :partial => "layouts/base"
doctype html
html lang="ja"
  head
    meta charset="utf-8"
    meta http-equiv="X-UA-Compatible" content="IE=Edge,chrome=1"
    meta name="viewport" content="width=device-width, initial-scale=1.0"
    title= content_for?(:title) ? yield(:title) : "SimpleForm"
    = csrf_meta_tags
    = yield :head
    = favicon_link_tag 'favicon.ico', :rel => 'shortcut icon'

  body
    = yield :header
    = render('layouts/content')
    = yield :footer
.navbar.navbar-default.navbar-static-top
    .container
      button.navbar-toggle type="button" data-toggle="collapse" data-target=".navbar-responsive-collapse"
        span.icon-bar
        span.icon-bar
        span.icon-bar
      a.navbar-brand href="#"SimpleForm
      .navbar-collapse.collapse.navbar-responsive-collapse
        ul.nav.navbar-nav
          li= link_to "Link 1", "/path1"
          li= link_to "Link 2", "/path2"
          li= link_to "Link 3", "/path3"
.container
  .row
    .col-lg-9
      = bootstrap_flash
      \ このyieldでレイアウトファイルが呼び出される
      = yield
    = yield :sidebar
.col-lg-3
  .well.sidebar-nav
    h3 Sidebar
    ul.nav.nav-list
      li.nav-header Sidebar
      li= link_to "Link 1", "/path1"
      li= link_to "Link 2", "/path2"
      li= link_to "Link 3", "/path3"
.container
  footer
    p © Company 2015
_base.html.slimで必要なlayoutsの呼び出しをyieldで行っている。
次にテンプレートに対応したブロックをview側でcontent_for使用してブロックを作成する。
# ブロックの作成
# ヘッダー
- content_for :header, render('layouts/header')
# サイドバー
- content_for :sidebar, render('layouts/sidebar')
# フッター
- content_for :footer, render('layouts/footer')

- model_class = Book
div class="page-header"
  h1=t '.title', :default => model_class.model_name.human.pluralize.titleize
table class="table table-striped"
# 省略
ヘッダー サイドバー フッターをいずれか表示しない場合はcontent_forを呼び出さない。
yieldでは呼び出そうとしているブロックが存在しなくてもエラーにはならないので問題ない。
内容を変更する場合はcontent_forの第二引数に指定したrenderの値を変更する。
そのほかの使い方としてはGoogleにインデックスされたくないページにnoindexを指定する場合です。
Googleのクローラにインデックスさせないことを知らせるためにnoindexメタタグをヘッダに指定する必要がある。
ページによって出力するしないを設定するにはyieldとcontent_forを使用するのが最適です。
doctype html
html lang="ja"
  head
    meta charset="utf-8"
    meta http-equiv="X-UA-Compatible" content="IE=Edge,chrome=1"
    meta name="viewport" content="width=device-width, initial-scale=1.0"
    title= content_for?(:title) ? yield(:title) : "SimpleForm"
    = csrf_meta_tags
    = yield :head
    = yield :noindex
    = favicon_link_tag 'favicon.ico', :rel => 'shortcut icon'

  body
    = yield :header
    = render('layouts/content')
    = yield :footer
meta content="noindex" name="robots"
# インデックスされたくないテンプレートビュー
- content_for :header, render('layouts/noindex')

- model_class = Book
div class="page-header"
  h1=t '.title', :default => model_class.model_name.human.pluralize.titleize
table class="table table-striped"
# 省略
