はじめに
今回はAzure AutoMLの時系列予測をPythonから行ってみます。こちらの公式ドキュメントを参考に、トレーニングから推論まで実行します。
環境
- OS Windows 10(NVIDIA GTX 1650Ti,16GB RAM, i5-10300H CPU)
- Visual Studio Code 1.73.1
- Python 3.8
時系列予測をPythonから行う際の流れ
使用するデータセット
KaggleのコンペBike Sharing Demandのデータセットをダウンロードして使います。
内容は過去データと天候データを学習して、自転車のレンタル需要数を予測するというものです。
データの中身はこのようになっており、時間がdatetime、レンタル数がcountとなっています。

それではこのデータを使ってトレーニングから実行します!
トレーニング
ワークスペース・コンピューティングリソースの作成・データセットの指定をし、forecasting()を用いてトレーニングの設定を行います。
from azure.identity import DefaultAzureCredential
from azure.ai.ml import MLClient, Input, automl
from azure.ai.ml.constants import AssetTypes
from azure.ai.ml.entities import AmlCompute

credential = DefaultAzureCredential(exclude_shared_token_cache_credential=True)

subscription_id=<"サブスクリプションID">
resource_group=<"リソースグループ">
workspace_name=<"ワークスペース名">

ml_client = MLClient(credential, subscription_id, resource_group, workspace_name)

#データ
my_training_data_input = Input(
    type=AssetTypes.MLTABLE, path="azureml://datastores/workspaceblobstore/paths/<MLTableデータセットのパス>"
)

#コンピューティングの作成
cpu_compute_target = "cpu-cluster"

try:
    ml_client.compute.get(cpu_compute_target)
except Exception:
    print("Creating a new cpu compute target...")
    compute = AmlCompute(
        name=cpu_compute_target, size="STANDARD_D2_V2",min_instances=0, max_instances=1
    )
    ml_client.compute.begin_create_or_update(compute).result()

forecasting_job = automl.forecasting(
    compute=cpu_compute_target,
    experiment_name="<実験名>",
    training_data=my_training_data_input,
    target_column_name="<ターゲット列>",
    primary_metric="NormalizedRootMeanSquaredError",
    n_cross_validations=5,
    enable_model_explainability=True,
)

forecasting_job.set_limits(
    timeout_minutes=600,
    trial_timeout_minutes=100,
    max_trials=4,
)

forecasting_job.set_forecast_settings(
    time_column_name=<"時間列">,
    forecast_horizon=24,
)

forecasting_job.set_training(
    # allowed_training_algorithms=["ExponentialSmoothing", "ElasticNet"]
    # blocked_training_algorithms=["Prophet"]
)

returned_job = ml_client.jobs.create_or_update(forecasting_job)
print(f"Created job: {returned_job.name}")
コードの中身を解説します。
まずワークスペース接続にはDefaultAzureCredential()を使用しています。これは以前Azure Functionsを使う際にロール割り当ての追加など作業をしていたら、ローカルから実行する際に
The refresh token has expired due to inactivity.
というエラー文と共にAzure CLIの認証ができなくなったのでexclude_shared_token_cache_credential=Trueを追加しています。
次にデータセットについて
MLTableデータセットはAzure BLOBストレージにアップロードをしておきます。そして「MLTable」という名前のファイルとトレーニングファイルを一緒にしたフォルダを指定します。
paths:
  - file: day.csv
transformations:
  - read_delimited:
        delimiter: ','
        encoding: 'ascii'
これでデータの準備はOKです!続いてトレーニングの条件などを設定します。
トレーニング設定
forecasting()ではトレーニングの設定を行えます。
experiment_nameに実験名を入力し、target_column_nameにはターゲットとなる列名を入力します。今回は総レンタル数であるcntをターゲット列として設定しました。
実験の終了条件・パラメータ管理
set_limits()では実験の終了条件を設定します。
set_forecast_setting()では予測タスクで用いるパラメータの管理します。time_column_nameで時間列を指定し、forecasting_horizonで予測しようとしている期間を設定します(単位はトレーニングデータの期間に基づく)。
また、今回は特に指定しませんでしたがset_training()ではアルゴリズムの指定や削除を行うことができます。サポートされているアルゴリズムの一覧はこちらから確認できます。
実行結果
最後はMLClientクラスのcreate_or_update()でジョブを送信したらトレーニングが実行されます。
実行したらこのようにジョブ名が返ってきました。
Created job: musing_vinegar_w4cxgmzvlr
続いて、この送信したジョブが完了したかどうか確認したいので、返ってきたジョブ名を使ってstatusをチェックできるコードを作ります。
トレーニングジョブの状況
ジョブ送信時に用いたMLClientのjobs()を使って、指定したジョブの状況を確認します。
from azure.ai.ml.entities import Job
from azure.identity import DefaultAzureCredential
from azure.ai.ml import MLClient

credential = DefaultAzureCredential(exclude_shared_token_cache_credential=True)

subscription_id=<"サブスクリプションID">
resource_group=<"リソースグループ">
workspace_name=<"ワークスペース名">

ml_client = MLClient(credential, subscription_id, resource_group, workspace_name)

returned_job = ml_client.jobs.get(name="<ジョブ名>")
print(returned_job.status)
print(returned_job.tags["automl_best_child_run_id"])
ml_client.jobs.get()のnameには、statusを確認したいジョブ名を入力します。
ここは先ほど保存したジョブ名を貼り付けるだけです。
returned_job = ml_client.jobs.get(name="musing_vinegar_w4cxgmzvlr")
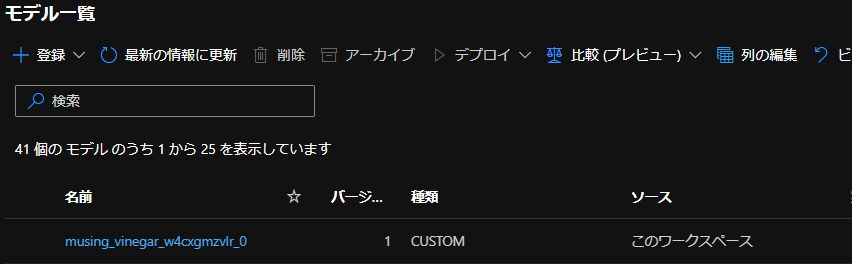
あとはstatusのほかに、モデル登録を行う際に1番精度の良いモデル名が必要になるのでそれも一緒に返すようにします。
実行後、statusとベストモデル名が返ってきます。
Completed
musing_vinegar_w4cxgmzvlr_0
返ってきたベストモデル名を保存して、今度はモデル登録を行います。
モデル登録
MLClientクラスのmodels()を使ってモデル登録をします。
from azure.ai.ml.entities import Model
from azure.identity import DefaultAzureCredential
from azure.ai.ml import MLClient

credential = DefaultAzureCredential(exclude_shared_token_cache_credential=True)

subscription_id=<"サブスクリプションID">
resource_group=<"リソースグループ">
workspace_name=<"ワークスペース名">
ml_client = MLClient(
    credential, subscription_id, resource_group, workspace
)

run_model = Model(
    path="azureml://subscriptions/<サブスクリプションID>/resourceGroups/<リソースグループ名>/workspaces/<ワークスペース名>/datastores/workspaceartifactstore/paths/ExperimentRun/dcid.<モデル名>/outputs/mlflow-model/",
    name="<モデル名>"
)

ml_client.models.create_or_update(run_model)
モデル名には先ほどコピペしたベストモデルを入力します。
run_model = Model(
    path="azureml://subscriptions/<サブスクリプションID>/resourceGroups/<リソースグループ名>/workspaces/<ワークスペース名>/datastores/workspaceartifactstore/paths/ExperimentRun/dcid.musing_vinegar_w4cxgmzvlr_0/outputs/mlflow-model/",
    name="musing_vinegar_w4cxgmzvlr_0"
)
モデル登録は実行したらすぐ登録できるので、モデル登録状況を確認するコードは特に作成しませんが、モデル一覧から確認することができます。
一応スタジオから登録できたか確認してみるときちんとモデルが登録されていました。
それでは登録したモデルをデプロイしていきますが、その前にエンドポイントの作成と必要なファイルのダウンロードが必要です。まずはエンドポイント作成から行います。
エンドポイント作成
エンドポイント作成にはManagedOnlineEndpoint()を使用します。
from azure.ai.ml import MLClient
from azure.ai.ml.entities import ManagedOnlineEndpoint
from azure.ai.ml import MLClient
from azure.identity import DefaultAzureCredential

credential = DefaultAzureCredential(exclude_shared_token_cache_credential=True)

subscription_id=<"サブスクリプションID">
resource_group=<"リソースグループ">
workspace_name=<"ワークスペース名">
ml_client = MLClient(
    credential, subscription_id, resource_group, workspace
)

endpoint_name = "<エンドポイント名>"
endpoint = ManagedOnlineEndpoint(name=endpoint_name)

endpoint_result=ml_client.online_endpoints.begin_create_or_update(endpoint)
endpoint_nameに任意の名前を入れて作成します。このとき、「_(アンダーバー)」を名前に含めるとエラーが出るため、「-(ハイフン)」などを使用します。
実行したら、作成完了まで5分ほど時間がかかるため、こちらもエンドポイントが作成できたかどうか確認できるコードを作っておきます。
エンドポイントの状況確認
状況確認にはMLClientクラスのget()を使えばOKです。
from azure.ai.ml.entities import OnlineEndpoint
from azure.identity import DefaultAzureCredential
from azure.ai.ml import MLClient

credential = DefaultAzureCredential(exclude_shared_token_cache_credential=True)

subscription_id=<"サブスクリプションID">
resource_group=<"リソースグループ">
workspace_name=<"ワークスペース名">

ml_client = MLClient(credential, subscription_id, resource_group, workspace_name)

endpoint = ml_client.online_endpoints.get(name="<エンドポイント名>")
api_key = ml_client.online_endpoints.get_keys(name="<エンドポイント名>").primary_key

print(endpoint.provisioning_state)
print(api_key)
MLClient.online_endpoints.get()のnameには先ほど設定したエンドポイントの名前を入力します。
また、今回エンドポイント状況確認と共に、後ほど推論で使うときに必要なAPIキーもget_keys()で一緒に取っておきます。
実行後、エンドポイントの状況とAPIキーが返ってきました。
Succeeded
XXX(APIキー)
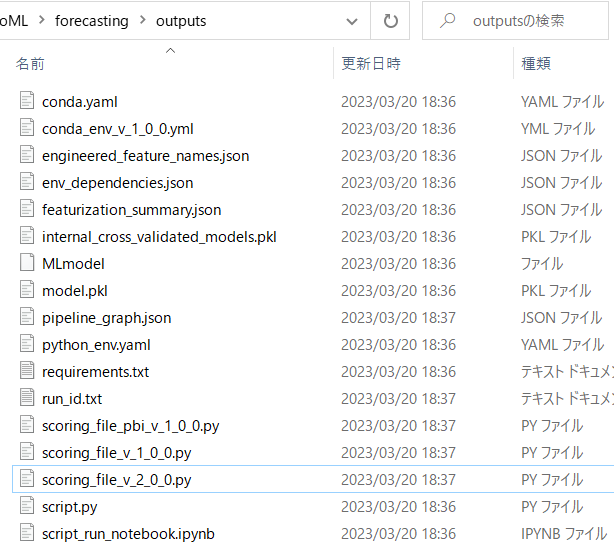
続いて、デプロイ時に必要なcondaファイルとscoringファイルをSAS生成してローカルにダウンロードします。
ファイルのダウンロード
トレーニングでモデルが生成されるときに、いくつかファイルがBlobに自動的に生成されます。
その生成されるファイルの中の「conda_env_v_1_0_0.yml」と「scoring_file_v_2_0_0.py」がデプロイ時に必要になってくるので、これをダウンロードします。
import os
from azure.identity import DefaultAzureCredential
from azure.storage.blob import BlobServiceClient, BlobSasPermissions,  generate_blob_sas
import datetime
import requests

try:
    account_url = "https://<ストレージアカウント>.blob.core.windows.net"
    credential = DefaultAzureCredential(exclude_shared_token_cache_credential=True)
    blob_service_client = BlobServiceClient(account_url, credential=credential)

    container_name = "azureml"
    container_client = blob_service_client.get_container_client(container=container_name)

    outputs_path = "ExperimentRun/dcid.<ベストモデル名>/outputs/"
    blob_list = container_client.list_blobs(name_starts_with=outputs_path)

    outputs_folder = "outputs"
    if not os.path.exists(outputs_folder):
        os.makedirs(outputs_folder)

    for blob in blob_list:
        sas_token=generate_blob_sas(
        blob_service_client.account_name,
        account_key="<アカウントキー>",
        container_name=container_name,
        blob_name=blob.name,
        permission=BlobSasPermissions(read=True),
        expiry=datetime.datetime.utcnow() + datetime.timedelta(hours=1)
    )

        sas_url=f"{account_url}/{container_name}/{blob.name}?{sas_token}"
        response = requests.get(sas_url)
        print(sas_url)
        if response.status_code==200:

            file_path=os.path.join(outputs_folder,(blob.name.split("/")[-1]))
            with open(file_path, mode="wb") as download_file:
                download_file.write(response.content)
        else:
            print("Failed to download the file")

except Exception as ex:
    print("Exception:")
    print(ex)
ストレージアカウント名、ベストモデルの名前、そしてアカウントキーを入力して実行すればローカルフォルダの「outputs」にファイルをダウンロードできるようしています。
BLOBのSAS生成・ダウンロードについてはこちらの記事に詳細を書いているのでご参照ください。
condaファイルとscoringファイルの中身は最後の付録に載せます。
さて、必要なものはすべてそろったので、いよいよ登録したモデルをデプロイします。
モデルのデプロイ
ManagedOnlineDeployment()を使用してデプロイをします。
from azure.ai.ml import MLClient
from azure.ai.ml.entities import (
    ManagedOnlineDeployment,
    Model,
    Environment,
    CodeConfiguration,
)
from azure.identity import DefaultAzureCredential

credential = DefaultAzureCredential(exclude_shared_token_cache_credential=True)

subscription_id=<"サブスクリプションID">
resource_group=<"リソースグループ">
workspace_name=<"ワークスペース名">
ml_client = MLClient(
    credential, subscription_id, resource_group, workspace
)

local_endpoint_name = "<エンドポイント名>"

model = Model(
    path="azureml://subscriptions/<サブスクリプションID>/resourceGroups/<リソースグループ名>/workspaces/<ワークスペース>/datastores/workspaceartifactstore/paths/ExperimentRun/dcid.<モデル名>/outputs/mlflow-model/model.pkl",
    name="<モデル名>"
)

env = Environment(
    conda_file="outputs/conda_env_v_1_0_0.yml",
    image="mcr.microsoft.com/azureml/minimal-ubuntu20.04-py38-cpu-inference:latest",
)
deployment = ManagedOnlineDeployment(
    name="<デプロイ名>",
    endpoint_name=local_endpoint_name,
    model=model,
    environment=env,
    code_configuration=CodeConfiguration(
        code="outputs/",
        scoring_script="scoring_file_v_2_0_0.py"
    ),
    instance_type="Standard_DS2_v2",
    instance_count=1,
)

ml_client.online_deployments.begin_create_or_update(deployment=deployment)
local_endpoint_nameには作成したエンドポイント名を入力し、Modelには登録したモデルのパス名を入力します。
また、ManegedOnlineDeployment()のnameには任意のデプロイの名前を入れます。
デプロイ実行完了には時間が10分以上かかることが多いので、こちらもstatus確認をできるようにします。
デプロイ状況
MLClientクラスのget()を使ってデプロイ状況を確認します。
from azure.ai.ml.entities import OnlineEndpoint
from azure.identity import DefaultAzureCredential
from azure.ai.ml import MLClient

credential = DefaultAzureCredential(exclude_shared_token_cache_credential=True)

subscription_id=<"サブスクリプションID">
resource_group=<"リソースグループ">
workspace_name=<"ワークスペース名">

ml_client = MLClient(credential, subscription_id, resource_group, workspace_name)

deployment = ml_client.online_deployments.get(name="<デプロイ名>",endpoint_name="<エンドポイント名>")
print(deployment.provisioning_state)
nameにはデプロイ名、endpoint_nameにはエンドポイント名を入力して実行したらこちらの結果が返ってきます。
Succeeded
最後に時間を指定して推論をします。
推論
こちらのコードは、スタジオの「使用」タブからコードをコピーし、それをPythonで実行してみます。
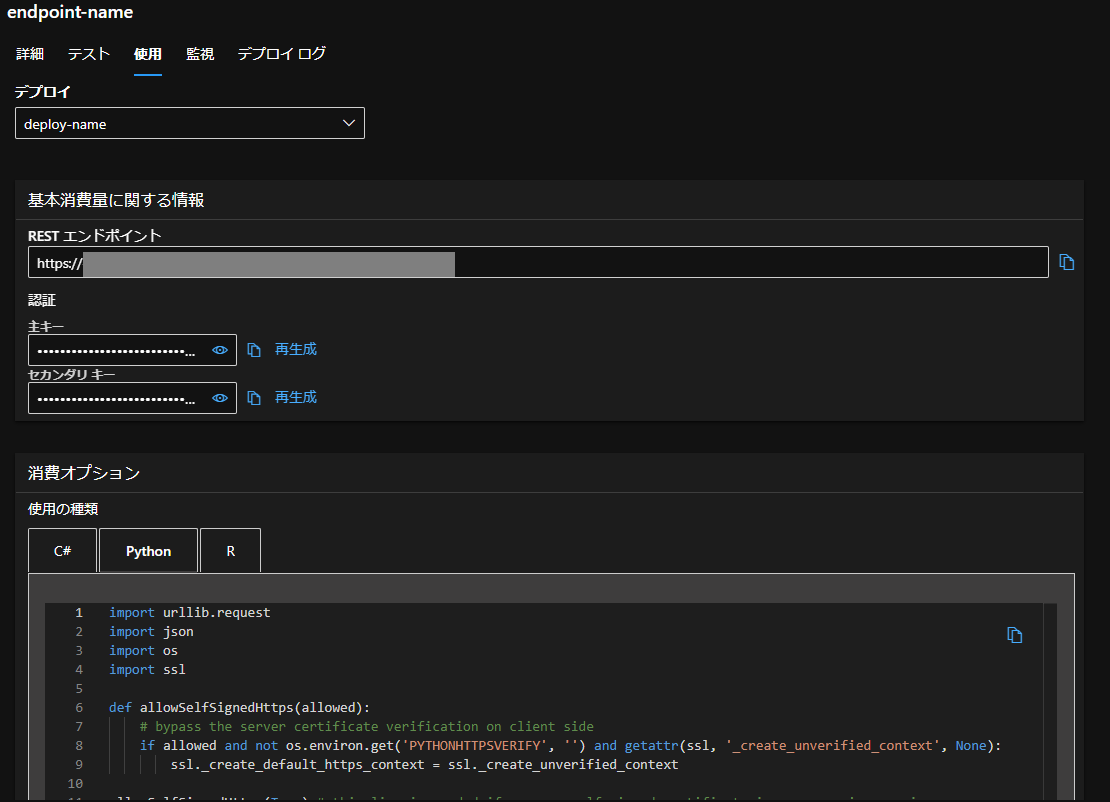
コピーしたコードに、いくつか修正を加えて実行をします。
import urllib.request
import json
import os
import ssl

def allowSelfSignedHttps(allowed):
    # bypass the server certificate verification on client side
    if allowed and not os.environ.get('PYTHONHTTPSVERIFY', '') and getattr(ssl, '_create_unverified_context', None):
        ssl._create_default_https_context = ssl._create_unverified_context

allowSelfSignedHttps(True) # this line is needed if you use self-signed certificate in your scoring service.

# Request data goes here
# The example below assumes JSON formatting which may be updated
# depending on the format your endpoint expects.
# More information can be found here:
# https://docs.microsoft.com/azure/machine-learning/how-to-deploy-advanced-entry-script
data =  {
  "Inputs": {
    "data": [
      {
        "datetime": "2012-12-20T00:00:00.000Z",
        "season": 4,
        "holiday": 0,
        "workingday": 1,
        "weather": 1,
        "temp": 13.12,
        "atemp": 17.425,
        "humidity": 66,
        "windspeed": 0.0,
        "casual": 0,
        "registered": 0
      }
    ]
  },
  "GlobalParameters": {
    "quantiles": [
      0.025,
      0.975
    ]
  }
}

body = str.encode(json.dumps(data))

url = 'https://XXX'
# Replace this with the primary/secondary key or AMLToken for the endpoint
api_key = '<APIキー>'
if not api_key:
    raise Exception("A key should be provided to invoke the endpoint")

# The azureml-model-deployment header will force the request to go to a specific deployment.
# Remove this header to have the request observe the endpoint traffic rules
headers = {'Content-Type':'application/json', 'Authorization':('Bearer '+ api_key), 'azureml-model-deployment': 'deploy-name2' }

req = urllib.request.Request(url, body, headers)

try:
    response = urllib.request.urlopen(req)

    result = response.read()
    print(result)
except urllib.error.HTTPError as error:
    print("The request failed with status code: " + str(error.code))

    # Print the headers - they include the requert ID and the timestamp, which are useful for debugging the failure
    print(error.info())
    print(error.read().decode("utf8", 'ignore'))
まずは、日付を表すdatetimeを「2000-01-01T00:00:00.000Z」から「2012-12-20T00:00:00.000Z」に変更します。(トレーニングデータに載っていた日付2011/1/1~2012/12/19より前の日付だとエラーが出ます。)
続いてapi_keyには、エンドポイント状況を確認する際に保存したAPIキーを入力します。
2点修正をし、実行したらこちらの推論結果が返ってきます。
b'{"Results": {"forecast": [68.58547751506723], "prediction_interval": ["[-147.55469732943465, 284.72565235956904]"], "index": [{"datetime": 1355961600000}]}}'
コンピューティングリソース・エンドポイントの削除
最後に使わなくなったコンピューティングリソースとエンドポイントの削除を行います。
from azure.identity import DefaultAzureCredential
from azure.ai.ml import MLClient

credential = DefaultAzureCredential(exclude_shared_token_cache_credential=True)

subscription_id=<"サブスクリプションID">
resource_group=<"リソースグループ">
workspace_name=<"ワークスペース名">

ml_client = MLClient(credential, subscription_id, resource_group, workspace_name)

returned_endpoint=ml_client.online_endpoints.begin_delete(name="<エンドポイント名>")
returned_cluster=ml_client.compute.begin_delete(name="<コンピューティングリソース名>")
付録
# Conda environment specification. The dependencies defined in this file will
# be automatically provisioned for runs with userManagedDependencies=False.

# Details about the Conda environment file format:
# https://conda.io/docs/user-guide/tasks/manage-environments.html#create-env-file-manually

name: project_environment
dependencies:
  # The python interpreter version.
  # Currently Azure ML only supports 3.8 and later.
- python=3.8.16

- pip:
  - azureml-train-automl-runtime==1.49.0
  - inference-schema
  - azureml-interpret==1.49.0
  - azureml-defaults==1.49.0
- numpy==1.21.6
- pandas==1.1.5
- scikit-learn==0.22.1
- py-xgboost==1.3.3
- fbprophet==0.7.1
- holidays==0.10.3
- psutil==5.9.4
channels:
- anaconda
- conda-forge
# ---------------------------------------------------------
# Copyright (c) Microsoft Corporation. All rights reserved.
# ---------------------------------------------------------
import json
import logging
import os
import pickle
import numpy as np
import pandas as pd
import joblib

import azureml.automl.core
from azureml.automl.core.shared import logging_utilities, log_server
from azureml.telemetry import INSTRUMENTATION_KEY

from inference_schema.schema_decorators import input_schema, output_schema
from inference_schema.parameter_types.numpy_parameter_type import NumpyParameterType
from inference_schema.parameter_types.pandas_parameter_type import PandasParameterType
from inference_schema.parameter_types.standard_py_parameter_type import StandardPythonParameterType

data_sample = PandasParameterType(pd.DataFrame({"datetime": pd.Series(["2000-1-1"], dtype="datetime64[ns]"), "season": pd.Series([0], dtype="int64"), "holiday": pd.Series([0], dtype="int64"), "workingday": pd.Series([0], dtype="int64"), "weather": pd.Series([0], dtype="int64"), "temp": pd.Series([0.0], dtype="float64"), "atemp": pd.Series([0.0], dtype="float64"), "humidity": pd.Series([0], dtype="int64"), "windspeed": pd.Series([0.0], dtype="float64"), "casual": pd.Series([0], dtype="int64"), "registered": pd.Series([0], dtype="int64")}), enforce_shape=False)
input_sample = StandardPythonParameterType({'data': data_sample})
quantiles_sample = StandardPythonParameterType([0.025, 0.975])
sample_global_params = StandardPythonParameterType({"quantiles": quantiles_sample})

result_sample = StandardPythonParameterType({
    'forecast': NumpyParameterType(np.array([0])),
    'prediction_interval': NumpyParameterType(np.array([0])),
    'index': PandasParameterType(pd.DataFrame({}), enforce_shape=False)
})
output_sample = StandardPythonParameterType({'Results': result_sample})
try:
    log_server.enable_telemetry(INSTRUMENTATION_KEY)
    log_server.set_verbosity('INFO')
    logger = logging.getLogger('azureml.automl.core.scoring_script_forecasting_v2')
except Exception:
    pass


def init():
    global model
    # This name is model.id of model that we want to deploy deserialize the model file back
    # into a sklearn model
    model_path = os.path.join(os.getenv('AZUREML_MODEL_DIR'), 'model.pkl')
    path = os.path.normpath(model_path)
    path_split = path.split(os.sep)
    log_server.update_custom_dimensions({'model_name': path_split[-3], 'model_version': path_split[-2]})
    try:
        logger.info("Loading model from path.")
        model = joblib.load(model_path)
        logger.info("Loading successful.")
    except Exception as e:
        logging_utilities.log_traceback(e, logger)
        raise


@input_schema('GlobalParameters', sample_global_params, convert_to_provided_type=False)
@input_schema('Inputs', input_sample)
@output_schema(output_sample)
def run(Inputs, GlobalParameters={"quantiles":[0.025, 0.975]}):
    y_query = None
    data = Inputs['data']
    if 'y_query' in data.columns:
        y_query = data.pop('y_query').values

    quantiles = GlobalParameters.get("quantiles", [0.025, 0.975])
    quantiles = [min(quantiles), 0.5, max(quantiles)]
    PI = 'prediction_interval'
    model.quantiles = quantiles
    pred_quantiles = model.forecast_quantiles(data, y_query)
    pred_quantiles[PI] = pred_quantiles[[min(quantiles), max(quantiles)]].apply(lambda x: '[{}, {}]'.format(x[0], x[1]), axis=1)

    index_as_df = pred_quantiles.iloc[:,:-4].reset_index(drop=True)# get time column name and grain column name
    forecast_as_list = pred_quantiles[0.5].to_list()
    PI_as_list = pred_quantiles[PI].to_list()
    result = {
        "forecast": forecast_as_list,
        "prediction_interval": PI_as_list,
        "index": json.loads(index_as_df.to_json(orient='records'))
    }
    return {'Results': result}