January 26, 2021
←前回:Day 20 カテゴリー毎のトピック一覧画面を作る
「Djangoを学びたい」とのことでありましたら[Day 1]Djangoの開発環境から読むことをおすすめします。
#はじめに
まだまだ不完全な掲示板アプリではありますが、今回を終えると以下の機能を満たすウェブアプリになる予定です。
・トピックの登録
・トピックの一覧表示
・トピックのカテゴリー毎の表示
・コメントの一覧表示
・コメントの追加
#コメント投稿用のフォーム作成
ユーザー入力画面といえばフォームの作成ですね。
今回もモデルベースのフォームで大丈夫ですのでModelFormを継承して作っていきます。
class CommentModelForm(forms.ModelForm):
    class Meta:
        model = Comment
        fields = [
            'user_name',
            'message',
        ]

    def __init__(self, *args, **kwargs):
        kwargs.setdefault('label_suffix', '')
        super().__init__(*args, **kwargs)
        self.fields['user_name'].widget.attrs['value'] = '名無し'
FormとModelFormで扱ったとおり__init__関数をオーバライドして各種設定をしています。
#トピック詳細表示テンプレートの修正
では早速トピック詳細表示テンプレートであるthread/detail_topic.htmlをコメント表示・登録用に修正しましょう。
{% extends 'base/base.html' %}
{% block title %}トピック作成 - {{ block.super }}{% endblock %}
{% block content %}
<div class="ui grid stackable">
<div class="eleven wide column">
<div class="ui breadcrumb">
<a href="{% url 'base:top' %}" class="section">TOP</a>
<i class="right angle icon divider"></i>
<a href="{% url 'thread:category' url_code=topic.category.url_code %}" class="section">{{topic.category.name}}</a>
<i class="right angle icon divider"></i>
<a class="active section">{{topic.title}}</a>
</div>
<div class="ui segment">
<div class="content">
<div class="header"><h3>{{topic.title}}</h3></div>
<p>{{topic.user_name}} - {{topic.created}}</p>
<div class="ui segment">
<p><pre>{{topic.message}}</pre></p>
</div>
</div>
</div>
<!--コメント表示-->
<div class="ui segment">
{% if comment_list %}
{% for comment in comment_list %}
<div class="ui segment secondary">
<p>{{comment.no}}. {{comment.user_name}}<br>{{comment.created}}</p>
{% if comment.pub_flg %}
<p><pre>:{{comment.message}}</pre></p>
{% else %}
<p style="color: #aaa">このコメントは非表示となりました。</p>
{% endif %}
</div>
{% endfor %}
{% else %}
<div class="ui warning message"><p>まだコメントはありません</p></div>
{% endif %}
</div>
<!--//コメント表示-->
<!--コメント投稿-->
<h4>コメント投稿</h4>
<div class="ui segment">
<form class="ui form" action="" method="POST">
{% csrf_token %}
{{form.as_p}}
<button class="ui button orange" type="submit">コメント投稿</button>
</form>
</div>
<!--//コメント投稿-->
</div>
{% include 'base/sidebar.html' %}
</div>
{% endblock %}
テンプレートの中で条件分岐をしています。
1つ目はcomment_listの有無で分岐、
2つ目はコメントのpub_flgによって表示を分岐しています。
Djangoのテンプレートはループや分岐等のある程度ロジカルな操作が可能ですが、あくまで表示に関する部分に限り見せたいデータの整形はViewで行った方が良いと考えます。
また、コメント投稿欄については{{form.as_p}}でHTML出力しました。
#ビューの作成
では次にビューを作っていきます。
TopicDetailViewをカスタマイズしても良いのですが、練習なので新たにクラスを作成しましょう。
TopicAndCommentViewとします。(ダサい命名でスミマセン)この画面はトピックの詳細表示、コメントのリスト表示、コメントの作成が行われる画面です。
コメントの投稿は確認画面は作りません。
さて、クラスベースビューで実装する際、どのベースビューを継承するのが良いでしょうか?これが正解というのはないのですが、今回の場合だとFormViewを継承したクラスを作るのが手間が少ないかと思います。
CreateViewを使わない理由は入力した情報だけでなく、他の情報も付与してオブジェクトを保存したいためです。
これについては実際のコードを見たほうが早いと思います。
ではthread/views.pyを見ていきましょう。
class TopicAndCommentView(FormView):
    template_name = 'thread/detail_topic.html'
    form_class = CommentModelForm

    def form_valid(self, form):
        comment = form.save(commit=False) #保存せずオブジェクト生成する
        comment.topic = Topic.objects.get(id=self.kwargs['pk'])
        comment.no = Comment.objects.filter(topic=self.kwargs['pk']).count() + 1
        comment.save()
        return super().form_valid(form)

    def get_success_url(self):
        return reverse_lazy('thread:topic', kwargs={'pk': self.kwargs['pk']})

    def get_context_data(self):
        ctx = super().get_context_data()
        ctx['topic'] = Topic.objects.get(id=self.kwargs['pk'])
        ctx['comment_list'] = Comment.objects.filter(
                topic_id=self.kwargs['pk']).order_by('no')
        return ctx
簡単に解説します。
template_nameについてはもう説明不要かと思います。
GETでアクセスされた場合に表示するテンプレート名ですね。
この時テンプレートに渡すコンテキストがget_context_data関数で定義されています。
ここでは表示するトピックとリスト表示するコメント一覧をDBから取得しています。
’topic_id’は’topic__idの誤りではないのか?とお気づきになった方は鋭いです。
外部キーのIDは例外扱いなのです。
get_success_url関数はフォームのデータ検証成功後のリダイレクト先のURLを定義しています。
さて、問題はform_valid関数の中身ですね。
これまでの話であればform.save()メソッドを呼んで保存すれば良かったのですが、トピックとコメント番号は後から付与したいために、上記のような記述になっています。
saveメソッドにcommit=Falseと引数を渡すことで、保存せずにオブジェクトだけを生成出来ます。
このオブジェクトに情報を付与して改めて保存しています。
よく使う手段なので覚えておくと便利ですよ。
thread/urls.pyも書き換えましょう。
from django.urls import path

from . import views
app_name = 'thread'

urlpatterns = [
    path('create_topic/', views.TopicCreateView.as_view(), name='create_topic'),
    path('<int:pk>/', views.TopicAndCommentView.as_view(), name='topic'),
    path('category/<str:url_code>/', views.CategoryView.as_view(), name='category'),
]
#あらためてMVTモデルについて考える
コメントを投稿し、保存するという機能は満たしました。
この処理このようにビューで保存処理をしている参考サイトはとても多くて、おそらくこのように書く場合も多いのだと思います。
しかし、改めて考えてみるとcommentオブジェクトの保存処理はビューの仕事ではありません。
あくまで「ユーザーからこんな情報でコメント作成するって依頼が来ましたよ」とモデルに伝えて、その結果として「ユーザーに見せる情報」を返すことが(Djangoの)ビューの仕事です。
なので、commentの保存処理はモデルにお任せしましょう。
今回のようにフォームから受けた情報の保存処理はモデルのマネージャに書くか、フォームに書くことが多いです。
フォームがモデルとは意外かも知れません。
Djangoにおけるフォームの役割はMVTを横断しているため分かりづらいのですが、特にModelFormはモデルとしての役割が強いです。
今回はCommentオブジェクトの保存処理はCommentModelForm内で処理することにします。
もちろん、CommentManager内で書いても良いと思います。
class CommentModelForm(forms.ModelForm):
    class Meta:
        model = Comment
        fields = [
            'user_name',
            'message',
            'image',
        ]

    def __init__(self, *args, **kwargs):
        kwargs.setdefault('label_suffix', '')
        super().__init__(*args, **kwargs)
        self.fields['user_name'].widget.attrs['value'] = '名無し'

    def save_with_topic(self, topic_id, commit=True):
        comment = self.save(commit=False)
        comment.topic = Topic.objects.get(id=topic_id)
        comment.no = Comment.objects.filter(topic_id=topic_id).count() + 1
        if commit:
            comment.save()
        return comment
CommentModelFormクラスにsave_with_topic関数を定義しました。
トピックIDを引数にとりコメントを保存します。
ビューからはこの処理をメソッドとして呼び出すように書き換えましょう。
class TopicAndCommentView(FormView):
    template_name = 'thread/detail_topic.html'
    form_class = CommentModelForm

    def form_valid(self, form):
        # comment = form.save(commit=False)
        # comment.topic = Topic.objects.get(id=self.kwargs['pk'])
        # comment.no = Comment.objects.filter(topic=self.kwargs['pk']).count() + 1
        # comment.save()
        # コメント保存のためsave_with_topicメソッドを呼ぶ
        forms.save_with_topic(self.kwargs.get('pk'))
        return super().form_valid(form)

    def get_success_url(self):
        return reverse_lazy('thread:topic', kwargs={'pk': self.kwargs['pk']})

    def get_context_data(self):
        ctx = super().get_context_data()
        ctx['topic'] = Topic.objects.get(id=self.kwargs['pk'])
        ctx['comment_list'] = Comment.objects.filter(
                topic_id=self.kwargs['pk']).order_by('no')
        return ctx
これでビューは本来の仕事に専念できますね。「どうやってcommentを保存するか」はモデルにお任せすべきと考えます。
作ってきたサンプルアプリの確認をしてみましょう。
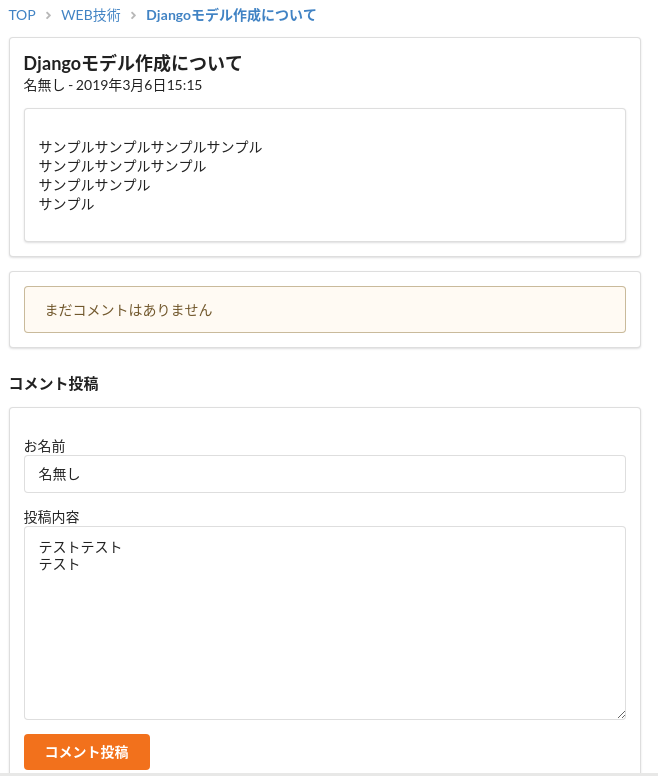

コメント投稿後の画面

これで、取り敢えず「掲示板」と呼べそうなものが出来上がってきました。サイドバーの表示がまだダミーのままですが、その処理も第二章で扱います。まだまだお伝えしたいことはありますが第一章に関しては筆を置きたいと思います。しばらく鋭気を養ったら第二章を書き始めます。どうぞ宜しくお願いいたします。
#おわりに
今日はコメント投稿機能を追加しようと思っていましたができませんでした。(追記:できるようになりました!!!)
今から掲示板を制作しようとしているのにコメント機能がないのも問題ですが、さいあく諦めて次に進みたいと考えています。。。
今後も自分のペースで進めていきたいと思います。
それではまたまた