はじめに
Jetson Nano の Node-RED で TensorFlow モデルを試した際に GPU リソースを使用する手順をまとめておきます。
公式手順では、TensorFlow 1.x, JetPack 4.3を使用する必要がありますが、最新のTensorFlow 2.x, JetPack 4.4/4.5/4.6でも動作することを確認しました。(TensorFlow 2.3.1/2.4.0/2.4.1, JetPack 4.4/4.5/4.6を使用する手順をまとめておきます。)
TensorFlow 1.x, JetPack 4.3の手順はこちら。
環境
TensorFlow.js を Node.js で利用する場合、Jetson Nano の GPU リソースを使用するためには環境が重要です。
- @tensorflow/tfjs-node のバージョンを使用するTensorFlowのバージョンに合わせる必要がある。
- TensorFlow 1.15.0 → @tensorflow/tfjs-node @1.7.4
- TensorFlow 2.3.1 → @tensorflow/tfjs-node @2.8.6
- TensorFlow 2.4.0 → @tensorflow/tfjs-node @3.6.1
- TensorFlow 2.4.1 → @tensorflow/tfjs-node @3.6.1
- TensorFlow v1.15.0 が指定されているが、custom-binary.jsonで目的のTensorFlow shared librariesを指定すれば問題なくインストールできる
- 公式ではサポートしていない arm64 でビルドされたTensorFlow shared libraries (C++)が必要で、custom-binary.json でダウンロード先を指定する
- JetPack 4.4/4.5/4.6 は CUDA 10.2 と cuDNN 8 ライブラリを使用して arm64 ビルドされた TensorFlow shared librariesを使用する
|リリース時期 |JetPack |CUDA |cuDNN | TensorFlow | @tensorflow/tfjs-node | @kitazaki/node-red-contrib-tfjs-coco-ssd |
|---|---|---|---|---|---|---|---|
|2019/12 |4.3 | 10.0.326 |7.6.3 | 1.15.0 | 1.7.4 | 0.0.3
|2020/7 |4.4 |10.2.89 |8.0.0 DP | 2.3.1
2.4.0
2.4.1 |2.8.6
3.6.1
3.6.1|0.1.1
0.2.1
0.2.2 |
|2020/7 |4.4.1 |10.2.89 |8.0.0 DP |^|^|^|
|2021/1 |4.5 |10.2.89 |8.0.0.180 |^|^|^|
|2021/2 |4.5.1 |10.2.89 |8.0.0.180 |^|^|^|
|2021/8 |4.6 |10.2.300 |8.2.1.32 |^|^|^|
TensorFlow shared libraries
TensorFlowのビルドは非常に時間が掛かるため、以下のサイトからビルド済のライブラリを利用させていただきました。
C++ API library installation file with CUDA 10.2, cuDNN 8.0 and TensorRT.
TensorFlow 2.3.1 / 2.4.0 / 2.4.1
Google Driveからダウンロードする必要がありますが、ファイルサイズが大きく、custom-binary.jsonでダウンロード先として指定することができなかったので、node-red-contrib-tf-model の手順で実績のあるIBM Cloud Object Storageに配置しました。
手順
簡単に試したい場合は、後ろの手順(簡単に試す場合の手順)を参照してください。
0. 事前準備
$ sudo apt update
$ sudo apt upgrade
$ sudo apt install -y curl
1. Node-REDのインストール
以下のコマンドを実行して、Jetson Nano に Node-RED をインストールします。
$ bash <(curl -sL https://raw.githubusercontent.com/node-red/linux-installers/master/deb/update-nodejs-and-nodered)
質問を聞かれた場合は、y を入力します。(2回)
Are you really sure you want to do this ? [y/N] ? y
Would you like to install the Pi-specific nodes ? [y/N] ? y
2. @tensorflow/tfjs-node のインストール
TensorFlow.js を Node-RED(Node.js) で使用するために、@tensorflow/tfjs-node モジュールをインストールします。
使用するTensorFlowのバージョンに合わせて@tensorflow/tfjs-nodeのバージョンを指定します。
(以下はTensorFlow 2.4.1を使用する場合の例です)
$ cd ~/.node-red
$ npm i @tensorflow/tfjs-node@3.6.1
エラーが表示されるので、以下の手順を実施します。
$ cd node_modules/@tensorflow/tfjs-node
custom-binary.json ファイルを作成します。
$ vi scripts/custom-binary.json
{
  "tf-lib": "https://cloud-object-storage-82-cos-standard-ztk.s3.jp-tok.cloud-object-storage.appdomain.cloud/libtensorflow-2.4.1-JetsonNano.tar.gz"
}
再度インストールします。
$ npm i
3. node-red-contrib-tfjs-coco-ssd のインストール
COCO モデルを使用した SSD によるオブジェクト検出を試すために、 node-red-contrib-tfjs-coco-ssd モジュールをインストールします。
node-red-contrib-tfjs-coco-ssd は 依存関係に @tensorflow/tfjs-node モジュールのバーション 1.4.0 が指定されているため、使用するTensorFlowのバージョンに合わせて変更する必要があります。
$ cd ~/.node-red
$ npm i node-red-contrib-tfjs-coco-ssd
エラーが表示されるので、以下の手順を実施します。
$ cd node_modules/node-red-contrib-tfjs-coco-ssd
package.json の依存関係で、@tensorflow/tfjs-node に指定されているバージョンを変更します。
(以下はTensorFlow 2.4.1を使用する場合の例です)
        "@tensorflow/tfjs-node": "1.4.0",
↓
        "@tensorflow/tfjs-node": "3.6.1",
エラーが表示されるので、2. @tensorflow/tfjs-node のインストールと同様に、以下の手順を実施します。
$ cd node_modules/@tensorflow/tfjs-node
custom-binary.json ファイルを作成します。
$ vi scripts/custom-binary.json
{
  "tf-lib": "https://cloud-object-storage-82-cos-standard-ztk.s3.jp-tok.cloud-object-storage.appdomain.cloud/libtensorflow-2.4.1-JetsonNano.tar.gz"
}
再度インストールします。
$ npm i
package-lock.json を削除します。
(@tensorflow/tfjs-node モジュールのバーション 1.4.0 をインストールした情報が残っているため)
$ cd ~/.node-red
$ rm package-lock.json
4. Node-RED を起動します。
$ node-red-start
Node-RED の起動ログが表示されますので、起動が完了したら Ctrl + C で抜けます。
停止する場合は、以下のコマンドを実行します。
$ node-red-stop
簡単に試す場合の手順
node-red-contrib-tfjs-coco-ssd モジュールを fork して導入手順を簡略化しています。
1. Node-REDのインストール
以下のコマンドを実行して、Jetson Nano に Node-RED をインストールします。
$ bash <(curl -sL https://raw.githubusercontent.com/node-red/linux-installers/master/deb/update-nodejs-and-nodered)
質問を聞かれた場合は、y を入力します。(2回)
Are you really sure you want to do this ? [y/N] ? y
Would you like to install the Pi-specific nodes ? [y/N] ? y
2. @kitazaki/node-red-contrib-tfjs-coco-ssd のインストール
使用するTensorFlowのバージョンに合わせて@kitazaki/node-red-contrib-tfjs-coco-ssdのバージョンを変更する必要があります。
(以下はTensorFlow 2.4.1を使用する場合の例です。TensorFlow 2.3.1の場合は@0.1.1、TensorFlow 2.4.0の場合は@0.2.1を指定します。)
$ cd ~/.node-red
$ npm i @kitazaki/node-red-contrib-tfjs-coco-ssd@0.2.2
エラーが表示されるので、以下の手順を実施します。
(インストールの中で @tensorflow/tfjs-node の custom-binary.json を作成しているので、2回目のインストールで成功します)
$ cd node_modules/@tensorflow/tfjs-node/
$ npm i
3. Node-RED を起動します。
$ node-red-start
Node-RED の起動ログが表示されますので、起動が完了したら Ctrl + C で抜けます。
停止する場合は、以下のコマンドを実行します。
$ node-red-stop
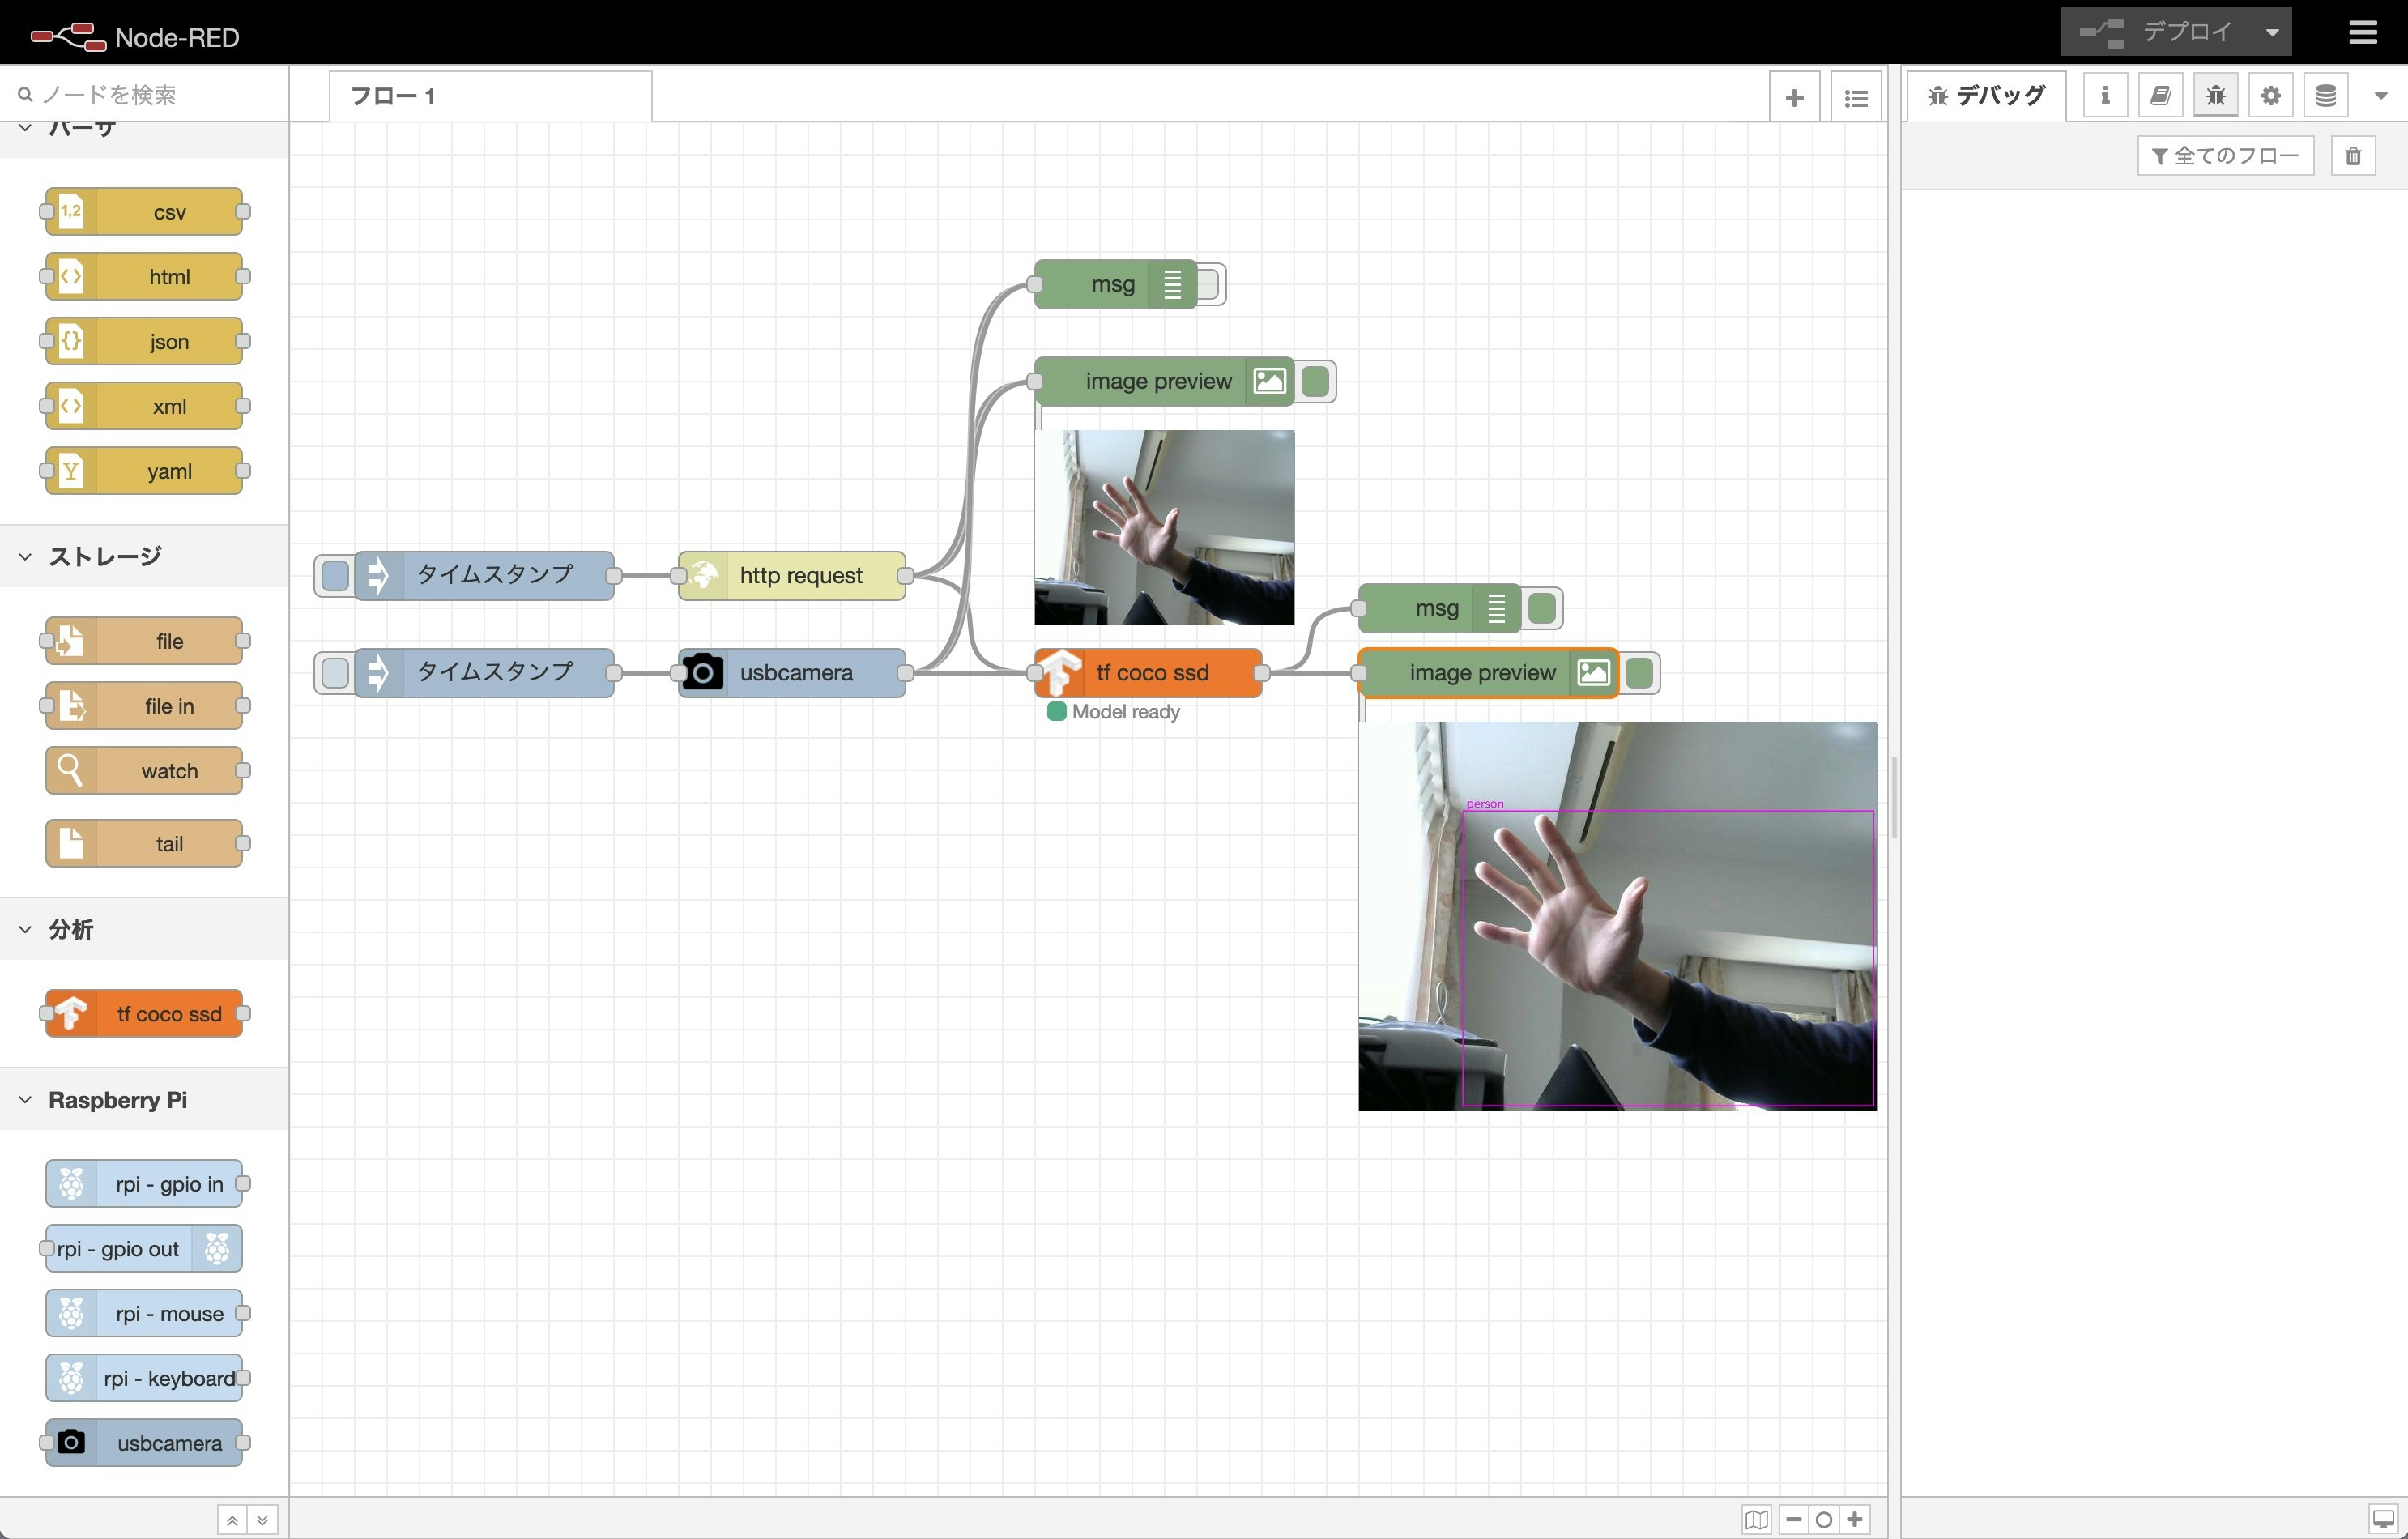
サンプルのフローを動かす
USB カメラで撮影した画像を使用してオブジェクト検出し、結果を Node-RED のフロー上に表示するため、以下の2つのモジュールをインストールします。
- node-red-contrib-image-output
- node-red-contrib-usbcamera
node-red-contrib-usbcamera モジュールを使用するためには、fswebcam コマンドをインストールする必要があります。
$ sudo apt install fswebcam
$ cd ~/.node-red
$ npm i node-red-contrib-image-output
$ npm i node-red-contrib-usbcamera
モジュールをインストールした後は Node-RED の停止・起動を行います。
$ node-red-stop
$ node-red-start
サンプルのフローをインポートします。
[{"id":"7b70c5ee.6f8b54","type":"tab","label":"フロー 1","disabled":false,"info":""},{"id":"536b8b06.e08124","type":"tensorflowCoco","z":"7b70c5ee.6f8b54","name":"","modelUrl":"http://localhost:1880/coco/model.json","scoreThreshold":0.5,"passthru":"bbox","lineColour":"magenta","x":530,"y":340,"wires":[["322a680c.2a6458","91d145e.e45deb8"]]},{"id":"974b536b.811538","type":"image","z":"7b70c5ee.6f8b54","name":"","width":160,"data":"payload","dataType":"msg","thumbnail":false,"active":true,"pass":false,"outputs":0,"x":540,"y":160,"wires":[]},{"id":"6bc3a717.18fcd","type":"http request","z":"7b70c5ee.6f8b54","name":"","method":"GET","ret":"bin","paytoqs":"ignore","url":"https://upload.wikimedia.org/wikipedia/commons/b/b3/Team_Queerala.jpg","tls":"","persist":false,"proxy":"","authType":"","x":310,"y":280,"wires":[["974b536b.811538","536b8b06.e08124","8f34f7cf.94bfe8"]]},{"id":"71825deb.2c1e34","type":"inject","z":"7b70c5ee.6f8b54","name":"","props":[{"p":"payload"},{"p":"topic","vt":"str"}],"repeat":"","crontab":"","once":false,"onceDelay":0.1,"topic":"","payload":"","payloadType":"date","x":120,"y":280,"wires":[["6bc3a717.18fcd"]]},{"id":"322a680c.2a6458","type":"debug","z":"7b70c5ee.6f8b54","name":"","active":true,"tosidebar":true,"console":false,"tostatus":false,"complete":"true","targetType":"full","statusVal":"","statusType":"auto","x":710,"y":300,"wires":[]},{"id":"91d145e.e45deb8","type":"image","z":"7b70c5ee.6f8b54","name":"","width":"320","data":"image","dataType":"msg","thumbnail":false,"active":true,"pass":false,"outputs":0,"x":740,"y":340,"wires":[]},{"id":"8f34f7cf.94bfe8","type":"debug","z":"7b70c5ee.6f8b54","name":"","active":false,"tosidebar":true,"console":false,"tostatus":false,"complete":"true","targetType":"full","statusVal":"","statusType":"auto","x":510,"y":100,"wires":[]},{"id":"20417db3.6bb88a","type":"usbcamera","z":"7b70c5ee.6f8b54","filemode":"0","filename":"image01.jpg","filedefpath":"1","filepath":"","fileformat":"jpeg","resolution":"2","name":"","x":310,"y":340,"wires":[["974b536b.811538","8f34f7cf.94bfe8","536b8b06.e08124"]]},{"id":"e39ca5b2.147f48","type":"inject","z":"7b70c5ee.6f8b54","name":"","props":[{"p":"payload"},{"p":"topic","vt":"str"}],"repeat":"","crontab":"","once":false,"onceDelay":0.1,"topic":"","payload":"","payloadType":"date","x":120,"y":340,"wires":[["20417db3.6bb88a"]]}]
サンプルのフローはGithubにも置いておきます。
動作確認
Node-RED を実行し、サンプルフローを読み込んだ後、以下のようなログが出力されれば正常です。
6 May 18:17:40 - [info] Starting flows
2021-05-06 18:17:42.140794: I tensorflow/stream_executor/platform/default/dso_loader.cc:49] Successfully opened dynamic library libcudart.so.10.2
2021-05-06 18:17:42.297185: I tensorflow/stream_executor/platform/default/dso_loader.cc:49] Successfully opened dynamic library libcuda.so.1
2021-05-06 18:17:42.304728: I tensorflow/stream_executor/cuda/cuda_gpu_executor.cc:908] ARM64 does not support NUMA - returning NUMA node zero
2021-05-06 18:17:42.304905: I tensorflow/core/common_runtime/gpu/gpu_device.cc:1720] Found device 0 with properties:
pciBusID: 0000:00:00.0 name: NVIDIA Tegra X1 computeCapability: 5.3
coreClock: 0.9216GHz coreCount: 1 deviceMemorySize: 3.87GiB deviceMemoryBandwidth: 194.55MiB/s
2021-05-06 18:17:42.304958: I tensorflow/stream_executor/platform/default/dso_loader.cc:49] Successfully opened dynamic library libcudart.so.10.2
2021-05-06 18:17:42.309247: I tensorflow/stream_executor/platform/default/dso_loader.cc:49] Successfully opened dynamic library libcublas.so.10
2021-05-06 18:17:42.309382: I tensorflow/stream_executor/platform/default/dso_loader.cc:49] Successfully opened dynamic library libcublasLt.so.10
2021-05-06 18:17:42.325550: I tensorflow/stream_executor/platform/default/dso_loader.cc:49] Successfully opened dynamic library libcufft.so.10
2021-05-06 18:17:42.362620: I tensorflow/stream_executor/platform/default/dso_loader.cc:49] Successfully opened dynamic library libcurand.so.10
2021-05-06 18:17:42.382124: I tensorflow/stream_executor/platform/default/dso_loader.cc:49] Successfully opened dynamic library libcusolver.so.10
2021-05-06 18:17:42.400306: I tensorflow/stream_executor/platform/default/dso_loader.cc:49] Successfully opened dynamic library libcusparse.so.10
2021-05-06 18:17:42.401419: I tensorflow/stream_executor/platform/default/dso_loader.cc:49] Successfully opened dynamic library libcudnn.so.8
2021-05-06 18:17:42.401614: I tensorflow/stream_executor/cuda/cuda_gpu_executor.cc:908] ARM64 does not support NUMA - returning NUMA node zero
2021-05-06 18:17:42.401814: I tensorflow/stream_executor/cuda/cuda_gpu_executor.cc:908] ARM64 does not support NUMA - returning NUMA node zero
2021-05-06 18:17:42.401912: I tensorflow/core/common_runtime/gpu/gpu_device.cc:1862] Adding visible gpu devices: 0
2021-05-06 18:17:45.742836: I tensorflow/core/common_runtime/gpu/gpu_device.cc:1261] Device interconnect StreamExecutor with strength 1 edge matrix:
2021-05-06 18:17:45.742927: I tensorflow/core/common_runtime/gpu/gpu_device.cc:1267]      0
2021-05-06 18:17:45.742958: I tensorflow/core/common_runtime/gpu/gpu_device.cc:1280] 0:   N
2021-05-06 18:17:45.743110: I tensorflow/stream_executor/cuda/cuda_gpu_executor.cc:908] ARM64 does not support NUMA - returning NUMA node zero
2021-05-06 18:17:45.743264: I tensorflow/stream_executor/cuda/cuda_gpu_executor.cc:908] ARM64 does not support NUMA - returning NUMA node zero
2021-05-06 18:17:45.743395: I tensorflow/stream_executor/cuda/cuda_gpu_executor.cc:908] ARM64 does not support NUMA - returning NUMA node zero
2021-05-06 18:17:45.743513: I tensorflow/core/common_runtime/gpu/gpu_device.cc:1406] Created TensorFlow device (/job:localhost/replica:0/task:0/device:GPU:0 with 646 MB memory) -> physical GPU (device: 0, name: NVIDIA Tegra X1, pci bus id: 0000:00:00.0, compute capability: 5.3)
2021-05-06 18:17:45.744608: I tensorflow/compiler/jit/xla_gpu_device.cc:99] Not creating XLA devices, tf_xla_enable_xla_devices not set
6 May 18:17:45 - [info] Started flows
2021-05-06 18:17:47.238542: I tensorflow/stream_executor/platform/default/dso_loader.cc:49] Successfully opened dynamic library libcudnn.so.8
2021-05-06 18:17:51.600569: I tensorflow/stream_executor/platform/default/dso_loader.cc:49] Successfully opened dynamic library libcublas.so.10
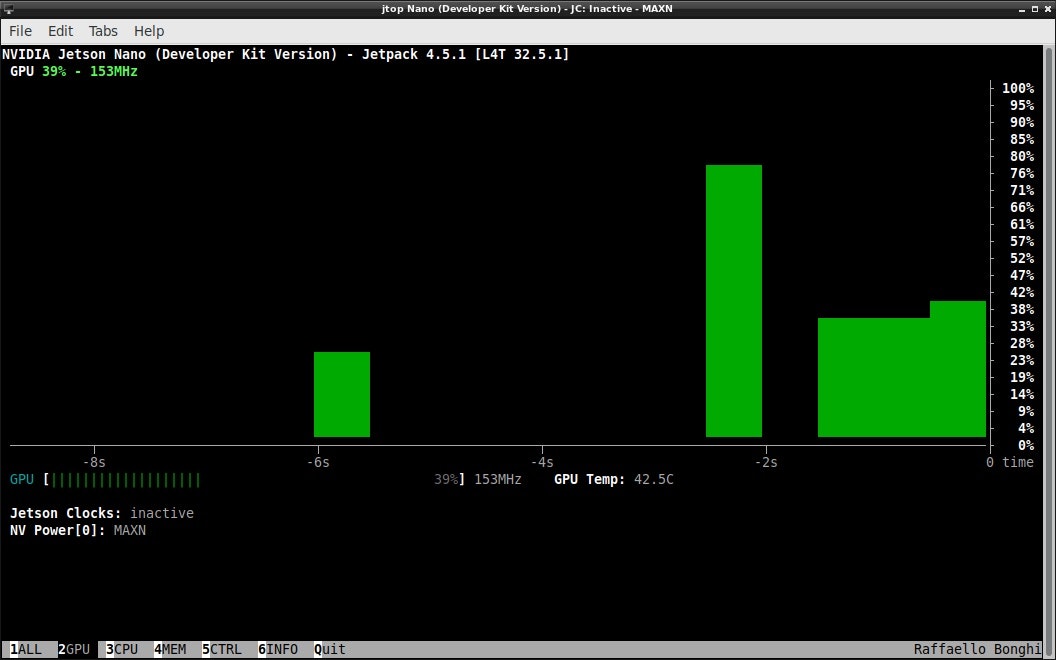
実際に GPU リソースが使用されているか確認する場合、jtop コマンドを実行するのが簡単です。
初回にインストールした場合、OSの再起動が必要です。既にインストールされている場合、最新の jtop コマンドがインストールされます。
以下の手順でインストールします。
$ sudo apt install python-pip
$ sudo -H pip install -U jetson-stats

# 初回の場合のみ
$ sudo reboot
以下の手順で実行します。
$ jtop
まとめ
みなさま、良き Jetson Nano & Node-RED ライフを!
参考