【コア機能】HTML,CSSに引き続き、JavaScriptを実装していきます。
こちらの記事では[1][2][3]までを掲載しております。
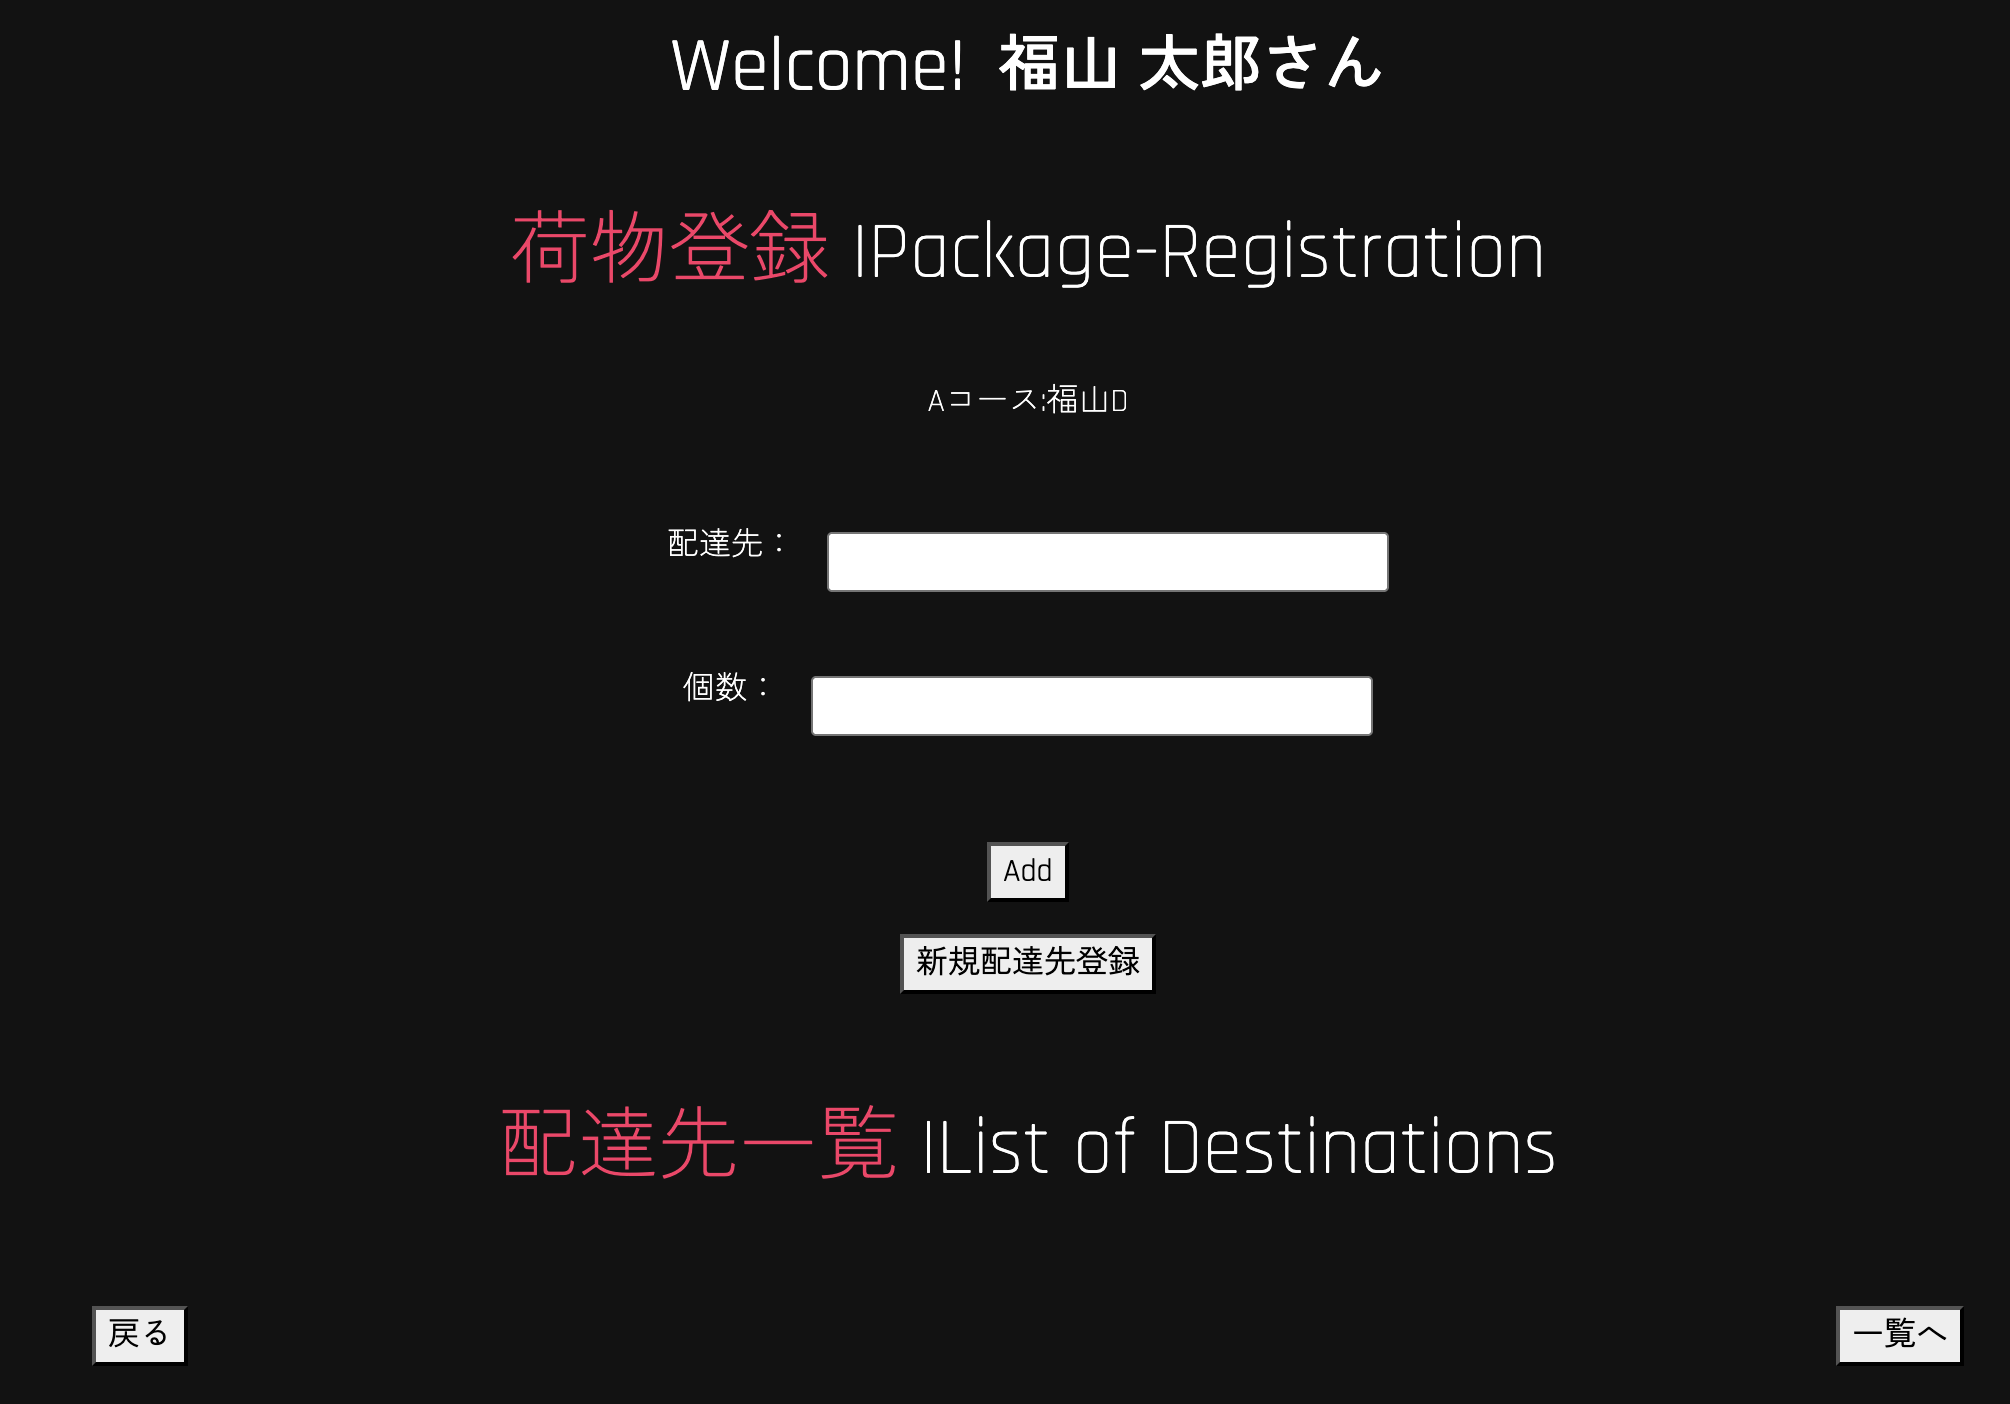
【実装内容】
- [1][Add]ボタンを押すとリストが増える。
- [2]配達先と個数をプルダウンで選択できるようにする。
- [3]上部のフォームに入力された値がリストとして増える。
- [4]リストを個別で削除できるボタンを実装する。
- [5]リストを個別で終了させられる[完了]ボタンを実装する。
- [6][完了]ボタンが押されたら右横にリアルタイムの時間が表示される。
[1] [Add]ボタンを押すとリストが増える。
1-1,完成イメージを確認。
完成イメージ

配達先と個数を選択後、[Add]を押すと下にListが表示される

1-2,リストを表示させるための場所を作成。
前回作成した画面のすぐ下にリストが増えていくような仕様にしたい。
一旦以下のように場所を作成しました。
1-3,リストを表示させるためのhtmlを書く
1-2と1-3を書いたHTMLが以下↓
     <div class="list-box">
      <div class="title-group">
        <div class="title">
          <p2>配達先一覧</p2>
          <p3>|List of Destinations</p3>
        </div>
      </div>
      <ul id="list"></ul>
    </div>
<ul id="list"></ul>この部分にボタンを押せば<li>が増えていくように実装していきたい。
----Memo----
HTMLで空のListタグを作り
↓
JSでイベントハンドラーの結果、<ul>の中に子要素<li>をが追加される。
という流れを作る。
1-4,1-3の要件に合わせたJavaScript実装
照合させるhtml
    <div class="button-group">
      <button id="button-add" class="button" type="button">Add</button>
      <button id="new-create" class="button" type="button">新規配達先登録</button>
    </div>

    <div class="list-box">
      <div class="title-group">
        <div class="title">
          <p2>配達先一覧</p2>
          <p3>|List of Destinations</p3>
        </div>
      </div>
      <ul id="list"></ul>
    </div>
JavaScript イベントハンドラー
const buttonAdd = document.getElementById('button-add');
const list = document.getElementById('list');

buttonAdd.addEventListener('click', function() {
    const New Destination = document.createElement('li');
    New Destination.textContent = 'New Destination';
    list.appendChild(Destination);
});
これで[Add]を押せばcreateElementで[New Destination]というテキストの入った<list>が追加される。という機能ができました。

[2]配達先と個数をプルダウンで選択できるようにする。
html
    <div class="form-group">
      <div class ="field-row destinations">
        <label for="select-destinations" class="form-label">配達先:</label>
          <select class="form-select select-30" required id="select-destinations" name="destination">
            <option value="" selected disabled hidden>選択してください</option>
            <option value="">スズキアリーナ神殿</option>
            <option value="">イエローハット奈良</option>
            <option value="">○○中古自動車販売店</option>
            <option value="">△△自動車</option>
            <option value="">××パーツ</option>
            <option value="">◻︎◻︎Cars</option>
          </select>
      </div>
      <div class="field-row packages">
        <label for="select-packages" class="form-label">件数:</label>
          <select class="form-select select-30" required id="select-packages" name="packages">
            <option value="" selected disabled hidden>選択してください</option>
            <option value="1">1件</option>
            <option value="2">2件</option>
            <option value="3">3件</option>
            <option value="4">4件</option>
            <option value="5">5件</option>
            <option value="6">6件</option>
            <option value="7">7件</option>
            <option value="8">8件</option>
            <option value="9">9件</option>
            <option value="10">10件</option>
          </select>
      </div>

      <div class="field-row pieces-count">
        <label for="select-pieces" class="form-label">個数:</label>
          <select class="form-select select-30" required id="select-pieces" name="pieces">
            <option value="" selected disabled hidden>選択してください</option>
            <option value="1">1個</option>
            <option value="2">2個</option>
            <option value="3">3個</option>
            <option value="4">4個</option>
            <option value="5">5個</option>
            <option value="6">6個</option>
            <option value="7">7個</option>
            <option value="8">8個</option>
            <option value="9">9個</option>
            <option value="10">10個</option>
            <option value="11">11個</option>
            <option value="12">12個</option>
            <option value="13">13個</option>
            <option value="14">14個</option>
            <option value="15">15個</option>
            <option value="16">16個</option>
            <option value="17">17個</option>
            <option value="18">18個</option>
            <option value="19">19個</option>
            <option value="20">20個</option>
          </select>
      </div>
    </div>
[3]上部のフォームに入力された値がリストとして増える。JS
要素の取得
const buttonAdd = document.getElementById('button-add');
const list = document.getElementById('list');
const selectDestinations = document.getElementById('select-destinations');
const selectPackages = document.getElementById('select-packages');
const selectPieces = document.getElementById('select-pieces');
イベントハンドラーの設定
buttonAdd.addEventListener('click', function() {
選択されたindexを変数に入れて、そのtext要素をまた変数に入れるを繰り返す
    const numDestinations = selectDestinations.selectedIndex; // Get the index of the selected option
    const getDestination = selectDestinations.options[numDestinations].text; // Get the text of the selected option
    const numPackages = selectPackages.selectedIndex;
    const getPackage = selectPackages.options[numPackages].text;
    const numPieces = selectPieces.selectedIndex;
    const getPiece = selectPieces.options[numPieces].text;
取り出した3つのtextを並べたい順にtext変数に入れる
const text = `${getDestination} - ${getPackage} - ${getPiece}`;
<li>を作成&textを持たせる
    // Create a new list item and append it to the list
    const newList = document.createElement('li');
    newList.textContent = text;
最後に子要素を追加
    list.appendChild(newList);
});
-----感想-----
正直、list.appendChild(newList);が本当に必要なのかどうか正確には理解できていないです。
しかし、<li>要素をクリックイベントでどんどん作成させたい時には、このように書く。と、とりあえず覚えてしまっています。
注意
私はプログラミング学習歴1年未満の初学者です。
この記事は自身の備忘録用として掲載しております。
間違いがあるかと思いますので、今後の学習のためにコメントにご指摘を頂けますと幸いです。