投稿者はvCenterとESXi5.5の知識に乏しいので、そのせいなのかも知れませんが、vagrant-vpshereでvCenter+ESXi5.x環境をコントロールしようとしたら結構ハマったので参考にしてみてください。5.0、5.5環境それぞれで試しましたが同じ設定で動作しました。
vagrant-vsphereのインストール
vagrant plugin install vagrant-vsphere
Dummy Boxの用意
Vagrant-vsphereではダミー用のboxを使う為、ダミー用のboxイメージを用意します
cd ~/.vagrant.d/gems/gems/vagrant-vsphere-0.8.2/example_box
tar czvf dummy.box metadata.json
boxイメージは任意の場所に置きます
mv dummy.box ~/vsphere-test/host01/
vagrantfileを用意
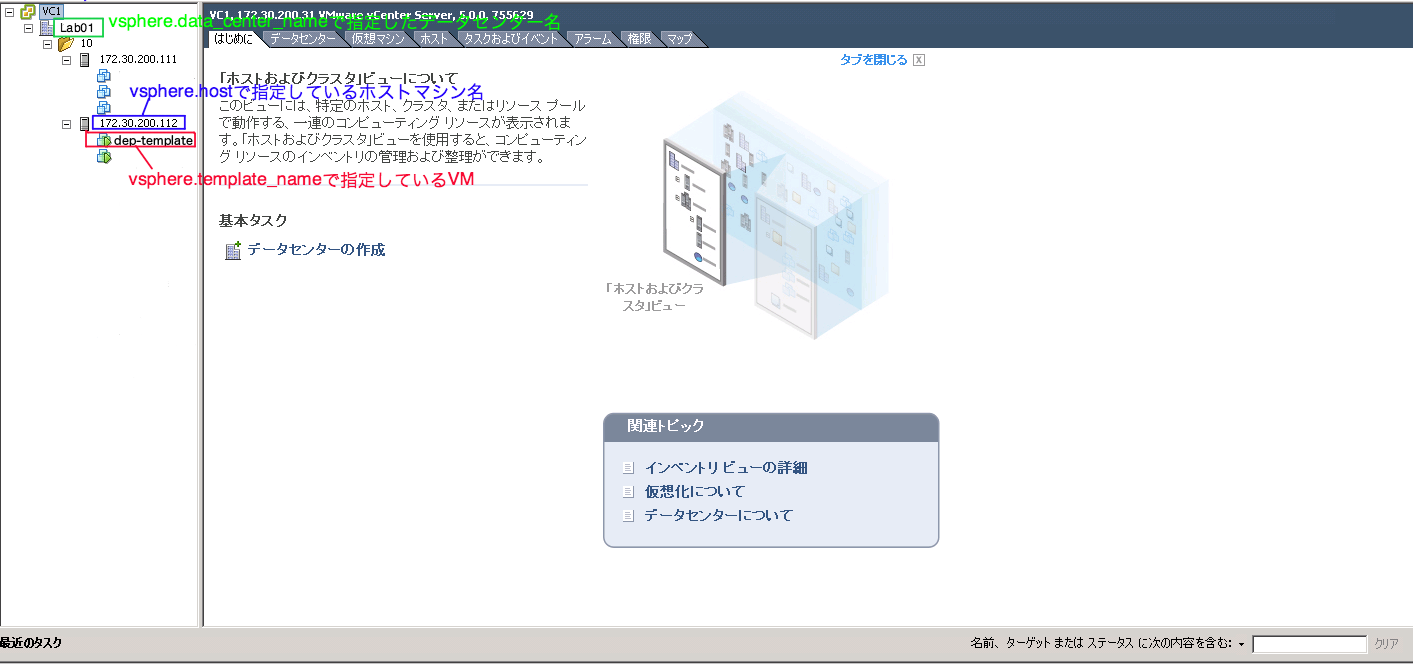
vagrantfileとvspehre側の設定の関連は画像参考にしてください
vsphere.passwordについて1
Vagrant.configure("2") do |config|
  config.vm.box = 'dummy'
  config.vm.box_url = './dummy.box'
  config.ssh.private_key_path = '/home/kinunori/.ssh/id_rsa_vagrant'
  config.ssh.username = 'kinunori'

  config.vm.provider :vsphere do |vsphere, override|
    override.vm.network 'private_network', ip: '192.168.0.101'
    # 作成したVMに設定するIPアドレス
    vsphere.customization_spec_name = 'template-spec'
    # VMクローニング時に使用するカスタマイズスペック名
    config.ssh.host = '192.168.0.101'
    # vagrant up実行時にアクセスするssh接続先
  end

  config.vm.provider :vsphere do |vsphere|
    vsphere.host = '172.30.200.31'
    vsphere.name = 'deptest-01'
    # 作成するVMの名前
    vsphere.clone_from_vm = true
    # クローニングを使用するかどうか
    vsphere.template_name = 'dep-template'
    # クローン元のVM名
    vsphere.data_center_name = 'Lab01'
    # vCenterのデータセンター名
    vsphere.compute_resource_name = '172.30.200.112'
    # VMを作成する先のホストマシン名
    vsphere.user = 'host-admin'
    # VM作成可能な権限を持つvCenterのユーザ名
    vsphere.password = 'P@ssw0rd'
    # 上記ユーザのパスワード
    vsphere.insecure = true
    # 証明書のWarningを無視
  end

end
vSphereの設定
まずはvagrantfileとの関連を確認

クローニング対象のVMとカスタマイズスペックを作る
- クローニング対象のVMを選択して右クリック
- クローン作成を選ぶ
- 必要な内容を入力してウィザードを進めていく
- ゲストのマスタマイズのところで"カスタマイズウィザードを使用してカスタマイズする"を選ぶ
- カスタマイズの内容を入力(IPはvagrant up時に変更されるので仮でOK)
- 仕様の保存で名前を入力(ここがvsphere.customization_spec_nameで指定するカスタマイズスペックの名前になる)
- 完了まで進めて終わり
あとは、vagrantfileとdummy.boxを置いたディレクトリに移動してvagrant upを実行
vagrant up --provider=vsphere
1. vsphere.passwordをvagrantfileに記述するのはセキュリティ上好ましくないので以下のように毎回指定したほうが良いです
VSPHERE_PASSWORD=P@ssw0rd vagrant up --provider=vsphere