はじめに
Python で作成した Flask Web API に対して、JWT (JSON Web Token) 認証を組み込んでみました。
参考:Python + Flask + MongoDB を利用した Web API の作成と Azure VM + Nginx への配置(ホロライブの動画配信予定を収集 その3)
2023/1/30 更新 Python 3.11系で Flask-JWT を利用できないため、あらためて投稿しました。
Python の Flask Web API に JWT認証(Flask-JWT-Extended)を組み込んだ
JWT (JSON Web Token) とは
JWT は JSON Web Token の略で、要求情報(Claim)を JSON オブジェクトとしてやりとりするトークンの仕様です。
仕様は RFC7519 で定められており、二者間の通信時の認証(Authorization)に利用されます。
今回は、Web API へのリクエストで指定されたユーザー名とパスワードを元に、JWT トークンを生成してレスポンスとして返し、その JWT トークンを用いて、Web API の機能を利用できるようにしてみました。
環境
-
ローカル環境
- Windows 10 Pro 1909
- Python 3.8.5
- PowerShell 7.1 / WSL
- Git for Windows 2.27.0
- MongoDB 4.4.2
-
クラウド環境
- Azure VM の Ubuntu 20.04(LTS)
- Python 3.8.6
- Git 2.25.1
- MongoDB 4.4.2
- Nginx 1.18.0
ユーザー情報の準備
ユーザー名とパスワードを元に、Web API の機能を利用できるかを判定するため、既存の MongoDB に users コレクションを追加し、ユーザー情報を登録しておきます。
> mongo localhost:27017/admin -u admin -p
> use holoduledb
switched to db holoduledb
> show collections
holodules
> db.createCollection("users");
{ "ok" : 1 }
> db.users.save( {"id":"1", "username":"user01", "password":"password01"} );
WriteResult({ "nInserted" : 1 })
> db.users.find();
{ "_id" : ObjectId("5fe1aca6d53eaa62c5f8c75b"), "id" : "1", "username" : "user01", "password" : "password01" }
ユーザークラスの作成
MongoDB の users コレクションから取得したユーザー情報を格納するクラスを作成します。
Object-Document-Mapper を利用していないため、JSONとオブジェクトを相互変換するメソッドも作成しておきました。
class User:
    def __init__(self, id, username, password):
        self.__id = id
        self.__username = username
        self.__password = password

    # id
    @property
    def id(self):
        return self.__id

    @id.setter
    def id(self, id):
        self.__id = id

    # username
    @property
    def username(self):
        return self.__username

    @username.setter
    def username(self, username):
        self.__username = username

    # password
    @property
    def password(self):
        return self.__password

    @password.setter
    def password(self, password):
        self.__password = password

    # ドキュメントから変換
    @classmethod
    def from_doc(cls, doc):
        if doc is None:
            return None
        user = User(doc['id'],
                    doc['username'],
                    doc['password'])
        return user

    # ドキュメントへ変換
    def to_doc(self):
        doc = { 'id': str(self.id),
                'username': str(self.username),
                'password' : str(self.password) }
        return doc
Flask で JWT 認証を利用するパッケージの追加
既存の Web API はフレームワークとして Flask を利用しているため、Flask で JWT を利用するための Flask-JWT パッケージを追加しておきます。
> poetry add Flask-JWT
JWT 認証処理の組み込み
既存の Web API の app.py に対して、JWT 認証処理を組み込みます。
作成した User クラスと Flask-JWT パッケージのインポートを追加
from flask_jwt import jwt_required, current_identity, JWT
from models.user import User
ユーザー名とパスワードをもとに認証を行いユーザーオブジェクト (identity) を返却する関数を追加
def authoricate(username, password):
    user = User.from_doc(db.users.find_one({"username": username}))
    authenticated = True if user is not None and user.password == password else False
    return user if authenticated else None
ユーザーIDをもとにユーザーオブジェクト (identity) を返却する関数を追加
def identity(payload):
    # @jwt.jwt_payload_handler でJWTペイロードをカスタマイズし、identity をユーザー名にしている
    username = payload['identity']
    user = User.from_doc(db.users.find_one({"username": username}))
    return user
JWT 認証の初期化処理を追加
秘密鍵 JWT_SECRET_KEY は設定ファイルからセットしています。
# Flask
app = Flask(__name__)
# JSONのソートを抑止
app.config['JSON_SORT_KEYS'] = False
# Flask JWT
app.config['JWT_SECRET_KEY'] = settings.jwt_secret_key      # JWTに署名する際の秘密鍵
app.config['JWT_ALGORITHM'] = 'HS256'                       # 暗号化署名のアルゴリズム
app.config['JWT_LEEWAY'] = 0                                # 有効期限に対する余裕時間
app.config['JWT_EXPIRATION_DELTA'] = timedelta(seconds=300) # トークンの有効期間
app.config['JWT_NOT_BEFORE_DELTA'] = timedelta(seconds=0)   # トークンの使用を開始する相対時間
app.config['JWT_AUTH_URL_RULE'] = '/auth'                   # 認証エンドポイントURL
jwt = JWT(app, authoricate, identity)                       # ここで上記2つの関数を指定
JWTペイロードのカスタマイズを行う関数を追加
@jwt.jwt_payload_handler
def make_payload(identity):
    iat = datetime.utcnow()
    exp = iat + current_app.config.get('JWT_EXPIRATION_DELTA')
    nbf = iat + current_app.config.get('JWT_NOT_BEFORE_DELTA')
    identity = getattr(identity, 'username')
    return {'exp': exp, 'iat': iat, 'nbf': nbf, 'identity': identity}
認証が必要な Web API のメソッドにデコレータを指定
@log(logger)
@app.route('/holodules/<string:date>', methods=['GET'])
@jwt_required()                                   # デコレータを指定
def get_Holodules(date):
    logger.info(f"holodules/{date}")
    if len(date) != 8:
        abort(500)
    ...
JWT 認証処理の動作確認
Web API を起動
> poetry run flask run

 * Environment: production
   WARNING: This is a development server. Do not use it in a production deployment.
   Use a production WSGI server instead.
 * Debug mode: off
[INFO    ]_log -  * Running on http://127.0.0.1:5000/ (Press CTRL+C to quit)
curl コマンドを利用して JWT トークンを取得
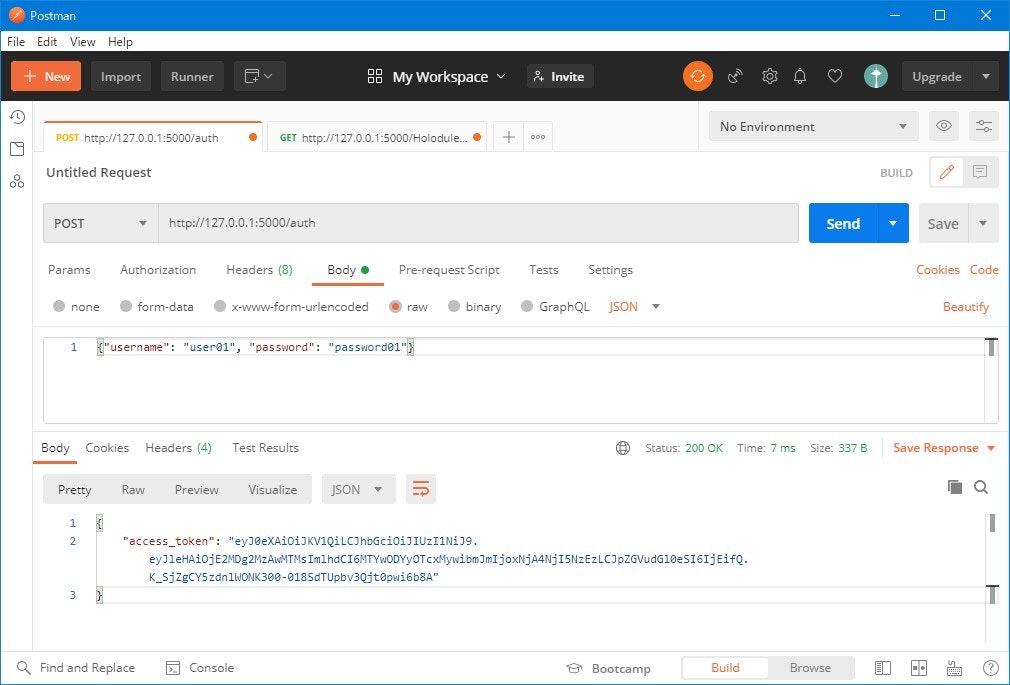
認証エンドポイントURLの /auth に対して、ユーザー名とパスワードを指定してリクエストを投げ、JWT トークンが取得できることを確認します。
# Powershell の場合は JSON のエスケープが必要
> curl "http://127.0.0.1:5000/auth" -X POST -H "Content-Type: application/json" -d '"{ \"username\": \"user01\", \"password\": \"password01\" }"'

{"access_token":"eyJ0eXAiOiJKV1QiLCJhbGciOiJIUzI..."}
# WSL であればいつも通り
$ curl "http://127.0.0.1:5000/auth" -X POST -H "Content-Type: application/json" -d '{ "username": "user01", "password": "password01" }'

{"access_token":"eyJ0eXAiOiJKV1QiLCJhbGciOiJIUzI..."}
curl コマンドを利用して Web API のメソッド呼び出し
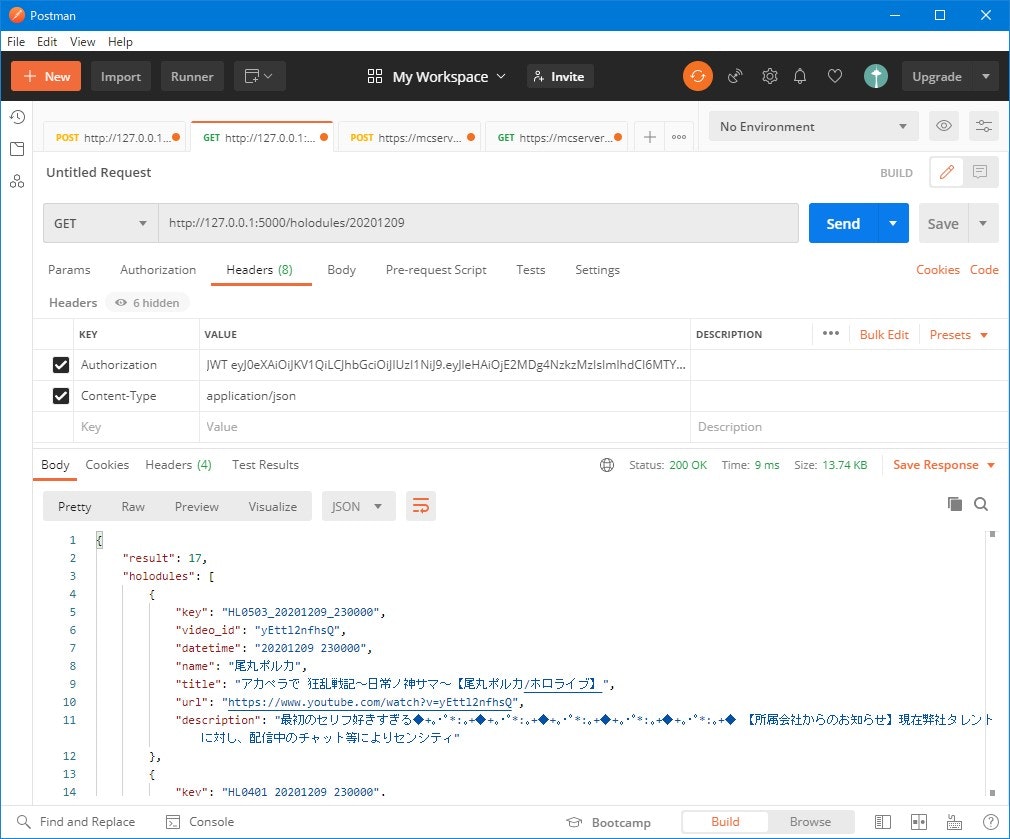
取得した JWT トークンを指定して、Web API のメソッドを呼び出し、レスポンスを取得できることを確認します。
# Powershell
> curl "http://localhost:5000/holodules/20201209" -H "Authorization: JWT eyJ0eXAiOiJKV1QiLCJhbGciOiJIUzI..."

{"result":17,"holodules":[{"key":"HL0503_20201209_230000","video_id":"yEttl2nfhsQ","datetime":"20201209 230000","name":"\u5c3e\u4e38\u30dd\u30eb\u30ab","title":"\u30a2\u30ab\u30da\u30e9\u3067...
# WSL
$ curl "http://localhost:5000/Holodules/20201209" -H "Authorization: JWT eyJ0eXAiOiJKV1QiLCJhbGciOiJIUzI..."

{"result":17,"holodules":[{"key":"HL0503_20201209_230000","video_id":"yEttl2nfhsQ","datetime":"20201209 230000","name":"\u5c3e\u4e38\u30dd\u30eb\u30ab","title":"\u30a2\u30ab\u30da\u30e9\u3067...
JWT トークンを指定しないと認証エラーとなります。
$ curl "http://localhost:5000/Holodules/20201209"

{"status_code":401,"error":"Authorization Required","description":"Request does not contain an access token"}
JWT トークンが期限切れの場合はこのようになります。
$ curl "http://localhost:5000/Holodules/20201209" -H "Authorization: JWT eyJ0eXAiOiJKV1QiLCJhbGciOiJIUzI..."

{"status_code": 401,"error": "Invalid token","description": "Signature has expired"}
JWT 認証を組み込んだ app.py のソースコード
前回から、JWT 認証だけではなくロギングを追加したりなど修正しています。
import json
from flask import Flask, jsonify, request, abort, make_response, current_app
from flask_jwt import jwt_required, current_identity, JWT
from pymongo import MongoClient
from os.path import join, dirname
from urllib.parse import quote_plus
from datetime import timedelta, datetime
from models.holodule import Holodule
from models.user import User
from settings import Settings
from logger import log, get_logger

# ロギングの設定
json_path = join(dirname(__file__), "config/logger.json")
log_dir = join(dirname(__file__), "log")
logger = get_logger(log_dir, json_path, False)

# Settings インスタンス
settings = Settings(join(dirname(__file__), '.env'))

# MongoDB 接続情報
mongodb_user = quote_plus(settings.mongodb_user)
mongodb_password = quote_plus(settings.mongodb_password)
mongodb_host = "mongodb://%s/" % (settings.mongodb_host)

# MongoDB 接続認証
client = MongoClient(mongodb_host)
db = client.holoduledb
db.authenticate(name=mongodb_user,password=mongodb_password)

# ユーザー名とパスワードを用いて認証情報を検証するコールバック関数
def authoricate(username, password):
    user = User.from_doc(db.users.find_one({"username": username}))
    authenticated = True if user is not None and user.password == password else False
    return user if authenticated else None

# JWTペイロードをもとにユーザー情報を取得するコールバック関数
def identity(payload):
    # @jwt.jwt_payload_handler でJWTペイロードをカスタマイズし、identity をユーザー名にしている
    username = payload['identity']
    user = User.from_doc(db.users.find_one({"username": username}))
    return user

# Flask
app = Flask(__name__)
# JSONのソートを抑止
app.config['JSON_SORT_KEYS'] = False
# Flask JWT
app.config['JWT_SECRET_KEY'] = settings.jwt_secret_key      # JWTに署名する際の秘密鍵
app.config['JWT_ALGORITHM'] = 'HS256'                       # 暗号化署名のアルゴリズム
app.config['JWT_LEEWAY'] = 0                                # 有効期限に対する余裕時間
app.config['JWT_EXPIRATION_DELTA'] = timedelta(seconds=300) # トークンの有効期間
app.config['JWT_NOT_BEFORE_DELTA'] = timedelta(seconds=0)   # トークンの使用を開始する相対時間
app.config['JWT_AUTH_URL_RULE'] = '/auth'                   # 認証エンドポイントURL
jwt = JWT(app, authoricate, identity)                       # ここで上記2つの関数を指定

# JWTペイロードのカスタマイズ
@jwt.jwt_payload_handler
def make_payload(identity):
    iat = datetime.utcnow()
    exp = iat + current_app.config.get('JWT_EXPIRATION_DELTA')
    nbf = iat + current_app.config.get('JWT_NOT_BEFORE_DELTA')
    identity = getattr(identity, 'username')
    return {'exp': exp, 'iat': iat, 'nbf': nbf, 'identity': identity}

# ホロジュール配信予定の取得
@log(logger)
@app.route('/holodules/<string:date>', methods=['GET'])
@jwt_required()
def get_Holodules(date):
    logger.info(f"holodules/{date}")
    if len(date) != 8:
        abort(500)

    # MongoDB から年月日を条件にホロジュール配信予定を取得してリストに格納
    holodule_list = []
    for doc in db.holodules.find({"datetime": {'$regex':'^'+date}}).sort("datetime", -1):
        holodule = Holodule.from_doc(doc)
        holodule_list.append(holodule)

    if len(holodule_list) == 0:
        abort(404)

    # オブジェクトをもとに辞書を構築してJSONとして返却
    holodules = []
    for holodule in holodule_list:
        doc = holodule.to_doc()
        holodules.append(doc)
    result = {
        "result":len(holodule_list),
        "holodules":holodules
    }
    # UTF-8コード、Content-Type は application/json
    return make_response(jsonify(result))
    # UTF-8文字、Content-Type は text/html; charset=utf-8
    # return make_response(json.dumps(result, ensure_ascii=False))

# エラーハンドラ:404
@log(logger)
@app.errorhandler(404)
def not_found(error):
    logger.error(f"{error}")
    return make_response(jsonify({'error': 'Not found'}), 404)

# エラーハンドラ:500
@log(logger)
@app.errorhandler(500)
def internal_server_error(error):
    logger.error(f"{error}")
    return make_response(jsonify({'error': 'Internal Server Error'}), 500)

if __name__ == "__main__":
    app.run()
おわりに
JWT (JSON Web Token) 認証を利用した、最低限の仕組みを組み込めました。
やりたかった、SSL通信とJWT認証を実現できましたが、いろいろな仕組みを無理やり組み合わせた感があるので全体を見直したいと思います。
サーバー側の機能はここまでとして、Web API を利用するクライアント側(Android アプリ)の開発を始めながら修正していきます。

