はじめに
前回はバックエンドの YouTube Live Chat API に Google OAuth 2.0 認証とチャット投稿の機能を追加したので、フロントエンドの YouTube Live Chat Viewer から、これらの認証や投稿の機能を利用できるようにしました。
今回の実装では以下の技術要素を組み合わせています。
- Google OAuth 2.0 認証フロー(ポップアップウィンドウ方式)
- YouTube Data API v3 を利用したチャット投稿
- React Hooks を活用した状態管理
- TypeScript による型安全な実装
前回作成した YouTube Live Chat API(バックエンド)
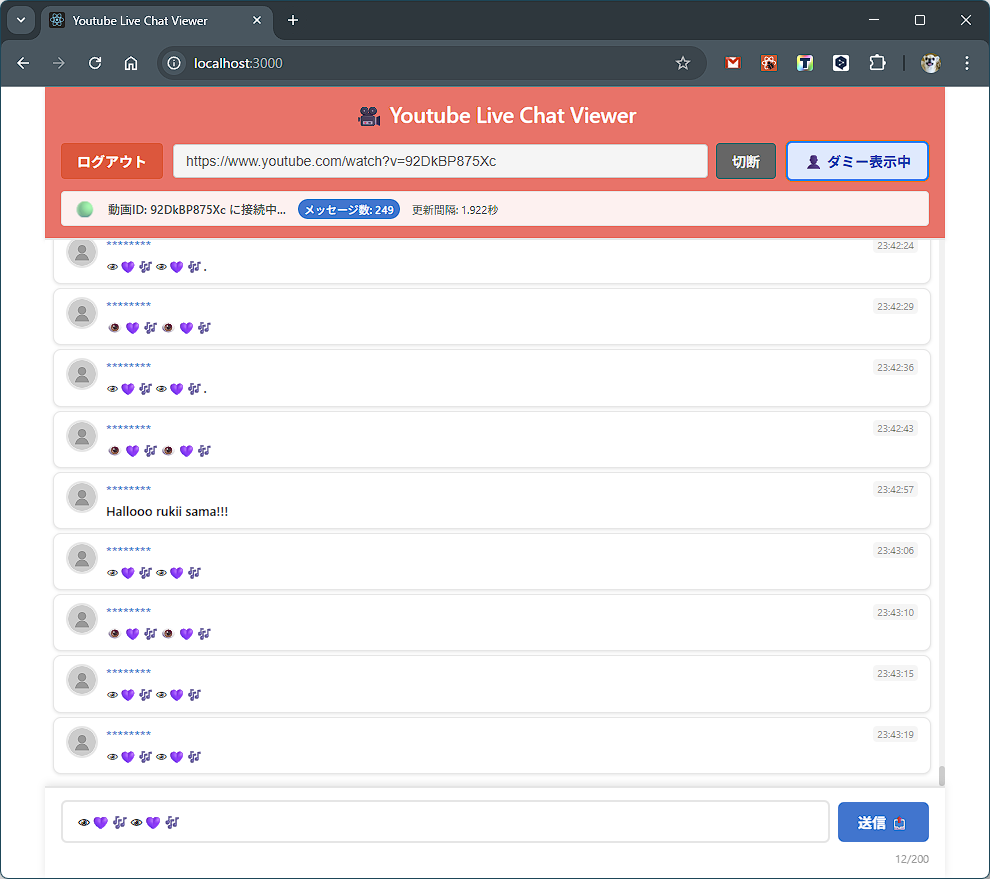
作ったもの
- OAuth 2.0 認証: Google アカウントでログイン可能
- チャット投稿: 認証後、配信中のライブチャットにメッセージを投稿可能
- メッセージ引用: 既存のチャットメッセージをクリックして入力欄に挿入
- 認証状態の永続化: localStorage を利用してアクセストークンを保存
- ダミー表示モード: スクリーンショットを撮るためのダミーモードに切替可能
開発環境
- Windows 11
- Node.js 22.x + npm 10.x
- React 18.2.0
- TypeScript 5.x
- Vite 5.x
アーキテクチャ概要
今回の実装では、フロントエンドとバックエンドを明確に分離した構成を採用しています。
[React App] ←→ [FastAPI Backend] ←→ [YouTube Data API v3]
- フロントエンド: React + TypeScript + Vite
- バックエンド: FastAPI (Python) でプロキシとして動作
- 認証フロー: OAuth 2.0 Authorization Code Flow
実装内容
型定義の追加
YouTube Data API のレスポンスと OAuth 認証に関する型を定義しました。
src/types/youtube.ts
// 認証関連の型定義
export interface AuthResponse {
  auth_url: string;
  state: string;
}

export interface AuthCallbackParams {
  code?: string;
  state?: string;
  access_token?: string;
}

export interface SendMessageRequest {
  video_id: string;
  message_text: string;
  access_token: string;
}

export interface SendMessageResponse {
  message_id: string;
  message_text: string;
  author_name: string;
  published_at: string;
  success?: boolean;
}
OAuth 認証フック (useAuth)
認証状態の管理とログイン/ログアウト処理を行うカスタムフックを実装しました。
src/hooks/useAuth.ts
import { useCallback, useEffect, useState } from 'react';
import { config } from '../config';
import type { AuthResponse } from '../types/youtube';

export const useAuth = () => {
    const [isAuthenticated, setIsAuthenticated] = useState(false);
    const [accessToken, setAccessToken] = useState<string | null>(null);
    const [isLoading, setIsLoading] = useState(false);
    const [error, setError] = useState<string | null>(null);

    // ローカルストレージからトークンを復元
    useEffect(() => {
        const storedToken = localStorage.getItem('youtube_access_token');
        if (storedToken) {
            setAccessToken(storedToken);
            setIsAuthenticated(true);
        }
    }, []);

    // 認証URLを取得して認証フローを開始
    const login = useCallback(async () => {
        setIsLoading(true);
        setError(null);

        try {
            const callbackUrl = `${window.location.origin}/auth/callback`;
            const response = await fetch(
                `${config.apiBaseUrl}/api/auth/login?callback_url=${encodeURIComponent(callbackUrl)}`
            );

            if (!response.ok) {
                throw new Error('認証URLの取得に失敗しました');
            }

            const data: AuthResponse = await response.json();

            // 新しいウィンドウで認証ページを開く
            const authWindow = window.open(
                data.auth_url,
                'YouTube Authentication',
                'width=600,height=700,left=100,top=100'
            );

            if (!authWindow) {
                throw new Error('ポップアップがブロックされました。ポップアップを許可してください。');
            }

            // ポーリングで認証完了を待つ
            const pollTimer = setInterval(() => {
                if (authWindow.closed) {
                    clearInterval(pollTimer);
                    setIsLoading(false);

                    // ウィンドウが閉じられた後、トークンを確認
                    const storedToken = localStorage.getItem('youtube_access_token');
                    if (!storedToken) {
                        setError('認証がキャンセルされたか、失敗しました');
                    }
                }
            }, 500);

        } catch (err) {
            setError(err instanceof Error ? err.message : '認証エラーが発生しました');
            setIsLoading(false);
        }
    }, []);

    // コールバックからトークンを処理
    const handleCallback = useCallback((token: string) => {
        setAccessToken(token);
        setIsAuthenticated(true);
        localStorage.setItem('youtube_access_token', token);
        setError(null);
    }, []);

    // ログアウト
    const logout = useCallback(() => {
        setAccessToken(null);
        setIsAuthenticated(false);
        localStorage.removeItem('youtube_access_token');
        setError(null);
    }, []);

    return {
        isAuthenticated,
        accessToken,
        isLoading,
        error,
        login,
        logout,
        handleCallback,
    };
};
ポイント:
-
localStorageでトークンを永続化し、ページリロード後も認証状態を維持 - ポップアップウィンドウを使った OAuth フローを実装
- ポーリングでウィンドウのクローズを検知
認証コールバックコンポーネント
OAuth 認証後のコールバック処理を担当するコンポーネントです。
src/components/AuthCallback.tsx
import { useEffect } from 'react';

interface AuthCallbackProps {
    onAuthSuccess: (token: string) => void;
}

const AuthCallback: React.FC<AuthCallbackProps> = ({ onAuthSuccess }) => {
    useEffect(() => {
        // URLパラメータからアクセストークンを取得
        const params = new URLSearchParams(window.location.search);
        const accessToken = params.get('access_token');
        const code = params.get('code');
        const error = params.get('error');

        if (error) {
            console.error('認証エラー:', error);
            // エラーを親ウィンドウに通知
            if (window.opener) {
                window.opener.postMessage(
                    { type: 'auth_error', error: error },
                    window.location.origin
                );
                window.close();
            } else {
                alert(`認証エラー: ${error}`);
                window.location.href = '/';
            }
            return;
        }

        if (accessToken) {
            // トークンを親ウィンドウに渡す(ポップアップの場合)
            if (window.opener) {
                window.opener.postMessage(
                    { type: 'auth_success', token: accessToken },
                    window.location.origin
                );
                window.close();
            } else {
                // 通常のリダイレクトの場合
                onAuthSuccess(accessToken);
                window.location.href = '/';
            }
        } else if (code) {
            // codeパラメータがある場合(バックエンドでトークン交換が必要)
            console.error('認証コードが返されましたが、アクセストークンへの変換が必要です');
            if (window.opener) {
                window.close();
            } else {
                window.location.href = '/';
            }
        } else {
            console.error('認証パラメータが見つかりません');
            if (window.opener) {
                window.close();
            } else {
                window.location.href = '/';
            }
        }
    }, [onAuthSuccess]);

    return (
        <div style={{
            display: 'flex',
            flexDirection: 'column',
            alignItems: 'center',
            justifyContent: 'center',
            height: '100vh',
            fontFamily: 'Arial, sans-serif',
        }}>
            <h2>🔐 認証処理中...</h2>
            <p>このウィンドウは自動的に閉じます</p>
            <div style={{
                marginTop: '20px',
                width: '50px',
                height: '50px',
                border: '5px solid #f3f3f3',
                borderTop: '5px solid #3498db',
                borderRadius: '50%',
                animation: 'spin 1s linear infinite',
            }} />
            <style>{`
        @keyframes spin {
          0% { transform: rotate(0deg); }
          100% { transform: rotate(360deg); }
        }
      `}</style>
        </div>
    );
};

export default AuthCallback;
ポイント:
-
postMessageAPI を使って親ウィンドウにトークンを安全に渡す - ポップアップウィンドウとリダイレクト両方のパターンに対応
- セキュリティのため
window.location.originでメッセージの送信元を検証
チャット入力コンポーネント
メッセージ投稿用の入力コンポーネントです。
src/components/ChatInput.tsx
import type { FormEvent } from 'react';
import { forwardRef, useImperativeHandle, useState } from 'react';

interface ChatInputProps {
    onSend: (message: string) => Promise<void>;
    disabled?: boolean;
    isSending?: boolean;
}

export interface ChatInputRef {
    setMessage: (text: string) => void;
}

const ChatInput = forwardRef<ChatInputRef, ChatInputProps>(({ onSend, disabled = false, isSending = false }, ref) => {
    const [message, setMessage] = useState('');
    const [error, setError] = useState<string | null>(null);

    // 親コンポーネントからメッセージをセットできるようにする
    useImperativeHandle(ref, () => ({
        setMessage: (text: string) => {
            setMessage(text);
        }
    }));

    const handleSubmit = async (e: FormEvent) => {
        e.preventDefault();

        if (!message.trim() || isSending || disabled) return;

        setError(null);

        try {
            await onSend(message);
            setMessage('');
        } catch (err) {
            const errorMessage = err instanceof Error ? err.message : 'メッセージの送信に失敗しました';
            setError(errorMessage);
            console.error('送信失敗:', err);
        }
    };

    return (
        <div className="chat-input-container">
            <form onSubmit={handleSubmit} className="chat-input-form">
                <div className="input-wrapper">
                    <input
                        type="text"
                        value={message}
                        onChange={(e) => setMessage(e.target.value)}
                        placeholder={disabled ? '接続してからメッセージを送信してください...' : 'メッセージを入力...'}
                        disabled={disabled || isSending}
                        className="chat-input"
                        maxLength={200}
                    />
                    <button
                        type="submit"
                        disabled={disabled || isSending || !message.trim()}
                        className="chat-send-button"
                    >
                        {isSending ? '送信中...' : '送信 📤'}
                    </button>
                </div>
                {error && (
                    <div className="chat-input-error">
                        ⚠️ {error}
                    </div>
                )}
                <div className="chat-input-info">
                    {message.length}/200
                </div>
            </form>
        </div>
    );
});

ChatInput.displayName = 'ChatInput';

export default ChatInput;
ポイント:
-
forwardRefとuseImperativeHandleを使って親から入力値を制御可能に - 200文字の文字数制限を実装(YouTube API の制限に準拠)
- 送信中は重複送信を防ぐためボタンを無効化
チャット投稿機能の追加 (useLiveChat フックの拡張)
既存の useLiveChat フックにチャット投稿機能を追加しました。
src/hooks/useLiveChat.ts (抜粋)
// メッセージ送信機能
const sendMessage = useCallback(async (message: string): Promise<void> => {
    if (!accessToken) {
        throw new Error('認証が必要です。まずログインしてください');
    }

    if (!videoId) {
        throw new Error('動画IDが見つかりません。チャットに接続してからメッセージを送信してください');
    }

    if (!message.trim()) {
        throw new Error('メッセージを入力してください');
    }

    setIsSending(true);

    try {
        const requestBody: SendMessageRequest = {
            video_id: videoId,
            message_text: message.trim(),
            access_token: accessToken,
        };

        const response = await fetch(`${config.apiBaseUrl}/api/youtube/livechat/message`, {
            method: 'POST',
            headers: {
                'Content-Type': 'application/json',
            },
            body: JSON.stringify(requestBody),
        });

        if (!response.ok) {
            const errorData = await response.json().catch(() => ({}));
            const errorMessage = errorData.detail
                ? (Array.isArray(errorData.detail)
                    ? errorData.detail.map((e: any) => e.msg).join(', ')
                    : errorData.detail)
                : 'メッセージの送信に失敗しました';
            throw new Error(errorMessage);
        }

        const data: SendMessageResponse = await response.json();

        // 送信成功
        console.log('メッセージ送信成功', {
            message_id: data.message_id,
            message_text: data.message_text,
            author_name: data.author_name,
            published_at: data.published_at,
        });

    } catch (err) {
        console.error('メッセージ送信エラー:', err);
        throw err;
    } finally {
        setIsSending(false);
    }
}, [accessToken, videoId]);
ポイント:
-
accessTokenを引数として受け取り、認証が必要な API 呼び出しに利用 - エラーハンドリングを丁寧に実装し、ユーザーにわかりやすいエラーメッセージを表示
-
isSendingフラグで送信状態を管理
メインコンポーネントの統合
すべての機能を統合したメインコンポーネントです。
src/components/LiveChat.tsx (抜粋)
const LiveChat: React.FC = () => {
  const chatInputRef = useRef<ChatInputRef>(null);

  const {
    isAuthenticated,
    accessToken,
    isLoading,
    error: authError,
    login,
    logout,
    handleCallback
  } = useAuth();

  const {
    videoUrl,
    setVideoUrl,
    videoId,
    messages,
    isConnected,
    error,
    pollingInterval,
    messageCount,
    isSending,
    handleConnect,
    handleDisconnect,
    sendMessage,
  } = useLiveChat(accessToken);

  // チャットメッセージクリック時のハンドラー
  const handleMessageClick = (message: string) => {
    if (chatInputRef.current) {
      chatInputRef.current.setMessage(message);
    }
  };

  // postMessageイベントリスナーを追加して認証を処理
  useEffect(() => {
    const handleMessage = (event: MessageEvent) => {
      // セキュリティチェック
      if (event.origin !== window.location.origin) return;

      if (event.data.type === 'auth_success' && event.data.token) {
        handleCallback(event.data.token);
      } else if (event.data.type === 'auth_error') {
        console.error('認証エラー:', event.data.error);
      }
    };

    window.addEventListener('message', handleMessage);
    return () => window.removeEventListener('message', handleMessage);
  }, [handleCallback]);

  return (
    <div className="live-chat">
      <div className="live-chat-header">
        <h1>🎥 Youtube Live Chat Viewer</h1>

        {/* 認証ボタンと接続コントロール */}
        <div className="auth-and-controls">
          <div className="auth-button-container">
            {!isAuthenticated ? (
              <button
                onClick={login}
                disabled={isLoading}
                className="auth-button login-button"
              >
                {isLoading ? '認証中...' : 'ログイン 🔐'}
              </button>
            ) : (
              <button
                onClick={logout}
                className="auth-button logout-button"
              >
                ログアウト
              </button>
            )}
          </div>

          {/* 接続コントロール */}
          <div className="connection-controls-inline">
            <input
              type="text"
              className="url-input"
              value={videoUrl}
              onChange={(e) => setVideoUrl(e.target.value)}
              placeholder="YouTube動画URLを入力..."
              disabled={isConnected}
            />
            {!isConnected ? (
              <button
                className="connect-btn"
                onClick={handleConnect}
                disabled={!videoUrl.trim()}
              >
                接続
              </button>
            ) : (
              <button
                className="disconnect-btn"
                onClick={handleDisconnect}
              >
                切断
              </button>
            )}
          </div>
        </div>

        {/* エラーメッセージ */}
        {(authError || error) && (
          <div className="error-message">
            ⚠️ {authError || error}
          </div>
        )}

        {/* ステータス表示 */}
        <ChatStatus
          isConnected={isConnected}
          videoId={videoId}
          pollingInterval={pollingInterval}
          messageCount={messageCount}
        />
      </div>

      <ChatContainer
        messages={messages}
        isConnected={isConnected}
        error={error}
        onMessageClick={handleMessageClick}
      />

      {/* チャット入力欄(認証済みかつ接続中のみ表示) */}
      {isAuthenticated && isConnected && (
        <ChatInput
          ref={chatInputRef}
          onSend={sendMessage}
          disabled={!isConnected || isSending}
          isSending={isSending}
        />
      )}

      {/* 認証が必要な場合のメッセージ */}
      {!isAuthenticated && isConnected && (
        <div style={{
          padding: '15px',
          backgroundColor: '#fff3cd',
          borderTop: '1px solid #ffc107',
          textAlign: 'center',
          color: '#856404',
        }}>
          💬 チャットを投稿するには、Googleアカウントでログインしてください
        </div>
      )}
    </div>
  );
};
ポイント:
-
useRefを使って子コンポーネントの入力フィールドを制御 -
postMessageイベントリスナーでポップアップからの認証結果を受信 - 認証状態と接続状態に応じて UI を動的に変更
ルーティングの追加
OAuth コールバックページへのルーティングを追加しました。
src/App.tsx
import React, { useState } from 'react';
import './App.css';
import AuthCallback from './components/AuthCallback';
import LiveChat from './components/LiveChat';
import { useAuth } from './hooks/useAuth';

const App: React.FC = () => {
  const { handleCallback } = useAuth();
  const [currentPath, setCurrentPath] = useState(window.location.pathname);

  // シンプルなルーティング処理
  React.useEffect(() => {
    const handleLocationChange = () => {
      setCurrentPath(window.location.pathname);
    };

    // popstateイベントでブラウザの戻る/進むをハンドリング
    window.addEventListener('popstate', handleLocationChange);

    return () => {
      window.removeEventListener('popstate', handleLocationChange);
    };
  }, []);

  // 認証コールバックページの表示
  if (currentPath === '/auth/callback') {
    return (
      <div className="App">
        <AuthCallback onAuthSuccess={handleCallback} />
      </div>
    );
  }

  // メインページの表示
  return (
    <div className="App">
      <LiveChat />
    </div>
  );
};

export default App;
ポイント:
- React Router を使わず、シンプルなパス判定でルーティングを実装
-
popstateイベントでブラウザバックにも対応
スタイルの追加
チャット入力欄や認証ボタンのスタイルを追加しました。
src/components/LiveChat.css (抜粋)
/* チャット入力欄のスタイル */
.chat-input-container {
  border-top: 2px solid #e5e5e5;
  background: white;
  padding: 12px 16px;
  box-shadow: 0 -2px 8px rgba(0, 0, 0, 0.1);
}

.chat-input-form {
  display: flex;
  flex-direction: column;
  gap: 8px;
}

.input-wrapper {
  display: flex;
  gap: 8px;
  align-items: center;
}

.chat-input {
  flex: 1;
  padding: 10px 14px;
  border: 2px solid #e5e5e5;
  border-radius: 6px;
  font-size: 14px;
  font-family: inherit;
  transition: all 0.2s ease;
  background: white;
}

.chat-input:focus {
  outline: none;
  border-color: #1976d2;
  box-shadow: 0 0 0 3px rgba(25, 118, 210, 0.1);
}

.chat-send-button {
  padding: 10px 20px;
  background: #1976d2;
  color: white;
  border: none;
  border-radius: 6px;
  font-size: 14px;
  font-weight: 600;
  cursor: pointer;
  transition: all 0.2s ease;
  white-space: nowrap;
}

.chat-send-button:hover:not(:disabled) {
  background: #1565c0;
  transform: translateY(-1px);
  box-shadow: 0 4px 8px rgba(25, 118, 210, 0.3);
}

.chat-send-button:disabled {
  background: #ccc;
  cursor: not-allowed;
  transform: none;
}

/* メッセージクリック時のホバーエフェクト */
.chat-message:hover {
  box-shadow: 0 2px 8px rgba(0, 0, 0, 0.15);
  border-color: #1976d2;
  background: #f8f9fa;
}

.chat-message:active {
  transform: scale(0.98);
  background: #e3f2fd;
}
動作確認
プロジェクトをデバッグ実行します。
npm run dev
Vite の開発サーバーが起動します。
- ログイン: 「ログイン 🔐」ボタンをクリックし、Google アカウントで認証
- チャット接続: YouTube Live 動画の URL を入力して「接続」
- メッセージ投稿: 入力欄にメッセージを入力して「送信 📤」
- メッセージ引用: 既存のメッセージをクリックすると入力欄に挿入される
- ダミー表示モード: スクリーンショットを撮るためのダミーモードに切り替える
実行結果
- Google OAuth 2.0 認証フローが正常に動作
- ライブチャットへのメッセージ投稿が成功
- 既存メッセージのクリックによる引用機能も動作確認
- ダミー表示モードによる投稿者のアバターアイコンと名前の非表示化も動作
おわりに
React と TypeScript を使って、YouTube Live Chat Viewer に OAuth 認証とチャット投稿機能を追加しました。
引き続き、歌枠用の弾幕パターンの管理や、チャットメッセージのフィルタリング機能、スーパーチャットの表示など、リアルタイムチャット関連の機能を拡充したいなと考えています。チャット内容からその配信の盛り上がりなどを分析してみるのも面白いかもしれません。