前回までのあらすじ
前回まででこのオリジナルアプリのバックエンドを完成させた。
DjangoとReact redux TypeScriptを使ってオリジナルアプリを作ってみました(TwitterAPI)その1
DjangoとReact redux TypeScriptを使ってオリジナルアプリを作ってみました(TwitterAPI)その2
git↓
https://github.com/kenshow-blog/twitter
今回はついにフロントエンドの構築のフェーズに移っていく
このオリジナルアプリ開発記事
DjangoとReact redux TypeScriptを使ってオリジナルアプリを作ってみました(TwitterAPI)その1
DjangoとReact redux TypeScriptを使ってオリジナルアプリを作ってみました(TwitterAPI)その2
[DjangoとReact redux TypeScriptを使ってオリジナルアプリを作ってみました(TwitterAPI)その3]
(https://qiita.com/kenshow-blog/items/7ecbd85e00a7e1f0bc75)
[DjangoとReact redux TypeScriptを使ってオリジナルアプリを作ってみました(TwitterAPI)その4]
(https://qiita.com/kenshow-blog/items/5606d29b0b2bfa4a5c1d)
今回やること
・ログイン認証画面の作成
・登録画面の作成
・ホーム画面の作成
・非同期処理でバックとのやりとりを書いていく
完成形
登録画面↓

ログイン画面↓

ログインすると....
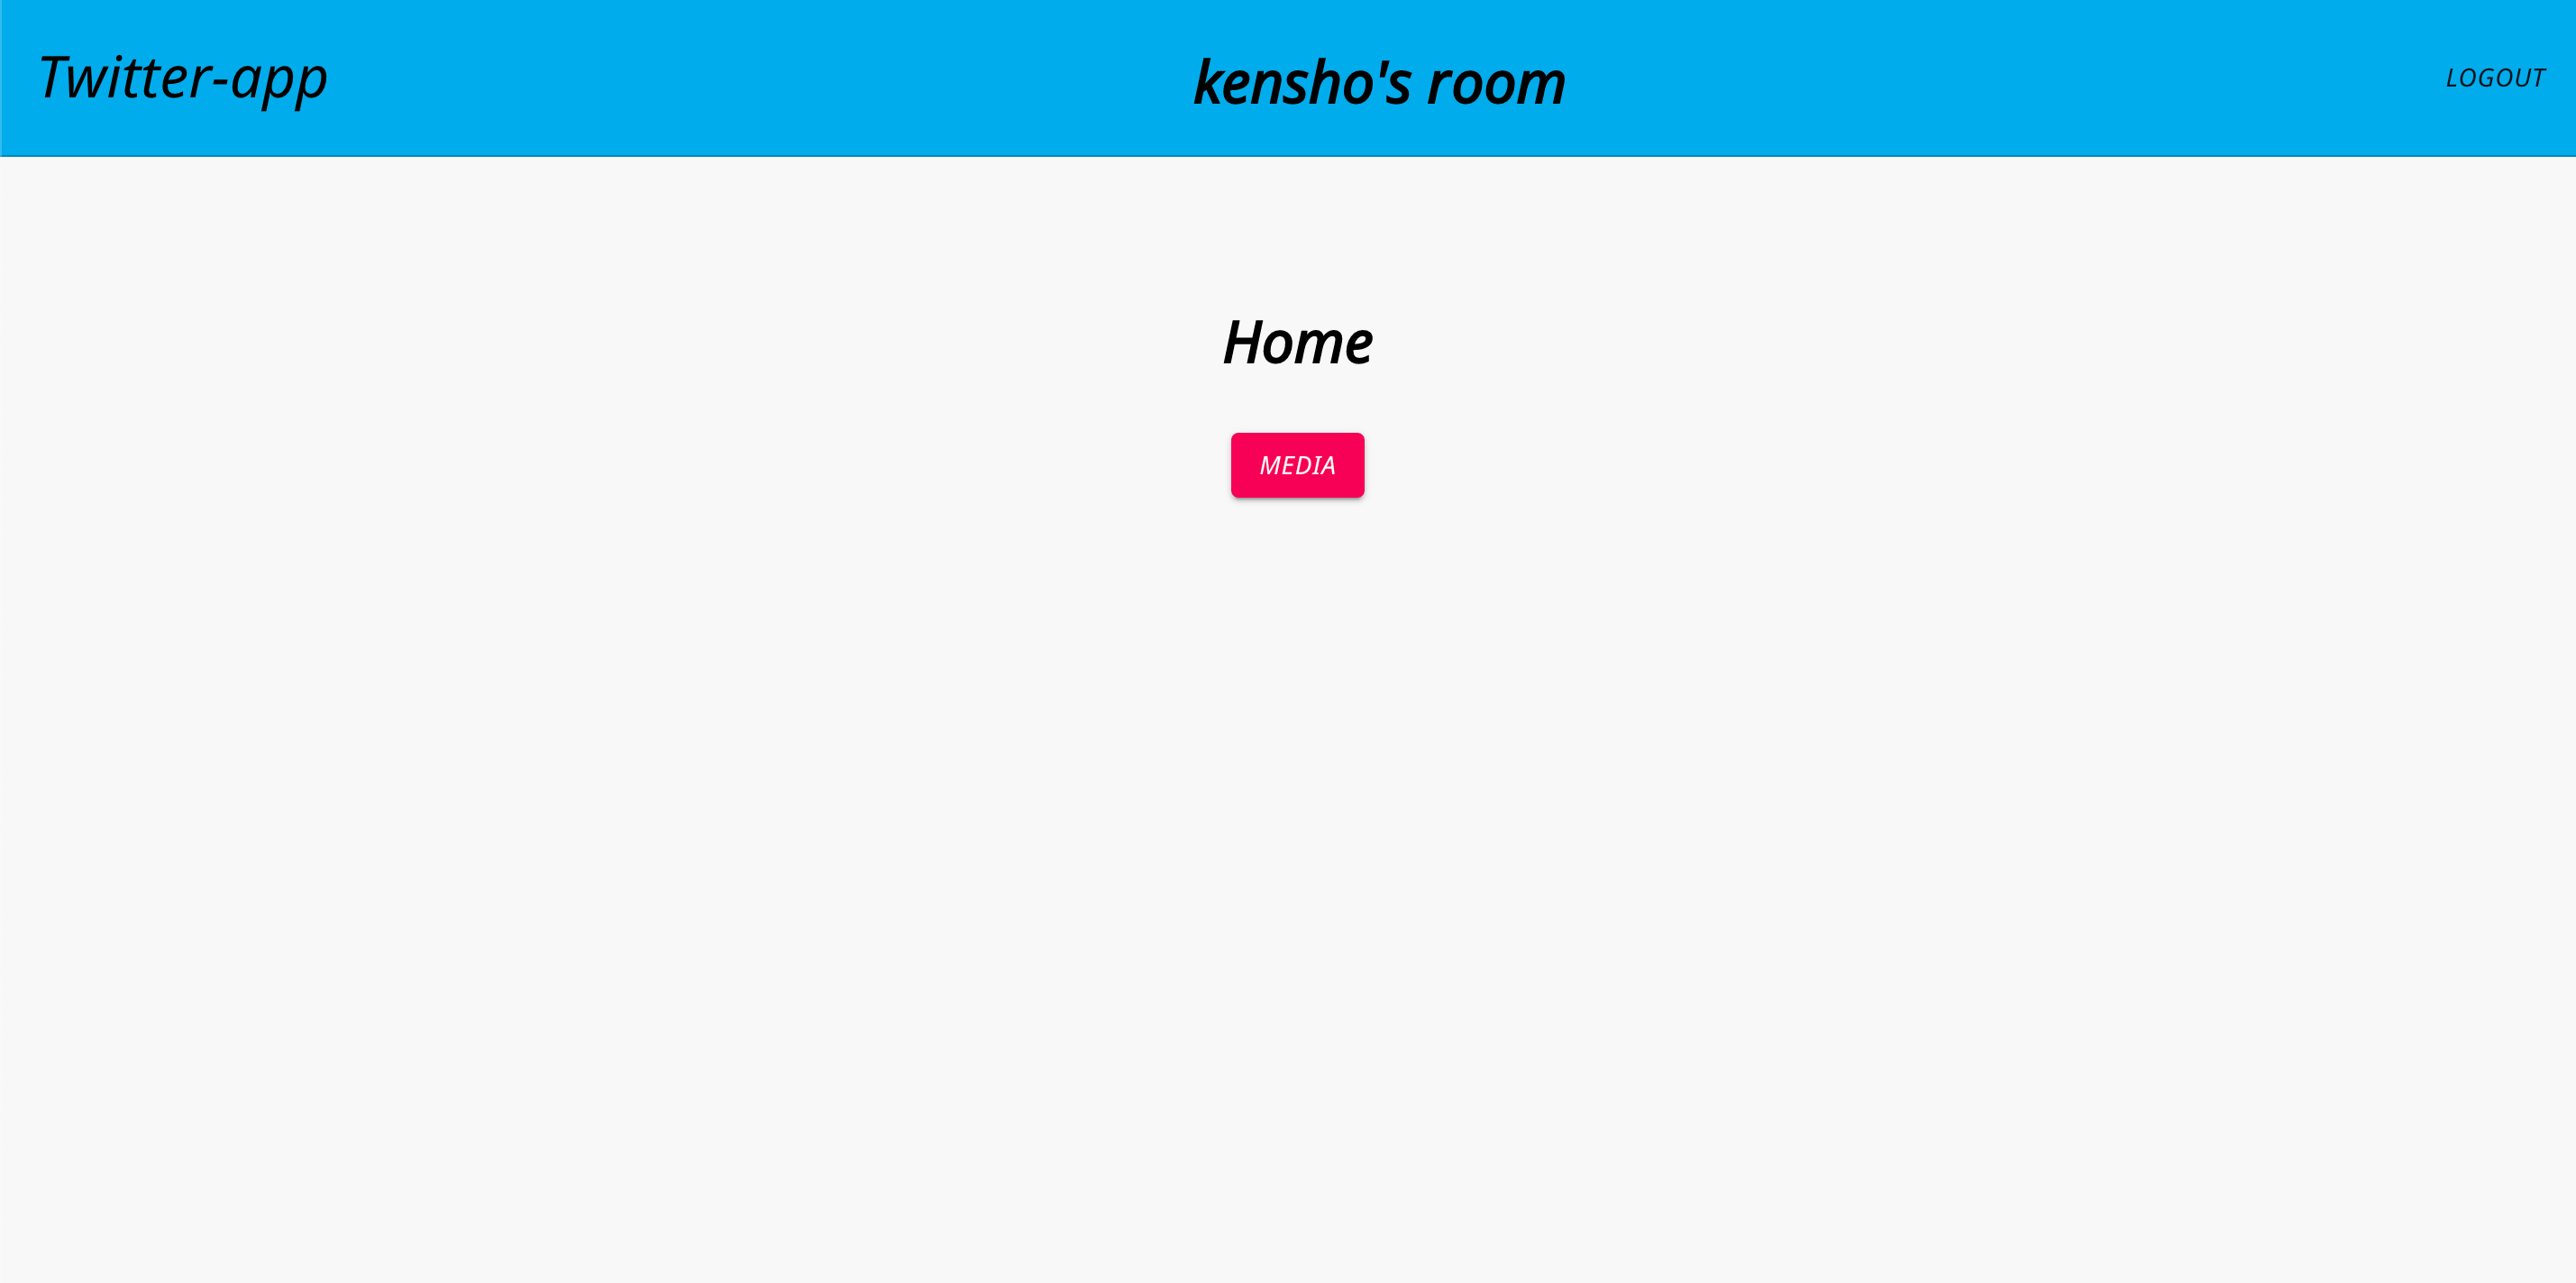
※ホーム画面の「kensho」の文字はユーザー名によって変わります
ホーム画面がMEDIAのボタンだけだが、今後TwitterAPI利用して
新しい機能(ボタン)をどんどん追加していく予定って感じ、、、
アプリ構造
フロントエンドディレクトリ階層構造

twitter/twitter_react/
.
├──node_modules
├── README.md
├── package-lock.json
├── package.json
├── public#reduxのデフォルトで用意してあるディレクトリ
├   ├──*****
├── src
│   ├── App.module.css
│   ├── App.test.tsx
│   ├── App.tsx
│   ├── app
│   │   └── store.ts
│   ├── features
│   │   ├── auth #今回作成していく部分
│   │   │   ├── Auth.module.css
│   │   │   ├── Auth.tsx
│   │   │   └── authSlice.ts
│   │   ├── core
│   │   │   ├── Core.module.css
│   │   │   ├── Core.tsx
│   │   │   └── Home.tsx
│   │   ├── counter #reduxのデフォルトで用意してあるディレクトリ
│   │   ├── media
│   │   │   ├── DeleteDialog.tsx
│   │   │   ├── Media.module.css
│   │   │   ├── Media.tsx
│   │   │   ├── MediaDetail.tsx
│   │   │   └── mediaSlice.ts
│   │   └── types.ts
│   ├── index.css
│   ├── index.tsx
│   ├── logo.svg
│   ├── react-app-env.d.ts
│   ├── serviceWorker.ts
│   └── setupTests.ts
└── tsconfig.json
1. npmで必要なライブラリをインストール
npx create-react-app . --template redux-typescript

npm install @material-ui/core
npm install @material-ui/lab
npm install axios
npm install formik --save
npm install formik-material-ui
npm install yup @types/yup
npm install react-router-dom @types/react-router-dom
npm install @types/react-modal
npm install react-modal
基本的に、material-uiを用いてUIを作成していきました。
formikとyupを使うことでフォームで使う機能(submitやバリデーションエラーが起きた時の挙動)を簡単に実装することができる。
参考になった記事
フォームのバリデーションに役立つYupとは? React向けライブラリを解説
仕事で使えるようになるまで Formik を理解するためにドキュメントをしっかり読んでみた
2. types.tsに予めstateの型の定義をして、まとめておく
export interface LOGIN {
    email: string;
    password: string;
}

export interface REGISTER {
    username: string;
    email: string;
    password: string;
}

export interface POST_IMAGE {
    scrName: string;
}
まだ自分は設計をしっかりできるスキルがないので、これを作成した時点では、「この型、定義してるけどワンチャン使わないかもな笑」
っていう状態で作成していた。
実際途中定義してる型の名前を変えたりしてた。
基本的にはDjangoのmodelsで作成したカラムの名前をそのまま引用しちゃえば大丈夫な印象、、、、
3. ユーザー認証の非同期処理を作成していく。
ここでユーザー認証の非同期処理を作成してくのだが、redux-toolkitの概念や、処理の流れが頭の中でイメージできていないと、理解がとても難しい、、、
概念図を理解するためにこれらの記事を参考にしていた
HookとRedux ToolkitでReact Reduxに入門する
React reduxとredux-toolkitの使い方 基礎編
それでは実際にコードを見てみる、、、
import { createSlice, createAsyncThunk } from '@reduxjs/toolkit';
import { RootState } from '../../app/store';
import axios from "axios";
import { LOGIN, REGISTER } from "../types";

const apiUrl = process.env.REACT_APP_DEV_API_URL;

export const fetchAsyncLogin = createAsyncThunk(
    "auth/post",
    async (authen: LOGIN) =>{
        const res = await axios.post(`${apiUrl}login/`, authen, {
            headers: {
                "Content-Type": "application/json",
            },
        });
        return res.data;
    }
);

export const fetchAsyncRegister = createAsyncThunk(
    "auth/register",
    async (auth: REGISTER) => {
        const res = await axios.post(`${apiUrl}api/register/`, auth, {

            headers: {
                "Content-Type": "application/json",
            },
        });
        return res.data;
    }
);

export const fetchAsyncGetMyProf = createAsyncThunk(
    "profile/get",
    async () => {
        const res = await axios.get(`${apiUrl}api/mypage/`, {
            headers: {
                Authorization: `JWT ${localStorage.localJWT}`,
            },
        });
        return res.data;
    }
)

export const authSlice = createSlice({
    name: "auth",
    initialState: {
        openSignIn: true,
        openSignUp: false,
        isLoadingAuth: false,
        myprofile: {
            id: "",
            username: "",
            email: "",
        }
    },
    reducers: {
        fetchCredStart(state) {
            state.isLoadingAuth = true;
        },
        fetchCredEnd(state) {
            state.isLoadingAuth = false;
        },
        setOpenSignIn(state) {
            state.openSignIn = true;
        },
        resetOpenSignIn(state) {
            state.openSignIn = false;
        },
        setOpenSignUp(state) {
            state.openSignUp = true;
        },
        resetOpenSignUp(state) {
            state.openSignUp = false;
        },
        editUsername(state, action) {
            state.myprofile.username = action.payload;
        }
    },
    extraReducers: (builder) => {
        builder.addCase(fetchAsyncLogin.fulfilled, (state, action) => {
            localStorage.setItem('localJWT', action.payload.token);
        });
        builder.addCase(fetchAsyncGetMyProf.fulfilled, (state, action) => {
            state.myprofile = action.payload;
        });

    }
});

export const {
    fetchCredStart,
    fetchCredEnd,
    setOpenSignIn,
    resetOpenSignIn,
    setOpenSignUp,
    resetOpenSignUp,
    editUsername
} = authSlice.actions;

export const selectIsLoadingAuth = (state: RootState) =>
    state.auth.isLoadingAuth;
export const selectOpenSignIn = (state: RootState) => state.auth.openSignIn;
export const selectOpenSignUp = (state: RootState) => state.auth.openSignUp;
export const selectProfile = (state: RootState) => state.auth.myprofile;

export default authSlice.reducer;
apiUrlはenvファイルを作成してその中にバック側のAPI先urlを設定している感じ
REACT_APP_DEV_API_URL="http://127.0.0.1:8000/"
postリクエスト
fetchAsyncのpostリクエストの部分は基本的に、送られてきたデータに型を当てはめてそれを第二引数に入れて送信している感じ
get
ログイン、登録した後、ユーザー情報を取得する際は、JWTトークンも一緒に送ってあげないとバック側で開示を拒否られるので
Authorization: JWT ${localStorage.localJWT}をheadersに入れてあげてる
createSlice
initialStateにて
やったこと2つ
・ ログイン画面、登録画面の表示をbooleanで条件分岐させるべく,openSignIn,openSignUpを作っておいた。ログイン画面が最初表示されるのが好ましいのでopenSignInをTrue,openSignUpをFalseにしている。
・ fetchAsycでgetしたデータの初期値を定義して,myprofileに入れてる
extraReducersにて、バックとやりとりを行った後のstateの変更を記述している。
バックから送られてきたデータはaction.payloadに入っている。
どんなデータが入ってるかをconsole.logで出力して確認しながら構築していった
RootState
createSliceより後のコードを書くことでstoreでこれらのstateとreducerを状態を管理させるようにした。
4. storeの作成
正直、ここの理解が完全にできているわけではないけど、とりあえず「ここでstateの状態とreducerを管理してるんだなあ」っていう認識でいる。。。。。
もし補足説明等いただけたらとても助かります。😅
import { configureStore, ThunkAction, Action } from '@reduxjs/toolkit';
import authReducer from '../features/auth/authSlice';

export const store = configureStore({
  reducer: {
    auth: authReducer,
  },
});

export type RootState = ReturnType<typeof store.getState>;
export type AppThunk<ReturnType = void> = ThunkAction<
  ReturnType,
  RootState,
  unknown,
  Action<string>
>;

export type AppDispatch = typeof store.dispatch;
一応はここまででなんとか非同期処理の部分は完成した、、、
ここから実際にユーザー認証周りのコンポーネントを作成してく、、、
5. 認証周りのコンポーネントの作成
コンポーネント部分であるが故、コードがかなり長くなった。
ポイントとなる部分だけ記述していく、、、
実際のコードは、ここで見れます
export const Auth: React.FC = () => {

    Modal.setAppElement("#root");
    const openSignIn = useSelector(selectOpenSignIn);
    const openSignUp = useSelector(selectOpenSignUp);
    const isLoadingAuth = useSelector(selectIsLoadingAuth);
    const dispatch: AppDispatch = useDispatch();
*
*省略
*
<Modal
            isOpen={openSignUp}
            onRequestClose={async () => {
                await dispatch(resetOpenSignUp());
            }}
            style={customStyles}

            >
                <Formik
                    initialErrors={{ username: "required", email: "required" }}
                    initialValues={{ username: "", email:"", password: "" }}
                    onSubmit={async (values) => {
                        await dispatch(fetchCredStart());
                        const resultReg = await dispatch(fetchAsyncRegister(values));
                        if (fetchAsyncRegister.fulfilled.match(resultReg)) {
                            await dispatch(fetchAsyncLogin(values));
                            await dispatch(fetchAsyncGetMyProf());
                        }
                        await dispatch(fetchCredEnd());
                        await dispatch(resetOpenSignUp());
                    }}
                    validationSchema={object().shape({
                        username: string()
                        .required('username is must'),
                        email: string()
                        .email('email format is wrong')
                        .required('email is must'),
                        password: string().required('password is must').min(4),
                    })}
                    >
                        {({
                            handleSubmit,
                            handleChange,
                            handleBlur,
                            values,
                            errors,
                            touched,
                            isValid,
                        }) => (
                            <div>
                                <form onSubmit={handleSubmit}>
                                    <div className={styles.auth_signUp}>
                                        <h1 className={styles.auth_title}>
                                            Welcome to Twitter-app
                                        </h1>
                                        <br />
                                        <div className={styles.auth_progress}>
                                            {isLoadingAuth && <CircularProgress/>}
                                        </div>
                                        <br />

                                        <TextField
                                        placeholder="username"
                                        type="input"
                                        name="username"
                                        onChange={handleChange}
                                        onBlur={handleBlur}
                                        value={values.username}
                                        />
                                        <br />

                                        {touched.username && errors.username ? (
                                            <div className={styles.auth_error}>
                                                {errors.username}
                                            </div>
                                        ): null
                                        }

                                    <TextField
                                        placeholder="email"
                                        type="input"
                                        name="email"
                                        onChange={handleChange}
                                        onBlur={handleBlur}
                                        value={values.email}
                                        />
                                        <br />

                                        {touched.email && errors.email ? (
                                            <div className={styles.auth_error}>
                                                {errors.email}
                                            </div>
                                        ): null
                                        }
                                        <TextField
                                        placeholder="password"
                                        type="password"
                                        name="password"
                                        onChange={handleChange}
                                        onBlur={handleBlur}
                                        value={values.password}
                                        />
                                        <br />

                                        {touched.password && errors.password ? (
                                            <div className={styles.auth_error}>
                                                {errors.password}
                                            </div>
                                        ): null
                                        }

                                        <br />
                                        <br />

                                        <Button
                                        variant="contained"
                                        color="primary"
                                        disabled={!isValid}
                                        type="submit"
                                        >
                                            Register
                                        </Button>
                                        <br />
                                        <br />

                                        <span
                                        className={styles.auth_text}
                                        onClick={async () => {
                                            await dispatch(setOpenSignIn());
                                            await dispatch(resetOpenSignUp());
                                        }}>
                                        You already have a account?
                                        </span>
                                        <br />
                                        <br />

                                    </div>
                                </form>
                            </div>
                        )}
                    </Formik>

            </Modal>
以下にポイントをまとめておく
・useSelectorを使うことで現在のstateを確認することができる
・ModalのisOpenはopenSignUp(or In)に依存させて表示状況を設定している
・dispatchにactionを格納して記述することで呼び出したいactionを実行することができる
・onRequestCloseは、Modalの外をクリック or タッチした時に起こる挙動を設定することができて、今回はModal画面を閉じるように処理している
・fetchCredStartとfetchCredEndでisLoadingAuthを更新することができる。つまり、fetchCredStartの時、isLoadingAuthがtrueになるので {isLoadingAuth && <CircularProgress/>}の処理が起動してCircularProgress(ロード時のあのクルクル)が表示される。fetchCredEndで非表示になる
これをonSubmitの最初の処理と、最後の処理に挿入することで、バック側で処理が行われている間、ロードマークを表示することができる。
・handleChange(文字か何か入力されたかを追跡できる)とhandleBlur(ユーザーが画面をタッチしたかを追跡できる)でエラーハンドリングを起こすかを決めることができる。
classNameで指定したstyleはこんな感じ
.auth_signUp {
    display: flex;
    flex-direction: column;
}
.auth_title {
    font-family: "Noto Sans";
    font-weight: normal;
    text-align: center;
}

.auth_progress {
    margin-top: 15px;
    display: flex;
    justify-content: center;
}
.auth_error {
    color: #ff00ff;
    text-align: center;
    margin: 10px;
}

.auth_text {
    color: rgb(6,  153, 211);
    text-align: center;
    cursor: pointer;
}
これでユーザー認証周りの機能と画面を作成することができた。
最後にホーム画面を作って、今回の記事は終了と
する。
6. ホーム画面を作成する。
工夫したことは、画面遷移の際、headerはそのままでbody(コンポーネント)だけ変更できるようにしたことである。
画面が遷移しても、変更したい部分だけ更新されるのでUXの良いものにすることができる。
実際にコードを見てみる、、、
const Core: React.FC = () => {
    const dispatch: AppDispatch = useDispatch();
    const profile = useSelector(selectProfile);
    const isLoadingAuth = useSelector(selectIsLoadingAuth);

    useEffect(() => {
        const fetchBootLoader = async () => {
            if(localStorage.localJWT) {
                dispatch(resetOpenSignIn());
                const result = await dispatch(fetchAsyncGetMyProf());

                if (fetchAsyncGetMyProf.rejected.match(result)) {
                    dispatch(setOpenSignIn());
                    return null;
                }

            }
        };
        fetchBootLoader();
    }, [dispatch]);

    return (
        <div>
            <Auth />

            <div className={styles.core_header}>
                <h1 className={styles.core_title}>Twitter-app</h1>
                {profile?.username ? <>
                <h2 className={styles.core_titleModal}>
                    {profile.username}'s room
                </h2>
                <div className={styles.core_logout}>
                    {(isLoadingAuth) && <CircularProgress/>}
                    <Button
                    onClick={() => {
                        localStorage.removeItem("localJWT");
                        dispatch(editUsername(""));
                        dispatch(setOpenSignIn());
                    }}
                    >

                        Logout
                    </Button>
                </div>
                </> : <div>
                    <Button
                    onClick={() => {
                        dispatch(setOpenSignIn());
                        dispatch(resetOpenSignUp());
                    }}>
                        Login
                    </Button>

                    <Button
                    onClick={() => {
                        dispatch(setOpenSignUp());
                        dispatch(resetOpenSignIn());
                    }}>
                        SignUp
                    </Button>

                    </div>}
            </div>


            {/* body */}

            <main className={styles.container}>
                <div className={styles.inner_container}>
                {profile?.username ? <>
                    <BrowserRouter>
                    <Switch>
                        <Route exact path="/" component={Home} />
                        <Route exact path="/media" component={Media} />
                        <Route path="/media/detail/:id" component={MediaDetail} />

                     </Switch>
                    </BrowserRouter>

                </> :
                <>
                </>}
                </div>
            </main>
            <div className={styles.all}></div>

            <footer></footer>
        </div>
    )
}

export default Core
抑えておきたいポイント
・useSelectorでユーザーのstateを状況を参照してprofileという変数に入れているところ
・useEffectでここにアクセスされた際の挙動を書いている(今回はJWTトークンを持っているかを確認して、持っていない(ログインしていない)場合、ログイン画面を表示できるようにしている
・{profile?.username ? <>.......</> : <></>}でユーザーネームを保持している(ログインしている)かで条件分岐させて、ログインしていない場合はbodyに何も表示されないようにしている
・BrowserRouterとSwitchとRouteでurlによって表示させるコンポーネントを切り替えている
あとはこれらにcssを適用させて、表示画面を整えていった感じ
*{
    font-family: "Noto Sans";
}
.all {
    width: 100%;
    height: 100vh;
    background-color: #F8F8F8;
    z-index: -10;
  }
.container {
    height: 100%;
    position: relative;
    background-color: #F8F8F8;
}
.inner_container {
    margin: 0 auto;
    padding: 5rem;
    text-align:center;
    width: 80%;
    max-width: 800px;
}
.home {
    margin-bottom: 30px;
}
.button {
    margin: 10px
}
.core_header {
    position: sticky;
    top: 0;
    background-color: #00acee;
    padding: 20px;
    border-bottom: 1px solid #008abe;
    object-fit: contain;
    display: flex;
    z-index: 1;
    justify-content: space-between;
}
.core_title {
    font-weight: normal;
    text-align: center;
  }
.core_titleModal{
    padding-top: 3px;
    font-size: 32px;
}
.core_logout {
    display: flex;
    justify-content: flex-end;
}
後から微調整しまくって、css設計が少しグチャグチャになってしまったのであまり参考にならないかもしれませんが、、、笑
初めにbodyに表示させるHomeコンポーネント
export const Home: React.FC = () =>{
        return (
            <div className={styles.all}>
                <h1 className={styles.home}>Home</h1>
                <p className={styles.button}>
                <Link to="/media" style={{ textDecoration: 'none' }}>
                        <Button variant="contained" color="secondary">
                            Media
                        </Button>
                </Link>
                </p>

            </div>
        );
}
これでホーム画面が完成🎉🎉
ここまでの感想
非同期処理の部分とその理解はそこまで難しくなかった印象、、、
地味に、BrowserRouterとSwitchとRouteでurlによって表示させるコンポーネントを切り替える部分が苦戦した笑😅
ちなみに、
<Route exact path="/" component={Home} />のexactを書かなかったがために、表示させたいコンポーネントが表示されない事態に陥ったので、注意が必要です。
次回は、実際にTwitterからユーザー画像を収集してきて、保存、表示、削除ができる機能のフロント部分をreact redux typescriptで開発していきます!!!
ここまで読んでくださりありがとうございました!🙇♂️🙇♂️