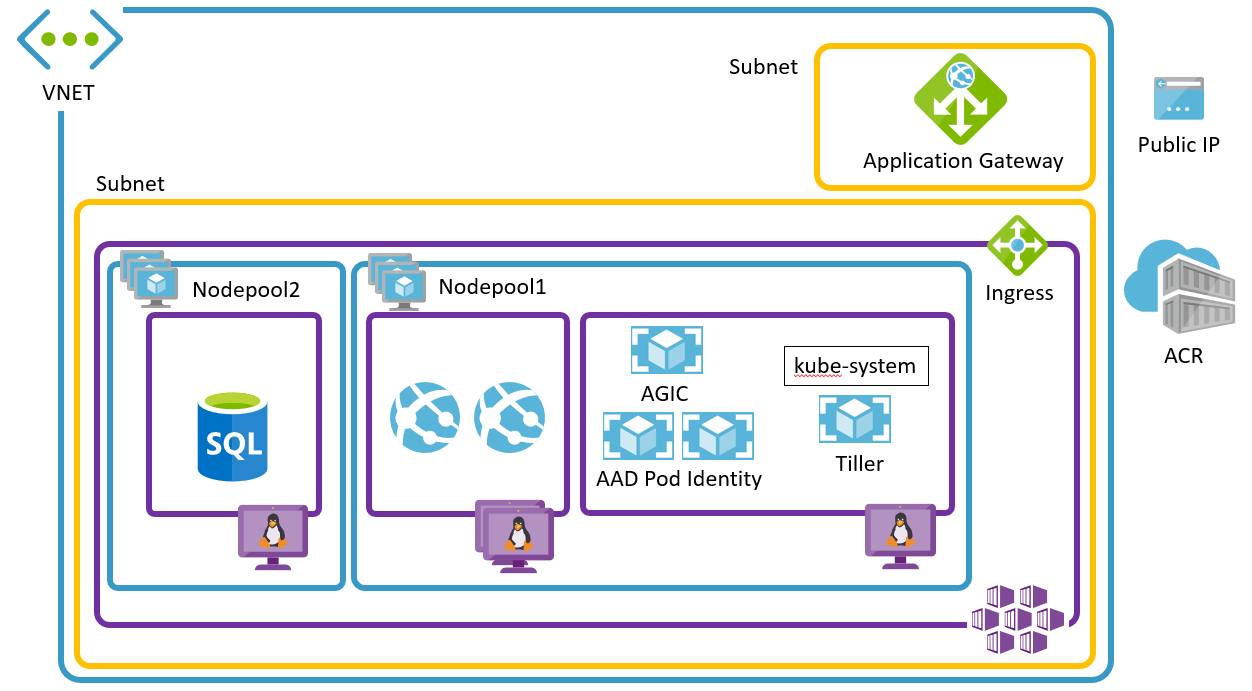
前回の記事までで、以下の図のようにある程度の構成ができました。
この記事ではノードセレクターと名前空間を使っていくつかの問題を解決します。
ポッドの配置問題
これまでの手順でポッドを配置していると、なんとなく意図したノードにポッドが配置されているように見えますが、必ずしも意図通りにならない問題があります。
Taints と Tolerations
現在 SQL と Web アプリをそれぞれ別のノードプールに配置するため、こちらの記事 で紹介したとおりテイントと容認を使っています。しかし前回 AGIC を入れるため、テイントがないノードを追加しており、現在は以下のような構成となっています。
| ノード | 付与したテイント |
|---|---|
| aks-nodepool1-23705949-vmss000000 | kind=app:NoSchedule |
| aks-nodepool1-23705949-vmss000001 | kind=app:NoSchedule |
| aks-nodepool1-23705949-vmss000002 | なし |
| aks-nodepool2-23705949-vmss000000 | kind=sql:NoSchedule |
| デプロイ | 付与した容認 |
|---|---|
| core3webapp | kind=app:NoSchedule |
| mssql-deployment | kind=sql:NoSchedule |
この場合の問題は、SQL も Web アプリもノード aks-nodepool1-23705949-vmss000002 には配置される可能性があるという事です。
1. 現在の core3webapp ポッドの 1 つの配置先を確認。
>kubectl get pods -o wide
NAME                                          READY   STATUS    RESTARTS   AGE   IP           NODE                                NOMINATED NODE   READINESS GATES
core3webapp-67b678b946-h2t9p                  1/1     Running   0          8h    10.0.0.16    aks-nodepool1-23705949-vmss000000   <none>           <none>
2. core3webapp ポッドを 1 つ削除。
kubectl delete pod core3webapp-67b678b946-h2t9p
3. ポッドを再度表示しテイントが内ノードに配置されていることを確認。
※一度で再現しない可能性はあるが、何度かやると再現する。
>kubectl get pods -o wide
NAME                                          READY   STATUS              RESTARTS   AGE   IP           NODE                                NOMINATED NODE   READINESS GATES
core3webapp-67b678b946-vlp2h                  0/1     ContainerCreating   0          10s   <none>       aks-nodepool1-23705949-vmss000002   <none>           <none>
この問題を解決するにはポッドでノードセレクターを利用します。
ラベルとノードセレクター
ノードをはじめ各種リソースにはラベルが指定できますが、このラベルを使ってリソースを指定することが可能です。早速 SQL ポッドがノードプール 2 のノードに配置できるようにしてみます。
1. 任意のラベルをノードに追加。
kubectl label nodes aks-nodepool2-23705949-vmss000000 kind=sql
2. 追加したラベルを確認。
>kubectl describe node aks-nodepool2-23705949-vmss000000
Name:               aks-nodepool2-23705949-vmss000000
Roles:              agent
Labels:             agentpool=nodepool2
                    beta.kubernetes.io/arch=amd64
                    beta.kubernetes.io/instance-type=Standard_DS1_v2
                    beta.kubernetes.io/os=linux
                    failure-domain.beta.kubernetes.io/region=japaneast
                    failure-domain.beta.kubernetes.io/zone=0
                    kind=sql
                    kubernetes.azure.com/cluster=MC_netcoresample_myaks_japaneast
<省略>
3. Deployment で mssql-deployment にノードセレクターを追加。
<省略>
---
apiVersion: apps/v1beta1
kind: Deployment
metadata:
  name: mssql-deployment
spec:
  replicas: 1
  template:
    metadata:
      labels:
        app: mssql
    spec:
      terminationGracePeriodSeconds: 10
      containers:
      - name: mssql
        image: mcr.microsoft.com/mssql/server:2017-latest
        ports:
        - containerPort: 1433
        env:
        - name: MSSQL_PID
          value: "Developer"
        - name: ACCEPT_EULA
          value: "Y"
        - name: MSSQL_SA_PASSWORD
          valueFrom:
            secretKeyRef:
              name: mssql
              key: SA_PASSWORD
        volumeMounts:
        - name: mssqldb
          mountPath: /var/opt/mssql
      volumes:
      - name: mssqldb
        persistentVolumeClaim:
          claimName: mssql-data
      tolerations:
      - key: "kind"
        operator: "Equal"
        value: "sql"
        effect: "NoSchedule"
      nodeSelector:
        kind: sql
<省略>
3. 同様に Web アプリも対応。
kubectl label nodes aks-nodepool1-23705949-vmss000000 kind=app
kubectl label nodes aks-nodepool1-23705949-vmss000001 kind=app
4. core3webapp に nodeSelector を追加。またレプリカを 4 に増加。
<省略>
---
apiVersion: apps/v1
kind: Deployment
metadata:
  name: core3webapp
  namespace: default
  labels:
    app: core3webapp
spec:
  replicas: 4
  selector:
    matchLabels:
        app: core3webapp
  template:
    metadata:
      name: core3webapp
      labels:
        app: core3webapp
    spec:
      containers:
      - name: core3webapp
        image: kenakamuacr.azurecr.io/core3webapp:20191029043926
        resources:
          requests:
            cpu: "250m"
            memory: "512Mi"
          limits:
            cpu: "500m"
            memory: "1Gi"
        imagePullPolicy: Always
      restartPolicy: Always
      terminationGracePeriodSeconds: 30
      tolerations:
        key: "kind"
        operator: "Equal"
        value: "app"
        effect: "NoSchedule"
      nodeSelector:
        kind: app
<省略>
5. kubectl apply を実行。
kubectl apply -f myapp.yaml
6. ポッドの詳細を取得して、意図通りになっていることを確認。
>kubectl get pods -o wide
NAME                                          READY   STATUS    RESTARTS   AGE   IP           NODE                                NOMINATED NODE   READINESS GATES
core3webapp-b599bd5d-4rjl6                    1/1     Running   0          3s    10.0.0.50    aks-nodepool1-23705949-vmss000001   <none>           <none>
core3webapp-b599bd5d-9wp7c                    1/1     Running   0          51s   10.0.0.22    aks-nodepool1-23705949-vmss000000   <none>           <none>
core3webapp-b599bd5d-cjdqm                    1/1     Running   0          57s   10.0.0.10    aks-nodepool1-23705949-vmss000000   <none>           <none>
core3webapp-b599bd5d-szmgv                    1/1     Running   0          3s    10.0.0.55    aks-nodepool1-23705949-vmss000001   <none>           <none>
invited-kiwi-ingress-azure-66d6855bf7-f6lgh   1/1     Running   2          22h   10.0.0.106   aks-nodepool1-23705949-vmss000002   <none>           <none>
mic-65cbc47665-2wgfb                          1/1     Running   2          24h   10.0.0.102   aks-nodepool1-23705949-vmss000002   <none>           <none>
mic-65cbc47665-xqfgq                          1/1     Running   2          24h   10.0.0.125   aks-nodepool1-23705949-vmss000002   <none>           <none>
mssql-deployment-749f664d67-zc86p             1/1     Running   0          57s   10.0.0.83    aks-nodepool2-23705949-vmss000000   <none>           <none>
nmi-nkkkn                                     1/1     Running   3          23h   10.0.0.98    aks-nodepool1-23705949-vmss000002   <none>           <none>
ポッドやサービスの分離問題
同じクラスタにテスト環境や本番環境をデプロイする場合、それぞれのリソースが扱いやすいようにグループ化する必要があります。k8s では名前空間が利用できます。
名前空間
k8s には名前空間の概念があり、必要に応じてポッドを任意の名前空間に配置することができます。名前空間を使うと、表示を絞れる他、リソースの制約など各種設定を名前空間に対して設定することもできるため、操作性や管理性が上がります。
既定の名前空間
既定で以下の名前空間を持ちます。
- default
- kube-public
- kube-system
ユーザーが作成したリソースの大半は default へ自動配置されます。名前空間は kubectl create でも yaml 経由でも作成できますが今回は kubectl で作成しました。
1. production 名前空間リソースを作成。
kubectl create namespace production
2. 現在のデプロイを一度削除。※ Persistent Volume も消えるため SQL のデータが削除される。 PV は名前空間に関係ないため、PV 以外を手動で削除してもよい。
kubectl delete -f myapp.yaml
3. 名前空間の指定つきでデプロイ。
kubectl apply -f myapp.yaml --namespace=production
4. 既定の名前空間でポッド一覧を取得。
>kubectl get pods
NAME                                          READY   STATUS    RESTARTS   AGE
invited-kiwi-ingress-azure-66d6855bf7-f6lgh   1/1     Running   2          23h
mic-65cbc47665-2wgfb                          1/1     Running   2          24h
mic-65cbc47665-xqfgq                          1/1     Running   2          24h
nmi-nkkkn                                     1/1     Running   3          24h
5. 名前空間を指定して取得。
>kubectl get pods --namespace production
NAME                                READY   STATUS    RESTARTS   AGE
core3webapp-b599bd5d-47wjx          1/1     Running   3          3m11s
core3webapp-b599bd5d-9l8hx          1/1     Running   2          3m11s
core3webapp-b599bd5d-mp7h9          1/1     Running   2          3m11s
core3webapp-b599bd5d-n76cj          1/1     Running   3          3m11s
mssql-deployment-749f664d67-w8pd7   1/1     Running   0          3m11s
既定の名前空間の切り替え
既定が default の場合、常に --namespace パラメーターをつける必要があるため面倒です。ここでは既定の名前空間を production に変更します。
1. 現在の構成情報を確認。
kubectl config view
2. 現在のコンテキストを確認。
>kubectl config current-context
myaks
3. myaks コンテキストの情報を使いつつ、名前空間を指定してコンテキストを作成。
kubectl config set-context prod --namespace=production --cluster=myaks --user=clusterUser_netcoresample_myaks
4. コンテキストを切り替え。
kubectl config use-context prod
5. ポッドを取得。
>kubectl get pods
NAME                                READY   STATUS    RESTARTS   AGE
core3webapp-b599bd5d-47wjx          1/1     Running   3          12m
core3webapp-b599bd5d-9l8hx          1/1     Running   2          12m
core3webapp-b599bd5d-mp7h9          1/1     Running   2          12m
core3webapp-b599bd5d-n76cj          1/1     Running   3          12m
mssql-deployment-749f664d67-w8pd7   1/1     Running   0          12m
まとめ
配置の問題はテイント/容認にノードセレクターを組み合わせることで解決し、グループ化の問題は名前空間を使いました。次回は自動のスケールについて詳細を見ていきます。

