前回の記事までは初期で設定したノードに対してポッドを配置してきました。本来データベースのワークロードとアプリのワークロードは異なるため、今回はそれぞれに適したノードにポッドを配置する方法を見ていきます。またこの機能は現在プレビューで、プレビュー機能を有効にする前に作成したクラスタは作り直す必要があるため、以降の手順で既存環境を削除します。
既存の環境を残したい場合は、別のリソースグループを作るなど手順を読み替えてください。
情報元:プレビュー: Azure Kubernetes Service (AKS) のクラスターで複数のノード プールを作成および管理する
注意事項
異なるサイズの VM をノードに使う機能は 2019 年 10 月時点ではまだプレビューです。上記ページに以下の注意があるため、検証用のサブスクリプションを使うようにしてください。
注意事項
サブスクリプションで機能を登録する場合、現時点ではその機能を登録解除することはできません。 一部のプレビュー機能を有効にした後、すべての AKS クラスターに対して既定値が使用され、サブスクリプション内に作成されます。 運用サブスクリプションではプレビュー機能を有効にしないでください。 プレビュー機能をテストし、フィードバックを集めるには、別のサブスクリプションを使用してください。
事前準備
まずは作業に必要なツールをインストールします。
1. Azure CLI のバージョンを確認。2.0.61 よりバージョンが古い場合、Azure CLI のインストール より最新をインストール。
>az --version
azure-cli                         2.0.73 *
2. aks-preview 拡張機能のインストール。
# Install the aks-preview extension
az extension add --name aks-preview

# Update the extension to make sure you have the latest version installed
az extension update --name aks-preview
3. MultiAgentpoolPreview を有効化。
※上記注意にある通り設定は戻せないため、運用サブスクリプションで実行しないでください。
az feature register --name MultiAgentpoolPreview --namespace Microsoft.ContainerService
4. プロバイダーの登録を更新して、有効化したプレビュー機能を利用できるようにする。
az provider register --namespace Microsoft.ContainerService
5. サービスプリンシパルの作成。
az ad sp create-for-rbac --skip-assignment
6. 既存の ACR のリソース名を取得。
az acr show --resource-group netcoresample --name kenakamuacr --query "id" --output tsv
7. 作成したサービスプリンシパルに ACR のプル権限を付与。
az role assignment create --assignee <appId> --scope <acrId> --role acrpull
8. 既存の myaks を削除。ACR はそのまま使うため残しておく。
クラスタの作成
1. az aks create コマンドでクラスタを作成。appId、password はサービスプリンシパル作成時に取得された値を利用。ロードバランサーについては、ドキュメントにある通り Standard を選択。
az aks create -g netcoresample \
-n myaks -c 2 \
--service-principal <appId> \
--client-secret <password> \
--generate-ssh-keys \
--vm-set-type VirtualMachineScaleSets \
--load-balancer-sku standard
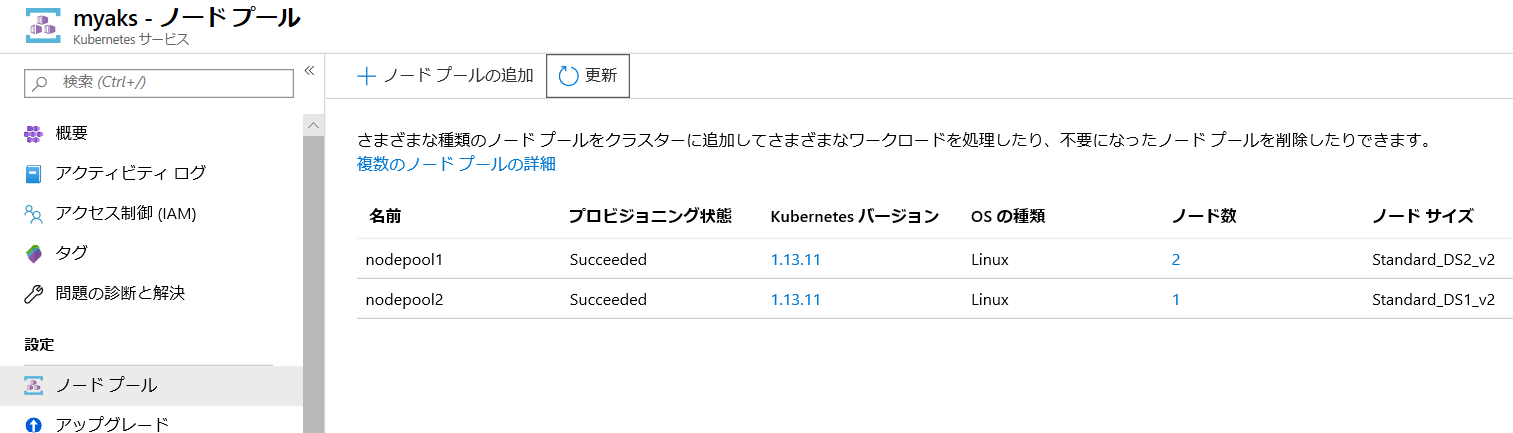
2. クラスタ作成後、現在のノードプールを取得して既定の Standard_DS2_v2 で作成されていることを確認。
>az aks nodepool list -g netcoresample --cluster-name myaks
[
  {
    "agentPoolType": "VirtualMachineScaleSets",
    "availabilityZones": null,
    "count": 2,
    "enableAutoScaling": null,
    "enableNodePublicIp": null,
    "id": "/subscriptions/93b67b2c-9ac0-4bd8-a565-4603f7073a97/resourcegroups/netcoresample/providers/Microsoft.ContainerService/managedClusters/myaks/agentPools/nodepool1",
    "maxCount": null,
    "maxPods": 110,
    "minCount": null,
    "name": "nodepool1",
    "nodeTaints": null,
    "orchestratorVersion": "1.13.11",
    "osDiskSizeGb": 100,
    "osType": "Linux",
    "provisioningState": "Succeeded",
    "resourceGroup": "netcoresample",
    "scaleSetEvictionPolicy": null,
    "scaleSetPriority": null,
    "type": "Microsoft.ContainerService/managedClusters/agentPools",
    "vmSize": "Standard_DS2_v2",
    "vnetSubnetId": null
  }
]
3. 新しいノードプールの作成。ここでは新しいプールで Standard_DS1_v2 を指定。
az aks nodepool add -g netcoresample --cluster-name myaks --name nodepool2 -c 1 --node-vm-size Standard_DS1_v2
4. 追加した結果は az aks nodepool list から確認できるが、ポータル上でも同様に確認可能。
5. 作成したクラスタに接続。以前のクラスタ名と同じ場合構成の上書きを聞かれた場合は y で進める。
az aks get-credentials -g netcoresample -n myaks
6. ノード一覧を確認。
>kubectl get nodes
NAME                                STATUS   ROLES   AGE     VERSION
aks-nodepool1-23705949-vmss000000   Ready    agent   3h16m   v1.13.11
aks-nodepool1-23705949-vmss000001   Ready    agent   3h16m   v1.13.11
aks-nodepool2-23705949-vmss000000   Ready    agent   22m     v1.13.11
アプリのデプロイ
次に作成したクラスタに対してアプリをデプロイしてみます。尚、こちらのページにある通り、HTTP アプリケーションのルーティング アドオンは使用できません。よってアプリでも再度ロードバランサ―サービスを使った構成に戻します。
またデータベースを新規にデプロイしたため、データベースの初期化ができていません。今回はアプリケーションのコード内でそれが行えるように改修します。
アプリの改修
1. Visual Studio でアプリを開き、Startup.cs の ConfigureServices メソッド内を以下コードと差し替え。
- Database.Migrate() メソッドでデータベースを初期化
public void ConfigureServices(IServiceCollection services)
{
    services.AddDbContext<ApplicationDbContext>(options =>
        options.UseSqlServer(
            Configuration.GetConnectionString("DefaultConnection")));
    services.BuildServiceProvider().GetService<ApplicationDbContext>().Database.Migrate();
    services.AddDefaultIdentity<IdentityUser>(options => options.SignIn.RequireConfirmedAccount = true)
        .AddEntityFrameworkStores<ApplicationDbContext>();
    services.AddControllersWithViews();
    services.AddRazorPages();
}
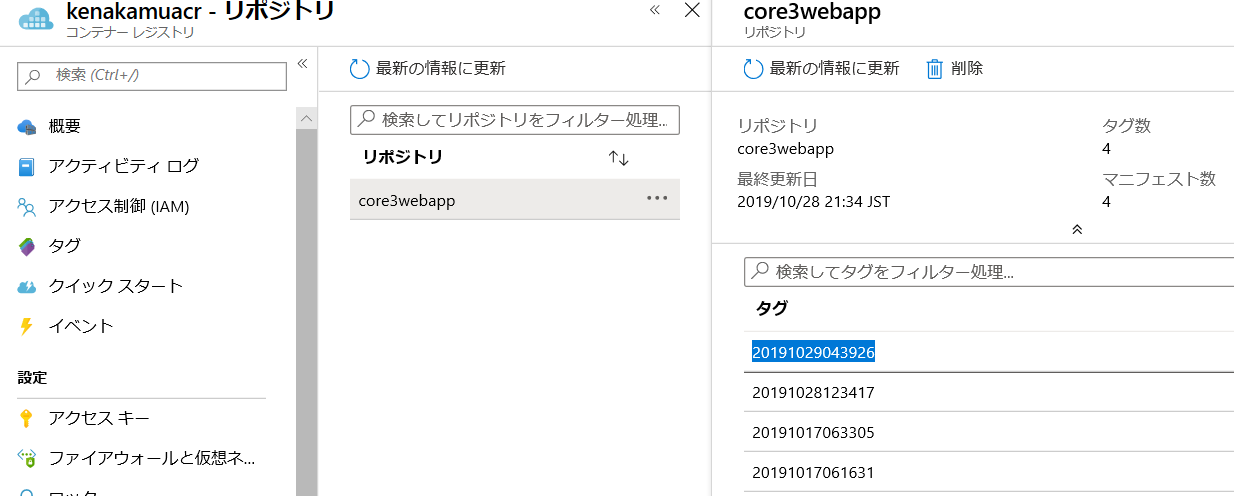
2. アプリを発行し、ACR で新規に発行されたイメージのタグを確認。
アプリのデプロイ
1. 新規に myapp.yaml を作成し、以下のコードを張り付け。
- コンテナ名は上記で取得したタグを使用
- イングレスがないためアプリのサービスで LoadBalancer を利用
kind: StorageClass
apiVersion: storage.k8s.io/v1beta1
metadata:
     name: azure-disk
provisioner: kubernetes.io/azure-disk
parameters:
  storageaccounttype: Premium_LRS
  kind: Managed
---
kind: PersistentVolumeClaim
apiVersion: v1
metadata:
  name: mssql-data
  annotations:
    volume.beta.kubernetes.io/storage-class: azure-disk
spec:
  accessModes:
  - ReadWriteOnce
  resources:
    requests:
      storage: 8Gi
---
apiVersion: v1
kind: Secret
metadata:
  name: mssql
type: Opaque
data:
  SA_PASSWORD: "TXlDMG05bCZ4UEBzc3cwcmQ="
---
apiVersion: apps/v1beta1
kind: Deployment
metadata:
  name: mssql-deployment
spec:
  replicas: 1
  template:
    metadata:
      labels:
        app: mssql
    spec:
      terminationGracePeriodSeconds: 10
      containers:
      - name: mssql
        image: mcr.microsoft.com/mssql/server:2017-latest
        ports:
        - containerPort: 1433
        env:
        - name: MSSQL_PID
          value: "Developer"
        - name: ACCEPT_EULA
          value: "Y"
        - name: MSSQL_SA_PASSWORD
          valueFrom:
            secretKeyRef:
              name: mssql
              key: SA_PASSWORD
        volumeMounts:
        - name: mssqldb
          mountPath: /var/opt/mssql
      volumes:
      - name: mssqldb
        persistentVolumeClaim:
          claimName: mssql-data
---
apiVersion: v1
kind: Service
metadata:
  name: mssql-deployment
spec:
  selector:
    app: mssql
  ports:
    - protocol: TCP
      port: 1433
      targetPort: 1433
---
apiVersion: apps/v1
kind: Deployment
metadata:
  name: core3webapp
  namespace: default
  labels:
    app: core3webapp
spec:
  replicas: 2
  selector:
    matchLabels:
        app: core3webapp
  template:
    metadata:
      name: core3webapp
      labels:
        app: core3webapp
    spec:
      containers:
      - name: core3webapp
        image: kenakamuacr.azurecr.io/core3webapp:20191029043926
        resources:
          requests:
            cpu: "250m"
            memory: "512Mi"
          limits:
            cpu: "500m"
            memory: "1Gi"
        imagePullPolicy: Always
      restartPolicy: Always
      terminationGracePeriodSeconds: 30
---
apiVersion: v1
kind: Service
metadata:
  name: core3webapp
  labels:
    app: core3webapp
spec:
  type: "LoadBalancer"
  ports:
  - protocol: TCP
    port: 80
  selector:
    app: core3webapp
2. デプロイを実行。
kubectl apply -f myapp.yaml
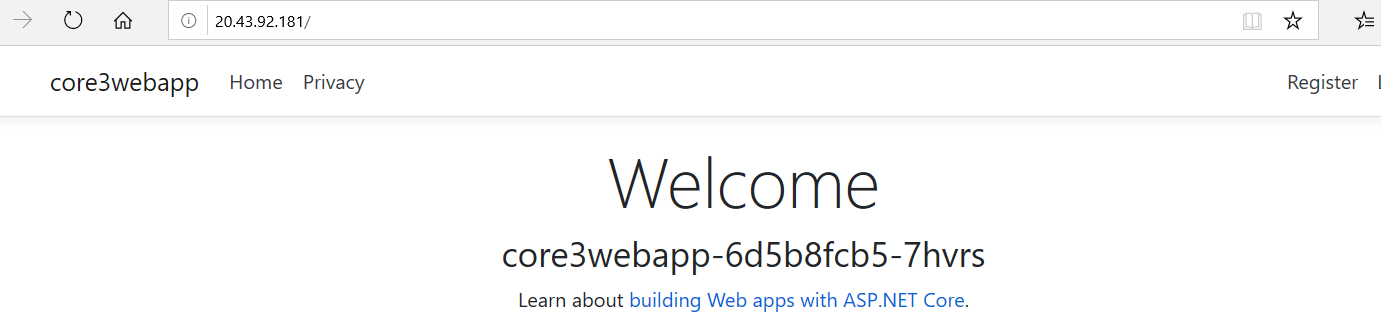
3. 外部 IP アドレスを取得してアプリが起動したか確認。
>kubectl get svc
NAME               TYPE           CLUSTER-IP     EXTERNAL-IP    PORT(S)        AGE
core3webapp        LoadBalancer   10.0.140.159   20.43.92.181   80:30789/TCP   23s
kubernetes         ClusterIP      10.0.0.1       <none>         443/TCP        3h22m
mssql-deployment   ClusterIP      10.0.227.73    <none>         1433/TCP       23s
4. Register を行い、データベースが期待どおり動作するかも確認。

5. 各ポッドがどのノードに配置されているか確認。
>kubectl get pods -o wide
NAME                                READY   STATUS    RESTARTS   AGE     IP           NODE                                NOMINATED NODE   READINESS GATES
core3webapp-6cc784c468-8r9fv        1/1     Running   0          5m48s   10.244.3.2   aks-nodepool2-23705949-vmss000000   <none>           <none>
core3webapp-6cc784c468-j8n8g        1/1     Running   1          5m29s   10.244.1.4   aks-nodepool1-23705949-vmss000001   <none>           <none>
mssql-deployment-5b74bdb6f7-gqv7j   1/1     Running   0          15m     10.244.1.3   aks-nodepool1-23705949-vmss000001   <none>           <none>
ポッド配置先の指定
アプリは無事デプロイされましたが、ポッドは自動で配置されるため、現在ノードプール 1 で SQL とアプリが両方動作しています。SQL はノードプール 2 で、アプリはノードプール 1 で動作するように変更します。
Taints と Tolerations
k8s には Taints (テイント) と Tolerations (容認) という概念があります。
- テイント: ノードに適用されて、特定のポッドのみがそのノードでスケジュールできることを示します。
- 容認は: ポッドに適用されて、ポッドがノードのテイントを "許容する" ことを許可します。
ノードにテイントを追加した場合、そのテイントを容認する設定をもつポッドのみが配置可能となります。
今回はノードプール 2 に kind=sql のテイント、ノードプール 1 に kind=app のテイントを設定して、配置先を制御してみます。
このほかにもセレクターを使う方法もありますが、これはまた別の機会に。
Taints の設定
1. 現在のノード一覧を確認。
>kubectl get nodes
NAME                                STATUS   ROLES   AGE     VERSION
aks-nodepool1-23705949-vmss000000   Ready    agent   3h39m   v1.13.11
aks-nodepool1-23705949-vmss000001   Ready    agent   3h39m   v1.13.11
aks-nodepool2-23705949-vmss000000   Ready    agent   45m     v1.13.11
2. ノードプール 2 のノードにテイントを設定。
- キー: kind 値: sql スケジュールオプション: NoSchedule でテイント追加
kubectl taint node aks-nodepool2-23705949-vmss000000 kind=sql:NoSchedule
3. 結果の詳細を describe で Taints を確認。
>kubectl describe node aks-nodepool2-23705949-vmss000000
Name:               aks-nodepool2-23705949-vmss000000
Roles:              agent
Labels:             agentpool=nodepool2
                    beta.kubernetes.io/arch=amd64
                    beta.kubernetes.io/instance-type=Standard_DS1_v2
                    beta.kubernetes.io/os=linux
                    failure-domain.beta.kubernetes.io/region=japaneast
                    failure-domain.beta.kubernetes.io/zone=0
                    kubernetes.azure.com/cluster=MC_netcoresample_myaks_japaneast
                    kubernetes.azure.com/role=agent
                    kubernetes.io/hostname=aks-nodepool2-23705949-vmss000000
                    kubernetes.io/role=agent
                    node-role.kubernetes.io/agent=
                    storageprofile=managed
                    storagetier=Premium_LRS
Annotations:        node.alpha.kubernetes.io/ttl: 0
                    volumes.kubernetes.io/controller-managed-attach-detach: true
CreationTimestamp:  Tue, 29 Oct 2019 13:06:29 +0900
Taints:             kind=sql:NoSchedule
Unschedulable:      false
4. ノードプール 2 で実行されている core3webapp ポッドを削除。自動の再デプロイをさせる。
kubectl delete pod core3webapp-6cc784c468-8r9fv
5. 再度、ポッドの配置を取得して、アプリのポッドがノードプール 1 の VM で実行されていることを確認。
>kubectl get pods -o wide
NAME                                READY   STATUS    RESTARTS   AGE   IP           NODE                                NOMINATED NODE   READINESS GATES
core3webapp-6cc784c468-j8n8g        1/1     Running   1          16m   10.244.1.4   aks-nodepool1-23705949-vmss000001   <none>           <none>
core3webapp-6cc784c468-sfx9r        1/1     Running   0          6s    10.244.0.9   aks-nodepool1-23705949-vmss000000   <none>           <none>
mssql-deployment-5b74bdb6f7-gqv7j   1/1     Running   0          25m   10.244.1.3   aks-nodepool1-23705949-vmss000001   <none>           <none>
6. 同様にノードプール 1 の VM もテイントを実施。
kubectl taint node aks-nodepool1-23705949-vmss000000 kind=app:NoSchedule
kubectl taint node aks-nodepool1-23705949-vmss000001 kind=app:NoSchedule
Tolerations の設定
次にポッドに対して Tolerations を設定します。
1. myapp.yaml を以下のように書き換え。
- sql と app に tolerations の追加
kind: StorageClass
apiVersion: storage.k8s.io/v1beta1
metadata:
     name: azure-disk
provisioner: kubernetes.io/azure-disk
parameters:
  storageaccounttype: Premium_LRS
  kind: Managed
---
kind: PersistentVolumeClaim
apiVersion: v1
metadata:
  name: mssql-data
  annotations:
    volume.beta.kubernetes.io/storage-class: azure-disk
spec:
  accessModes:
  - ReadWriteOnce
  resources:
    requests:
      storage: 8Gi
---
apiVersion: v1
kind: Secret
metadata:
  name: mssql
type: Opaque
data:
  SA_PASSWORD: "TXlDMG05bCZ4UEBzc3cwcmQ="
---
apiVersion: apps/v1beta1
kind: Deployment
metadata:
  name: mssql-deployment
spec:
  replicas: 1
  template:
    metadata:
      labels:
        app: mssql
    spec:
      terminationGracePeriodSeconds: 10
      containers:
      - name: mssql
        image: mcr.microsoft.com/mssql/server:2017-latest
        ports:
        - containerPort: 1433
        env:
        - name: MSSQL_PID
          value: "Developer"
        - name: ACCEPT_EULA
          value: "Y"
        - name: MSSQL_SA_PASSWORD
          valueFrom:
            secretKeyRef:
              name: mssql
              key: SA_PASSWORD
        volumeMounts:
        - name: mssqldb
          mountPath: /var/opt/mssql
      volumes:
      - name: mssqldb
        persistentVolumeClaim:
          claimName: mssql-data
      tolerations:
      - key: "kind"
        operator: "Equal"
        value: "sql"
        effect: "NoSchedule"
---
apiVersion: v1
kind: Service
metadata:
  name: mssql-deployment
spec:
  selector:
    app: mssql
  ports:
    - protocol: TCP
      port: 1433
      targetPort: 1433
---
apiVersion: apps/v1
kind: Deployment
metadata:
  name: core3webapp
  namespace: default
  labels:
    app: core3webapp
spec:
  replicas: 2
  selector:
    matchLabels:
        app: core3webapp
  template:
    metadata:
      name: core3webapp
      labels:
        app: core3webapp
    spec:
      containers:
      - name: core3webapp
        image: kenakamuacr.azurecr.io/core3webapp:20191029043926
        resources:
          requests:
            cpu: "250m"
            memory: "512Mi"
          limits:
            cpu: "500m"
            memory: "1Gi"
        imagePullPolicy: Always
      restartPolicy: Always
      terminationGracePeriodSeconds: 30
      tolerations:
      - key: "kind"
        operator: "Equal"
        value: "app"
        effect: "NoSchedule"
---
apiVersion: v1
kind: Service
metadata:
  name: core3webapp
  labels:
    app: core3webapp
spec:
  type: "LoadBalancer"
  ports:
  - protocol: TCP
    port: 80
  selector:
    app: core3webapp
2. デプロイを実行。
kubectl apply -f myapp.yaml
3. ポッドが意図されたノードプールの VM に配置されていることを確認。
>kubectl get pods -o wide
NAME                                READY   STATUS    RESTARTS   AGE     IP            NODE                                NOMINATED NODE   READINESS GATES
core3webapp-67b678b946-bm924        1/1     Running   4          2m53s   10.244.0.12   aks-nodepool1-23705949-vmss000000   <none>           <none>
core3webapp-67b678b946-qhdp9        1/1     Running   4          2m53s   10.244.1.10   aks-nodepool1-23705949-vmss000001   <none>           <none>
mssql-deployment-6597f9f5b6-m2p7p   1/1     Running   0          2m53s   10.244.3.3    aks-nodepool2-23705949-vmss000000   <none>           <none>
4. アプリが利用可能か確認。

まとめ
今回は異なる VM タイプを使うために、複数のノードプールの構成を試しました。現在イングレスの設定がないため、次回は HTTP アプリケーションのルーティングアドオンを使わない方法でイングレスを構築してみます。