概要
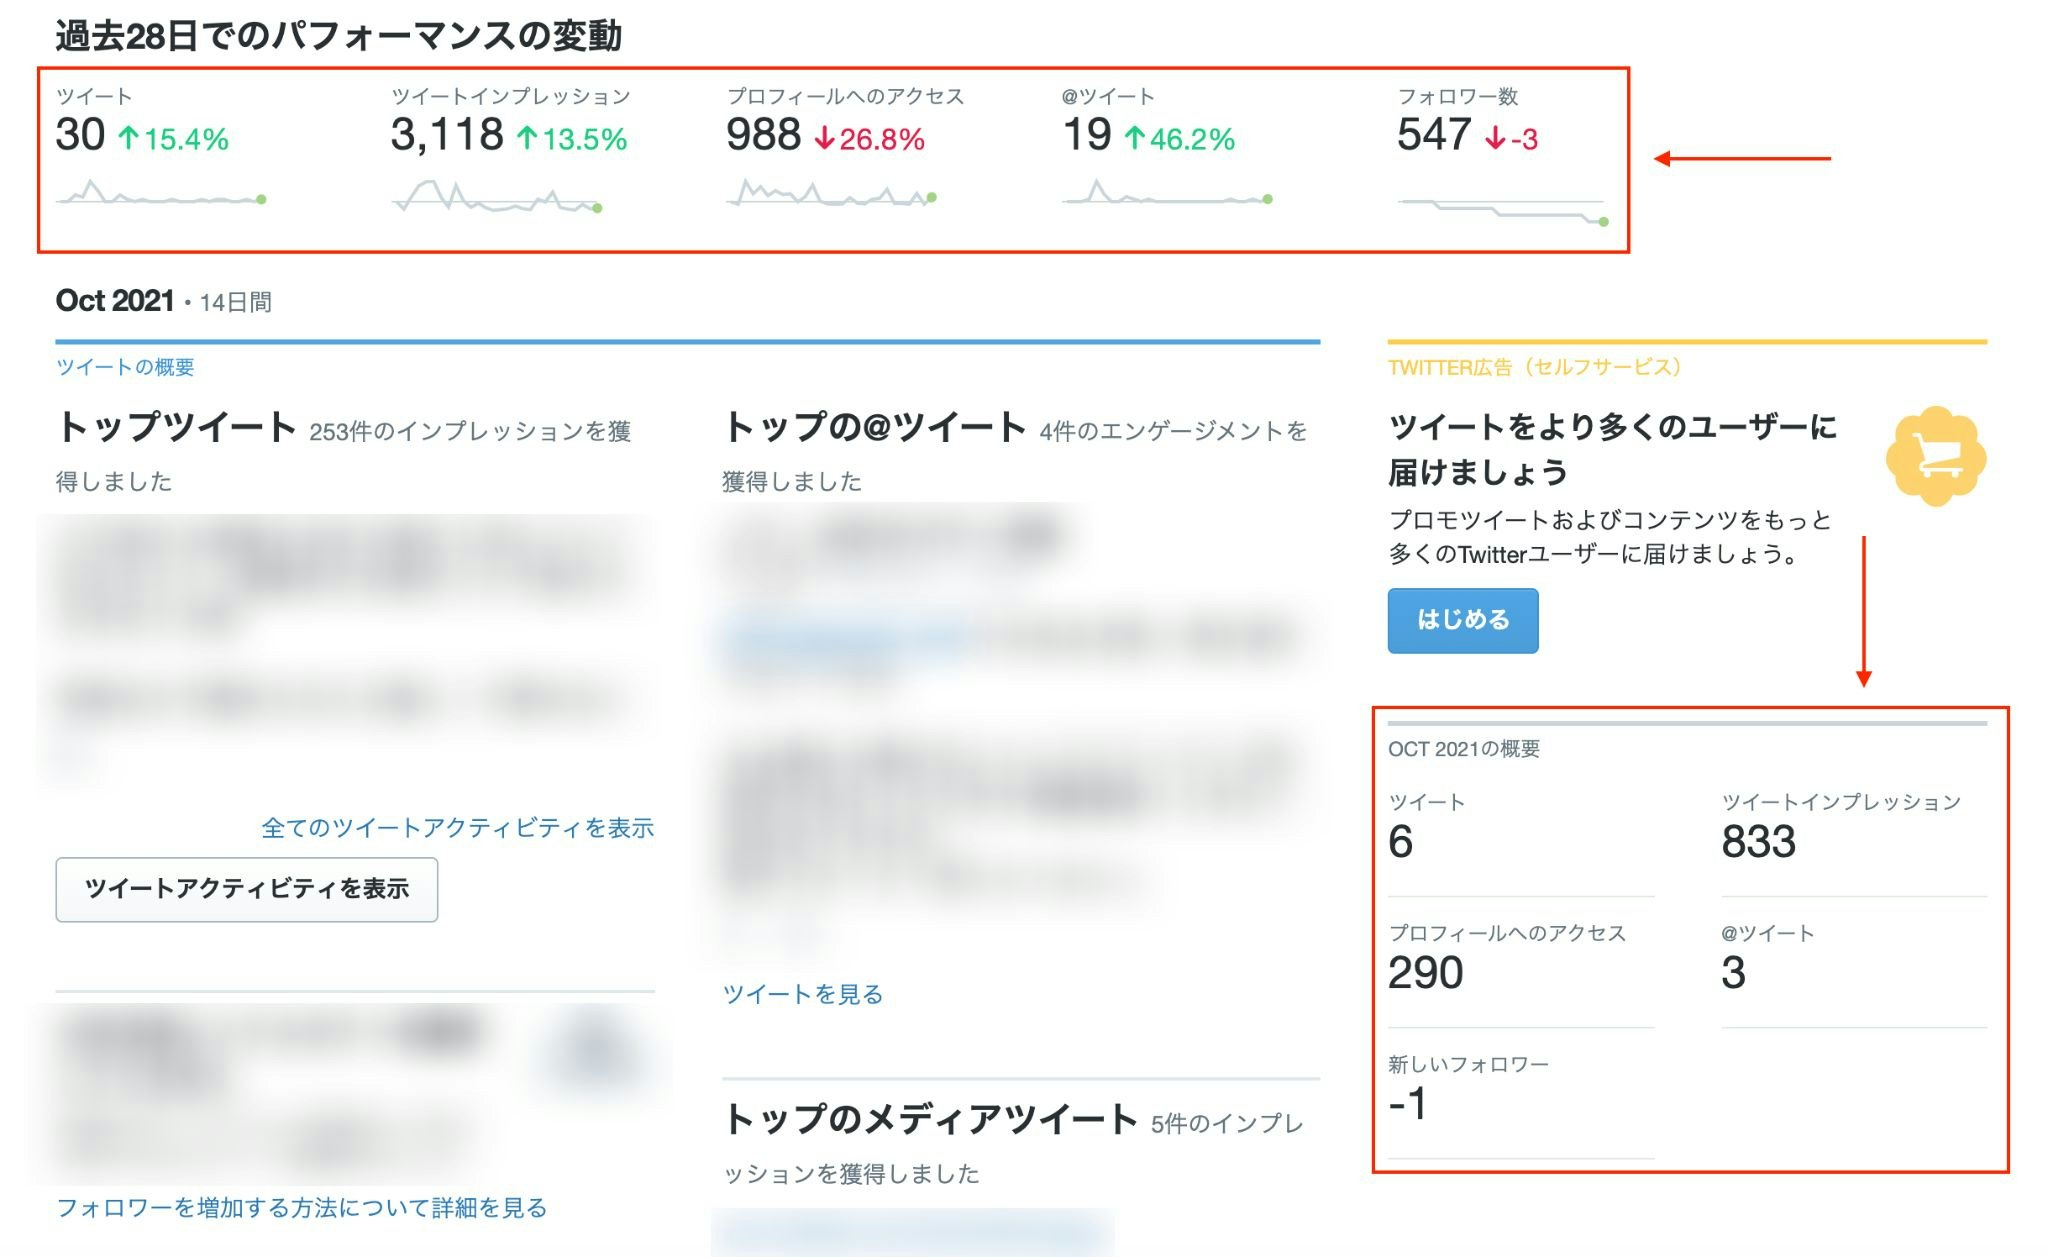
先日、とある業務の一環において「Twitter Analyticsの情報(上記画像のような部分)を毎日記録しておいてくれ」といった感じの指令を受けました。
一応、Twitter Analyticsのページ(https://analytics.twitter.com)では過去にさかのぼって各種データをCSV形式でエクスポートしたりといった機能が用意されていたりするものの、さすがに毎日ここを開いて逐一確認するのはナンセンスというか、曲がりなりにもプログラマーである自分がわざわざやるべき仕事ではないなと感じたため、何とか自動化できる手段は無いかと模索していたわけです。
そうなると真っ先に候補として挙がってくるのは「API経由での取得」ですが、ぱっと見、Twitter AnalyticsのデータをAPI経由で取得するための方法というのが簡単には出できませんでした。
仮に出てきたとしても、
- 可能ではあるが、広告を出稿したりするためのエンタープライズ用のアカウントでないと無理
- Twitter API v2 なら取得できるが、過去30日のみのデータに限られる
- そもそもそれらを使用するための審査が厳しい
といった感じでやや一癖ありそうな雰囲気...。
とりあえず、通常のTwitter APIのようにサードパーティ製のライブラリが充実していて「APIキーさえ取得できれば後はサンプル通りのコードを書けばOK!」みたいな軽いノリでは上手くいかないんだろうなぁと悟ってしまったわけですね。(もしかすると自分のリサーチが甘いだけかもしれませんが...)
中には「Seleniumで自動ログインしてスクレイピングすれば良いやん」といった声もあり、実際にそれっぽいコードを見かけたりもしたものの、Twitter社のスクレイピング嫌いは非常に有名で対策も頻繁に行われているそうなので安定感という点では欠けます。(変にいじくり回すとペナルティ食う可能性などもありますし)
で、他に何か手軽な手段は無いか試行錯誤してみたところ、意外と簡単な方法でイケたのでメモ書きしておきます。
cURLコマンドを使う
先に結論から言ってしまうと、cURLコマンドを使います。
そもそもこの画面上の数字がどこから送られてきているのか、デベロッパーツールの「ネットワーク」から確認してみましょう。

すると、
- summary.json
- top_tweet.json
- page_summary.json
- panels.json
などそれっぽいものがいくつか見つかるはず。したがって、これらにリクエストを送れば何となく取得できそうな気配がしますよね。
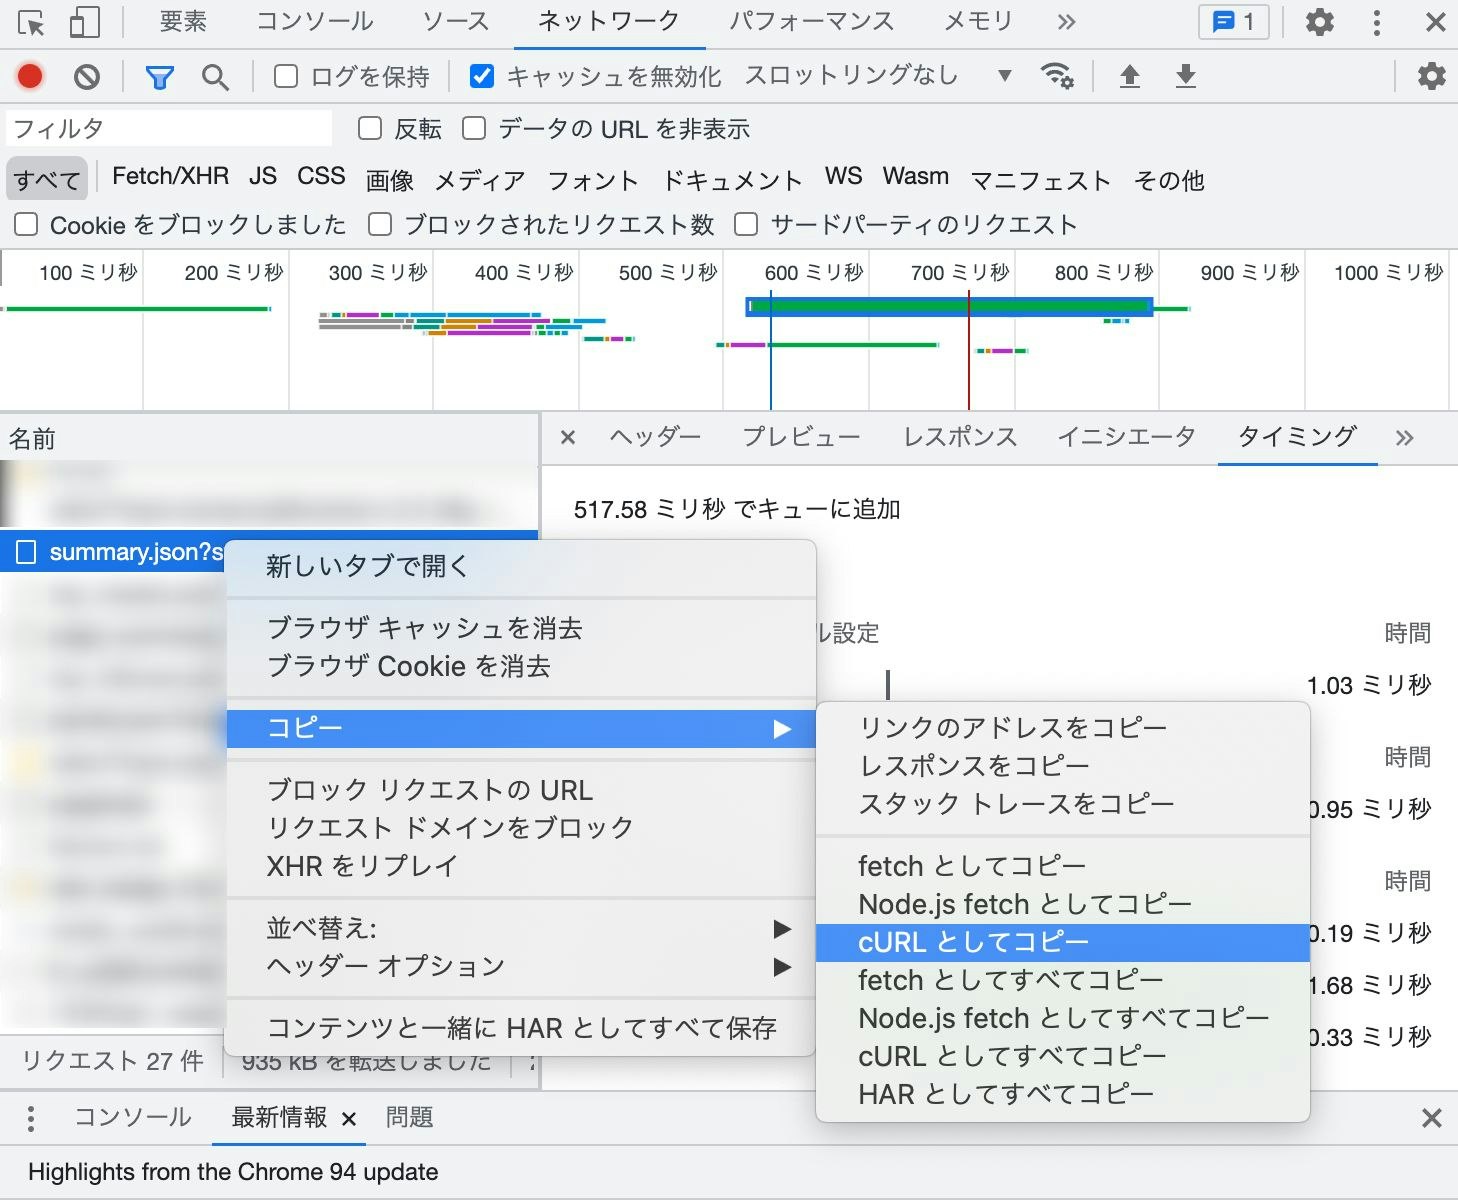
試しに「summary.json」にリクエストを送ってみたいと思います。
Google Chromeのデベロッパーツールなら「右クリック → コピー → cURLとしてコピー」でそのままコマンドをコピーできるので便利です。
curl 'https://analytics.twitter.com/user/******(ユーザー名)/home/summary.json?start_time=1631836800000&end_time=1634256000000' \
  -H 'authority: analytics.twitter.com' \
  -H 'pragma: no-cache' \
  -H 'cache-control: no-cache' \
  -H 'sec-ch-ua: "Chromium";v="94", "Google Chrome";v="94", ";Not A Brand";v="99"' \
  -H 'accept: application/json, text/javascript, */*; q=0.01' \
  -H 'x-requested-with: XMLHttpRequest' \
  -H 'sec-ch-ua-mobile: ?0' \
  -H 'user-agent: Mozilla/5.0 (Macintosh; Intel Mac OS X 10_15_7) AppleWebKit/537.36 (KHTML, like Gecko) Chrome/94.0.4606.81 Safari/537.36' \
  -H 'sec-ch-ua-platform: "macOS"' \
  -H 'sec-fetch-site: same-origin' \
  -H 'sec-fetch-mode: cors' \
  -H 'sec-fetch-dest: empty' \
  -H 'referer: https://analytics.twitter.com/user/******(ユーザー名)/home' \
  -H 'accept-language: ja,en-US;q=0.9,en;q=0.8' \
  -H 'cookie: kdt=********************; remember_checked_on=1; des_opt_in=Y; cd_user_id=**********************; dnt=1; lang=ja; _gid=***************; personalization_id="************"; guest_id=**************; gt=***************; _twitter_sess=********************; auth_token=******************; twid=****************; ct0=****************; att=********************; csrf_id=*******************; at_check=true; _gcl_au=*********************; mbox=PC#******************#***********|session#*****************#*************; _ga=***************; _ga_*************=******************' \
  --compressed
クリップボードに↑のようなコマンドがコピーされていればOK。
これを実行してみると、次のような形式のレスポンスが返ってくるはずです。
{
	"html": "<div class=\"row\">\n  <div class=\"col-md-10\">\n    <div class=\"home-summary-panel\">\n\n      <div class=\"home-summary-metric DataPoint\" data-metric=\"tweets\" title=\"30\">\n        <div class=\"DataPoint-label\">ツイート</div>\n        <div class=\"DataPoint-info\">30\n            <span class=\"DataPoint-trend DataPoint-trend--positive\">15.4%</span>\n\n        </div>\n        <div class=\"home-summary-chart\"></div>\n      </div>\n\n      <div class=\"home-summary-metric DataPoint\" data-metric=\"tweetviews\" title=\"3,118\">\n        <div class=\"DataPoint-label\">ツイートインプレッション</div>\n        <div class=\"DataPoint-info\">3,118\n            <span class=\"DataPoint-trend DataPoint-trend--positive\">13.5%</span>\n\n        </div>\n        <div class=\"home-summary-chart\"></div>\n      </div>\n\n      <div class=\"home-summary-metric DataPoint\" data-metric=\"profileviews\" title=\"988\">\n        <div class=\"DataPoint-label\">プロフィールへのアクセス</div>\n        <div class=\"DataPoint-info\">988\n            <span class=\"DataPoint-trend DataPoint-trend--negative\">26.8%</span>\n\n        </div>\n        <div class=\"home-summary-chart\"></div>\n      </div>\n\n      <div class=\"home-summary-metric DataPoint\" data-metric=\"mentions\" title=\"19\">\n        <div class=\"DataPoint-label\">@ツイート</div>\n        <div class=\"DataPoint-info\">19\n            <span class=\"DataPoint-trend DataPoint-trend--positive\">46.2%</span>\n\n        </div>\n        <div class=\"home-summary-chart\"></div>\n      </div>\n\n      <div class=\"home-summary-metric DataPoint\" data-metric=\"followers\" title=\"547\">\n        <div class=\"DataPoint-label\">フォロワー数</div>\n        <div class=\"DataPoint-info\">547\n            <span class=\"DataPoint-trend DataPoint-trend--negative\">-3</span>\n\n        </div>\n        <div class=\"home-summary-chart\"></div>\n      </div>\n\n    </div>\n  </div>\n</div>\n",
	"domain": [
		*************,
		*************
	],
	"step": **********,
	"timeseries": {
		"followers": [
			[
				***************,
				550
			],
            ...
		],
		"mentions": [
			[
				***************,
				0
			],
	    ...
		],
		"tweetviews": [
			[
				***************,
				118
			],
            ...
		],
		"profileviews": [
			[
				***************,
				14
			],
            ...
		],
		"tweets": [
			[
				***************,
				0
			],
            ...
		]
	}
}
どうやらそれっぽいデータが取得できてますね。
あとはこのJSONをパースして煮るなり焼くなり好きにすればOK。
他のデータ(top_tweet、page_summary、panelsなど)も同様のやり方で取得できるので試してみてください。
※ 返ってきたデータが文字化けなどしている場合、末尾に | perl -Xpne 's/\\u([0-9a-fA-F]{4})/chr(hex($1))/eg' を追記して実行すると解決できるかもしれません。
RubyやPythonで処理したい場合
ここからは番外編なので、必要無ければ読み飛ばしていただいて結構です。
ただデータを取得するだけならcURLコマンドで足りるかもしれませんが、色々とデータをこねくり回そうと思ったら何らかのプログラミング言語が必要になると思うので、参考にしていただければと思います。
Ruby
まずRubyから。
gemをインストール
# frozen_string_literal: true

source "https://rubygems.org"

git_source(:github) {|repo_name| "https://github.com/#{repo_name}" }

gem "dotenv"
gem "faraday"
gem "nokogiri"
$ bundle install --path vendor/bundle
- 秘匿情報を扱うための「dotenv」
- HTTPリクエストを送信するための「faraday」
- HTML解析を行うための「nokogiri」
などをインストールしておきます。
環境変数をセット
TWITTER_USERNAME=<Twitterのユーザー名>
TWITTER_AUTH_TOKEN=<認証トークン>
先ほど生成したcURLコマンド内のヘッダーには色々ごちゃごちゃした情報が付与されていましたが、実は認証トークンだけで十分だったりします。
「-H 'cookie: 」から「auth_token」だけ抜き出して「TWITTER_AUTH_TOKEN」にセットしてください。
コード
require "bundler/setup"
require "faraday"
require "nokogiri"
require "json"
require "dotenv"

Dotenv.load

# Twitter Analyticsの情報を取得するためのクラス
class TwitterAnalytics
  def initialize(username, auth_token)
    @client = Faraday.new(url: "https://analytics.twitter.com/user/#{username}/home") do |req|
      req.headers["Cookie"] = "auth_token=#{auth_token}; lang=ja;"
    end
  end

  # データを取得
  def fetch_data(category, start_time, end_time)
    @client.get "#{category}.json?start_time=#{start_time}&end_time=#{end_time}"
  end
end

# 取得したいデータのカテゴリを指定
category = "summary"

# 取得開始日時と取得終了日時をUnixtimeで指定
start_time = 1631836800000
end_time = 1634256000000

# リクエストを送信
ta = TwitterAnalytics.new(ENV["TWITTER_USERNAME"], ENV["TWITTER_AUTH_TOKEN"])
res = ta.fetch_data(category, start_time, end_time)

# NokogiriでHTML解析
html = JSON.parse(res.body)["html"]
doc = Nokogiri::HTML(html)

# 各種データを取り出し
metrics = doc.css(".home-summary-metric")
tweets = metrics[0].attr("title")
tweet_views = metrics[1].attr("title")
profile_views = metrics[2].attr("title")
mentions = metrics[3].attr("title")
followers = metrics[4].attr("title")

heredoc = <<~EOS
  ツイート: #{tweets}
  ツイートインプレッション: #{tweet_views}
  プロフィールへのアクセス: #{profile_views}
  @ツイート: #{mentions}
  フォロワー数: #{followers}
EOS

puts heredoc
大体こんな感じで良いでしょう。
$ bundle exec ruby main.rb

ツイート: 30
ツイートインプレッション: 3,127
プロフィールへのアクセス: 988
@ツイート: 19
フォロワー数: 547

実際のTwitter Analytics画面とも数字が一致しているので大丈夫そうですね!(個人アカウントを試しているので全体的な数字がショボいのは勘弁してください...)
Python
こういう作業はPythonでやりたいという方もいると思うので、一応Python版も掲載しておきます。
ライブラリをインストール
python-dotenv
requests
beautifulsoup4
$ pip install -r requirements.txt
- 秘匿情報を扱うための「python-dotenv」
- HTTPリクエストを送信するための「requests」
- HTML解析を行うための「beautifulsoup4」
などをインストールしておきます。
環境変数をセット
TWITTER_USERNAME=<Twitterのユーザー名>
TWITTER_AUTH_TOKEN=<認証トークン>
先ほど(Ruby版)と同じなので説明は割愛。
コード
import os
import json
import requests
import textwrap
from bs4 import BeautifulSoup
from dotenv import load_dotenv

load_dotenv()

# Twitter Analyticsの情報を取得するためのクラス
class TwitterAnalytics:
  def __init__(self, username, auth_token):
      self.username = username
      self.auth_token = auth_token

  # データを取得
  def fetch_data(self, category, start_time, end_time):
      url = f"https://analytics.twitter.com/user/{self.username}/home/{category}.json?start_time={start_time}&end_time={end_time}"
      headers = { "Cookie": f"auth_token={self.auth_token}; lang=ja" }

      return requests.get(url, headers=headers)

# 取得したいデータのカテゴリを指定
category = "summary"

# 取得開始日時と取得終了日時をUnixtimeで指定
start_time = 1631836800000
end_time = 1634256000000

# リクエストを送信
ta = TwitterAnalytics(os.getenv("TWITTER_USERNAME"), os.getenv("TWITTER_AUTH_TOKEN"))
res = ta.fetch_data(category, start_time, end_time)

# BeautifulSoupでHTML解析
html = res.json()["html"]
soup = BeautifulSoup(html, "html.parser")

# 各種データを取り出し
metrics = soup.find_all("div", class_ = "home-summary-metric")
tweets = metrics[0]["title"]
tweet_views = metrics[1]["title"]
profile_views = metrics[2]["title"]
mentions = metrics[3]["title"]
followers = metrics[4]["title"]

heredoc = textwrap.dedent("""
    ツイート: {tweets}
    ツイートインプレッション: {tweet_views}
    プロフィールへのアクセス: {profile_views}
    @ツイート: {mentions}
    フォロワー数: {followers}
""").format(
    tweets        = tweets,
    tweet_views   = tweet_views,
    profile_views = profile_views,
    mentions      = mentions,
    followers     = followers
)

print(heredoc)
あとはコイツを実行すればOK。
$ python main.py

ツイート: 30
ツイートインプレッション: 3,127
プロフィールへのアクセス: 988
@ツイート: 19
フォロワー数: 547
と返ってくるはずです。
あとがき
以上、APIなどを使用せずにTwitter Analytics(アナリティクス)の情報を取得してみました。もし同じような事を再現したい方は参考にしてみてください。
なお、この方法が果たしてTwitter側からして良いものであると見なされるとは限らないのでご注意を。もしかしたらある日急に使えなくなる可能性も十分にあります。
あと、auth_tokenの有効期限がどれくらいかわからないため、完全自動化を図ろうとする場合はその辺の回転も意識して工夫が必要になるかも...。
とにもかくにも、常識の範囲内で試していただけると幸いです。