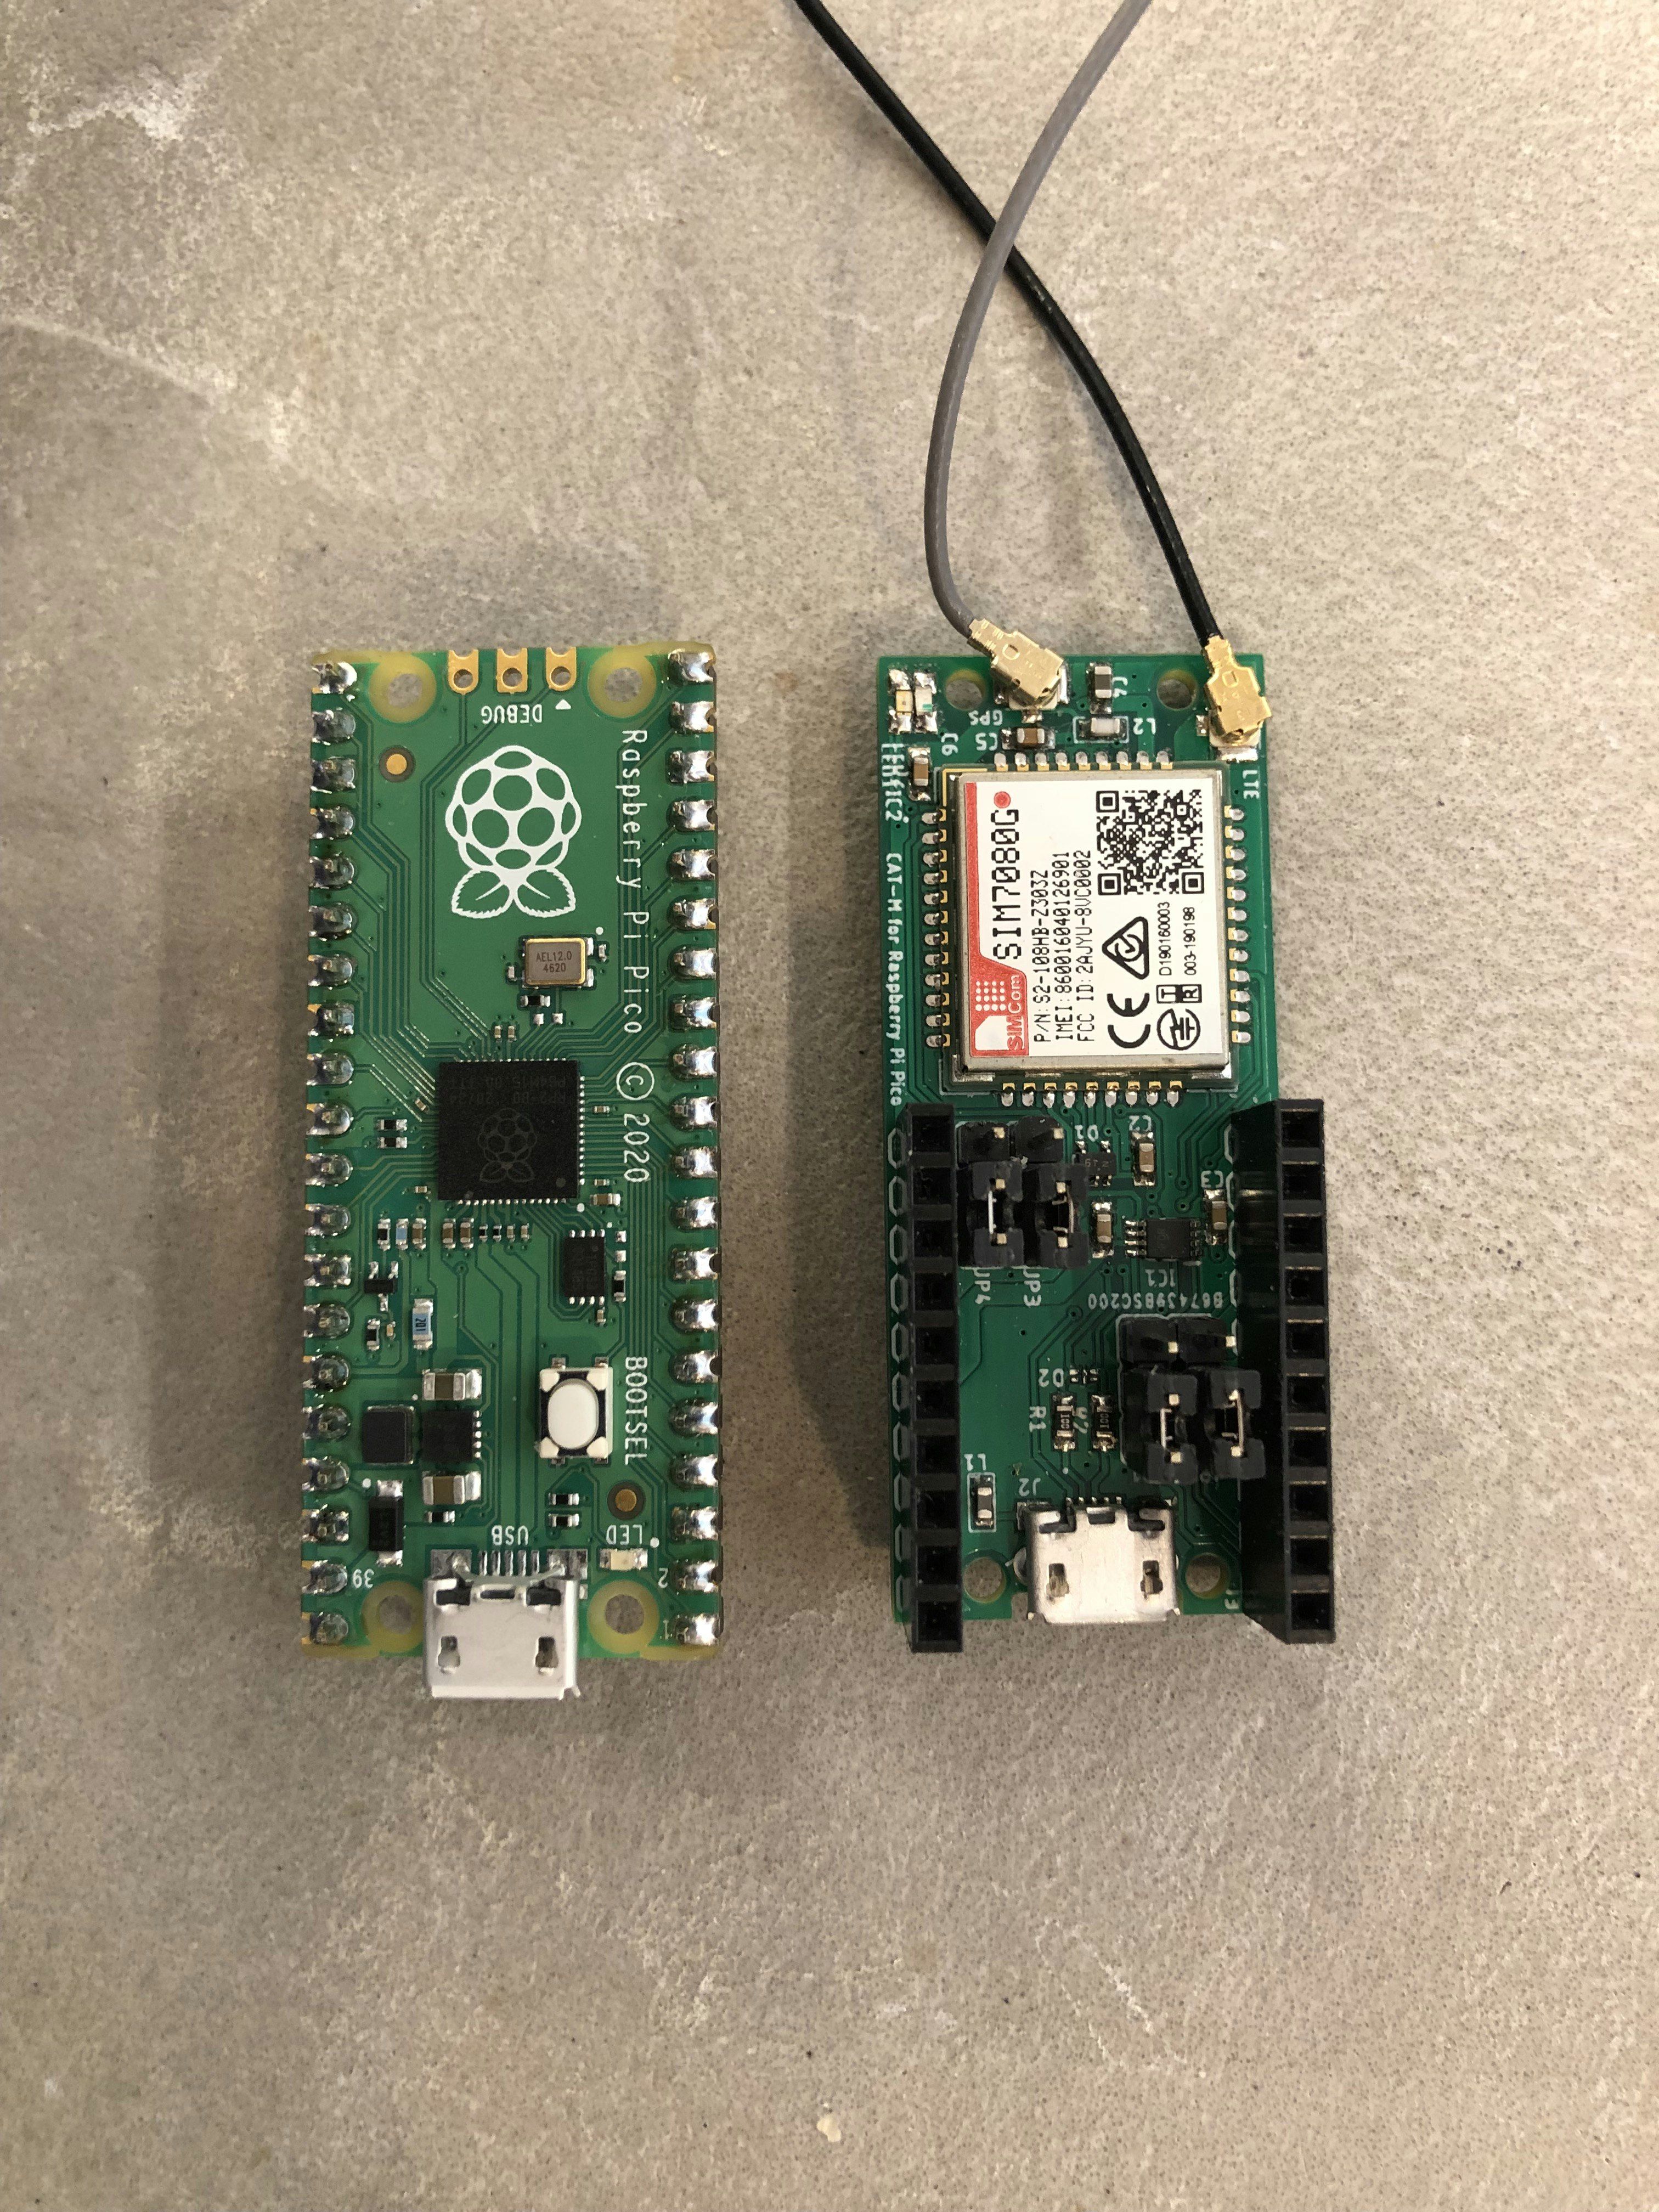
Raspberry Pi pico用の SIMCOM社のSIM7080Gを使ったLTE-M通信Addonボードを試作しました。 Addonボード自体は数か月前に作っていたのですが
Raspberry Pi picoのソフト開発が Arduino IDE で使えるようになったので
LTE通信用のライブラリ TYNY GMSを使ってテストプログラムを書きました。
Raspberry Pi picoをArduino IDEで使えるようにするための解説は色々と公開されているので
ここでは割愛します。
構成
メインボード : Raspberry Pi pico
LTE-M通信ボード : SIM7080G を使った自作ボード
SIMカード : SORACOM Plan-KM1
テストに使ったプログラムは
TinyGSM を使っています。
試作したAddonボード向けに若干の変更を加えています。
テキスト比較ツール等でオリジナルのソースと以下のソースを比較してみた下さい。
pico_HttpClient.ino
/**************************************************************
 *
 * This sketch connects to a website and downloads a page.
 * It can be used to perform HTTP/RESTful API calls.
 *
 * For this example, you need to install ArduinoHttpClient library:
 *   https://github.com/arduino-libraries/ArduinoHttpClient
 *   or from http://librarymanager/all#ArduinoHttpClient
 *
 * TinyGSM Getting Started guide:
 *   https://tiny.cc/tinygsm-readme
 *
 * For more HTTP API examples, see ArduinoHttpClient library
 *
 * NOTE: This example may NOT work with the XBee because the
 * HttpClient library does not empty to serial buffer fast enough
 * and the buffer overflow causes the HttpClient library to stall.
 * Boards with faster processors may work, 8MHz boards will not.
 **************************************************************/

// Select your modem:
// #define TINY_GSM_MODEM_SIM800
// #define TINY_GSM_MODEM_SIM808
// #define TINY_GSM_MODEM_SIM868
// #define TINY_GSM_MODEM_SIM900
// #define TINY_GSM_MODEM_SIM7000
// #define TINY_GSM_MODEM_SIM7000SSL
# define TINY_GSM_MODEM_SIM7080
// #define TINY_GSM_MODEM_SIM5360
// #define TINY_GSM_MODEM_SIM7600
// #define TINY_GSM_MODEM_UBLOX
// #define TINY_GSM_MODEM_SARAR4
// #define TINY_GSM_MODEM_M95
// #define TINY_GSM_MODEM_BG96
// #define TINY_GSM_MODEM_A6
// #define TINY_GSM_MODEM_A7
// #define TINY_GSM_MODEM_M590
// #define TINY_GSM_MODEM_MC60
// #define TINY_GSM_MODEM_MC60E
// #define TINY_GSM_MODEM_ESP8266
// #define TINY_GSM_MODEM_XBEE
// #define TINY_GSM_MODEM_SEQUANS_MONARCH

// Set serial for debug console (to the Serial Monitor, default speed 115200)
# define SerialMon Serial

// Set serial for AT commands (to the module)
// Use Hardware Serial on Mega, Leonardo, Micro
# ifndef __AVR_ATmega328P__
# define SerialAT Serial1

// or Software Serial on Uno, Nano
# else
# include <SoftwareSerial.h>
SoftwareSerial SerialAT(2, 3);  // RX, TX
# endif

// Increase RX buffer to capture the entire response
// Chips without internal buffering (A6/A7, ESP8266, M590)
// need enough space in the buffer for the entire response
// else data will be lost (and the http library will fail).
# if !defined(TINY_GSM_RX_BUFFER)
# define TINY_GSM_RX_BUFFER 650
# endif

// See all AT commands, if wanted
// #define DUMP_AT_COMMANDS

// Define the serial console for debug prints, if needed
# define TINY_GSM_DEBUG SerialMon
// #define LOGGING  // <- Logging is for the HTTP library

// Range to attempt to autobaud
// NOTE:  DO NOT AUTOBAUD in production code.  Once you've established
// communication, set a fixed baud rate using modem.setBaud(#).
# define GSM_AUTOBAUD_MIN 9600
# define GSM_AUTOBAUD_MAX 115200

// Add a reception delay, if needed.
// This may be needed for a fast processor at a slow baud rate.
// #define TINY_GSM_YIELD() { delay(2); }

// Define how you're planning to connect to the internet
// These defines are only for this example; they are not needed in other code.
# define TINY_GSM_USE_GPRS true
# define TINY_GSM_USE_WIFI false

// set GSM PIN, if any
# define GSM_PIN ""

// Your GPRS credentials, if any
const char apn[]      = "soracom.io";
const char gprsUser[] = "sora";
const char gprsPass[] = "sora";

// Your WiFi connection credentials, if applicable
const char wifiSSID[] = "YourSSID";
const char wifiPass[] = "YourWiFiPass";

// Server details
const char server[]   = "vsh.pp.ua";
const char resource[] = "/TinyGSM/logo.txt";
const int  port       = 80;

# include <TinyGsmClient.h>
# include <ArduinoHttpClient.h>

// Just in case someone defined the wrong thing..
# if TINY_GSM_USE_GPRS && not defined TINY_GSM_MODEM_HAS_GPRS
# undef TINY_GSM_USE_GPRS
# undef TINY_GSM_USE_WIFI
# define TINY_GSM_USE_GPRS false
# define TINY_GSM_USE_WIFI true
# endif
# if TINY_GSM_USE_WIFI && not defined TINY_GSM_MODEM_HAS_WIFI
# undef TINY_GSM_USE_GPRS
# undef TINY_GSM_USE_WIFI
# define TINY_GSM_USE_GPRS true
# define TINY_GSM_USE_WIFI false
# endif

# ifdef DUMP_AT_COMMANDS
# include <StreamDebugger.h>
StreamDebugger debugger(SerialAT, SerialMon);
TinyGsm        modem(debugger);
# else
TinyGsm        modem(SerialAT);
# endif

TinyGsmClient client(modem);
HttpClient    http(client, server, port);


# define PIN_SERIAL1_TX (0u)
# define PIN_SERIAL1_RX (1u)
# define PWKEY 2

void setup() {
  // Set console baud rate
  SerialMon.begin(115200);
  delay(10);

  // !!!!!!!!!!!
  // Set your reset, enable, power pins here
  pinMode(PWKEY, OUTPUT);
  digitalWrite(PWKEY, HIGH);   // turn the LED on (HIGH is the voltage level)
  delay(2000);                       // wait for a second
  digitalWrite(PWKEY, LOW);    // turn the LED off by making the voltage LOW
  // !!!!!!!!!!!

  SerialMon.println("Wait...");

  // Set GSM module baud rate
  TinyGsmAutoBaud(SerialAT, GSM_AUTOBAUD_MIN, GSM_AUTOBAUD_MAX);
  // SerialAT.begin(9600);
  delay(6000);

  // Restart takes quite some time
  // To skip it, call init() instead of restart()
  SerialMon.println("Initializing modem...");
  modem.restart();
  // modem.init();

  String modemInfo = modem.getModemInfo();
  SerialMon.print("Modem Info: ");
  SerialMon.println(modemInfo);

# if TINY_GSM_USE_GPRS
  // Unlock your SIM card with a PIN if needed
  if (GSM_PIN && modem.getSimStatus() != 3) { modem.simUnlock(GSM_PIN); }
# endif
}

void loop() {
# if TINY_GSM_USE_WIFI
  // Wifi connection parameters must be set before waiting for the network
  SerialMon.print(F("Setting SSID/password..."));
  if (!modem.networkConnect(wifiSSID, wifiPass)) {
    SerialMon.println(" fail");
    delay(10000);
    return;
  }
  SerialMon.println(" success");
# endif

# if TINY_GSM_USE_GPRS && defined TINY_GSM_MODEM_XBEE
  // The XBee must run the gprsConnect function BEFORE waiting for network!
  modem.gprsConnect(apn, gprsUser, gprsPass);
# endif

  SerialMon.print("Waiting for network...");
  if (!modem.waitForNetwork()) {
    SerialMon.println(" fail");
    delay(10000);
    return;
  }
  SerialMon.println(" success");

  if (modem.isNetworkConnected()) { SerialMon.println("Network connected"); }

# if TINY_GSM_USE_GPRS
  // GPRS connection parameters are usually set after network registration
  SerialMon.print(F("Connecting to "));
  SerialMon.print(apn);
  if (!modem.gprsConnect(apn, gprsUser, gprsPass)) {
    SerialMon.println(" fail");
    delay(10000);
    return;
  }
  SerialMon.println(" success");

  if (modem.isGprsConnected()) { SerialMon.println("GPRS connected"); }
# endif

  SerialMon.print(F("Performing HTTP GET request... "));
  int err = http.get(resource);
  if (err != 0) {
    SerialMon.println(F("failed to connect"));
    delay(10000);
    return;
  }

  int status = http.responseStatusCode();
  SerialMon.print(F("Response status code: "));
  SerialMon.println(status);
  if (!status) {
    delay(10000);
    return;
  }

  SerialMon.println(F("Response Headers:"));
  while (http.headerAvailable()) {
    String headerName  = http.readHeaderName();
    String headerValue = http.readHeaderValue();
    SerialMon.println("    " + headerName + " : " + headerValue);
  }

  int length = http.contentLength();
  if (length >= 0) {
    SerialMon.print(F("Content length is: "));
    SerialMon.println(length);
  }
  if (http.isResponseChunked()) {
    SerialMon.println(F("The response is chunked"));
  }

  String body = http.responseBody();
  SerialMon.println(F("Response:"));
  SerialMon.println(body);

  SerialMon.print(F("Body length is: "));
  SerialMon.println(body.length());

  // Shutdown

  http.stop();
  SerialMon.println(F("Server disconnected"));

# if TINY_GSM_USE_WIFI
  modem.networkDisconnect();
  SerialMon.println(F("WiFi disconnected"));
# endif
# if TINY_GSM_USE_GPRS
  modem.gprsDisconnect();
  SerialMon.println(F("GPRS disconnected"));
# endif

  // Do nothing forevermore
  while (true) { delay(1000); }
}
ターミナルソフトに接続して実行すると以下のようになります。
Wait...
[1959] Trying baud rate 115200 ...
[5409] Modem responded at rate 115200
Initializing modem...
[14703] ### TinyGSM Version: 0.10.9
[14703] ### TinyGSM Compiled Module:  TinyGsmClientSIM7080
[14733] ### Modem: SIMCOM SIM7080
Modem Info: R1951.01
Waiting for network... success
Network connected
Connecting to soracom.io[15610] ### Network time and time zone updated.
 success
GPRS connected
Performing HTTP GET request... [22063] ### Got Data: 0
[22069] ### Closed:  0
Response status code: 200
Response Headers:
    Server : nginx/1.10.3 (Ubuntu)
    Date : Sat, 26 Jun 2021 06:37:53 GMT
    Content-Type : text/plain; charset=UTF-8
    Content-Length : 121
    Connection : close
    X-DNS-Prefetch-Control : off
    X-Frame-Options : SAMEORIGIN
    Strict-Transport-Security : max-age=15552000; includeSubDomains
    X-Download-Options : noopen
    X-Content-Type-Options : nosniff
    X-XSS-Protection : 1; mode=block
    Accept-Ranges : bytes
    Cache-Control : public, max-age=0
    Last-Modified : Wed, 27 Sep 2017 09:03:12 GMT
    ETag : W/"79-15ec2936080"
Content length is: 121
Response:

  _____            _____  _____  _____
    |  | |\ | \_/ |  ___ |_____ |  |  |
    |  | | \|  |  |_____| _____||  |  |


Body length is: 121
Server disconnected
GPRS disconnected
最後に
Raspberry Pi picoの開発に Arduino IDE が使えるようになったことで
たくさんのライブラリを使えるようになり、Raspberry Pi picoの利用が増えそうです。