環境構築するにあたり、publicにweb機・privateにApp機と分けたほうがよりセキュリティ強化につながるということでその設計でrailsの環境を立ててみたのでまとめてみます。
はじめに
全体図はこんな感じです。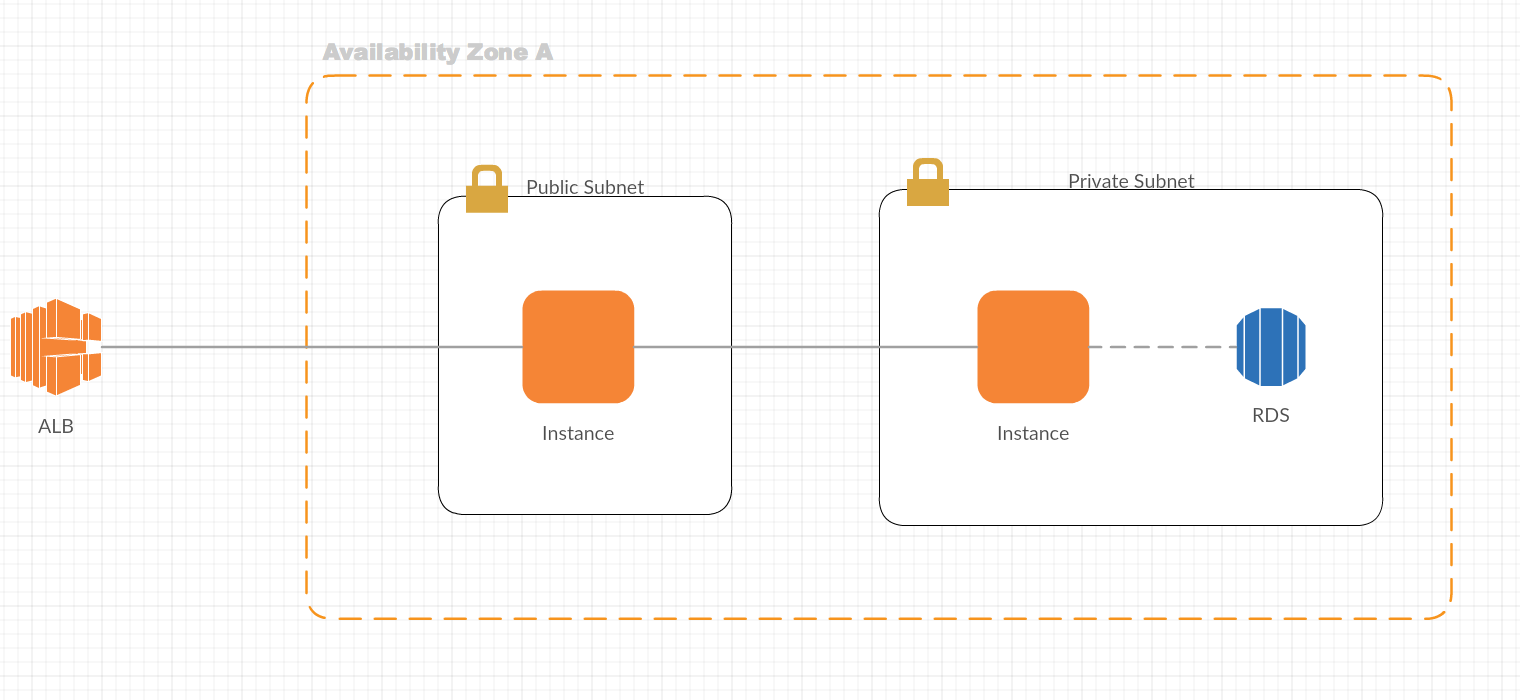
設定していきます。
nginx側
EC2サーバーを立てて、nginxをインストールします。
# yum -y install nginx
インストール後、nginxの設定をいじっていきます。
ファイルは/etc/nginx/nginx.confでこの中に書いてあります。
コードは全体的にこんな感じだったような・・・違ったらすみません。
user nginx;
worker_processes auto;
error_log /var/log/nginx/error.log;
pid /var/run/nginx.pid;

# Load dynamic modules. See /usr/share/nginx/README.fedora.
include /usr/share/nginx/modules/*.conf;

events {
    worker_connections 1024;
}

http {
    log_format  main  '$remote_addr - $remote_user [$time_local] "$request" '
                      '$status $body_bytes_sent "$http_referer" '
                      '"$http_user_agent" "$http_x_forwarded_for"';

    access_log  /var/log/nginx/access.log  main;

    sendfile            on;
    tcp_nopush          on;
    tcp_nodelay         on;
    keepalive_timeout   65;
    types_hash_max_size 2048;

    include             /etc/nginx/mime.types;
    default_type        application/octet-stream;

    # Load modular configuration files from the /etc/nginx/conf.d directory.
    # See http://nginx.org/en/docs/ngx_core_module.html#include
    # for more information.
    include /etc/nginx/conf.d/*.conf;

    index   index.html index.htm;

    server {
        listen       80 default_server;
        listen       [::]:80 default_server;
        server_name  localhost;

        access_log /var/log/nginx/access.log;
        error_log /var/log/nginx/error.log;

        set_real_ip_from 172.200.0.0/21;
        real_ip_header  X-Forwarded-For;

        client_max_body_size 100m;
        error_page 404 /404.html;
        error_page 500 502 503 504 /500.html;
        try_files $uri/index.html $uri @unicorn;

        location / {
          proxy_pass http://xxx.xxx.xxx.xxxx:8080;
        }


    }
}
いじるのはserverの箇所です。取り出してみます。
    server {
        listen       80 default_server;
        listen       [::]:80 default_server;
        server_name  localhost;

        access_log /var/log/nginx/access.log;
        error_log /var/log/nginx/error.log;

        set_real_ip_from xxx.xxx.xxx.xxxx/21; #←VPCのIPを設定
        real_ip_header  X-Forwarded-For;

        client_max_body_size 100m;
        error_page 404 /404.html;
        error_page 500 502 503 504 /500.html;
        try_files $uri/index.html $uri @unicorn;

        location / {
          proxy_pass http://xxx.xxx.xxx.xxxx:8080;#←privateインスタンスのIPを設定、ポート番号も設定する
        }


    }
修正すべきはlocationの部分です。(set_real_ip_fromとreal_ip_headerはALBを通した時にここのコードがないとALBのIPアドレスになってしまうため、自社からのアクセスなのかどうかを判断できるように入れています)
そこに指定するとポート8080でプライベートなインスタンスにリクエストを渡すことができます。
起動するときは以下コマンドです。
# nginx
unicorn
Gemfileにセットして、bundle installするだけです。
gem 'unicorn'
unicornの設定は以下です.
ファイルはconfig/unicorn.rb
$unicorn_user = "user"
$unicorn_group = "user"

worker_processes 16
working_directory '/var/www/app'

listen      '/tmp/unicorn.sock', :backlog => 1024
listen      8080, :tcp_nopush => true #←ここを8080にする
timeout     120

pid         "/tmp/pids/unicorn.pid"
stderr_path "/var/log/unicorn/unicorn_error.log"
stdout_path "/var/log/unicorn/unicorn.log"

preload_app  true

before_fork do |server, worker|
  defined?(ActiveRecord::Base) and ActiveRecord::Base.connection.disconnect!

  old_pid = "#{ server.config[:pid] }.oldbin"
  unless old_pid == server.pid
    begin
      Process.kill :QUIT, File.read(old_pid).to_i
    rescue Errno::ENOENT, Errno::ESRCH
    end
  end
end

after_fork do |server, worker|
  defined?(ActiveRecord::Base) and ActiveRecord::Base.establish_connection
end
ポート番号をnginxで渡すポートに合わせます。
起動するときは以下コマンドです。
bundle exec unicorn_rails -c config/unicorn.rb -E development -D
killするときは以下です。unicornの設定のpidsのところと合わせます。
kill -QUIT `cat /tmp/pids/unicorn.pid`
最後に
これでセキュアな環境を立てられます。同じ環境を建てる時にめんどくさいのでcloudformationで作成したいと思います。
nginxの設定ファイルを書き直します。
    server {
        listen       80 default_server;
        listen       [::]:80 default_server;
        server_name  localhost;

        access_log /var/log/nginx/access.log;
        error_log /var/log/nginx/error.log;

        set_real_ip_from xxx.xxx.xxx.xxxx/21; #←VPCのIPを設定
        real_ip_header  X-Forwarded-For;

        client_max_body_size 100m;
        error_page 404 /404.html;
        error_page 500 502 503 504 /500.html;
        try_files $uri/index.html $uri @unicorn;

        location / {
          proxy_pass http://private_ip_address:8080;#←privateインスタンスのIPを設定、ポート番号も設定する
        }


    }
locationのところをprivate_ip_addressに修正しています。このようにしてcloudformationのタスク実行時に置換してIPを入れ込む作戦です。テンプレートが以下です。
{
  "AWSTemplateFormatVersion": "2010-09-09",
  "Description": "Green CloudFormation Template for User Production",
  "Parameters": {
    "KeyName": {
      "Type": "AWS::EC2::KeyPair::KeyName"
    },
    "ALBName": {
      "Type": "String",
      "Description": "Production ALBName"
    },
    "LoadBalancerArn": {
      "Type": "String",
      "Description": "Production ALBName"
    },
    "VPCID": {
      "Type": "String",
      "Description": "Production VPC"
    },
    "PublicSubnetB": {
      "Type": "String",
      "Description": "Public SubnetId B"
    },
    "PrivateSubnetB": {
      "Type": "String",
      "Description": "Private Subnet B"
    },
    "InstanceSecurityGroupWeb": {
      "Type": "String",
      "Description": "WebServer SecurityGroup"
    },
    "InstanceSecurityGroupApp": {
      "Type": "String",
      "Description": "WebServer SecurityGroup"
    },
    "SSHGroup": {
      "Type": "String",
      "Description": "SSH SecurityGroup"
    }
  },
  "Resources": {
    "PrivateEc2Instance": {
      "Type": "AWS::EC2::Instance",
      "Properties": {
        "ImageId": "ami-xxxxxxxx",
        "InstanceType": "c3.2xlarge",
        "IamInstanceProfile": "ApplicationServer",
        "SecurityGroupIds": [
          {
            "Ref": "InstanceSecurityGroupApp"
          },
          {
            "Ref": "SSHGroup"
          }
        ],
        "SubnetId": {
          "Ref": "PrivateSubnetB"
        },
        "KeyName": {
          "Ref": "KeyName"
        },
        "Tags": [
          {
            "Key": "Name",
            "Value": "ApplicationServer"
          }
        ],
        "UserData": {
          "Fn::Base64": {
            "Fn::Join": [
              "",
              [
                "#!/bin/bash\n",
                "sudo su\n",
                "su user \n",
                "cd \n",
                "sudo dd if=/dev/zero of=/swapfile bs=1M count=1024\n",
                "sudo mkswap /swapfile\n",
                "sudo swapon /swapfile\n"
              ]
            ]
          }
        }
      }
    },
    "PublicEc2Instance": {
      "Type": "AWS::EC2::Instance",
      "Properties": {
        "ImageId": "ami-xxxxxxx",
        "InstanceType": "t2.small",
        "SecurityGroupIds": [
          {
            "Ref": "InstanceSecurityGroupWeb"
          },
          {
            "Ref": "SSHGroup"
          }
        ],
        "SubnetId": {
          "Ref": "PublicSubnetB"
        },
        "KeyName": {
          "Ref": "KeyName"
        },
        "Tags": [
          {
            "Key": "Name",
            "Value": "WebServer"
          }
        ],
        "UserData": {
          "Fn::Base64": {
            "Fn::Join": [
              "",
              [
                "#!/bin/bash\n",
                "sudo su\n",
                "su user\n",
                "cd \n",
                "sudo dd if=/dev/zero of=/swapfile bs=1M count=1024\n",
                "sudo mkswap /swapfile\n",
                "sudo swapon /swapfile\n",
                "sudo sed -i \"s/private_ip_address/",
                {
                  "Fn::GetAtt": [
                    "PrivateEc2Instance",
                    "PrivateIp"
                  ]
                },
                "/g\" /etc/nginx/nginx.conf \n",
                "sudo su \n",
                "service nginx start \n"
              ]
            ]
          }
        }
      }
    },
    "ALBTarget": {
      "Type": "AWS::ElasticLoadBalancingV2::TargetGroup",
      "Properties": {
        "HealthCheckIntervalSeconds": "30",
        "HealthCheckPath": "/login",
        "HealthCheckPort": "traffic-port",
        "HealthCheckProtocol": "HTTP",
        "HealthCheckTimeoutSeconds": "5",
        "HealthyThresholdCount": "5",
        "Matcher": {
          "HttpCode": "200"
        },
        "Name": {
          "Ref": "ALBName"
        },
        "Port": "80",
        "Protocol": "HTTP",
        "Targets": [
          {
            "Id": {
              "Ref": "PublicEc2Instance"
            },
            "Port": "80"
          }
        ],
        "UnhealthyThresholdCount": "2",
        "VpcId": {
          "Ref": "VPCID"
        }
      }
    }
  }
}
これが既存のALBのターゲットグループに作成したEC2を入れて、かつnginxとunicornの接続を可能したものです。
webserverのUserDataの箇所にごちゃごちゃコードを入れています。ここで置換をして接続を可能にしています。またスワップ設定も必要なので入れておきました。
nginxがスタートしてくれなかったので、その設定も入れておきました。
終わりに
cloudformationでテンプレートを作っておくと、同じ構成のものを作る時かなり楽になるのでオススメです。またAMIのID指定でその状態のものを使って構築できるのでこれも大きなメリットだなーと使用して思いました。