目的
IntelliJ IDEAで、JerseyでRESTfulAPIのサンプルを作る覚書。
ゴール
- Tomcat起動してブラウザでAPIを呼び出す(GETまで)
- Postmanを使ってAPIの動作確認
- とりあえずJSONで返す
環境など
| ツールなど | バージョンなど |
|---|---|
| MacbookPro | macOS Mojave 10.14.5 |
| IntelliJ IDEA | Ultimate 2019.3.3 |
| Java | AdoptOpenJDK 11 |
| apache maven | 3.6.3 |
| Jersey | 2.30.1 |
| JUnit | 5.6.0 |
| Tomcat | apache-tomcat-8.5.51 |
| Postman | 7.19.1 |
jdkやmaven、Tomcatのインストールは済んでいるものとします。
※コマンドラインでmavenコマンドを使わない場合は、mavenのインストールは不要です。(IntelliJにバンドルされています)
Postmanはこちらからインストールできます。
かつてはChromeの拡張機能で入れられたのですが、スタンドアロンアプリに変わっています。
同様の拡張機能はまだあるので、それらでも構わないと思います。
mavenプロジェクトの作成
mavenのJerseyを使ったWebアプリをまず作成します。
こちらを参考に、コマンドで作成します。
https://docs.huihoo.com/jersey/2.13/getting-started.html#new-webapp
$ mvn archetype:generate -DarchetypeArtifactId=jersey-quickstart-webapp \
-DarchetypeGroupId=org.glassfish.jersey.archetypes \
-DinteractiveMode=false \
-DgroupId=com.example \
-DartifactId=simple-service-webapp -Dpackage=com.example \
-DarchetypeVersion=2.30.1
groupIdやartifacgtId、packageは任意に変えてください。
TomcatではなくてGrizzlyで動かすので十分な場合は、#new-from-archetypeの項にあるコマンドで十分かと思います。
IntelliJ IDEAで開く
IntelliJ IDEAにプロジェクトをインポートします。
- 起動画面で[Import Project]を選ぶ

- プロジェクトフォルダを選び、[Open]をクリック
- Mavenを選ぶ

- [Finish]をクリック
プロジェクトが開きます。
pom.xmlを編集する
pom.xmlを開いたら、Enable Auto Importをクリックしておきましょう。
1. javaバージョン
まず、javaバージョンが1.7になっているのを11に変更します。
    <build>
        <finalName>simple-webapp</finalName>
        <plugins>
            <plugin>
                <groupId>org.apache.maven.plugins</groupId>
                <artifactId>maven-compiler-plugin</artifactId>
                <version>2.5.1</version>
                <inherited>true</inherited>
                <configuration>
                    <source>11</source> <!-- ここ -->
                    <target>11</target> <!-- ここ -->
                </configuration>
            </plugin>
        </plugins>
    </build>
2. 依存ライブラリの追加
(1)Json
Jsonを使いたいので、コメントアウトされている以下のコメントを外します。
        <dependency>
            <groupId>org.glassfish.jersey.media</groupId>
            <artifactId>jersey-media-json-binding</artifactId>
        </dependency>
(2)JUnit5
JUnit5を<dependencies>タグ下に追加します。
<!-- https://mvnrepository.com/artifact/org.junit.jupiter/junit-jupiter-api -->
<dependency>
    <groupId>org.junit.jupiter</groupId>
    <artifactId>junit-jupiter-api</artifactId>
    <version>5.6.0</version>
    <scope>test</scope>
</dependency>
※JUnitは、juint.junitから移動した模様です。
3. MyResourceクラスを眺める
Jerseyでどのように書くのか全く見たことがない、などの場合は、MyResouce.javaを開いて、眺めてみるとよいでしょう。
親切にコメントで何をやっているか説明してくれているので、それほど難しいことではないと思います。
ここでは、以下のことが読み取れれば問題ないかと思います。
-
@Path("myresource")で、サーバーのルートからのパスを指定している -
getIt()メソッドは、-
@GETなのでGETメソッドで呼び出される -
@Produces(MediaType.TEXT_PLAIN)なので、text/plainな文字列として提供される
-
POSTは@Postだろうなとか、そういうことが想像できれば十分です。
あ、あとでcurlで動かす時の為に、"Got It!"の後に改行を入れておいたほうがいいかもしれません。
二つぐらい入れておいたほうが見やすいかもです。
public String getIt() {
    return "Got it!\n\n";
}
4. 動かしてみる
(1)Tomcatから起動
Tomcatで起動する設定をし、(前記事参照)、実行します。
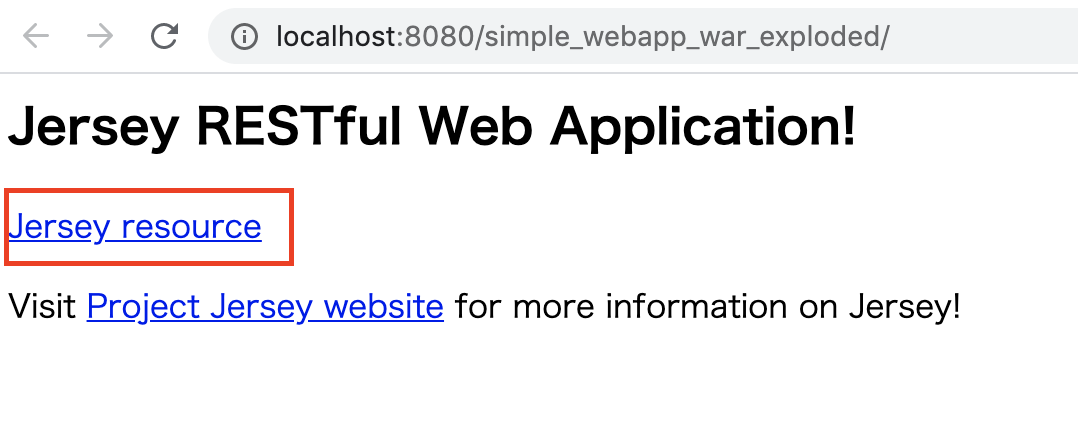
- [Jersey resource]のリンクをクリック
 |
|---|
- 下記のようなページが表示されればOK
 |
|---|
(2)curlコマンドで実行
APIなので、curlコマンドでも叩けないとね。
urlは、Tomcat版でブラウザを開いた時のをコピーしてくると楽です。
$ curl http://localhost:8080/simple_webapp_war_exploded/webapi/myresource
Got it!

$
改行を入れとかないと出力を見つけるのが大変です(汗)
-iオプションを入れると、詳細が見られます。
$ curl -i http://localhost:8080/simple_webapp_war_exploded/webapi/myresource
HTTP/1.1 200
Content-Type: text/plain
Content-Length: 9
Date: Tue, 10 Mar 2020 06:53:25 GMT

Got it!
(3) Postmanで実行
Postmanも使ってみます。
Tomcatでアプリを起動しておく必要があります。(サーバーが動いてないと当然反応はできませんので)
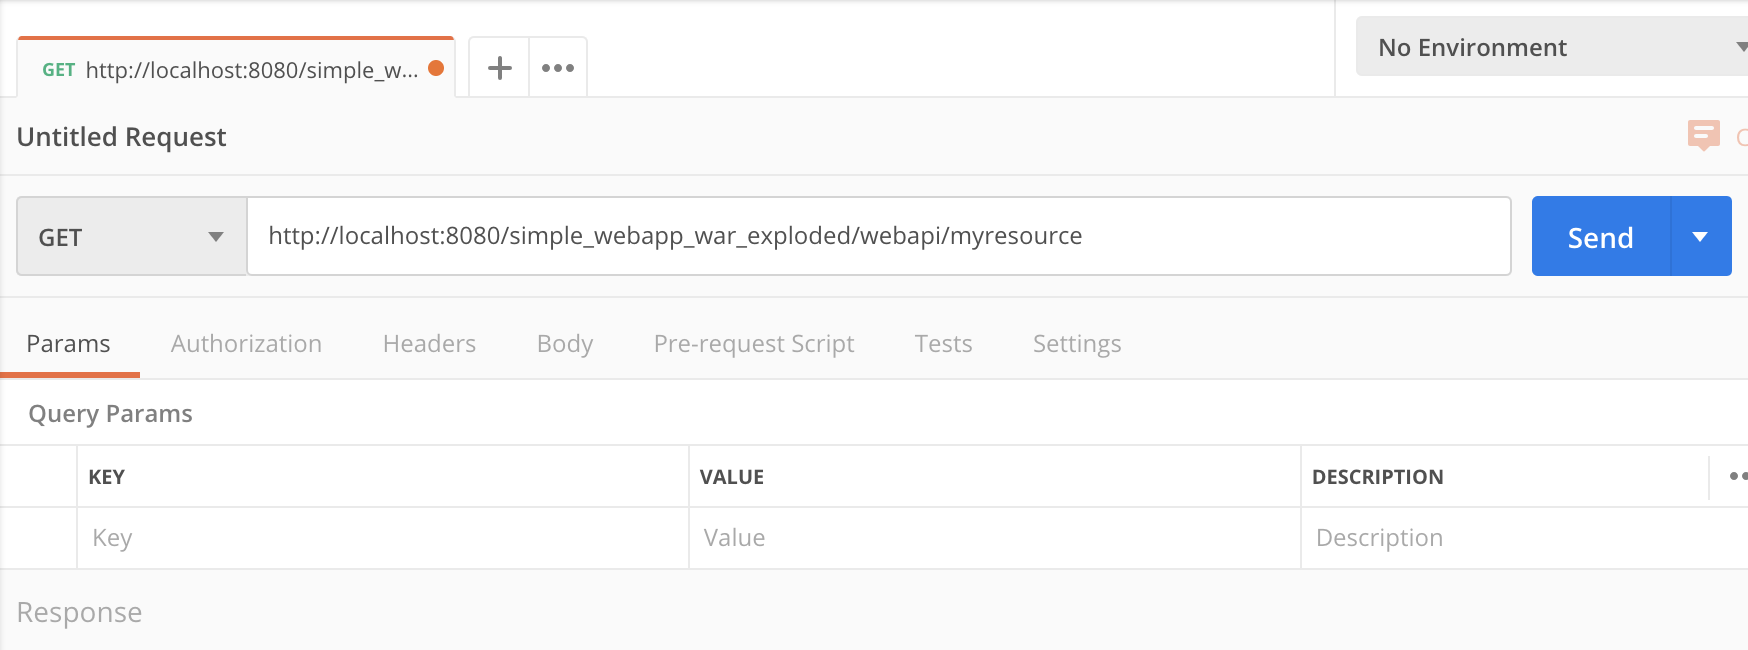
- Request URLに、APIへのパスを入力
- ブラウザからコピーするのが早いです
- メソッドは
GETを選択
 |
|---|
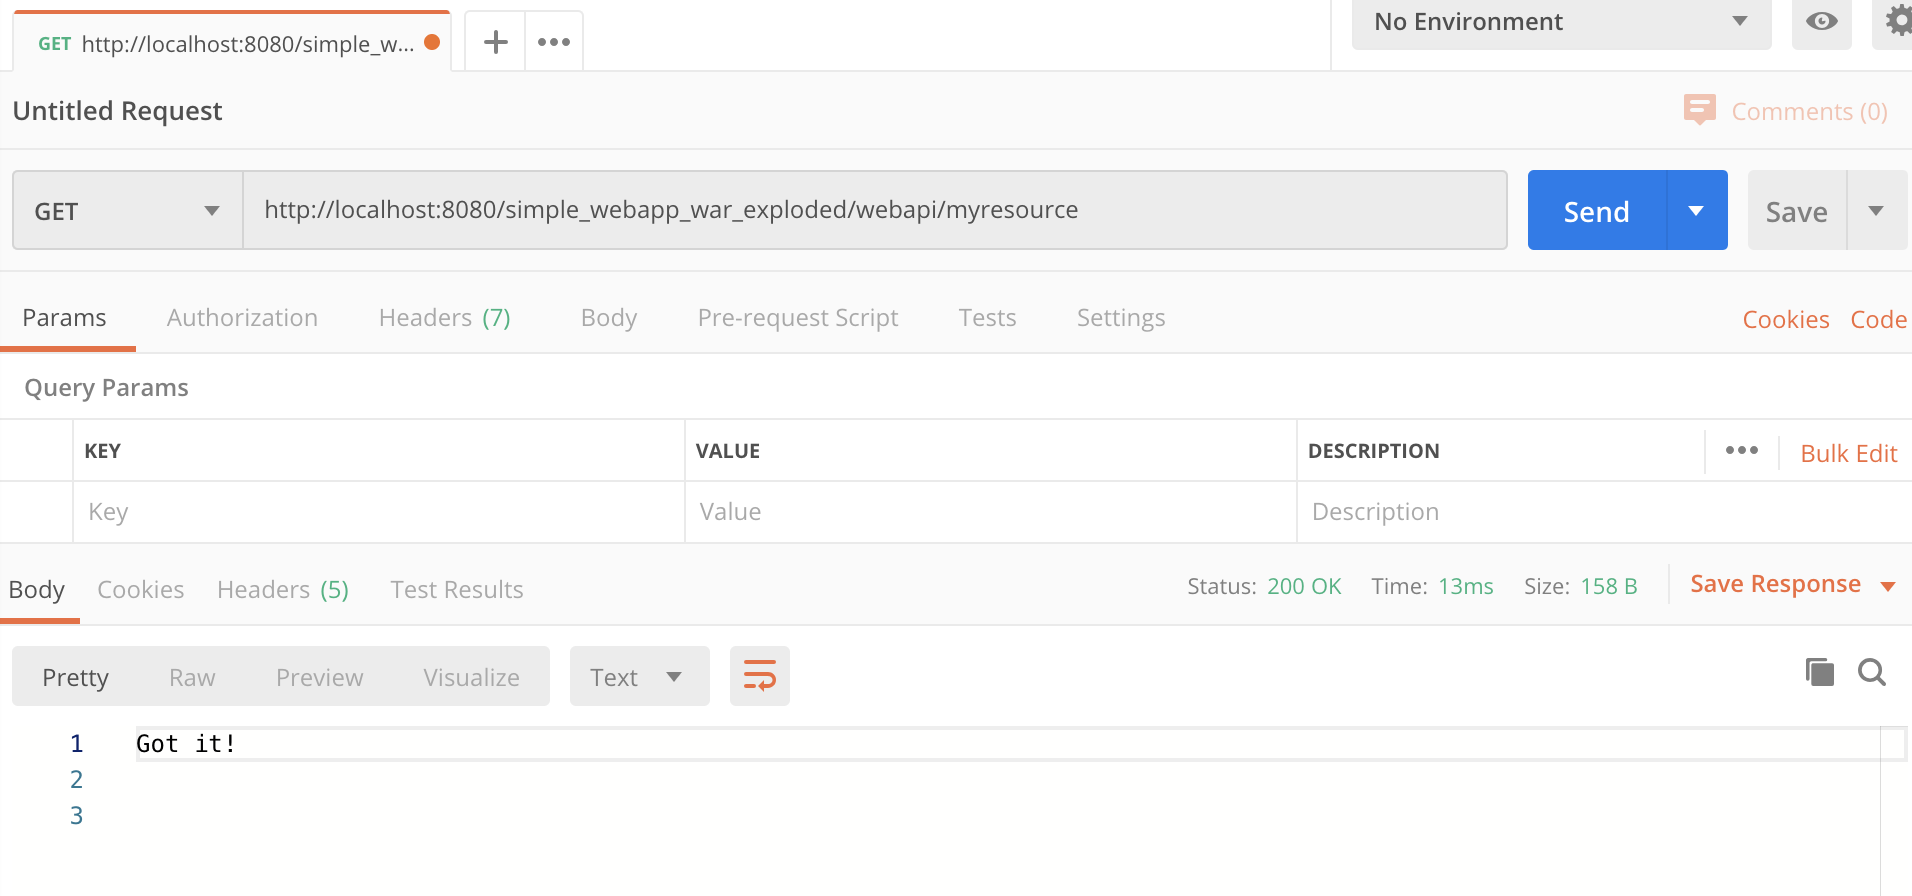
- [Send]ボタンをクリック
下の欄に結果が表示されているはずです。
 |
|---|
サンプルAPIを作る
1. モデルクラス
こんなモデルクラスでデータを登録して、読み書きするAPIを作ることを考えます。
public class Employee {
    private int id;
    private String firstName;


    public Employee(){}

    public Employee(int id, String firstName) {
        this.id = id;
        this.firstName = firstName;
    }

    public int getId() {
        return id;
    }

    public void setId(int id) {
        this.id = id;
    }

    public String getFirstName() {
        return firstName;
    }

    public void setFirstName(String firstName) {
        this.firstName = firstName;
    }
}
(独り言)Kotlinならdata classで簡単なのになー
追記
空のコンストラクタは必須なので、忘れないでください。
(無いと500エラーになります。内部的には、JSON Binding deserialization error: javax.json.bind.JsonbException: Internal error: nullという例外で落ちています。)
2. リポジトリクラス
データの読み書きは以下のクラスを介して行います。
本来はデータベースなどから読み出すべきですが、ここではそれは重要ではないので、とりあえずリストを持っておいて使うことにします。
public class EmployeeRepository {
    private static EmployeeRepository instance = new EmployeeRepository();

    private List<Employee> employeeList;

    private EmployeeRepository() {
        employeeList = new ArrayList<>();
    }

    public EmployeeRepository getInstance(){
        return instance;
    }

    public List<Employee> selectAll() {
        return employeeList;
    }

    public Employee select(int id){
        for (Employee employee : employeeList) {
            if(employee.getId()==id){
                return employee;
            }
        }
        throw new EmployeeNotFoundException();
    }

    public synchronized void insert(int id, String firstName){
        try{
            select(id);
        }catch (EmployeeNotFoundException e){
            // いなければ追加できる
            employeeList.add(new Employee(id, firstName));
            return;
        }
        // 同じIDが存在したら追加できない
        throw new DuplicateIdException();
    }

    public synchronized void update(int id, String firstName){
        Employee employee = select(id);
        employee.setFirstName(firstName);
    }

    public synchronized void delete(int id){
        Employee employee = select(id);
        employeeList.remove(employee);
    }

}
EmployeeNotFoundExceptionとDuplicateIdExceptionはそれぞれこんなクラスです。
public class EmployeeNotFoundException extends RuntimeException {
    public EmployeeNotFoundException() {
        super("そのIDのEmployeeは見つかりません。");
    }
}
public class DuplicateIdException extends RuntimeException {
    public DuplicateIdException() {
        super("そのIDのEmployeeはすでに登録されています。");
    }
}
3. リソースクラス
いよいよAPIの部分です。MyResourceの改造ではなくて、新たにリソースクラスを作っていきます。
(別に改造でもいいんですが)
(1)初期データ
まずは簡単に初期データを登録しておいて、GETできるようにしましょう。
先ほどのリポジトリクラスの初期化処理に、初期データを入れておきます。
    private EmployeeRepository() {
        employeeList = new ArrayList<>();
        employeeList.add(new Employee(3, "Cupcake"));
        employeeList.add(new Employee(4, "Donuts"));
        employeeList.add(new Employee(5, "Eclair"));
        employeeList.add(new Employee(8, "Froyo"));
        employeeList.add(new Employee(9, "Gingerbread"));
    }
名前に「ピン」ときたあなたは、ほくそ笑んでおいてください(笑)
Eclipseで頑張っていたあの時代・・・
(2)GETメソッドの作成
一番簡単なGETメソッド、さらにその中でもselectAllなAPIを作ります。
@Path("/employees")
public class EmployeeResource {

    @GET
    @Path("/all")
    @Produces({MediaType.APPLICATION_JSON, MediaType.APPLICATION_XML})
    public List<Employee> getAll(){
        return EmployeeRepository.getInstance().selectAll();
    }
}
-
@Path("/employees")-
/employeesパスでアクセス
-
-
@GET-
GETメソッド
-
-
@Path("/all")- 追加のパス。つまり、
/employees/allでアクセスします
- 追加のパス。つまり、
-
@Produces({MediaType.APPLICATION_JSON, MediaType.APPLICATION_XML})- JSONとXMLで返します。
- 将来のためにXMLも返すように指定していますが、今回はまだJSONしか返しません。
-
EmployeeRepositoryのシングルトンからリストを取得
(3)index.jspを編集する
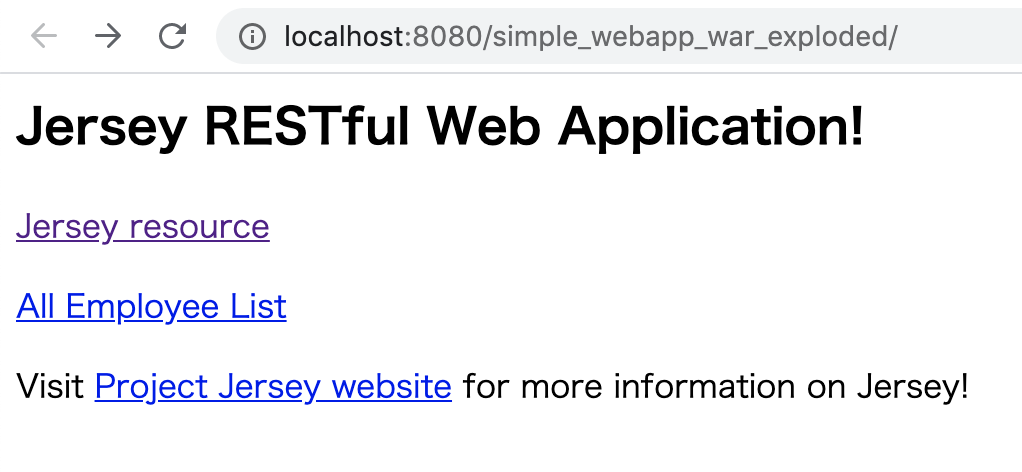
ブラウザからAPIにアクセスできるよう、index.jspにリンクを追加します。
お好みで見栄えを整えてください。
<p><a href="webapi/employees/all">All Employee List</a>
(4)リデプロイ
実行ボタンを押すと、以下のポップアップが表示されます。

- [Redeply]を選択
- [OK]をクリック
- ブラウザをリロード
これで変更が反映されるはずです。
 |
|---|
(5)動作確認
新しく作ったリンクをクリックしてみましょう。
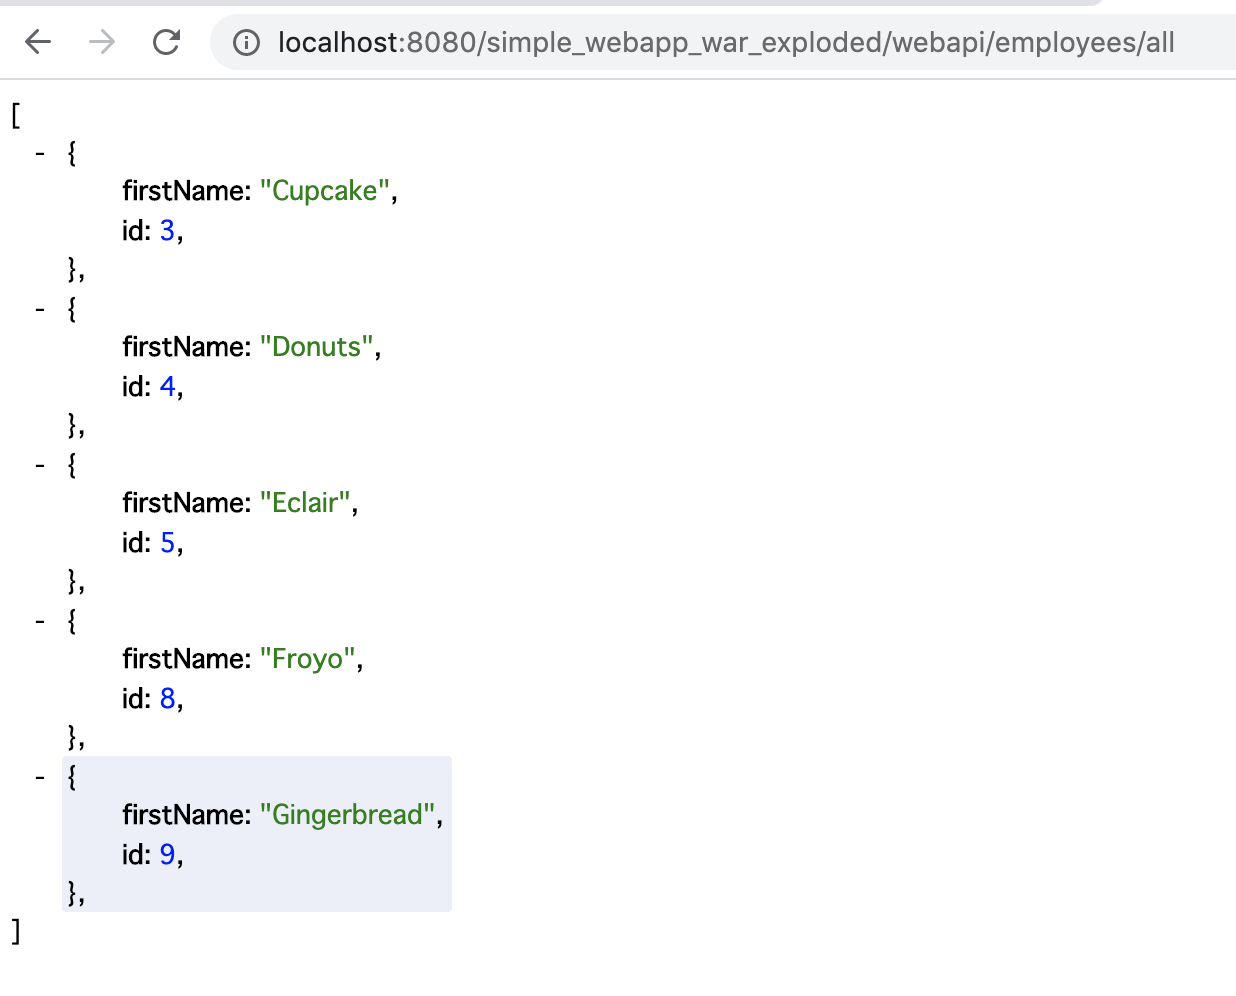 |
|---|
JSONの配列が返ってきていますね。
Postmanやcurlでも確認できます。
4. パスパラーメータ付きGET
(1)リソースクラスにAPIメソッドを追加
今度は、idをパラメーターとして受け取って単独オブジェクトを返すAPIを作ってみましょう。
    @GET
    @Path("/{id}")
    @Produces({MediaType.APPLICATION_JSON, MediaType.APPLICATION_XML})
    public Employee getEmployee(@PathParam("id") int id){
        return EmployeeRepository.getInstance().select(id);
    }
新しいのは@Path("/{id}")と@PathParam()ですね。
-
@Path("/{id}")- 先ほど出てきた
@Pathと同じで、アクセスパスの指定です。{id}は任意の値が入ることを示しています。つまり、APIを使う側は、xxxx/employee/3などのurlでアクセスすることになります。
- 先ほど出てきた
-
@PathParam("id")- パス"{id}"に指定された値を受け取る変数を宣言しています。
xxxx/employee/3でアクセスされると、id=3のEmployeeオブジェクトが渡ってきます。
- パス"{id}"に指定された値を受け取る変数を宣言しています。
(2)index.jspにリンクを追加
先ほどと同じく、index.jspにリンクを追加します。
<p><a href="webapi/employees/3">get id=3 employee</a>
(3)実行
リデプロイして、ブラウザを再読み込みし、追加したリンクをクリックしてみてください。
 |
|---|
ちゃんと返ってきました。
Postmanやcurlでも同様に確認できます。
5. クエリーパラメーター検索
今度はパスパラメーターではなく、クエリーパラメーターもやってみましょう。
/searchに対して、特定の文字(or文字列)を含むものだけ返すというのを作ってみます。
(1)検索メソッド
まずはリポジトリクラスです。
nameを受け取って、その文字列を含む名前のリストを作成して返します。
    public List<Employee> search(String name) {
        List<Employee> list = new ArrayList<>();
        for (Employee employee : employeeList) {
            if(employee.getFirstName().contains(name)){
                list.add(employee);
            }
        }
        if(list.size()>0) return list;
        throw new EmployeeNameNotFoundException(name);
    }
EmployeeNameNotFoundExceptionは次のようなものです。
public class EmployeeNameNotFoundException extends RuntimeException {
    public EmployeeNameNotFoundException(String name) {
        super("文字列{" + name + "}を含む名前のEmployeeは存在しません。");
    }
}
(2)リソースクラスにAPIメソッドを追加
    @GET
    @Path("/all")
    @Produces({MediaType.APPLICATION_JSON, MediaType.APPLICATION_XML})
    public List<Employee> searchEmployee(@QueryParam("name") String name){
        return EmployeeRepository.getInstance().search(name);
    }
@QueryParamを使います。これはなんとなく予想がついたんじゃないでしょうか^^;
(3) 実行
index.jspにリンクを追加してもいいですが、もう面倒なのでPostmanを使いました(笑)
あるいは、ブラウザのURLに直打ちでもいいですね。
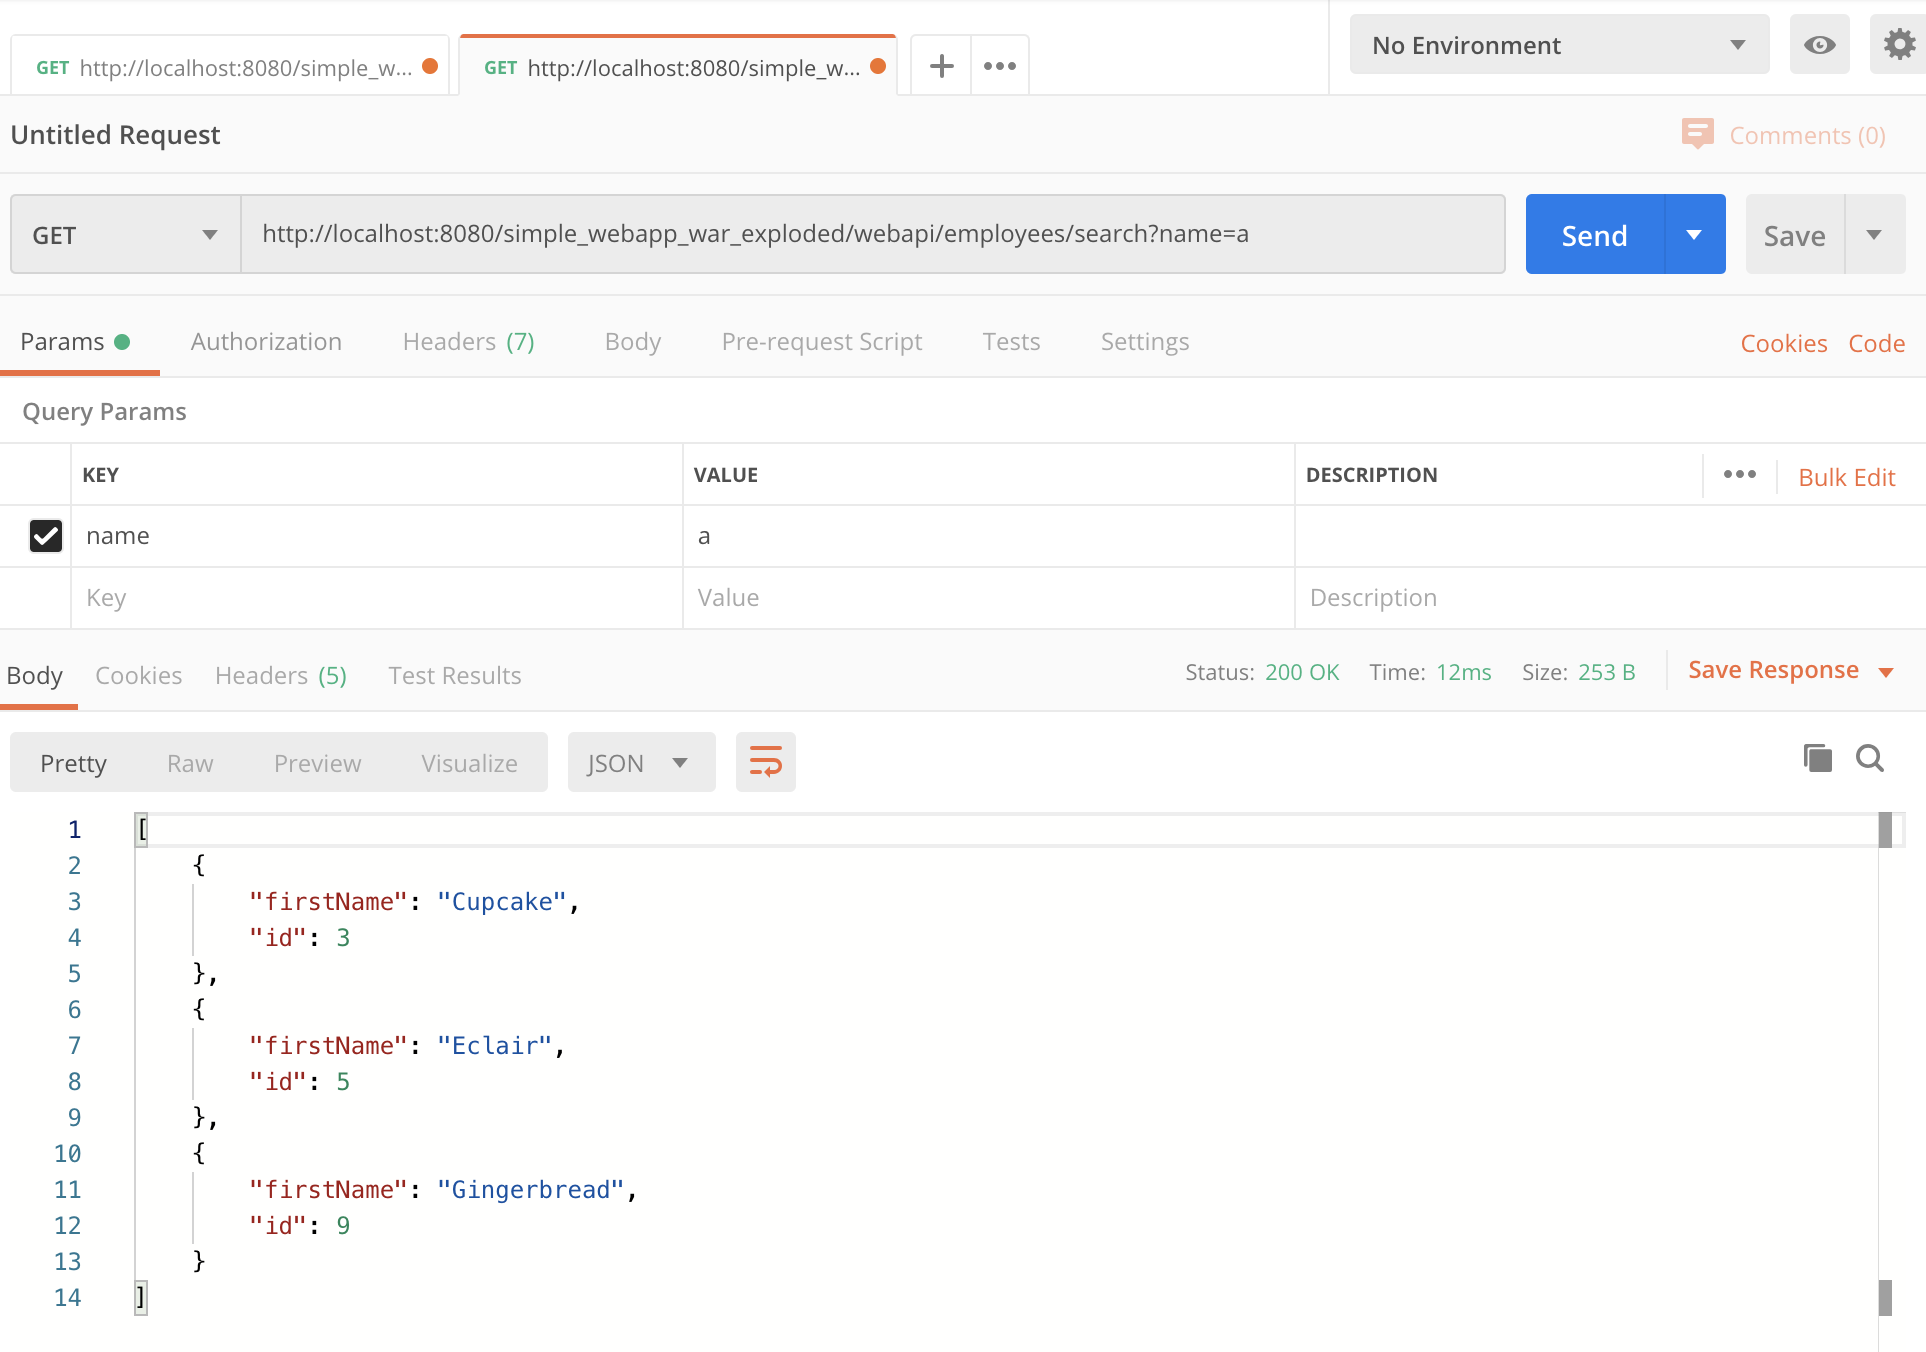 |
|---|
JUnitテスト
先に動作テストをしてしまっていますが、JUnitテストも書いてみます。
1.依存関係の設定
Jerseyのテストフレームワークを使います。ただ、JUnit5に対応していないようなので、ちょっとしたハックが必要です。
以下の依存関係をtestスコープに追加します。
- Jerseyのテストフレームワーク(grizzly)
- サーバーを仮で立てるのにgrizzlyを使います。
- AssertJ
- アサーションを書くのに使います。お好みで他でもいいですし、JUnitの標準を使っても構いません。
以下のようにpom.xmlの<dependencies>タグ内に追加します。
JUnitの下が良いでしょうね。
        <!-- https://mvnrepository.com/artifact/org.glassfish.jersey.test-framework.providers/jersey-test-framework-provider-grizzly2 -->
        <dependency>
            <groupId>org.glassfish.jersey.test-framework.providers</groupId>
            <artifactId>jersey-test-framework-provider-grizzly2</artifactId>
            <version>2.30.1</version>
            <scope>test</scope>
        </dependency>
        <!-- https://mvnrepository.com/artifact/org.assertj/assertj-core -->
        <dependency>
            <groupId>org.assertj</groupId>
            <artifactId>assertj-core</artifactId>
            <version>3.15.0</version>
            <scope>test</scope>
        </dependency>
2. MyResourceのテスト
まずは簡単に、Myrecourceクラスのテストを書いてみます。
私はimportで悩んだのでimport文まで全て載せます。
package com.example;

import org.glassfish.jersey.server.ResourceConfig;
import org.glassfish.jersey.test.JerseyTest;
import org.junit.jupiter.api.AfterEach;
import org.junit.jupiter.api.BeforeEach;
import org.junit.jupiter.api.Test;

import javax.ws.rs.core.Application;
import javax.ws.rs.core.Response;

import static org.assertj.core.api.Assertions.assertThat;


class MyResourceTest extends JerseyTest {

    @Override
    protected Application configure() {
        return new ResourceConfig(MyResource.class);
    }

    @BeforeEach
    @Override
    public void setUp() throws Exception {
        super.setUp();
    }

    @AfterEach
    @Override
    public void tearDown() throws Exception {
        super.tearDown();
    }

    @Test
    public void getIt(){
        final Response response = target("/myresource").request().get();

        String content = response.readEntity(String.class);
        assertThat(content).isEqualTo("Got it!\n\n");
    }
}
テストは基本的に以下のステップで書いていけば良いかと思います。
-
JerseyTestを継承したテストクラスを作る -
configureメソッドをオーバーライドする -
@BeforeEachと@AfterEachメソッドを作る- ここがJUnit5に対応させるための苦肉の策部分になります。
JerseyTestクラスでは、JUnit4用の@Beforeと@Afterが使われているのですが、JUnit5ではこれが呼び出されません。なので、わざわざラップしてやっています。面倒な場合は、エクステンションを作ってくださってる方などがいらっしゃるようなので、それを使うのも手かもしれません。
- ここがJUnit5に対応させるための苦肉の策部分になります。
- テストメソッドを作る
-
target("パス").request().get()でリクエストを投げてレスポンスを受け取る -
response.readEntity(クラス名)で戻り値を取得する - アサーションで結果確認
-
実行してみましょう。

ログを見ると、ポート番号が"9998"などで動いているのがわかりますね。
通過したら、残りのテストも書いていきましょう。
3. EmployeeResourceのテスト
MyResourceのテストを参考に書けると思います。
package com.example;

import org.glassfish.jersey.server.ResourceConfig;
import org.glassfish.jersey.test.JerseyTest;
import org.junit.jupiter.api.AfterEach;
import org.junit.jupiter.api.BeforeEach;
import org.junit.jupiter.api.Test;

import javax.ws.rs.core.Application;
import javax.ws.rs.core.GenericType;
import javax.ws.rs.core.Response;

import java.util.List;

import static org.assertj.core.api.Assertions.assertThat;
import static org.junit.jupiter.api.Assertions.*;

class EmployeeResourceTest extends JerseyTest {

    @Override
    protected Application configure() {
        return new ResourceConfig(EmployeeResource.class);
    }

    @BeforeEach
    @Override
    public void setUp() throws Exception {
        super.setUp();
    }

    @AfterEach
    @Override
    public void tearDown() throws Exception {
        super.tearDown();
    }

    @Test
    void getAll() {
        final Response response = target("/employees/all").request().get();

        List<Employee> content = response.readEntity(new GenericType<>() {});
        assertThat(content.size()).isEqualTo(5);
        assertThat(content.get(0)).isEqualToComparingFieldByField(new Employee(3, "Cupcake"));
        assertThat(content.get(1)).isEqualToComparingFieldByField(new Employee(4, "Donuts"));
        assertThat(content.get(2)).isEqualToComparingFieldByField(new Employee(5, "Eclair"));
        assertThat(content.get(3)).isEqualToComparingFieldByField(new Employee(8, "Froyo"));
        assertThat(content.get(4)).isEqualToComparingFieldByField(new Employee(9, "Gingerbread"));
    }

    @Test
    void getEmployee() {
        Employee employee = target("/employees/3").request().get(Employee.class);
        assertThat(employee).isEqualToComparingFieldByField(new Employee(3, "Cupcake"));

        employee = target("/employees/4").request().get(Employee.class);
        assertThat(employee).isEqualToComparingFieldByField(new Employee(4, "Donuts"));

        employee = target("/employees/5").request().get(Employee.class);
        assertThat(employee).isEqualToComparingFieldByField(new Employee(5, "Eclair"));

        employee = target("/employees/8").request().get(Employee.class);
        assertThat(employee).isEqualToComparingFieldByField(new Employee(8, "Froyo"));

        employee = target("/employees/9").request().get(Employee.class);
        assertThat(employee).isEqualToComparingFieldByField(new Employee(9, "Gingerbread"));
    }

    @Test
    void search(){
        final List<Employee> content = target("/employees/search")
                .queryParam("name", "a")
                .request()
                .get(new GenericType<>() {});

       assertThat(content.size()).isEqualTo(3);
        assertThat(content.get(0)).isEqualToComparingFieldByField(new Employee(3, "Cupcake"));
        assertThat(content.get(1)).isEqualToComparingFieldByField(new Employee(5, "Eclair"));
        assertThat(content.get(2)).isEqualToComparingFieldByField(new Employee(9, "Gingerbread"));
    }
}
getEmployeeのテストで、
Employee employee = target("/employees/3").request().get(Employee.class);
としています。get()に型を指定すると、readEntityをその型で処理した値を直接受け取れます。
また、searchのテストでは、queryParamを使って、クエリーパラメーターを指定しています。
感想
GET系は、たぶん、簡単です。まあ色々ハマりはしましたが。JerseyテストフレームワークがJUnit5に対応していないせいでテストが動かないとか。。。対処法はごく簡単なのに、何時間悩んだことか・・・(泣)
でも、XMLを返そうとしたり、POSTをやろうとしたらもっとハマったので、それを次回にします。
あと、例外系も次回やります。
今は存在しないidを指定して検索すると、500エラーになりますが、これを変えていきます。
参考ページ
いっぱい見たなあ・・・
- REST API Tutorial Create REST APIs with JAX-RS 2.0
https://restfulapi.net/create-rest-apis-with-jax-rs-2-0/ - Starting out with Jersey & Apache Tomcat using IntelliJ
https://medium.com/@jamsesso/starting-out-with-jersey-apache-tomcat-using-intellij-6338d93ffd40 - RESTサービスを触る際の必須ツールPostmanを使ってみました
https://www.xlsoft.com/jp/blog/blog/2017/06/23/post-1638/ - JerseyとSpringでのREST API
https://www.codeflow.site/ja/article/jersey-rest-api-with-spring - Github - macoshita/jersey-sample
https://github.com/macoshita/jersey-sample - Jersey公式 - Chapter 2. Modules and dependencies
https://docs.huihoo.com/jersey/2.13/modules-and-dependencies.html - Jersey & Grizzly で始める JAX-RS 入門 〜STEP1〜
https://blog1.mammb.com/entry/2016/03/19/235012 - JAX-RS(Jersey)を使って RESTful API を実装してみよう【導入編】
https://www.indetail.co.jp/blog/170228/ - JAX-RS(Jersey)を使って RESTful API を実装してみよう【応用編】
https://www.indetail.co.jp/blog/170309/ - Exploring the Jersey Test Framework
https://www.baeldung.com/jersey-test - JerseyTest is not compatible with JUnit 5
https://github.com/jersey/jersey/issues/3662 - JAX-RS - JerseyTest Examples
https://www.logicbig.com/how-to/code-snippets/jcode-jax-rs-jerseytest.html - jerseyの@QueryParamと@PathParamはURLデコードを自動でする
https://qiita.com/n_slender/items/41dfabc6ab8c29364cab - Set Query Parameters on a Jersey Test Call
https://stackoverflow.com/questions/24770027/set-query-parameters-on-a-jersey-test-call