DMM.com Advent Calendar 2018 12日目の記事です。
GitHub : https://github.com/karayok/nuxt-firestore-sample-app
内容に間違い等あれば、 Pull Request / 編集リクエスト等いただけると幸いです。
よろしくお願い致します。
はじめに
本記事では簡単なブログライクなアプリケーションを例に、 Firestore + Firebase Authentication を使う際の基礎部分を説明します。
特徴
- ログインユーザのみが記事を作成できる
- 記事の作成者のみが記事の削除・更新を行える
- ログイン・非ログイン問わず、すべてのユーザはすべての記事を閲覧できる
Firestore について
Cloud Firestore は GCP(Google Cloud Platform)のサービスの1つで、クライアントから直接接続できるデータベースです。
クライアントサイドのコードのみでデータの高速な同期処理が実現できます。
また、Firebase Authentication による認証と Firestore のセキュリティルールを使用することで、ユーザーの書き込み・読み込み等を制限することも可能です。
なお、本記事では Firebase 経由で Firestore を使用することを前提としています。
Firebase プロジェクトの作成と Firestore / Firebase Authentication の有効化
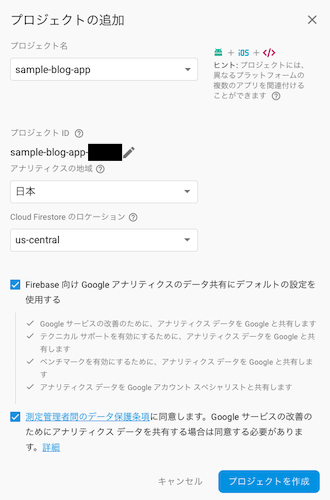
以下の手順で Firebase プロジェクトの作成と Firestore を有効化します。
今回、ログイン方法は Google ログインを使用しています。
-
Firebase コンソール から [プロジェクトを追加] を選択、必要事項を入力して [プロジェクトを作成]

-
左メニュー内の [Database] を選択し、 「 Cloud Firestore 」と書かれた項目の [データベースの作成] を選択
-
「Cloud Firestore セキュリティルール」で「テストモードで開始する」を選択し、 [有効にする] を選択
-
左メニュー内の [Authentication] を選択し、 「ログイン方法」と書かれた項目の [Google] を選択
-
「プロジェクトのサポートメール」を入力し、右上の [有効にする] のトグルを ON にして [保存] を選択
以上で、Firestore と Firebase Authentication の初期設定は完了です。
コレクション
「Database」内の [コレクションを追加] からコレクションを作成します。
ブログ投稿には投稿者と記事の情報が必要なため、ユーザ情報を保持する users/ と記事情報を保持する posts/ を作成します。

この users/ と posts/ にリレーションを持たせるには、いくつか方法があります。
参照型( reference )を使用
Firestore には参照型( reference )という他のコレクションのドキュメントに参照できる型があります。

参照型の author フィールドを作り、 users/ を参照しました。
RDB でよくある、 posts テーブルで users.id を参照させるような構成です。
ですが、 Firestore ではデータ取得時に JOIN 等が使えないため、 posts/ ごとに該当する users/ を別途取得する必要があります。
サブコレクションを使用
別の方法に、サブコレクションを使用する方法があります。
今回はこちらのサブコレクションを使用する方法で進めていきます。
どのような構成が良いかは要件によりますが、 Firestore のコレクションを設計する際は RDB でのテーブル設計をもとに考えるよりも、サーバーサイドの API からどういう形式でデータを受け取りたいかを考えて設計すると良いかもしれません。
セキュリティルール
Firestore のデータにアクセスできるユーザーの制限やデータの構成を定義することができます。
「Database」内の [ルール] から、現在のセキュリティルールの参照・編集が行えます。
Firestore 有効時に「テストモードで開始する」を選択した場合は、以下のようになっています。
これは、誰でもデータベース内の全データを読み込み・書き込みできる状態です。
service cloud.firestore {
  match /databases/{database}/documents {
    match /{document=**} {
      allow read, write;
    }
  }
}
今回は以下の条件で設定したいため、条件にあうよう users/ と posts/ にセキュリティルールを設定します。
- ログインユーザのみが記事を作成できる
- 記事の作成者のみが記事の削除・更新を行える
- ログイン・非ログイン問わず、すべてのユーザはすべての記事を閲覧できる
まず、ユーザを作成するにはログインが必要なので、ログイン認証をしたユーザのみ users/ を追加を行えるようにします。
また、ユーザ情報の更新は該当のユーザのみ行えるようにします。
認証情報は request.auth で取得できます。
service cloud.firestore {
  match /databases/{database}/documents {
    match /users/{userId} {
      allow create, read: if request.auth != null;
      allow update: if request.auth.uid == userId;
    }
  }
}
また、ルール内で関数を定義することが可能なため、以下のように記述することもできます。
service cloud.firestore {
  match /databases/{database}/documents {
    function isAuthenticated() {
      return request.auth != null;
    }
    function isUserAuthenticated(userId) {
      return request.auth.uid == userId;
    }

    match /users/{userId} {
      allow create, read: if isAuthenticated();
      allow update: if isUserAuthenticated(userId);
    }
  }
}
記事( posts/ )は作成者のみが削除・更新でき、誰でも読めるようにしたいため、以下のようになります。
service cloud.firestore {
  match /databases/{database}/documents {
    function isAuthenticated() {
      return request.auth != null;
    }
    function isUserAuthenticated(userId) {
      return request.auth.uid == userId;
    }

    match /users/{userId} {
      allow create, read: if isAuthenticated();
      allow update: if isUserAuthenticated(userId);
      match /posts/{postId} {
        allow read;
        allow create, update, delete: if isUserAuthenticated(userId);
      }
    }
  }
}
Firebase Authentication による認証
以下は Nuxt.js での例です。
plugins 配下に Firebase のラッパーと認証用のプラグインを作成します。
以下の API キー等は、Firebase プロジェクトダッシュボードの「ウェブアプリに Firebase を追加」にかかれている各種キーです。
import firebase from 'firebase'

if (!firebase.apps.length) {
  firebase.initializeApp(
    {
      apiKey: '<API_KEY>',
      authDomain: '<AUTH_DOMAIN>',
      databaseURL: '<DATABASE_URL>',
      projectId: '<PROJECT_ID>',
      storageBucket: '<STORAGE_BUCKET>',
      messagingSenderId: '<MESSAGING_SENDER_ID>'
    }
  )
}

export default firebase
import firebase from '@/plugins/firebase'
import 'firebase/auth'

const provider = new firebase.auth.GoogleAuthProvider()

const auth = {
  // サインイン
  login() {
    return new Promise((resolve, reject) => {
      firebase
        .auth()
        .signInWithRedirect(provider)
        .then(() => resolve())
        .catch(err => reject(err))
    })
  },
  // サインアウト
  logout() {
    return new Promise((resolve, reject) => {
      firebase
        .auth()
        .signOut()
        .then(() => resolve())
        .catch(err => reject(err))
    })
  },
  // 認証状態の変更検知
  auth() {
    return new Promise((resolve, reject) => {
      firebase.auth().onAuthStateChanged(user => resolve(user))
    })
  }
}

export default auth
plugins: [
    { src: '~/plugins/firebase.js', ssr: false },
    { src: '~/plugins/auth.js', ssr: false }
  ],
データの操作
公式のドキュメントに各言語のサンプルコード付きでデータの操作方法が載っているため、詳細はそちらをご覧ください。
ここでは、データ取得の一例を紹介します。
例1 : users/{userId} から、単一のユーザデータを取得(単一のドキュメントの内容を取得)
await firebase.firestore()
  .collection('/users')
  .doc(user.uid)
  .get()
  .then(function(doc) {
    if (doc.exists) {
      // do something
      // doc.data() でデータを取得
    } else {
      console.log("No user");
    }
  })
  .catch(function(error) {
    console.log("Error : ", error);
  })
例2 : users/{userId}/posts/ から、ユーザに紐づくすべての記事データを取得
await firebase.firestore()
  .doc(`users/${user.uid}`)
  .collection('posts')
  .get()
  .then(function(querySnapshot) {
    commit('setPosts', [])
    querySnapshot.forEach(function(doc) {
      // do something
      // doc.data() で各記事データを取得可能
    })
  })
  .catch(function(error) {
    console.log("Error : ", error);
  })
参考
おわりに
今回は、簡単なブログライクなアプリケーションを例に、 Firestore + Firebase Authentication を使う際の基礎部分の説明をしました。
Firestore を使用することで、サーバーサイドのAPI開発のコストから開放され、スピーディーに開発することができます。
ただし、リレーショナルな参照が可能であるとはいえ、 NoSQL のため複雑なリレーションを持つアプリケーションや大規模なシステムには不向きです。
また、クライアントから直接接続するデータベースのため、サーバーサイドでデータを加工したい場合や課金情報等クライアントから更新させたくないデータを扱う場合は考慮が必要です。
(今回は触れていませんが、 Cloud Functions 等で対応が可能です)
本記事の全体のコードは https://github.com/karayok/nuxt-firestore-sample-app にあげております(現在一部修正中です)。
誰かのお役に立てれば幸いです。

