この記事で行うこと
VuetifyのData tableサンプルページの一番下に、CRUDアクション付きData tableのサンプルがあります。
コードはこちら。以下、このコードを「オリジナルコード」と呼びます。
オリジナルコードをベースにして、PostGraphileを使ってPostgreSQLのデータをCRUD操作するように実装してみます。
参考ページ(感謝します)
vue.js, Apollo, graphQLで名簿アプリを作成する(CRUD機能の実装サンプル)
【Vue.js入門】ユーザ管理画面をVuetify.jsのData tablesで作る
環境構築その1:PostgreSQL関連まで
以前書いた記事「PostgreSQLを操作するAPIを提供する、PostgRESTとPostGraphileを両方試してみた」の「環境構築その1」と全く同じなので、この記事では割愛します。
環境構築その2:DB作成その1
以前書いた記事「PostgreSQLを操作するAPIを提供する、PostgRESTとPostGraphileを両方試してみた」の「環境構築その2:チュートリアル用DB作成」と同じですが、今回はPostgRESTは使用しませんので、PostgREST関連は飛ばしていただいて構いません。
環境構築その3:DB作成その2
Laradockのworkspaceに入リます。
docker-compose exec --user=laradock workspace bash
更にpsqlに入リます。defaultユーザのパスワード: secret
psql -h postgres -U default
カレントスキーマをforum_exampleに切り替えます。
SET search_path = forum_example;
select current_schema();
以下のSQLを実行して、CRUD対象にするdessertsテーブルを作成します。
A5:SQL Mk-2でER図を作成し、DDLを自動生成してもらいました。
-- Project Name : sample_crud
-- Date/Time    :
-- Author       :
-- RDBMS Type   : PostgreSQL
-- Application  : A5:SQL Mk-2

/*
  BackupToTempTable, RestoreFromTempTable疑似命令が付加されています。
  これにより、drop table, create table 後もデータが残ります。
  この機能は一時的に $$TableName のような一時テーブルを作成します。
*/

-- Desserts
--* BackupToTempTable
drop table if exists desserts cascade;

--* RestoreFromTempTable
create table desserts (
  id integer generated by default as identity
  , name character varying not null
  , calories real not null
  , fat real not null
  , carbs real not null
  , protein real not null
  , date_added timestamp not null default current_timestamp
  , date_updated timestamp
  , constraint desserts_PKC primary key (id)
) ;

comment on table desserts is 'Desserts';
comment on column desserts.id is 'id';
comment on column desserts.name is 'Dessert name';
comment on column desserts.calories is 'Calories';
comment on column desserts.fat is 'Fat';
comment on column desserts.carbs is 'Carbs';
comment on column desserts.protein is 'Protein';
comment on column desserts.date_added is 'Date added';
comment on column desserts.date_updated is 'Date updated';
date_updated列を自動更新するトリガーを作成します。
参考ページ:https://www.graphile.org/postgraphile/postgresql-schema-design/
create function forum_example_private.set_date_updated() returns trigger as $$
begin
  new.date_updated := current_timestamp;
  return new;
end;
$$ language plpgsql;

create trigger desserts_date_updated before update
  on forum_example.desserts
  for each row
  execute procedure forum_example_private.set_date_updated();
dessertsテーブルへのアクセス権限を設定します。
今回は認証なしでもdessertsテーブルにアクセスできるようにします。
grant select on table forum_example.desserts to forum_example_anonymous, forum_example_person;
grant insert, update, delete on table forum_example.desserts to forum_example_anonymous, forum_example_person;
grant usage on sequence forum_example.desserts_id_seq to forum_example_anonymous, forum_example_person;
初期データをINSERTします。
オリジナルコードのinitialize関数で作成しているデータと同じです。
INSERT INTO forum_example.desserts (name, calories, fat, carbs, protein) VALUES
  ('Frozen Yogurt', 159, 6.0, 24, 4.0),
  ('Ice cream sandwich', 237, 9.0, 37, 4.3),
  ('Eclair', 262, 16.0, 23, 6.0),
  ('Cupcake', 305, 3.7, 67, 4.3),
  ('Gingerbread', 356, 16.0, 49, 3.9),
  ('Jelly bean', 375, 0.0, 94, 0.0),
  ('Lollipop', 392, 0.2, 98, 0),
  ('Honeycomb', 408, 3.2, 87, 6.5),
  ('Donut', 452, 25.0, 51, 4.9),
  ('KitKat', 518, 26.0, 65, 7);
以上の作業が正常に行えたら、psqlと、Laradockのworkspaceからもexitしてホストに戻っておきます。
環境構築その4:PostGraphile、nginx関連
Laradockのdocker-compose.ymlファイルの最後に以下を追加。スマートな書き方でないかもしれませんが、とりあえずこれで先に進みます。
### PostGraphile ################################################
    postgraphile_tutorial:
      image: graphile/postgraphile
      environment:
        DATABASE_URL: "postgres://forum_example_postgraphile:xyz@postgres:${POSTGRES_PORT}/tutorialdb"
      expose:
        - "15000"
      command: ["--connection", "postgres://forum_example_postgraphile:xyz@postgres:${POSTGRES_PORT}/tutorialdb", "--port", "15000", "--schema", "forum_example", "--default-role", "forum_example_anonymous", "--export-schema-graphql", "/root/www/schema.graphql"]
      ports:
        - "15000:15000"
      depends_on:
        - postgres
      restart: on-failure:20
      networks:
        - backend
      volumes:
        - ${APP_CODE_PATH_HOST}:/root/www
Laradockのnginxのリバースプロキシ設定。~/work/laradock/nginx/sites/default.confファイルを編集します。
    location /.well-known/acme-challenge/ {
        root /var/www/letsencrypt/;
        log_not_found off;
    }
+
+    location /postgraphile/tutorial/ {
+        proxy_pass http://postgraphile_tutorial:15000/;
+    }
+
+    location /sample-crud/ {
+        proxy_pass http://workspace:8080/sample-crud/;
+    }
}
Docker環境の構築
docker-compose up -d postgres pgadmin workspace nginx postgraphile_tutorial
しばらく時間がかかります。終了したら、
docker-compose ps
以下のように表示されました。StateがUpになっているのを確認します。
              Name                            Command               State                    Ports
--------------------------------------------------------------------------------------------------------------------
laradock_docker-in-docker_1        dockerd-entrypoint.sh            Up      2375/tcp
laradock_nginx_1                   /bin/bash /opt/startup.sh        Up      0.0.0.0:443->443/tcp, 0.0.0.0:80->80/tcp
laradock_pgadmin_1                 docker-entrypoint.sh pgadmin4    Up      0.0.0.0:5050->5050/tcp
laradock_php-fpm_1                 docker-php-entrypoint php-fpm    Up      9000/tcp
laradock_postgraphile_tutorial_1   ./cli.js --connection post ...   Up      0.0.0.0:15000->15000/tcp, 5000/tcp
laradock_postgres_1                docker-entrypoint.sh postgres    Up      0.0.0.0:5432->5432/tcp
laradock_workspace_1               /sbin/my_init                    Up      0.0.0.0:2222->22/tcp
PostGraphile が postgres に接続できているか確認
docker logs laradock_postgraphile_tutorial_1
PostgreSQLが立ち上がっている状態でPostGraphileを立ち上げれば、何も問題がなければエラーは発生しません。
しかし、何も立ち上がっていない状態からdocker-composeで一斉にコンテナを立ち上げると、PostgreSQLの立ち上げを待たずにPostGraphileが立ち上がろうとして、以下のように何回かエラーが発生することがあります。
ここでは「PostGraphileの立ち上げを試みてはエラーが出る」を3回繰り返し、4回めでエラーが出なくなっています。
PostGraphileについて、今回docker-compose.ymlに「restart: on-failure:20」と記述しましたので、20回立ち上げを試みて、20回終わる前にPostgreSQLが立ち上がってくれれば、PostGraphileの立ち上げも成功するということになります。
PostGraphile v4.4.1-alpha.4 server listening on port 15000 🚀

  ‣ GraphQL API:         http://0.0.0.0:15000/graphql
  ‣ GraphiQL GUI/IDE:    http://0.0.0.0:15000/graphiql (enhance with '--enhance-graphiql')
  ‣ Postgres connection: postgres://forum_example_postgraphile:[SECRET]@postgres/tutorialdb
  ‣ Postgres schema(s):  forum_example
  ‣ Documentation:       https://graphile.org/postgraphile/introduction/
  ‣ Join Chris Watland in supporting PostGraphile development: https://graphile.org/sponsor/

* * *

A serious error occurred when building the initial schema. Exiting because `retryOnInitFail` is not set. Error details:

Error: connect ECONNREFUSED XXX.XX.0.2:5432
    at TCPConnectWrap.afterConnect [as oncomplete] (net.js:1054:14)


PostGraphile v4.4.1-alpha.4 server listening on port 15000 🚀

  ‣ GraphQL API:         http://0.0.0.0:15000/graphql
  ‣ GraphiQL GUI/IDE:    http://0.0.0.0:15000/graphiql (enhance with '--enhance-graphiql')
  ‣ Postgres connection: postgres://forum_example_postgraphile:[SECRET]@postgres/tutorialdb
  ‣ Postgres schema(s):  forum_example
  ‣ Documentation:       https://graphile.org/postgraphile/introduction/
  ‣ Join NodeSource in supporting PostGraphile development: https://graphile.org/sponsor/

* * *

A serious error occurred when building the initial schema. Exiting because `retryOnInitFail` is not set. Error details:

Error: connect ECONNREFUSED XXX.XX.0.2:5432
    at TCPConnectWrap.afterConnect [as oncomplete] (net.js:1054:14)


PostGraphile v4.4.1-alpha.4 server listening on port 15000 🚀

  ‣ GraphQL API:         http://0.0.0.0:15000/graphql
  ‣ GraphiQL GUI/IDE:    http://0.0.0.0:15000/graphiql (enhance with '--enhance-graphiql')
  ‣ Postgres connection: postgres://forum_example_postgraphile:[SECRET]@postgres/tutorialdb
  ‣ Postgres schema(s):  forum_example
  ‣ Documentation:       https://graphile.org/postgraphile/introduction/
  ‣ Join DOMONDA in supporting PostGraphile development: https://graphile.org/sponsor/

* * *

A serious error occurred when building the initial schema. Exiting because `retryOnInitFail` is not set. Error details:

Error: connect ECONNREFUSED XXX.XX.0.2:5432
    at TCPConnectWrap.afterConnect [as oncomplete] (net.js:1054:14)


PostGraphile v4.4.1-alpha.4 server listening on port 15000 🚀

  ‣ GraphQL API:         http://0.0.0.0:15000/graphql
  ‣ GraphiQL GUI/IDE:    http://0.0.0.0:15000/graphiql (enhance with '--enhance-graphiql')
  ‣ Postgres connection: postgres://forum_example_postgraphile:[SECRET]@postgres/tutorialdb
  ‣ Postgres schema(s):  forum_example
  ‣ Documentation:       https://graphile.org/postgraphile/introduction/
  ‣ Join Antwaan Harrison in supporting PostGraphile development: https://graphile.org/sponsor/

* * *
nginxのバージョンを確認してみます。
docker-compose run nginx nginx -v
Starting laradock_docker-in-docker_1 ... done
Starting laradock_workspace_1 ... done
Starting laradock_php-fpm_1 ... done
nginx version: nginx/1.15.9
GraphQL問い合わせ文を作成し、ブラウザからGraphiQLで試行する
ブラウザでGraphiQL GUI/IDEのURL( http://localhost:15000/graphiql )にアクセスして、プログラムに組み込むGraphQL問い合わせ文をあらかじめ作成・試行することにします。
PostGraphileについて、docker-compose.ymlに以下のように記述しましたので、ホスト側の${APP_CODE_PATH_HOST}(~/work)配下にschema.graphqlというファイルが自動生成されます。
ここにGraphQLのスキーマが記述されていますので、これを見ればGraphQL問い合わせ文を作成するときの参考になります。
      command: [(中略), "--export-schema-graphql", "/root/www/schema.graphql"]
      (中略)
      volumes:
        - ${APP_CODE_PATH_HOST}:/root/www
schema.graphqlから一部抜粋:
type Dessert implements Node {
  nodeId: ID!
  id: Int!
  name: String!
  calories: Float!
  fat: Float!
  carbs: Float!
  protein: Float!
  dateAdded: Datetime!
  dateUpdated: Datetime
}
SQLのSELECT文に相当するQuery
query allDesserts {
  allDesserts {
    nodes {
      id
      name
      calories
      fat
      carbs
      protein
      dateAdded
      dateUpdated
    }
  }
}
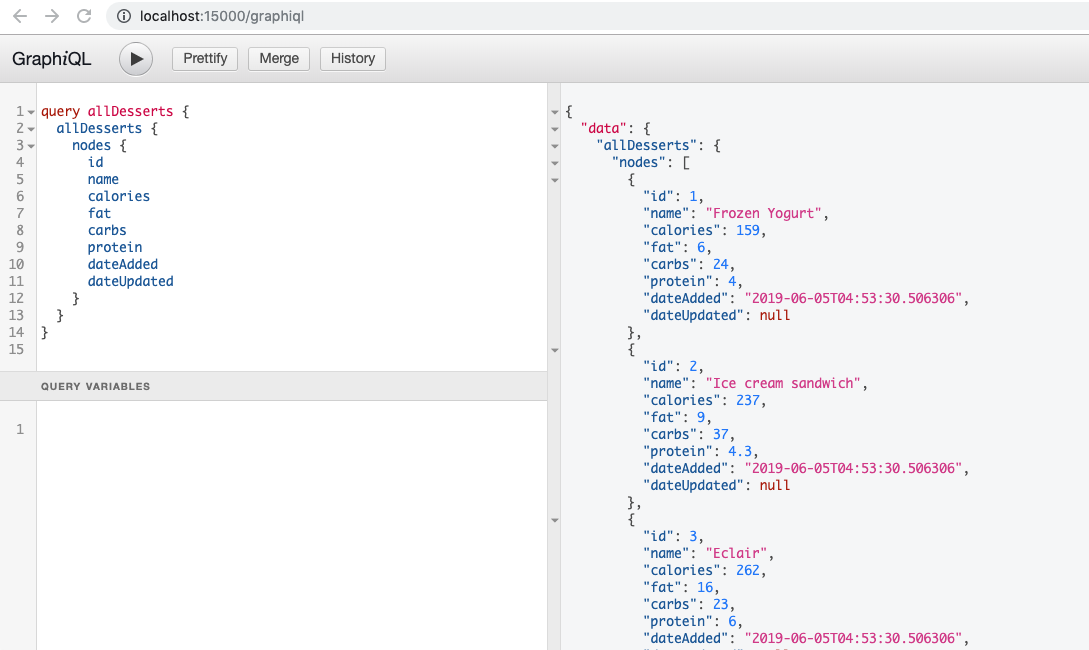
レスポンスは以下の通りです。
{
  "data": {
    "allDesserts": {
      "nodes": [
        {
          "id": 1,
          "name": "Frozen Yogurt",
          "calories": 159,
          "fat": 6,
          "carbs": 24,
          "protein": 4,
          "dateAdded": "2019-06-05T04:53:30.506306",
          "dateUpdated": null
        },
        {
          "id": 2,
          "name": "Ice cream sandwich",
          "calories": 237,
          "fat": 9,
          "carbs": 37,
          "protein": 4.3,
          "dateAdded": "2019-06-05T04:53:30.506306",
          "dateUpdated": null
        },
        {
          "id": 3,
          "name": "Eclair",
          "calories": 262,
          "fat": 16,
          "carbs": 23,
          "protein": 6,
          "dateAdded": "2019-06-05T04:53:30.506306",
          "dateUpdated": null
        },
        {
          "id": 4,
          "name": "Cupcake",
          "calories": 305,
          "fat": 3.7,
          "carbs": 67,
          "protein": 4.3,
          "dateAdded": "2019-06-05T04:53:30.506306",
          "dateUpdated": null
        },
        {
          "id": 5,
          "name": "Gingerbread",
          "calories": 356,
          "fat": 16,
          "carbs": 49,
          "protein": 3.9,
          "dateAdded": "2019-06-05T04:53:30.506306",
          "dateUpdated": null
        },
        {
          "id": 6,
          "name": "Jelly bean",
          "calories": 375,
          "fat": 0,
          "carbs": 94,
          "protein": 0,
          "dateAdded": "2019-06-05T04:53:30.506306",
          "dateUpdated": null
        },
        {
          "id": 7,
          "name": "Lollipop",
          "calories": 392,
          "fat": 0.2,
          "carbs": 98,
          "protein": 0,
          "dateAdded": "2019-06-05T04:53:30.506306",
          "dateUpdated": null
        },
        {
          "id": 8,
          "name": "Honeycomb",
          "calories": 408,
          "fat": 3.2,
          "carbs": 87,
          "protein": 6.5,
          "dateAdded": "2019-06-05T04:53:30.506306",
          "dateUpdated": null
        },
        {
          "id": 9,
          "name": "Donut",
          "calories": 452,
          "fat": 25,
          "carbs": 51,
          "protein": 4.9,
          "dateAdded": "2019-06-05T04:53:30.506306",
          "dateUpdated": null
        },
        {
          "id": 10,
          "name": "KitKat",
          "calories": 518,
          "fat": 26,
          "carbs": 65,
          "protein": 7,
          "dateAdded": "2019-06-05T04:53:30.506306",
          "dateUpdated": null
        }
      ]
    }
  }
}
SQLのINSERT文に相当するMutation
mutation createDessert ($input: CreateDessertInput!) {
  createDessert (input: $input) {
    dessert {
      id
      name
      calories
      fat
      carbs
      protein
      dateAdded
      dateUpdated
    }
  }
}
Variables
{
  "input": {
    "dessert": {
      "name": "test",
      "calories": 10,
      "fat": 20,
      "carbs": 30,
      "protein": 40
    }
  }
}
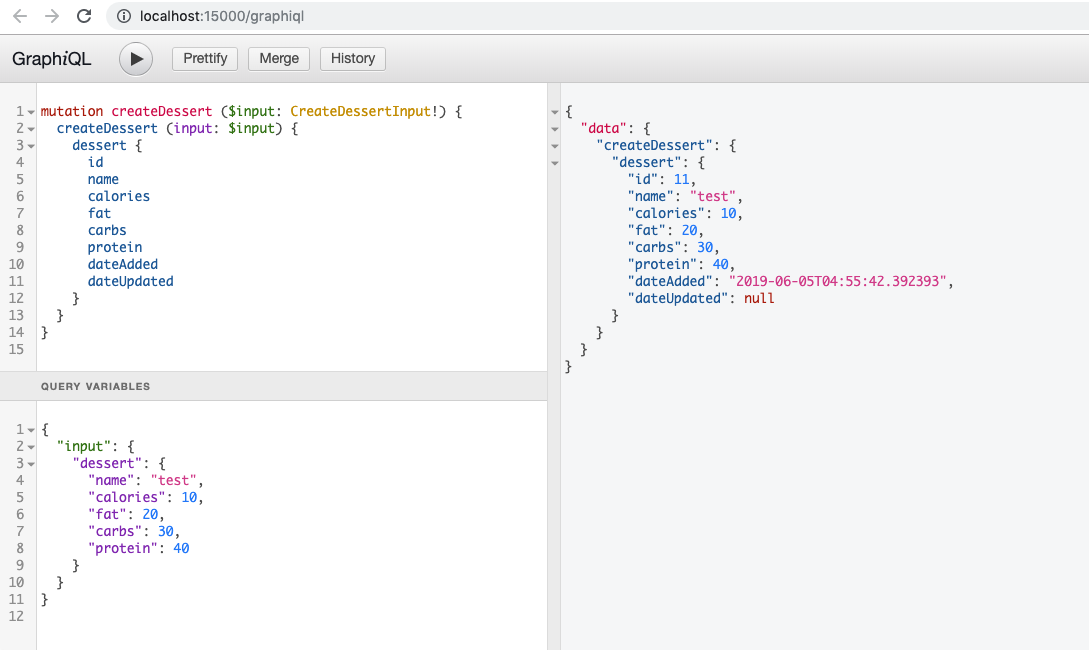
レスポンスは以下の通りです。
{
  "data": {
    "createDessert": {
      "dessert": {
        "id": 11,
        "name": "test",
        "calories": 10,
        "fat": 20,
        "carbs": 30,
        "protein": 40,
        "dateAdded": "2019-06-05T04:55:42.392393",
        "dateUpdated": null
      }
    }
  }
}
SQLのUPDATE文に相当するMutation
mutation updateDessertById ($input: UpdateDessertByIdInput!) {
  updateDessertById (input: $input) {
    dessert {
      id
      name
      calories
      fat
      carbs
      protein
      dateAdded
      dateUpdated
    }
  }
}
Variables
{
  "input": {
    "id": 11,
    "dessertPatch": {
      "name": "test",
      "calories": 100,
      "fat": 200,
      "carbs": 300,
      "protein": 400
    }
  }
}
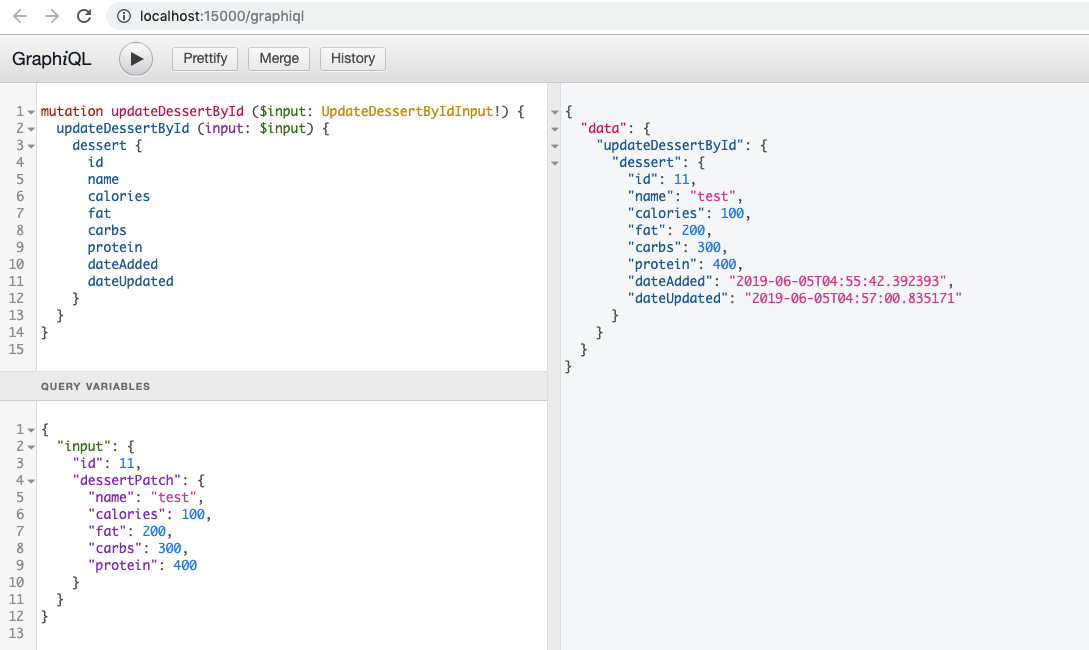
レスポンスは以下の通りです。
{
  "data": {
    "updateDessertById": {
      "dessert": {
        "id": 11,
        "name": "test",
        "calories": 100,
        "fat": 200,
        "carbs": 300,
        "protein": 400,
        "dateAdded": "2019-06-05T04:55:42.392393",
        "dateUpdated": "2019-06-05T04:57:00.835171"
      }
    }
  }
}
SQLのDELETE文に相当するMutation
mutation deleteDessertById ($input: DeleteDessertByIdInput!) {
  deleteDessertById (input: $input) {
    dessert {
      id
      name
      calories
      fat
      carbs
      protein
      dateAdded
      dateUpdated
    }
  }
}
Variables
{
  "input": {
    "id": 11
  }
}
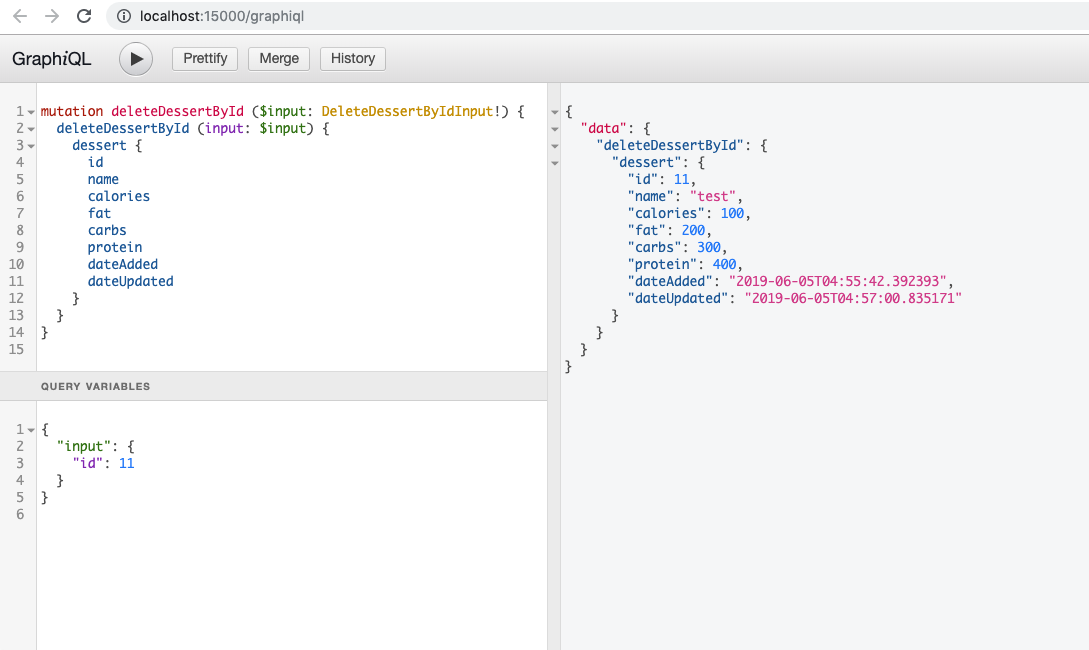
レスポンスは以下の通りです。
{
  "data": {
    "deleteDessertById": {
      "dessert": {
        "id": 11,
        "name": "test",
        "calories": 100,
        "fat": 200,
        "carbs": 300,
        "protein": 400,
        "dateAdded": "2019-06-05T04:55:42.392393",
        "dateUpdated": "2019-06-05T04:57:00.835171"
      }
    }
  }
}
フロント開発
以下、開発およびブラウザ実行はホスト側で行い、yarn serveのみCORSエラーを避けるためにLaradockのworkspaceで起動することにします。
今回の環境設定では、Laradockのworkspaceの「/var/www」がホスト側の「~/work」にマウントされます。
プロジェクトのディレクトリは、ホスト側では「~/work/sample-crud」、Laradock側では「/var/www/sample-crud」となります。
Laradockのworkspaceに入るには、以下を実行します。
docker-compose exec --user=laradock workspace bash
追記(2019-06-06)
CORSエラーについて、この記事ではnginxをリバースプロキシとして使用して回避していましたが、vue.config.jsでもリバースプロキシの設定ができるそうです。
module.exports = {
  devServer: {
    host: '0.0.0.0',
    disableHostCheck: true,
    proxy: {
      "^/postgraphile/tutorial": {
        target: "http://localhost:15000",
        ws: false,
        pathRewrite: {
          "^/postgraphile/tutorial": "/"
        }
      }
    }
  },
  publicPath: '/sample-crud',
}
VUE_APP_GRAPHQL_HTTP=http://localhost:8080/postgraphile/tutorial/graphql
vue.config.jsと.envを上記のように設定すれば、開発時にyarn serveもホスト側で立ち上げることができます(yarn serveのためにLaradockのworkspaceに入る必要がなくなります)。
(追記完了)
Vueプロジェクトの作成
cd ~/work
vue create sample-crud
以下、いくつか選択肢を訊かれます。
Vue CLI v3.8.2
? Please pick a preset:
  default (babel, eslint)
❯ Manually select features
上記のように、Manually select featuresを選択しました。
Vue CLI v3.8.2
? Please pick a preset: Manually select features
? Check the features needed for your project:
 ◉ Babel
 ◯ TypeScript
 ◯ Progressive Web App (PWA) Support
 ◉ Router
❯◉ Vuex
 ◯ CSS Pre-processors
 ◉ Linter / Formatter
 ◯ Unit Testing
 ◯ E2E Testing
上記のように、Babel、Router、Vuex、Linter / Formatterを選択しました。
他の選択肢はすべてデフォルト(エンターキのみ)にしました。
ホスト側で試しにyarn serveを立ち上げて、ブラウザからアクセスしてみます。
cd /sample-crud
yarn serve
http://localhost:8080/ にアクセスすると、「Welcome to Your Vue.js App」と表示されました。
Vuetifyの追加
vue add vuetify
選択肢はすべてデフォルト(エンターキのみ)にしました。
vue-apolloの追加
vue add apollo
選択肢はすべてデフォルト(エンターキのみ)にしました。
プロジェクト直下にファイル「vue.config.js」を作成
module.exports = {
    devServer: {
        host: '0.0.0.0',
        disableHostCheck: true,
    },
    publicPath: '/sample-crud',
}
src/vue-apollo.jsを修正(2行追加)
修正理由はこのサイトを参照。
(前略)

import { createApolloClient, restartWebsockets } from 'vue-cli-plugin-apollo/graphql-client'
+ import { InMemoryCache } from 'apollo-cache-inmemory';

(中略)

  // Override default cache
  // cache: myCache
+   cache: new InMemoryCache(),

(後略)
-------------------------
試しにyarn serve起動(Laradock側)
cd /var/www/sample-crud
yarn serve
試しにブラウザからアクセス
ホスト側から http://localhost/sample-crud/ にアクセスし、「Welcome to Vuetify」が表示されればOKです。
PostGraphile APIのエンドポイントの設定
プロジェクト直下に、以下の内容でファイル「.env」を作成します。
VUE_APP_GRAPHQL_HTTP=http://localhost/postgraphile/tutorial/graphql
この内容は、src/vue-apollo.js から参照されます。
GraphQL問い合わせ文を記述
srcディレクトリの下にgraphqlディレクトリを作成し、その下に以下の内容でファイル「desserts.js」を作成します。
ここには、ブラウザのGraphiQL GUI/IDEで動作確認済のGraphQL問い合わせ文を記述しています。
import gql from 'graphql-tag'

// SELECT
export const ALL_DESSERTS = gql`
  query allDesserts {
    allDesserts {
      nodes {
        id
        name
        calories
        fat
        carbs
        protein
        dateAdded
        dateUpdated
      }
    }
  }
`

// INSERT
export const CREATE_DESSERT = gql`
  mutation createDessert ($input: CreateDessertInput!) {
    createDessert (input: $input) {
      dessert {
        id
        name
        calories
        fat
        carbs
        protein
        dateAdded
        dateUpdated
      }
    }
  }
`

// UPDATE
export const UPDATE_DESSERT = gql`
  mutation updateDessertById ($input: UpdateDessertByIdInput!) {
    updateDessertById (input: $input) {
      dessert {
        id
        name
        calories
        fat
        carbs
        protein
        dateAdded
        dateUpdated
      }
    }
  }
`

// DELETE
export const DELETE_DESSERT = gql`
  mutation deleteDessertById ($input: DeleteDessertByIdInput!) {
    deleteDessertById (input: $input) {
      dessert {
        id
        name
        calories
        fat
        carbs
        protein
        dateAdded
        dateUpdated
      }
    }
  }
`
src/App.vueの修正
src/App.vueのデフォルトのコードは全削除して、以下のように書き換えます。
<template>
  <v-app>
    <SampleCRUD/>
  </v-app>
</template>

<script>
  import SampleCRUD from './components/SampleCRUD'

  export default {
    name: 'App',
    components: {
      SampleCRUD
    },
  }
</script>
vueコンポーネントの作成
src/componentsの下に以下の内容でファイル「SampleCRUD.vue」を作成します。
このコードは、オリジナルコードを書き換えて、PostGraphileを使ってPostgreSQLをCRUD操作するよう実装したものです。
後ほどdiffを取って、両者の違いについて説明を加えます。
<template>
  <div>
    <v-toolbar flat color="white">
      <v-toolbar-title>My CRUD</v-toolbar-title>
      <v-divider
        class="mx-2"
        inset
        vertical
      ></v-divider>
      <v-spacer></v-spacer>
      <v-dialog v-model="dialog" max-width="500px">
        <template v-slot:activator="{ on }">
          <v-btn color="primary" dark class="mb-2" v-on="on">New Item</v-btn>
        </template>
        <v-card>
          <v-card-title>
            <span class="headline">{{ formTitle }}</span>
          </v-card-title>

          <v-card-text>
            <v-container grid-list-md>
              <v-layout wrap>
                <v-flex xs12 sm6 md4>
                  <v-text-field v-model="editedItem.name" label="Dessert name"></v-text-field>
                </v-flex>
                <v-flex xs12 sm6 md4>
                  <v-text-field v-model="editedItem.calories" label="Calories"></v-text-field>
                </v-flex>
                <v-flex xs12 sm6 md4>
                  <v-text-field v-model="editedItem.fat" label="Fat (g)"></v-text-field>
                </v-flex>
                <v-flex xs12 sm6 md4>
                  <v-text-field v-model="editedItem.carbs" label="Carbs (g)"></v-text-field>
                </v-flex>
                <v-flex xs12 sm6 md4>
                  <v-text-field v-model="editedItem.protein" label="Protein (g)"></v-text-field>
                </v-flex>
              </v-layout>
            </v-container>
          </v-card-text>

          <v-card-actions>
            <v-spacer></v-spacer>
            <v-btn color="blue darken-1" flat @click="close">Cancel</v-btn>
            <v-btn color="blue darken-1" flat @click="save">Save</v-btn>
          </v-card-actions>
        </v-card>
      </v-dialog>
    </v-toolbar>
    <v-data-table
      :headers="headers"
      :items="allDesserts.nodes"
      class="elevation-1"
    >
      <template v-slot:items="props">
        <td>{{ props.item.name }}</td>
        <td class="text-xs-right">{{ props.item.calories }}</td>
        <td class="text-xs-right">{{ props.item.fat }}</td>
        <td class="text-xs-right">{{ props.item.carbs }}</td>
        <td class="text-xs-right">{{ props.item.protein }}</td>
        <td class="justify-center layout px-0">
          <v-icon
            small
            class="mr-2"
            @click="editItem(props.item)"
          >
            edit
          </v-icon>
          <v-icon
            small
            @click="deleteItem(props.item)"
          >
            delete
          </v-icon>
        </td>
      </template>
    </v-data-table>
  </div>
</template>

<script>
  import { ALL_DESSERTS, CREATE_DESSERT, UPDATE_DESSERT, DELETE_DESSERT } from "../graphql/desserts";

  export default {
    data: () => ({
      dialog: false,
      headers: [
        {
          text: 'Dessert (100g serving)',
          align: 'left',
          sortable: false,
          value: 'name'
        },
        { text: 'Calories', value: 'calories' },
        { text: 'Fat (g)', value: 'fat' },
        { text: 'Carbs (g)', value: 'carbs' },
        { text: 'Protein (g)', value: 'protein' },
        { text: 'Actions', value: 'name', sortable: false }
      ],
      allDesserts: {},
      isCreate: true,
      editedItem: {
        id: 0,
        name: '',
        calories: 0,
        fat: 0,
        carbs: 0,
        protein: 0
      },
      defaultItem: {
        id: 0,
        name: '',
        calories: 0,
        fat: 0,
        carbs: 0,
        protein: 0
      }
    }),

    computed: {
      formTitle () {
        return this.isCreate ? 'New Item' : 'Edit Item'
      }
    },

    watch: {
      dialog (val) {
        val || this.close()
      }
    },

    apollo: {
      allDesserts: ALL_DESSERTS
    },

    methods: {
      editItem (item) {
        this.isCreate = false
        this.editedItem = Object.assign({}, item)
        this.dialog = true
      },

      deleteItem (item) {
        if (! confirm('Are you sure you want to delete this item? : ' + item.name)) {
          return
        }
        this.$apollo.mutate({
          mutation: DELETE_DESSERT,
          variables: {
            input: {
              id: item.id
            }
          }
        }).then(() => {
          this.$apollo.queries.allDesserts.fetchMore({
            updateQuery: (previousResult, {fetchMoreResult}) => {
              return {
                allDesserts: fetchMoreResult.allDesserts
              }
            }
          })
        }).catch((error) => {
          console.error(error)
        })
      },

      close () {
        this.dialog = false
        setTimeout(() => {
          this.editedItem = Object.assign({}, this.defaultItem)
          this.isCreate = true
        }, 300)
      },

      save () {
        if (!this.isCreate) {
          this.updateDessert()
        } else {
          this.createDessert()
        }
      },

      // UPDATE
      updateDessert () {
        this.$apollo.mutate({
          mutation: UPDATE_DESSERT,
          variables: {
            input: {
              id: this.editedItem.id,
              dessertPatch: {
                name: this.editedItem.name,
                calories: Number(this.editedItem.calories),
                fat: Number(this.editedItem.fat),
                carbs: Number(this.editedItem.carbs),
                protein: Number(this.editedItem.protein),
              }
            }
          }
        }).then(() => {
          this.$apollo.queries.allDesserts.fetchMore({
            updateQuery: (previousResult, {fetchMoreResult}) => {
              return {
                allDesserts: fetchMoreResult.allDesserts
              }
            }
          })
          this.close()
        }).catch((error) => {
          console.error(error)
        })
      },

      // INSERT
      createDessert () {
        this.$apollo.mutate({
          mutation: CREATE_DESSERT,
          variables: {
            input: {
              dessert: {
                name: this.editedItem.name,
                calories: Number(this.editedItem.calories),
                fat: Number(this.editedItem.fat),
                carbs: Number(this.editedItem.carbs),
                protein: Number(this.editedItem.protein),
              }
            }
          }
        }).then(() => {
          this.$apollo.queries.allDesserts.fetchMore({
            updateQuery: (previousResult, {fetchMoreResult}) => {
              return {
                allDesserts: fetchMoreResult.allDesserts
              }
            }
          })
          this.close()
        }).catch((error) => {
          console.error(error)
        })
      },
    }
  }
</script>
開発は以上です。動作確認してみます。
yarn serve起動(Laradock側)
cd /var/www/sample-crud
yarn serve
ブラウザからアクセス(ホスト側)
http://localhost/sample-crud/ にアクセスします。以下のように表示されました。
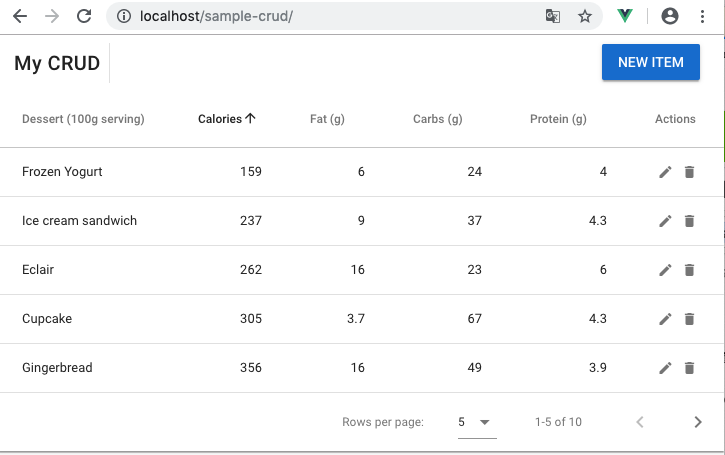
動作確認すると、意図通り動いている様子です。
今回はバリデーションを実装していないので、おかしな値を入力するとコンソールにエラーメッセージが出力され、処理が先に進まないことがあります。
オリジナルコードとの違いについて
オリジナルコードの取得
cd ~/work
git clone https://github.com/vuetifyjs/vuetify
diff実行
diff -u ~/work/vuetify/packages/docs/src/examples/data-tables/crud.vue ~/work/sample-crud/src/components/SampleCRUD.vue
diff結果
変更点について、スラッシュ4つ(////)入れて説明を加えてみました。
--- ~/work/vuetify/packages/docs/src/examples/data-tables/crud.vue
+++ ~/work/sample-crud/src/components/SampleCRUD.vue
@@ -49,7 +49,7 @@
     </v-toolbar>
     <v-data-table
       :headers="headers"
//// GraphQLクエリー「allDesserts」のレスポンスに合わせた。
-      :items="desserts"
+      :items="allDesserts.nodes"
       class="elevation-1"
     >
       <template v-slot:items="props">
@@ -74,14 +74,13 @@
           </v-icon>
         </td>
       </template>
//// プログラムでの初期データ作成機能は割愛した。
-      <template v-slot:no-data>
-        <v-btn color="primary" @click="initialize">Reset</v-btn>
-      </template>
     </v-data-table>
   </div>
 </template>

 <script>
//// GraphQL問い合わせ文をインポート。
+  import { ALL_DESSERTS, CREATE_DESSERT, UPDATE_DESSERT, DELETE_DESSERT } from "../graphql/desserts";
+
   export default {
     data: () => ({
       dialog: false,
@@ -98,9 +97,10 @@
         { text: 'Protein (g)', value: 'protein' },
         { text: 'Actions', value: 'name', sortable: false }
       ],
//// GraphQLクエリー「allDesserts」のレスポンスに合わせた。
-      desserts: [],
+      allDesserts: {},
//// データの特定はコレクションのインデックスではなくdessertsテーブルのid列で行うので、editedIndexは不要になる。
//// 代わりに、新規追加 or 更新の判定フラグ「isCreate」を追加。
-      editedIndex: -1,
+      isCreate: true,
       editedItem: {
//// id追加。
+        id: 0,
         name: '',
         calories: 0,
         fat: 0,
@@ -108,6 +108,7 @@
         protein: 0
       },
       defaultItem: {
//// id追加。
+        id: 0,
         name: '',
         calories: 0,
         fat: 0,
@@ -118,7 +119,7 @@

     computed: {
       formTitle () {
//// editedIndexの代わりにisCreateを使用。
-        return this.editedIndex === -1 ? 'New Item' : 'Edit Item'
+        return this.isCreate ? 'New Item' : 'Edit Item'
       }
     },

@@ -128,113 +129,115 @@
       }
     },

//// プログラムでの初期データ作成機能は割愛した。
-    created () {
-      this.initialize()
//// export defaultのオブジェクトにapolloというプロパティを作成し、GraphQL問い合わせ文を取り込む。
+    apollo: {
+      allDesserts: ALL_DESSERTS
     },

     methods: {
//// プログラムでの初期データ作成機能は割愛した。
//// 代わりにPostgreSQL側でINSERT文を発行して、dessertsテーブルに初期データを格納した。
-      initialize () {
-        this.desserts = [
-          {
-            name: 'Frozen Yogurt',
-            calories: 159,
-            fat: 6.0,
-            carbs: 24,
-            protein: 4.0
-          },
-          {
-            name: 'Ice cream sandwich',
-            calories: 237,
-            fat: 9.0,
-            carbs: 37,
-            protein: 4.3
-          },
-          {
-            name: 'Eclair',
-            calories: 262,
-            fat: 16.0,
-            carbs: 23,
-            protein: 6.0
-          },
-          {
-            name: 'Cupcake',
-            calories: 305,
-            fat: 3.7,
-            carbs: 67,
-            protein: 4.3
-          },
-          {
-            name: 'Gingerbread',
-            calories: 356,
-            fat: 16.0,
-            carbs: 49,
-            protein: 3.9
-          },
-          {
-            name: 'Jelly bean',
-            calories: 375,
-            fat: 0.0,
-            carbs: 94,
-            protein: 0.0
-          },
-          {
-            name: 'Lollipop',
-            calories: 392,
-            fat: 0.2,
-            carbs: 98,
-            protein: 0
-          },
-          {
-            name: 'Honeycomb',
-            calories: 408,
-            fat: 3.2,
-            carbs: 87,
-            protein: 6.5
-          },
-          {
-            name: 'Donut',
-            calories: 452,
-            fat: 25.0,
-            carbs: 51,
-            protein: 4.9
-          },
-          {
-            name: 'KitKat',
-            calories: 518,
-            fat: 26.0,
-            carbs: 65,
-            protein: 7
-          }
-        ]
-      },
-
       editItem (item) {
//// editedIndexの代わりにisCreateを使用。
-        this.editedIndex = this.desserts.indexOf(item)
+        this.isCreate = false
         this.editedItem = Object.assign({}, item)
         this.dialog = true
       },

       deleteItem (item) {
//// データ削除は、GraphQLミューテーションを使うように実装し直した。
-        const index = this.desserts.indexOf(item)
-        confirm('Are you sure you want to delete this item?') && this.desserts.splice(index, 1)
+        if (! confirm('Are you sure you want to delete this item? : ' + item.name)) {
+          return
+        }
+        this.$apollo.mutate({
+          mutation: DELETE_DESSERT,
+          variables: {
+            input: {
+              id: item.id
+            }
+          }
+        }).then(() => {
+          this.$apollo.queries.allDesserts.fetchMore({
+            updateQuery: (previousResult, {fetchMoreResult}) => {
+              return {
+                allDesserts: fetchMoreResult.allDesserts
+              }
+            }
+          })
+        }).catch((error) => {
+          console.error(error)
+        })
       },

       close () {
         this.dialog = false
         setTimeout(() => {
           this.editedItem = Object.assign({}, this.defaultItem)
//// editedIndexの代わりにisCreateを使用。
-          this.editedIndex = -1
+          this.isCreate = true
         }, 300)
       },

       save () {
//// editedIndexの代わりにisCreateを使用して、新規追加 or 更新を判定。
-        if (this.editedIndex > -1) {
+        if (!this.isCreate) {
//// データ更新は、GraphQLミューテーションを使うように実装し直した。
-          Object.assign(this.desserts[this.editedIndex], this.editedItem)
+          this.updateDessert()
         } else {
//// データ新規追加は、GraphQLミューテーションを使うように実装し直した。
-          this.desserts.push(this.editedItem)
+          this.createDessert()
         }
//// this.close()は、this.updateDessert()またはthis.createDessert()の内部から呼び出すように変更した。
-        this.close()
-      }
+      },
+
//// データ更新の実装。
+      // UPDATE
+      updateDessert () {
+        this.$apollo.mutate({
+          mutation: UPDATE_DESSERT,
+          variables: {
+            input: {
+              id: this.editedItem.id,
+              dessertPatch: {
+                name: this.editedItem.name,
+                calories: Number(this.editedItem.calories),
+                fat: Number(this.editedItem.fat),
+                carbs: Number(this.editedItem.carbs),
+                protein: Number(this.editedItem.protein),
+              }
+            }
+          }
+        }).then(() => {
+          this.$apollo.queries.allDesserts.fetchMore({
+            updateQuery: (previousResult, {fetchMoreResult}) => {
+              return {
+                allDesserts: fetchMoreResult.allDesserts
+              }
+            }
+          })
+          this.close()
+        }).catch((error) => {
+          console.error(error)
+        })
+      },
+
//// データ新規追加の実装。
+      // INSERT
+      createDessert () {
+        this.$apollo.mutate({
+          mutation: CREATE_DESSERT,
+          variables: {
+            input: {
+              dessert: {
+                name: this.editedItem.name,
+                calories: Number(this.editedItem.calories),
+                fat: Number(this.editedItem.fat),
+                carbs: Number(this.editedItem.carbs),
+                protein: Number(this.editedItem.protein),
+              }
+            }
+          }
+        }).then(() => {
+          this.$apollo.queries.allDesserts.fetchMore({
+            updateQuery: (previousResult, {fetchMoreResult}) => {
+              return {
+                allDesserts: fetchMoreResult.allDesserts
+              }
+            }
+          })
+          this.close()
+        }).catch((error) => {
+          console.error(error)
+        })
+      },
     }
   }
 </script>