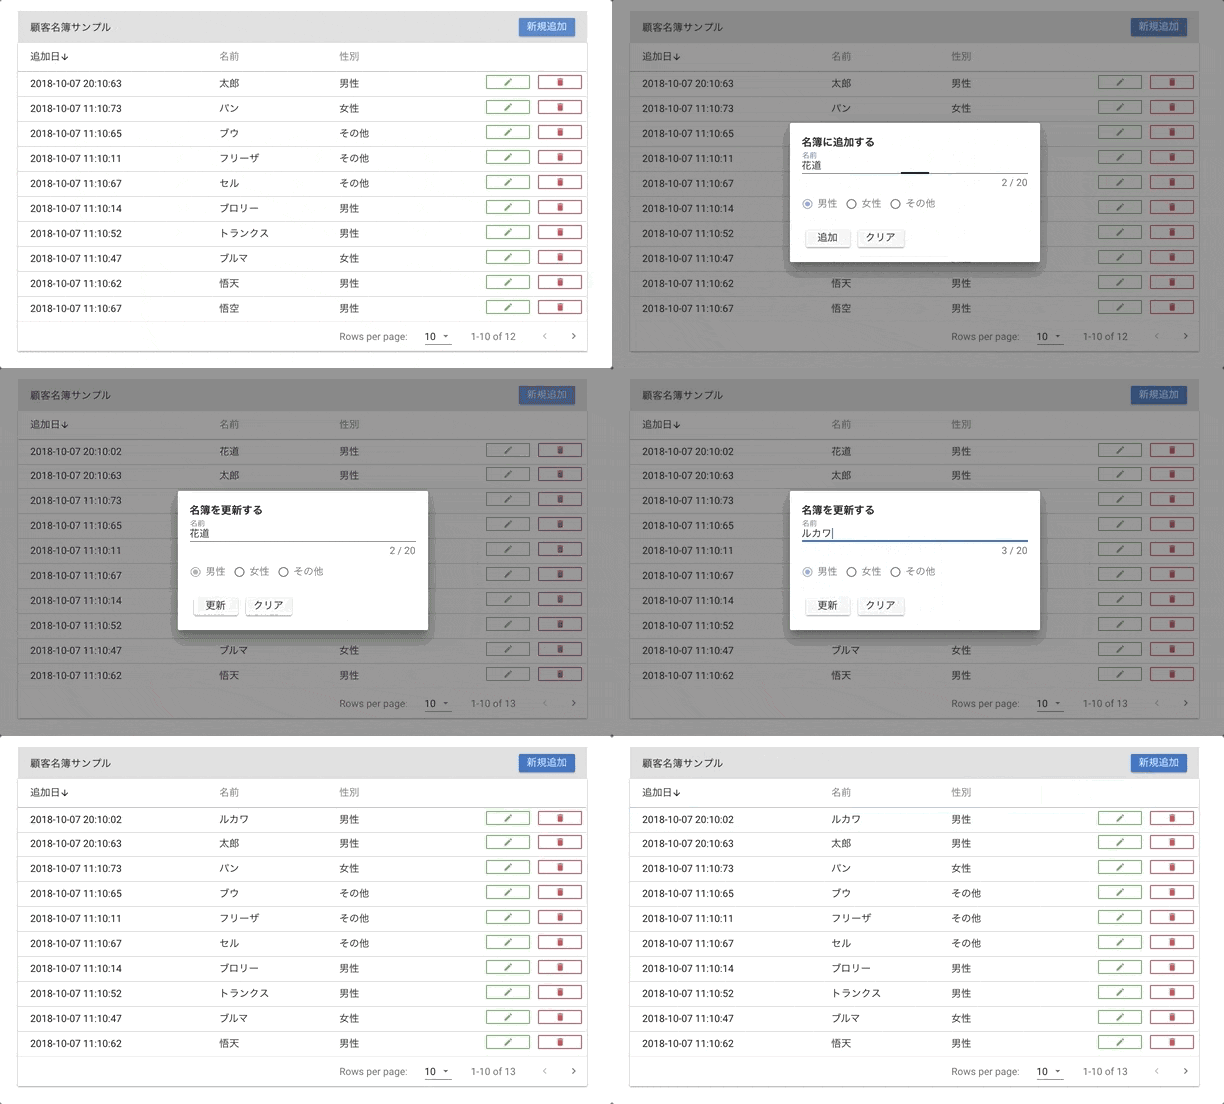
vue.jsとapollo、graphQLの学習用に、CRUD機能(create、read、update、delete)を持つ名簿アプリを作りました。
実装をチュートリアル形式でまとめます。
バックエンドはgraphQLのAPIサーバーであるGraphCMSというヘッドレスCMSを使っています。
概要

CRUD機能を持つ名簿アプリを作成します。
右上のボタンから名簿の追加。
各レコード右側のボタンで更新、削除が行えます。
さらにvuetifyのdata-tableの機能ですが、並び替えやページングも行えます。
デモサイトはこちら(追加更新削除やってみて大丈夫です。)
https://vue-sample-crud.firebaseapp.com/
全コードはこちら
https://github.com/kawamataryo/vue-apollo-crud
バージョン情報
- vue-cli 3.0.1
- vue 2.5.17
- vue-apollo 3.0.0
- vuetify 1.2.0
- vue-moment 4.0.0
初期設定
GraphQL APIの作成
GraphCMSを使って以下Customerモデルを作成します。
GraphCMSの初期設定は、「HeadLessCMS + GraphQL + Vue.js でSPA(ブログ)を作ってみる」
で説明しています。
schemeのname、gender以外はデフォルトで設定されているものです。
CRUD機能を実装するので、Settings>Public API PermissionsはOpenに設定してください。
また、contentsより初期データをなにか適当に追加しておいてください。
type Customer implements Node {
  status: Status!
  id: ID!
  createdAt: DateTime!
  updatedAt: DateTime!
  name: String # 顧客名
  gender: String # 性別
}
vueプロジェクトの作成
vue-cliでプロジェクトを作成。
$ vue create sample-crud #プロジェクトの作成
$ cd sample-crud
$ yarn serve # 起動
vuetifyの追加
見栄えは良い方がやる気が出るので、vueのコンポーネントライブラリvuetifyを追加します。
$ vue add vuetify
# 選択肢はすべてデフォルトでOK
vue-apolloのインストールと設定
graphQLをクライアントvue-apolloを追加します。
$ vue add apollo
# 選択肢はすべてデフォルトでOK
次に、接続するgraphCMSのエンドポイントの設定を追加します。
vue-cliのプロジェクトではデフォルトで.engファイルが設定ファイルとして使用されるので、そこにapollo.config.jsで読み込まれる変数を設定します。
VUE_APP_GRAPHQL_HTTP=以下は、接続するAPIのエンドポイントを設定してください。
$ echo "VUE_APP_GRAPHQL_HTTP=https://api-euwest.graphcms.com/v1/xxxx" > .env
ここまでで終了すると、main.jsは以下のような状態になっているはずです。
vuetify、apolloのセットアップも自動で追加されています。
import '@babel/polyfill'
import Vue from 'vue'
import './plugins/vuetify'
import App from './App.vue'
import { createProvider } from './vue-apollo'

Vue.config.productionTip = false

new Vue({
  apolloProvider: createProvider(),
  render: h => h(App)
}).$mount('#app')
一覧表示の実装(READ)
customerの一覧表示を実装します。
queryの作成(allCustomers)
一覧表示用にすべてのCustomerを取得するgraphQLのクエリを作成します。
クエリ記載ファイルの作成
$ mkdir src/constants
$ touch src/constants/customer-query.js
そしてcustomer-query.jsに以下を記述します。
import gql from 'graphql-tag'

// すべての顧客を取得
export const ALL_CUSTOMERS = gql`
    query allCustomers {
        customers(where: {status: PUBLISHED}) {
            id
            createdAt
            name
            gender
        }
    }
`
vueコンポーネントの作成
一覧表示用のvueコンポーネントをvuetifyのdata-tableコンポーネントを使って作成します。
$ touch src/components/CustomerTable.vue
CustomerTable.vueを以下のように記述します。
<template>
  <v-container>
    <!--ツールバー-->
    <v-toolbar flat color="grey lighten-2">
      <v-toolbar-title>顧客名簿サンプル</v-toolbar-title>
    </v-toolbar>

    <!-- データテーブル -->
    <v-data-table
        :headers="headers"
        :items="customers"
        :pagination.sync="pagination"
        no-data-text="顧客が登録されておりません。"
        class="elevation-1"
    >
      <template slot="items" slot-scope="props">
        <td>{{ props.item.createdAt }}</td>
        <td>{{ props.item.name }}</td>
        <td>{{ props.item.gender }}</td>
      </template>
    </v-data-table>
  </v-container>
</template>

<script>
  import {ALL_CUSTOMERS} from "../constants/customer-query";

  export default {
    name: "CustomerTable",
    data: () => ({
      // 顧客情報
      customers: [],
      // テーブルのヘッダー情報
      headers: [
        {text: '追加日', value: 'createdAt'},
        {text: '名前', value: 'name'},
        {text: '性別', value: 'gender'},
      ],
      // データテーブルの初期ソート、表示件数の設定
      pagination: {
        descending: true,
        rowsPerPage: 10
      },
    }),
    apollo: {
      // すべての顧客情報の取得
      customers: ALL_CUSTOMERS
    }
  }
</script>
そしてApp.vueにてCustomerTable.vueを読み込む設定をします。
App.vueにデフォルトで記載されているものは削除して、以下のように記述します。
<template>
  <v-app>
    <CustomerTable/>
  </v-app>
</template>

<script>
import CustomerTable from './components/CustomerTable'

export default {
  name: 'App',
  components: {
    CustomerTable
  },
}
</script>
これで一覧表示は完了です。
この時点でyarn serveでプロジェクトを起動すると以下のような画面が出るはずです。
※ レコードの内容自体は、GraphCMSのContentsから追加したデータが表示されます。

補足
graphCMSからのデータを取得している部分はcustomers: ALL_CUSTOMERSの部分です。
読み込み時にapollo: {}以下のクエリが実行されます。
以下の場合はALL_CUSTOMERS(前項で記述したquery-customer.jsのクエリ)が実行されて、
そのレスポンスが、customersに格納されます。
<script>
...
    apollo: {
      // すべての顧客情報の取得
      customers: ALL_CUSTOMERS
    }
...
</script>
そして、customersをvuetifyのdata-tableコンポーネントにバインドしています。
...
    <!-- データテーブル -->
    <v-data-table
        :headers="headers"
        :items="customers"
        :pagination.sync="pagination"
        no-data-text="顧客が登録されておりません。"
        class="elevation-1"
    >
...
apolloを使うとものすごく簡単にAPIのレスポンス結果をバインドすることができますね。
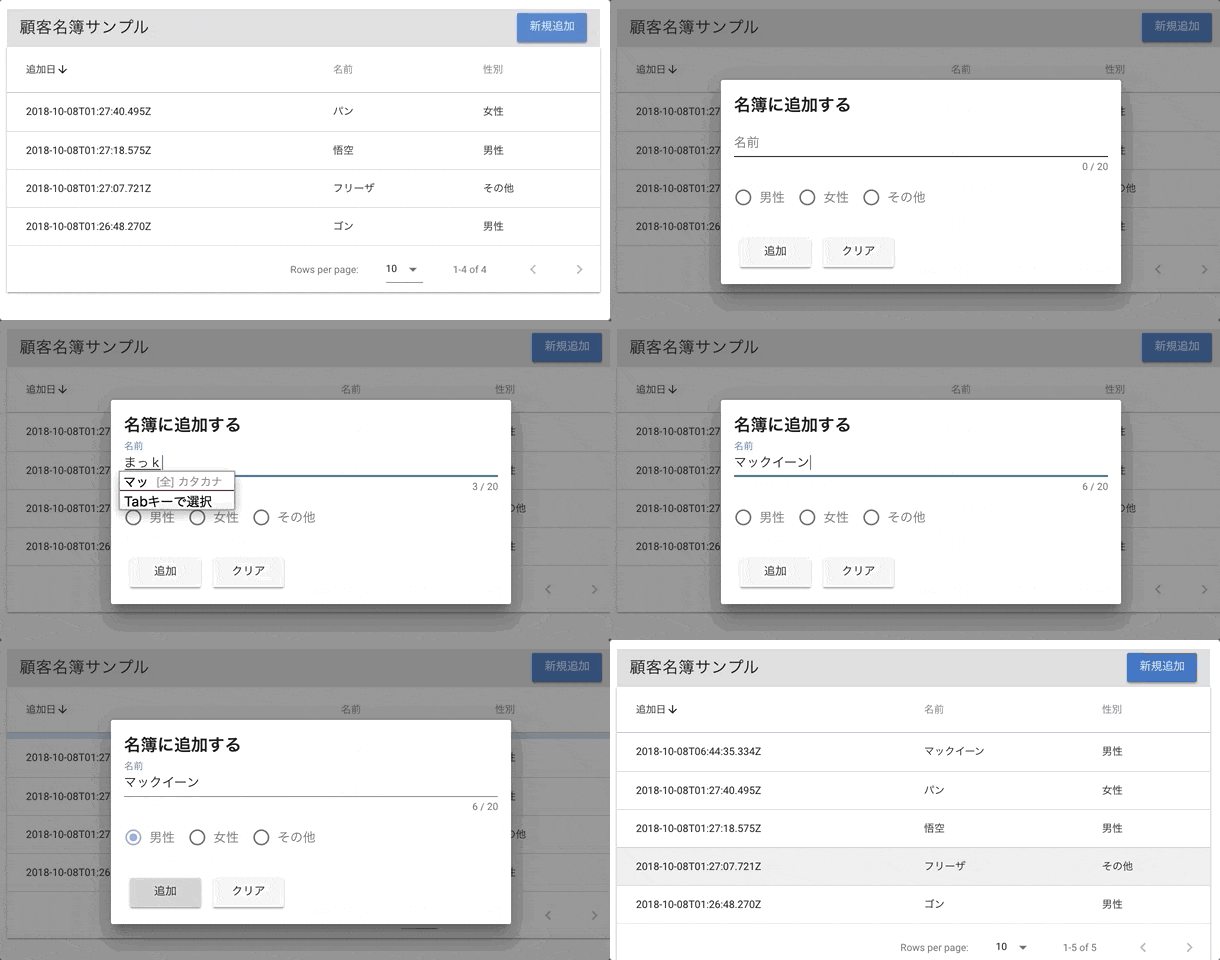
新規追加の実装(CREATE)
customerの追加機能を実装します。
mutationの作成(createCustomer)
graphQLでは、検索系をquery、追加更新削除などデータに変更を加えるものをmutationとして区別しています。
新規追加のmutationを作成します。
まず、graphQLを記載するファイルを作成
$ vi src/constants/customer-mutation.js
そしてmutationを記述します。
import gql from 'graphql-tag'

// customerの新規追加
export const CREATE_CUSTOMER = gql`
    mutation createCustomer($name: String, $gender: String) {
        createCustomer(data: {status: PUBLISHED, name: $name, gender: $gender}) {
            id
            name
            gender
        }
    }
`
createCustomerの引数として、nameと、genderを受け取り、その値をPOSTするデータに設定しています。
新規追加用のteamplateの修正
CustomerTableに新規追加ボタンと、データ入力用のフォーム、CREATE_CUSTOMERの呼び出しメソッドを追記します。
まずデータ入力用のフォームの追加。
入力フォームはモーダルで表示されるように、vuetifyの<v-dialog>で囲っています。
<template>
  <v-container>
    <!--入力フォーム-->
    <v-dialog v-model="dialog" max-width="500px">
      <v-card>
        <v-container>
          <h2>名簿に追加する</h2>
          <v-form ref="form" v-model="valid" lazy-validation>
            <!--名前-->
            <v-text-field
                v-model="customer.name"
                :rules="nameRules"
                :counter="20"
                label="名前"
                required
            ></v-text-field>
            <!--性別-->
            <v-radio-group
                v-model="customer.gender"
                :rules="nameRules"
                row
            >
              <v-radio label="男性" value="男性"></v-radio>
              <v-radio label="女性" value="女性"></v-radio>
              <v-radio label="その他" value="その他"></v-radio>
            </v-radio-group>
            <!--追加ボタン-->
            <v-btn
                :disabled="!valid"
                @click="createCustomer"
            >
              追加
            </v-btn>
            <v-btn @click="clear">クリア</v-btn>
          </v-form>
        </v-container>
      </v-card>
    </v-dialog>
...
次に、<v-toolbar>内に新規追加ボタンを作成。
<v-spacer>はスペースを追加するものです。
...
    <!--ツールバー-->
    <v-toolbar flat color="grey lighten-2">
      <v-toolbar-title>顧客名簿サンプル</v-toolbar-title>
+      <v-spacer></v-spacer>
+      <v-btn color="primary" dark class="mb-2" @click="showDialogNew">新規追加</v-btn>
    </v-toolbar>
...
最後にのapolloの通信中にプログレスバーが表示されるように<v-prgress>をデータテーブル内に追加します。
...
    <!-- データテーブル -->
    <v-data-table
        :headers="headers"
        :items="customers"
        :loading="progress"
        :pagination.sync="pagination"
        no-data-text="顧客が登録されておりません。"
        class="elevation-1"
    >
+      <v-progress-linear slot="progress" color="blue" indeterminate></v-progress-linear>
      <template slot="items" slot-scope="props">
...
templateの追加修正は以上です。
新規追加用のdata、methodの追加
次にtemplateで追記した部分で使用するdata、methodを<script>以下に追記していきます。
まず、dataの追加。customerから以下を追加しました。
それぞれ用途としてはコメントのとおりです。
<script>
  import {ALL_CUSTOMERS} from "../constants/customer-query";
  import {CREATE_CUSTOMER} from "../constants/customer-mutation";

  export default {
    name: "CustomerTable",
    data: () => ({
      // 顧客情報
      customers: [],
      // データテーブル
      headers: [
        {text: '追加日', value: 'createdAt'},
        {text: '名前', value: 'name'},
        {text: '性別', value: 'gender'},
      ],
      pagination: {
        descending: true,
        rowsPerPage: 10
      },
      // ーーーここから追加ーーー
      // フォーム入力値
      customer: {
        id: '',
        name: '',
        gender: '',
      },
      // バリデーション
      valid: true,
      nameRules: [
        v => !!v || '名前は必須項目です',
        v => (v && v.length <= 20) || '名前は20文字以内で入力してください'
      ],
      genderRules: [
        v => !!v || '性別は必須項目です',
      ],
      // ローディングの表示フラグ
      progress: false,
      // ダイアログの表示フラグ
      dialog: false,
    }),
...
</script>
次に新規追加に関わるメソッドを追加します。
- createCustomer: フォームのボタンと連動してmutationの実行を行う
- clear: フォームの入力内容クリア
- showDialogNew: 新規追加ダイアログの表示
<script>
...
    methods: {
      // --------------------------------
      // 新規作成
      // --------------------------------
      createCustomer: function () {
        if (this.$refs.form.validate()) {
          this.progress = true
          this.$apollo.mutate({
            mutation: CREATE_CUSTOMER,
            variables: {
              name: this.customer.name,
              gender: this.customer.gender,
            }
          }).then(() => {
            this.$apollo.queries.customers.fetchMore({
              updateQuery: (previousResult, {fetchMoreResult}) => {
                return {
                  customers: fetchMoreResult.customers
                }
              }
            })
            this.dialog = false
            this.progress = false
          }).catch((error) => {
            console.error(error)
          })
        }
      },
      // --------------------------------
      // フォームのクリア
      // --------------------------------
      clear: function () {
        this.$refs.form.reset()
      },
      // --------------------------------
      // 新規追加ダイアログの表示
      // --------------------------------
      showDialogNew: function () {
        this.clear()
        this.dialog = true
      },
    }
  }
</script>
以上で完了です。
修正後yarn serveでプロジェクトを起動すると以下のように新規追加が行えるはずです。

補足
何らかのアクション(今回だったらFormのクリック)によって、apolloの処理を呼び出すためには、methodを使います。
今回だとcreateCustomerメソッドがそれにあたります。
基本の書き方は以下のとおりです。
method: {
 メソッド名: function() {
  this.$apollo.mutate({
    mutation: // 実行するgraphQL mutation,
    variables: {
        // mutation時に設定する変数
       hoge: this.hoge
    }
  }).then(() => {
    // 成功した場合に実行する処理(200OKのレスポンスの場合)
    console.log("成功")
  }).catch((error) => {
    // errorの場合に実行する処理
    console.log("失敗")
  })
}
さらにここでは、成功した場合、リストのアップデートを行いたいので、
fetchMoreを使って、再度customerの一覧取得を行っています。
※ ここの書き方は自信がないです。効率的でない気がするので、分かり次第修正します。
this.$apollo.queries.customers.fetchMore({
    updateQuery: (previousResult /*更新前の値*/, {fetchMoreResult /*再取得後の値*/}) => {
        return {
            // 再取得後の値をcustomersに設定。
            customers: fetchMoreResult.customers
        }
    }
})
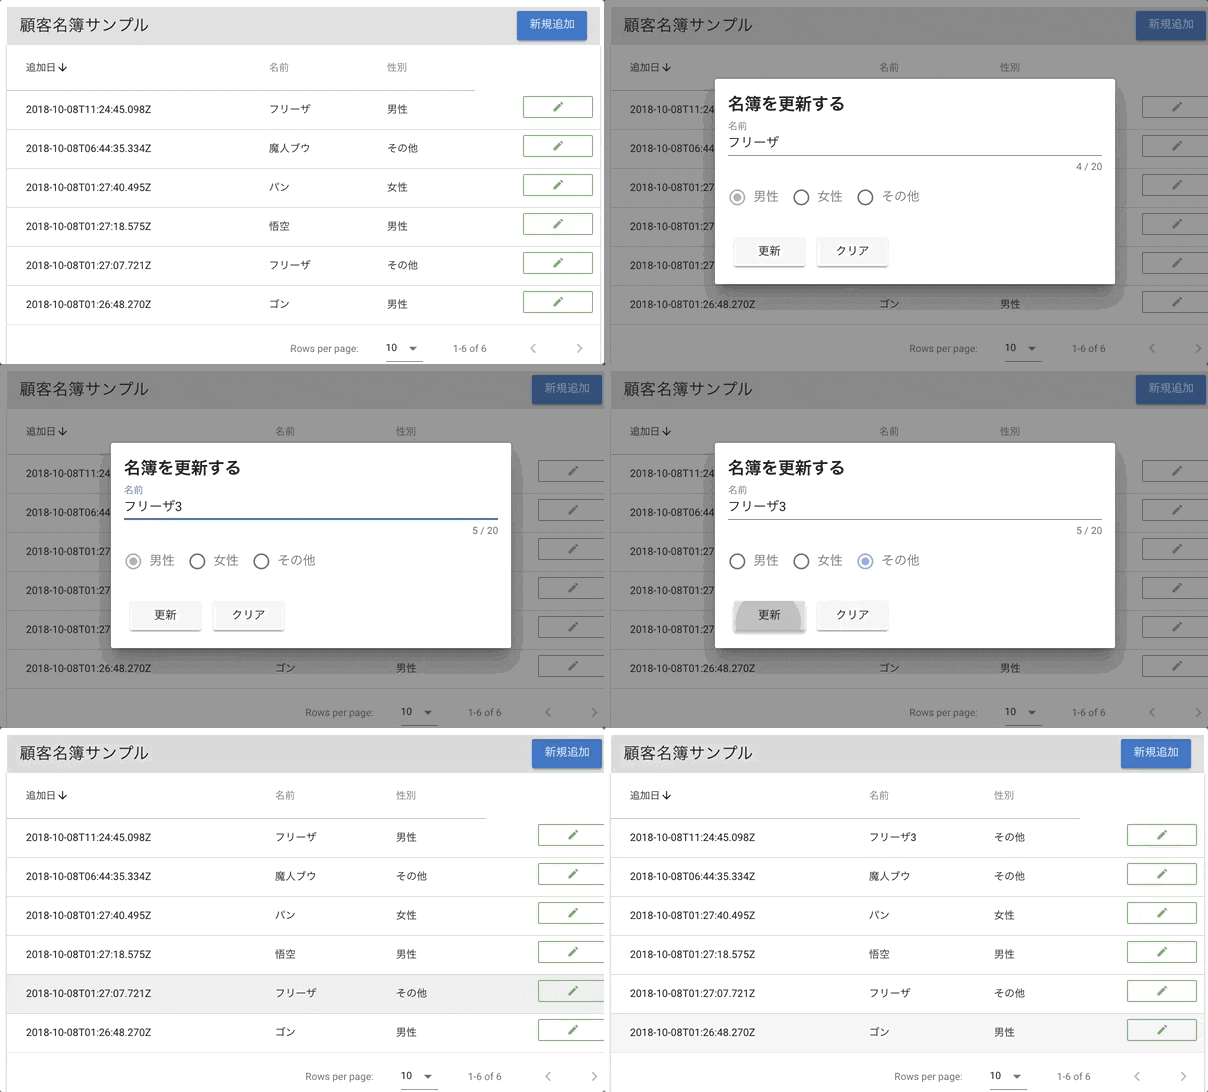
更新機能の実装(UPDATE)
customerの更新機能を実装します。
mutationの作成(updateCustomer)
まず更新用のmutationをcustomer-mutation.jsに追加します。
...

// 更新
export const UPDATE_CUSTOMER = gql`
    mutation updateCustomer($id: ID, $name: String, $gender: String) {
        updateCustomer(data: {name: $name, gender: $gender}, where:{id:$id}) {
            name
            gender
        }
    }
`
updateの場合は、必ず対象が一位に決められなくてはならないので、whereでidを指定しています。
その他、updateする内容として、nameと、genderの値を引数として指定しています。
更新用のteamplateの修正
データ入力用のフォームを、更新でも使えるように修正し、さらに更新ボタンの追加を行います。
追加更新についてはisCreateという変数で表示を出し分けています。
...
        <v-container>
+          <h2 v-if="isCreate">名簿に追加する</h2>
+          <h2 v-if="!isCreate">名簿を更新する</h2>
          <v-form ref="form" v-model="valid" lazy-validation>
            <!--名前-->
...
            <!--追加ボタン-->
            <v-btn
+                v-if="isCreate"
                :disabled="!valid"
                @click="createCustomer"
            >
              追加
            </v-btn>
+            <!--更新ボタン-->
+            <v-btn
+                v-if="!isCreate"
+                :disabled="!valid"
+                @click="updateCustomer"
+            >
+              更新
+            </v-btn>
            <v-btn @click="clear">クリア</v-btn>
...

      <template slot="items" slot-scope="props">
        <td>{{ props.item.createdAt }}</td>
        <td>{{ props.item.name }}</td>
        <td>{{ props.item.gender }}</td>
+        <td class="justify-end layout px-0">
+          <v-btn
+              color="success"
+              small
+              outline
+              flat
+              @click="showDialogUpdate(props.item.id, props.item.name, props.item.gender)"
+          >
+            <v-icon small>
+              edit
+            </v-icon>
+          </v-btn>
+        </td>
      </template>
...
更新用のdata、methodの追加修正
次にtemplateで追記した部分で使用するdata、methodを<script>以下に追記していきます。
dataについては、テーブルの列追加に伴うヘッダーの追加と新規追加・更新の判定フラグ、isCreateの追加です。
...
      // データテーブル
      headers: [
        {text: '追加日', value: 'createdAt'},
        {text: '名前', value: 'name'},
        {text: '性別', value: 'gender'},
+        {text: '', value: '', sortable: false},
      ],
....
      // ダイアログの表示フラグ
      dialog: false,
+      // 新規・更新のフラグ
+      isCreate: true,
    }),
...
次に更新用のメソッドupdateCustomerと更新用のフォームの表示制御用のshowDialogUpdateをmethod内に追加します。
また、shoDialogNewのメソッド内にも、isCreateのフラグ初期化を追加します。
<script>
...
  import {CREATE_CUSTOMER, UPDATE_CUSTOMER} from "../constants/customer-mutation";
...
      // --------------------------------
      // 更新
      // --------------------------------
      updateCustomer: function () {
        this.$apollo.mutate({
      this.progress = true
          mutation: UPDATE_CUSTOMER,
          variables: {
            id: this.customer.id,
            name: this.customer.name,
            gender: this.customer.gender,
          }
        }).then(() => {
          this.$apollo.queries.customers.fetchMore({
            updateQuery: (previousResult, {fetchMoreResult}) => {
              return {
                customers: fetchMoreResult.customers
              }
            }
          })
          this.dialog = false
          this.progress = false
        }).catch((error) => {
          console.error(error)
        })
      },
      // --------------------------------
      // 更新ダイアログの表示
      // --------------------------------
      showDialogUpdate: function (id, name, gender) {
        this.customer.id = id
        this.customer.name = name
        this.customer.gender = gender
        this.isCreate = false
        this.dialog = true
      }
      // --------------------------------
      // 新規追加ダイアログの表示
      // --------------------------------
      showDialogNew: function () {
        this.clear()
        this.isCreate = false // 追加
        this.dialog = true
      },
...
以上で完了です。
修正後yarn serveでプロジェクトを起動すると以下のように更新が行えるはずです。
補足
更新処理の場合でも、apolloの使い方は、基本新規の場合と変わりません。
Formを新規追加と、更新で共有するため、ダイアログの表示時(showDialogNew, showDialogUpdate)に、customerの値の設定と、フラグの切り替えを行い、
それにより表示するコンポーネントを切り替えています。
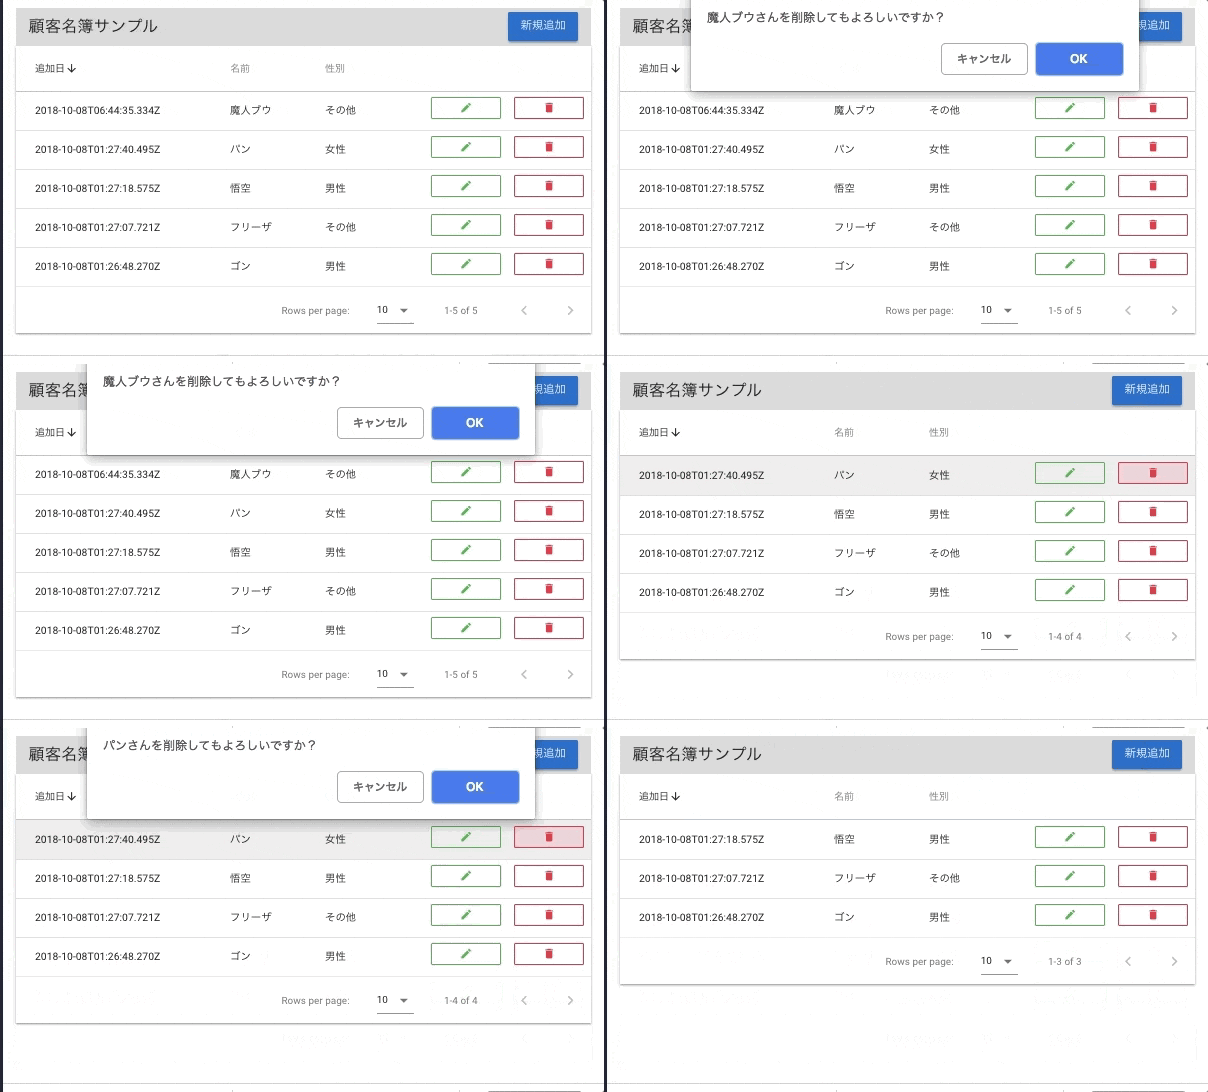
削除機能の実装(DELETE)
customerの削除機能を実装します。
mutationの作成(deleteCustomer)
まず削除用のmutationをcustomer-mutation.jsに追加します。
deleteCustomerでもcustomerを一位に識別するためidを引数で設定します。
// 削除
export const DELETE_CUSTOMER = gql`
    mutation deleteCustomer($id: ID) {
        deleteCustomer(where:{id: $id}){
            id
        }
    }
`
削除用のteamplateの修正
更新ボタンの下に削除ボタンを追加します。
        <td class="justify-end layout px-0">
          <v-btn
              color="success"
              small
              outline
              flat
              @click="showDialogUpdate(props.item.id, props.item.name, props.item.gender)"
          >
            <v-icon small>
              edit
            </v-icon>
          </v-btn>
+          <v-btn
+              color="error"
+              small
+              outline
+              flat
+              @click="deleteCustomer(props.item.name, props.item.id)"
+          >
+            <v-icon small>
+              delete
+            </v-icon>
+          </v-btn>
        </td>
削除用のmethodの追加
削除ボタンで実行されるメソッドを追加します。
<script>
  import {CREATE_CUSTOMER, UPDATE_CUSTOMER, DELETE_CUSTOMER} from "../constants/customer-mutation";

...

      // --------------------------------
      // 削除
      // --------------------------------
      deleteCustomer: function (name, id) {
        if (!confirm(name + 'さんを削除してもよろしいですか?')) {
          return
        }
        this.progress = true
        this.$apollo.mutate({
          mutation: DELETE_CUSTOMER,
          variables: {
            id: id
          }
        }).then(() => {
          this.$apollo.queries.customers.fetchMore({
            updateQuery: (previousResult, {fetchMoreResult}) => {
              return {
                customers: fetchMoreResult.customers
              }
            }
          })
          this.progress = false
        }).catch((error) => {
          console.error(error)
        })
      },
これで削除の実装は完了です。
修正後yarn serveでプロジェクトを起動すると以下のように削除が行えるはずです。
まとめ
以下ここまでのCustomerTable.vueの全コードです。
説明の都合上今回は1ファイルとしましたが、
本来CustomerTable.vueは機能ごとに別コンポーネントのvueファイルに分割したほうがよいかなと思います。
<template>
  <v-container>
    <!--入力フォーム-->
    <v-dialog v-model="dialog" max-width="500px">
      <v-card>
        <v-container>
          <h2 v-if="isCreate">名簿に追加する</h2>
          <h2 v-if="!isCreate">名簿を更新する</h2>
          <v-form ref="form" v-model="valid" lazy-validation>
            <!--名前-->
            <v-text-field
                v-model="customer.name"
                :rules="nameRules"
                :counter="20"
                label="名前"
                required
            ></v-text-field>
            <!--性別-->
            <v-radio-group
                v-model="customer.gender"
                :rules="nameRules"
                row
            >
              <v-radio label="男性" value="男性"></v-radio>
              <v-radio label="女性" value="女性"></v-radio>
              <v-radio label="その他" value="その他"></v-radio>
            </v-radio-group>
            <!--追加ボタン-->
            <v-btn
                v-if="isCreate"
                :disabled="!valid"
                @click="createCustomer"
            >
              追加
            </v-btn>
            <!--更新ボタン-->
            <v-btn
                v-if="!isCreate"
                :disabled="!valid"
                @click="updateCustomer"
            >
              更新
            </v-btn>
            <v-btn @click="clear">クリア</v-btn>
          </v-form>
        </v-container>
      </v-card>
    </v-dialog>

    <!--ツールバー-->
    <v-toolbar flat color="grey lighten-2">
      <v-toolbar-title>顧客名簿サンプル</v-toolbar-title>
      <v-spacer></v-spacer>
      <v-btn color="primary" dark class="mb-2" @click="showDialogNew">新規追加</v-btn>
    </v-toolbar>

    <!-- データテーブル -->
    <v-data-table
        :headers="headers"
        :items="customers"
        :loading="progress"
        :pagination.sync="pagination"
        no-data-text="顧客が登録されておりません。"
        class="elevation-1"
    >
      <v-progress-linear slot="progress" color="blue" indeterminate></v-progress-linear>
      <template slot="items" slot-scope="props">
        <td>{{ props.item.createdAt }}</td>
        <td>{{ props.item.name }}</td>
        <td>{{ props.item.gender }}</td>
        <td class="justify-end layout px-0">
          <v-btn
              color="success"
              small
              outline
              flat
              @click="showDialogUpdate(props.item.id, props.item.name, props.item.gender)"
          >
            <v-icon small>
              edit
            </v-icon>
          </v-btn>
          <v-btn
              color="error"
              small
              outline
              flat
              @click="deleteCustomer(props.item.name, props.item.id)"
          >
            <v-icon small>
              delete
            </v-icon>
          </v-btn>

        </td>
      </template>
    </v-data-table>
  </v-container>
</template>

<script>
  /* eslint-disable no-console */

  import {ALL_CUSTOMERS} from "../constants/customer-query";
  import {CREATE_CUSTOMER, UPDATE_CUSTOMER, DELETE_CUSTOMER} from "../constants/customer-mutation";

  export default {
    name: "CustomerTable",
    data: () => ({
      // 顧客情報
      customers: [],
      // データテーブル
      headers: [
        {text: '追加日', value: 'createdAt'},
        {text: '名前', value: 'name'},
        {text: '性別', value: 'gender'},
        {text: '', value: '', sortable: false},
      ],
      pagination: {
        descending: true,
        rowsPerPage: 10
      },
      // フォーム入力値
      customer: {
        id: '',
        name: '',
        gender: '',
      },
      // バリデーション
      valid: true,
      nameRules: [
        v => !!v || '名前は必須項目です',
        v => (v && v.length <= 20) || '名前は20文字以内で入力してください'
      ],
      genderRules: [
        v => !!v || '性別は必須項目です',
      ],
      // ローディングの表示フラグ
      progress: false,
      // ダイアログの表示フラグ
      dialog: false,
      // 新規・更新のフラグ
      isCreate: true,
    }),
    apollo: {
      // すべての顧客情報の取得
      customers: ALL_CUSTOMERS
    },
    methods: {
      // --------------------------------
      // 新規作成
      // --------------------------------
      createCustomer: function () {
        if (this.$refs.form.validate()) {
          this.progress = true
          this.$apollo.mutate({
            mutation: CREATE_CUSTOMER,
            variables: {
              name: this.customer.name,
              gender: this.customer.gender,
            }
          }).then(() => {
            this.$apollo.queries.customers.fetchMore({
              updateQuery: (previousResult, {fetchMoreResult}) => {
                return {
                  customers: fetchMoreResult.customers
                }
              }
            })
            this.dialog = false
            this.progress = false
          }).catch((error) => {
            console.error(error)
          })
        }
      },
      // --------------------------------
      // 更新
      // --------------------------------
      updateCustomer: function () {
        this.progress = true
        this.$apollo.mutate({
          mutation: UPDATE_CUSTOMER,
          variables: {
            id: this.customer.id,
            name: this.customer.name,
            gender: this.customer.gender,
          }
        }).then(() => {
          this.$apollo.queries.customers.fetchMore({
            updateQuery: (previousResult, {fetchMoreResult}) => {
              return {
                customers: fetchMoreResult.customers
              }
            }
          })
          this.dialog = false
          this.progress = false
        }).catch((error) => {
          console.error(error)
        })
      },
      // --------------------------------
      // フォームのクリア
      // --------------------------------
      clear: function () {
        this.$refs.form.reset()
      },
      // --------------------------------
      // 新規追加ダイアログの表示
      // --------------------------------
      showDialogNew: function () {
        this.clear()
        this.isCreate = true
        this.dialog = true
      },
      // --------------------------------
      // 更新ダイアログの表示
      // --------------------------------
      showDialogUpdate: function (id, name, gender) {
        this.customer.id = id
        this.customer.name = name
        this.customer.gender = gender
        this.isCreate = false
        this.dialog = true
      },
      // --------------------------------
      // 削除
      // --------------------------------
      deleteCustomer: function (name, id) {
        if (!confirm(name + 'さんを削除してもよろしいですか?')) {
          return
        }
        this.progress = true
        this.$apollo.mutate({
          mutation: DELETE_CUSTOMER,
          variables: {
            id: id
          }
        }).then(() => {
          this.$apollo.queries.customers.fetchMore({
            updateQuery: (previousResult, {fetchMoreResult}) => {
              return {
                customers: fetchMoreResult.customers
              }
            }
          })
          this.progress = false
        }).catch((error) => {
          console.error(error)
        })
      },
    }
  }
</script>
感想
以上長くなりましたが、vue, apollo, graphQLでの名簿アプリ作成でした。
vue、apolloを使えばSPAのCRUD機能はかなり簡易に作成できますね。
CRUDが行えれば、その応用で色々なアプリが作れると思います。
Typo等あるかもしれないので、なにかエラーで動かなかったら、
githubのリポジトリのコードと見比べてみてください。
今後は、更にロジックを追加したwebアプリをvueで作って行きたいです。

