SysOps のWeb問題集を解いていたら、やたらとCloudFormation の問題が出てきました。
「これは実際にさわってみたほうがよさそうだな」と感じたので、やってみました![]()
「CloudFormation ってなんなの」という方は以下をご覧ください。
概要をつかむきっかけになれば、とてもうれしいです。
【AWS】CloudFormation についてざっくりまとめる:学習メモ
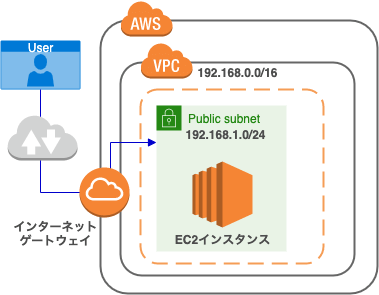
この構成をつくるぞ
今回は諸事情(※)によりオハイオリージョンで作成します。
みなさま適宜お好きなリージョンでやってみてください。
※自社のsandbox環境で東京リージョンに作成しようとしたら、VPCの上限数に達していて作れなかった
事前準備①:テンプレートの用意
YAML / JSON どちらの形式でもだいじょうぶです。
コメントを入れられるという点でYAMLの方がいいかなと思うので、今回はYAMLにしました。
AWSTemplateFormatVersion: '2010-09-09'
Description: Test cfn Template

# ----------------------------------------------------------------
#     Parameters
# ----------------------------------------------------------------
Parameters:
  InstanceType:
    Type: String
    Default: t2.micro
    AllowedValues:
      - t2.micro
      - t2.small
      - t2.medium
    Description: Select EC2 instance type.
  KeyPair:
    Description: Select KeyPair Name.
    Type: AWS::EC2::KeyPair::KeyName


# ----------------------------------------------------------------
#     Resources
# ----------------------------------------------------------------

# --------------------  VPCの定義ここから --------------------
Resources:
  cfnVpc:
    Type: 'AWS::EC2::VPC'
    Properties:
      CidrBlock: '192.168.0.0/16'
      Tags:
        - Key: 'Name'
          Value: 'test-vpc'
# --------------------  VPCの定義ここまで --------------------

# --------------------  サブネットの定義ここから --------------------
  cfnSubnet:
    Type: 'AWS::EC2::Subnet'
    Properties:
      CidrBlock: '192.168.1.0/24'
      MapPublicIpOnLaunch: true
      Tags:
        - Key: 'Name'
          Value: 'test-cfn-subnet'
      VpcId: !Ref cfnVpc
# --------------------  サブネットの定義ここまで --------------------

# --------------------  ネットワーク周りの定義ここから --------------------
  cfnInternetGateway:
    Type: 'AWS::EC2::InternetGateway'
    Properties:
      Tags:
      - Key: 'Name'
        Value: 'test-cfn-igw'
  cfnAttachGateway:
    Type: 'AWS::EC2::VPCGatewayAttachment'
    Properties:
      VpcId: !Ref cfnVpc
      InternetGatewayId: !Ref cfnInternetGateway
  cfnRouteTable:
    Type: 'AWS::EC2::RouteTable'
    Properties:
      Tags:
        - Key: 'Name'
          Value: 'test-cfn-rt'
      VpcId: !Ref cfnVpc
  cfnRoute:
    Type: 'AWS::EC2::Route'
    DependsOn: cfnInternetGateway
    Properties:
      RouteTableId: !Ref cfnRouteTable
      DestinationCidrBlock: 0.0.0.0/0
      GatewayId: !Ref cfnInternetGateway
  cfnSubnetRouteTableAssociation:
    Type: AWS::EC2::SubnetRouteTableAssociation
    Properties:
      SubnetId: !Ref cfnSubnet
      RouteTableId: !Ref cfnRouteTable
# --------------------  ネットワーク周りの定義ここまで --------------------

# --------------------  EC2の定義ここから --------------------
  cfnEC2Instance:
    Type: 'AWS::EC2::Instance'
    Properties:
      ImageId: "ami-07c8bc5c1ce9598c3" # オハイオリージョンの最新のAmazon Linux 2 AMI にしています
      InstanceType: !Ref InstanceType
      SubnetId: !Ref cfnSubnet
      BlockDeviceMappings:
        - DeviceName: '/dev/xvda'
          Ebs:
            VolumeType: 'gp2'
            VolumeSize: 8
      Tags:
        - Key: 'Name'
          Value: 'test-cfn-ec2-instance'
      SecurityGroupIds:
        - !Ref cfnSecurityGroup
      KeyName: !Ref KeyPair
  cfnSecurityGroup:
    Type: "AWS::EC2::SecurityGroup"
    Properties:
      GroupDescription: "cfnSecurityGroup"
      VpcId: !Ref cfnVpc
      Tags:
        - Key: 'Name'
          Value: 'test-cfn-ssh-sg'
      SecurityGroupIngress:
      - IpProtocol: tcp
        FromPort: '22'
        ToPort: '22'
        CidrIp: 0.0.0.0/0
# --------------------  EC2の定義ここまで --------------------
※ 上記だとネットワークのセキュリティがゆるゆるなので、適宜修正してお使いください
※ 参考:AWS公式のサンプルテンプレートが多数公開されているようです
事前準備②:キーペアの作成
今回作成するEC2インスタンスにSSH接続できるようにしたいので、あらかじめキーペアを作っておきます。
「キーペアどこから作るんだっけ?」ってなっちゃったので、こちらを見つつ作りました。
作業手順
1. AWSコンソール にログイン
2. [CloudFormation] と入力し、Enterキーを押す
CloudFormation でスタックを作成する
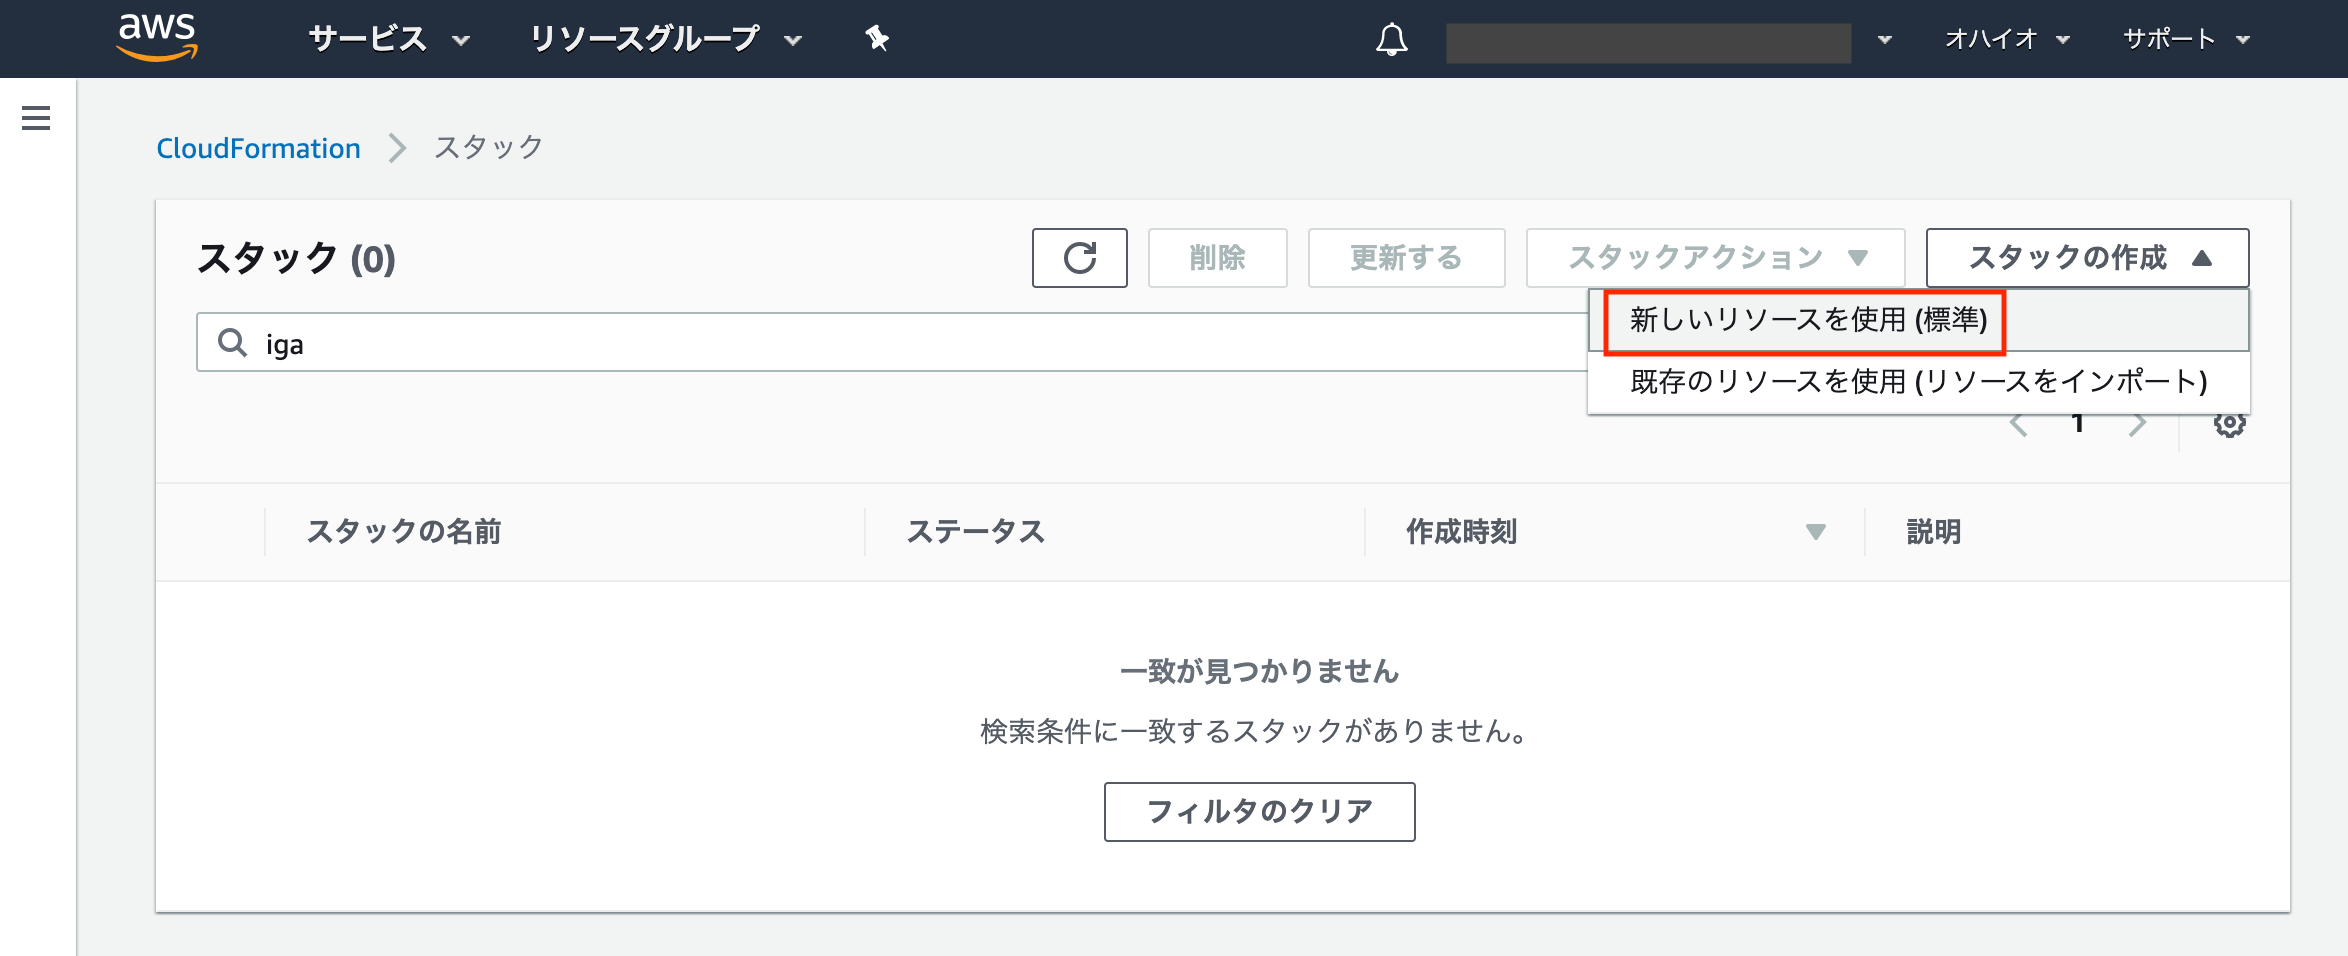
1. [スタックの作成] をクリック
2. [スタックの作成] > [新しいリソースを使用 (標準)] をクリック
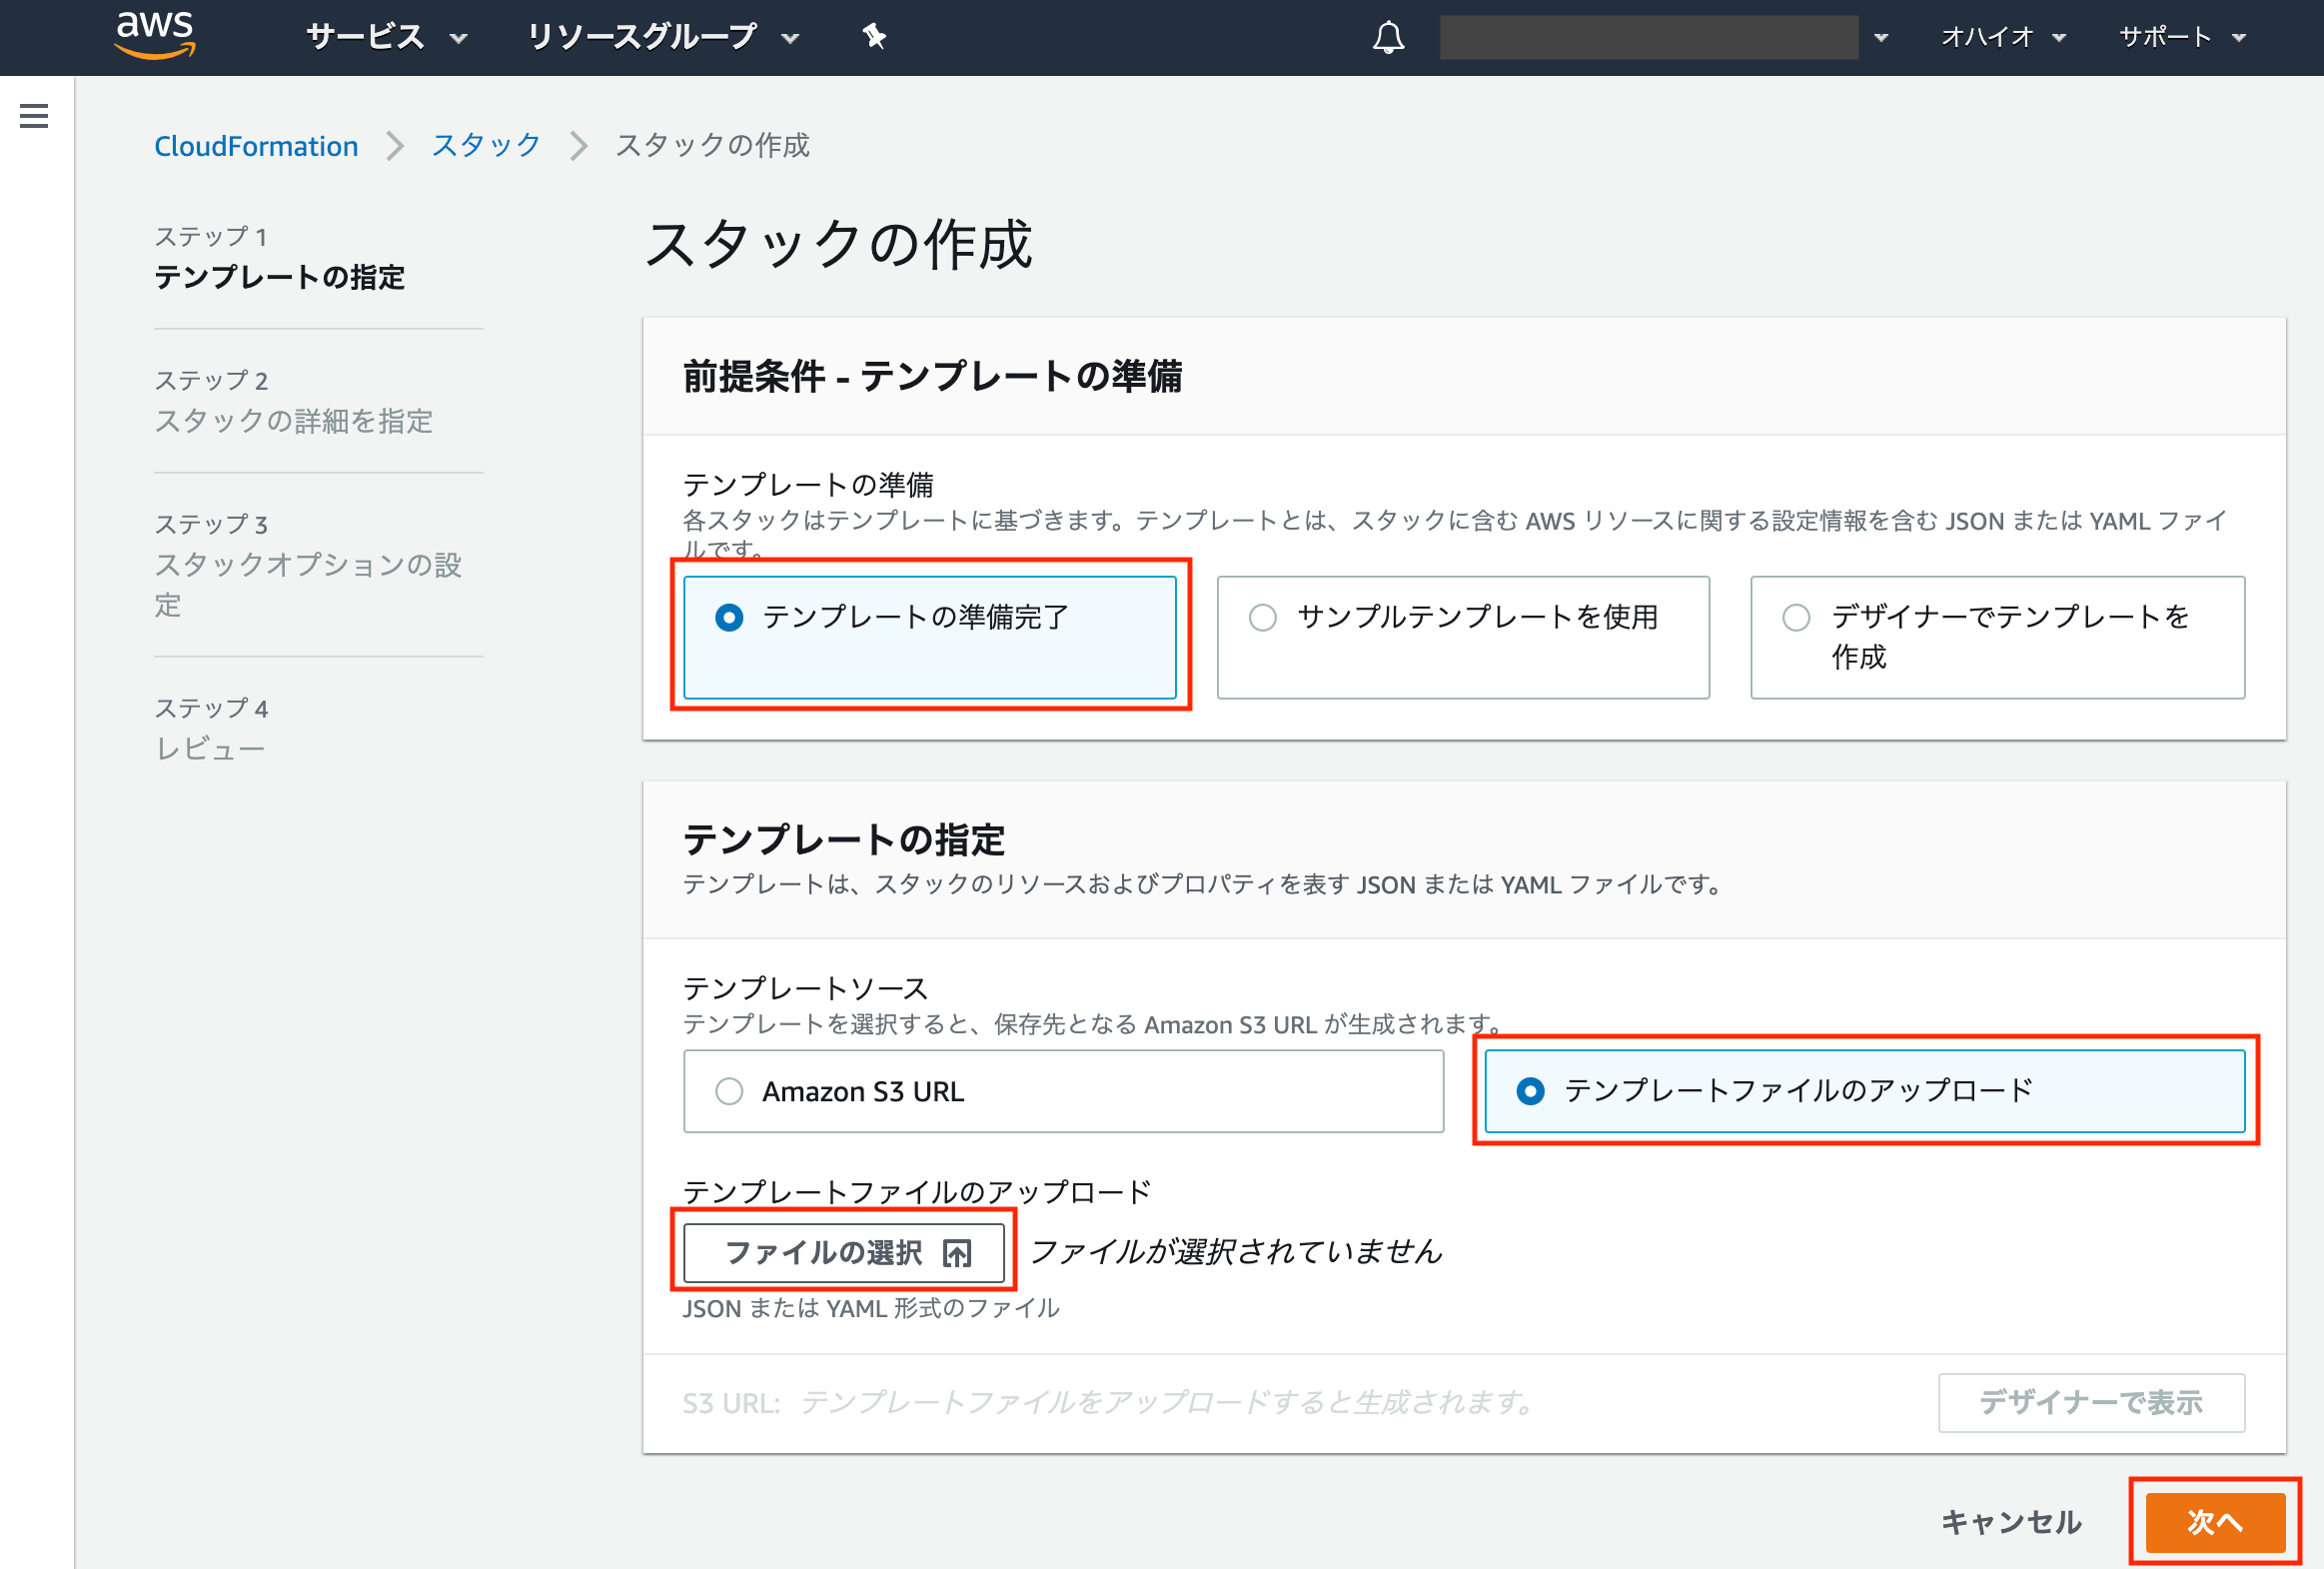
ステップ1:テンプレートの指定
- テンプレートの準備:テンプレートの準備完了
- テンプレートの指定:テンプレートのファイルのアップロード (事前に準備しておいたテンプレートを選択します)
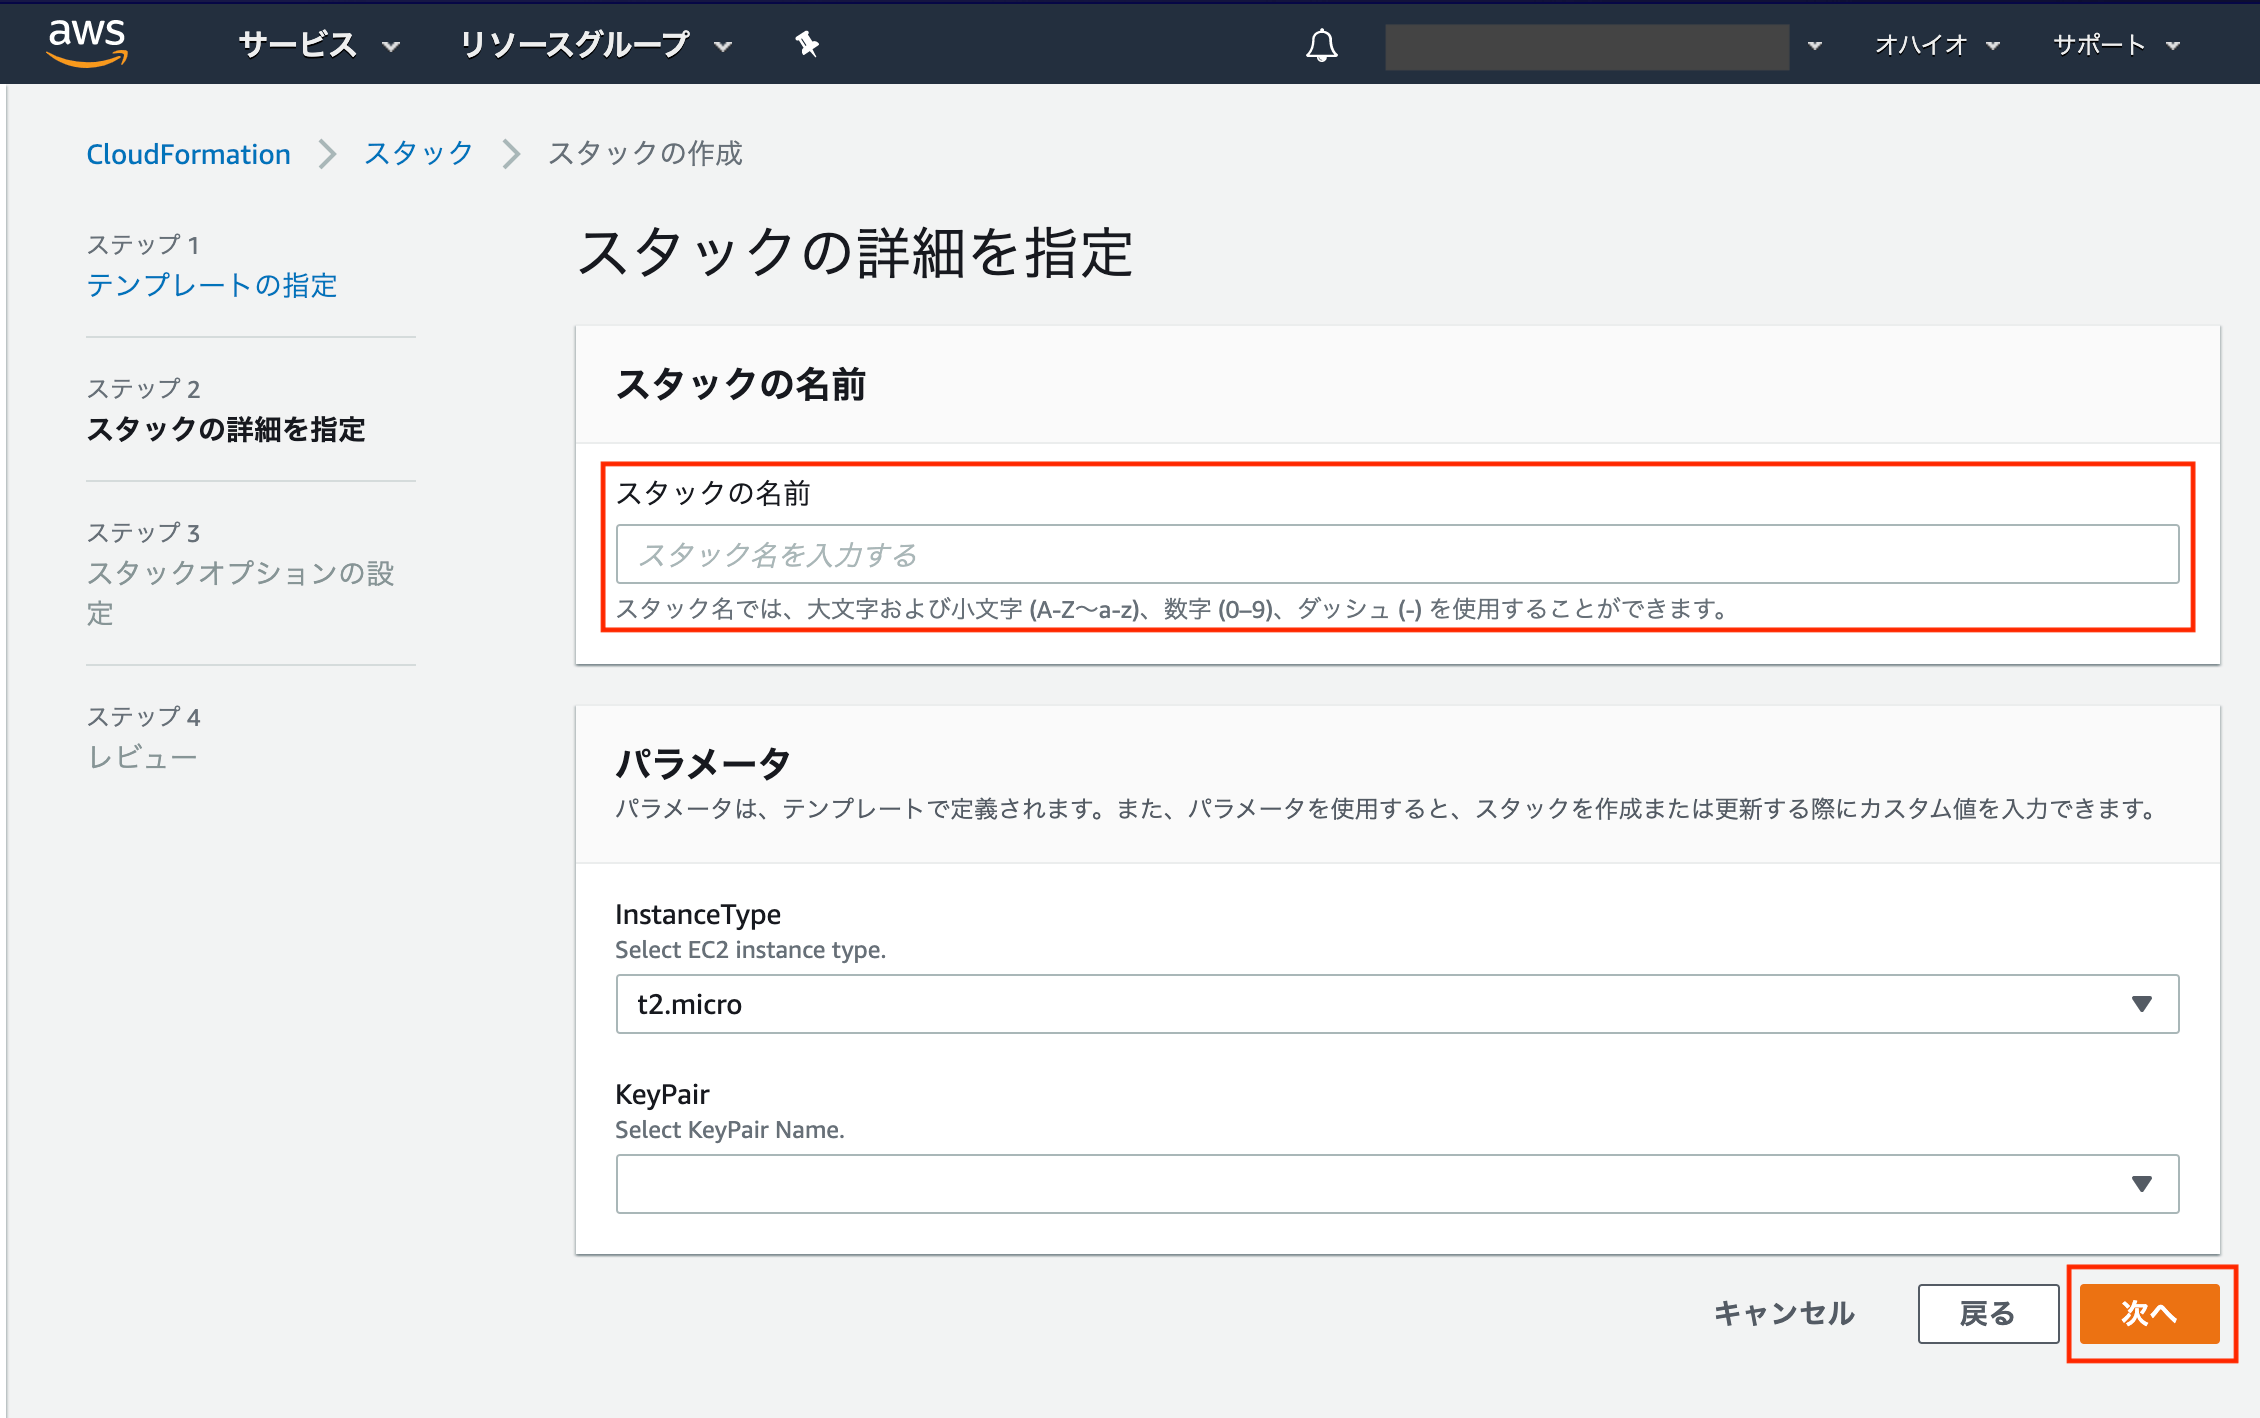
ステップ2:スタックの詳細を指定
今回テンプレート内に[Parameters] を定義したため、パラメータ欄が表示されています。
EC2インスタンスタイプ・SSH接続する際に使うキーペアを選びます。
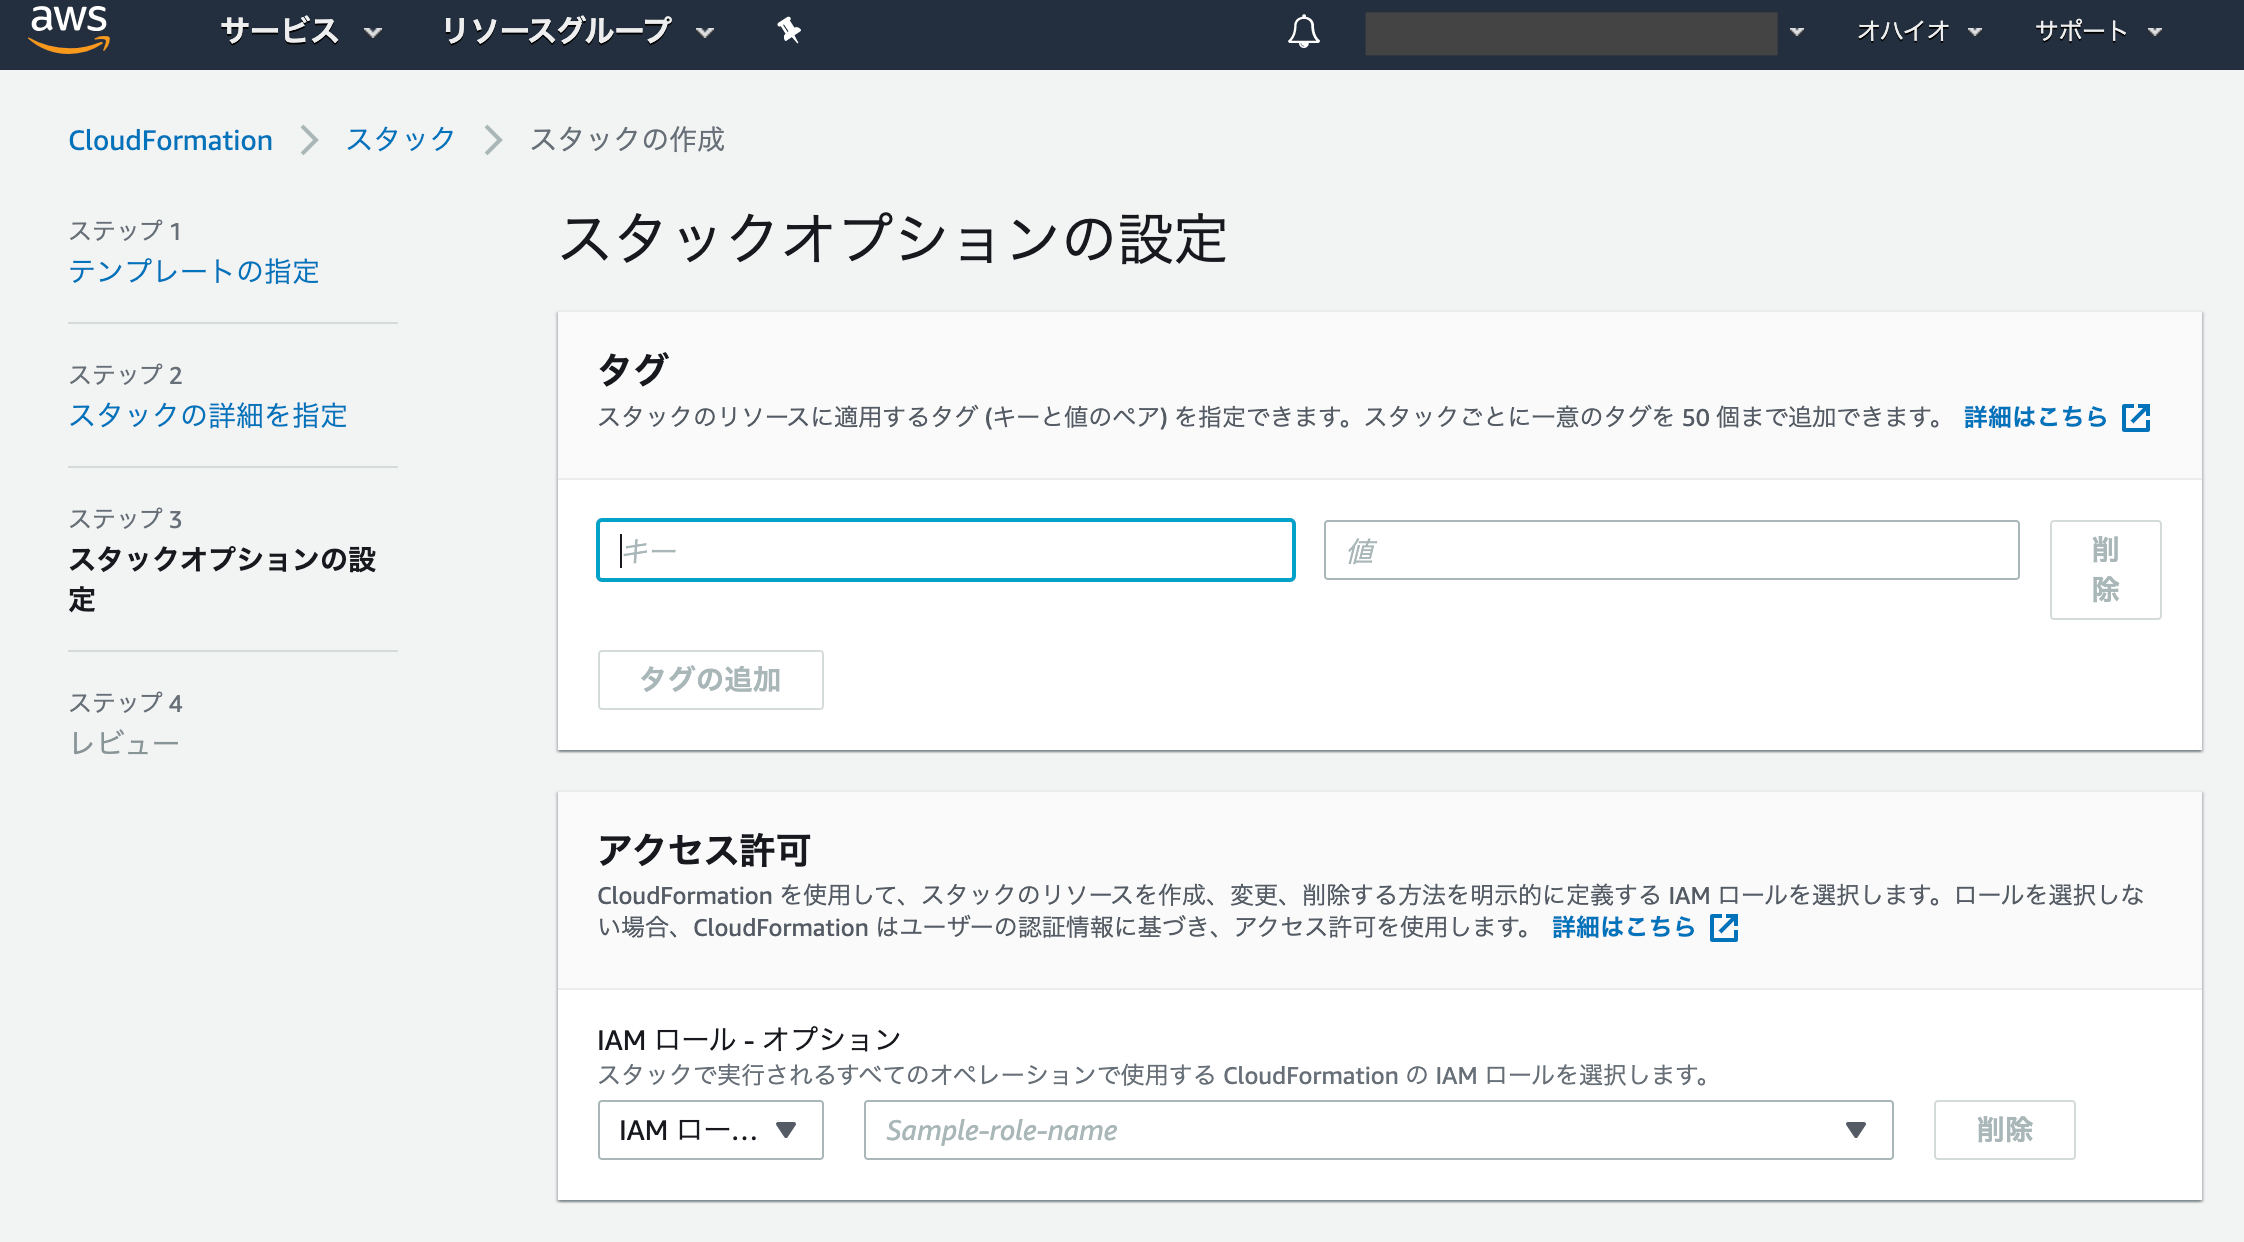
ステップ3:スタックオプションの設定
1. 任意の項目を入力し、[次へ] をクリック
ここでタグを設定しておくと、今回作成するリソース全部に同じタグが付くのでとても便利です![]()
(テンプレート内でいちいち書くよりも、ここで設定した方が楽)
私は社内のSandbox環境で実行したので、自分のものだとわかるように以下のタグを付けました。
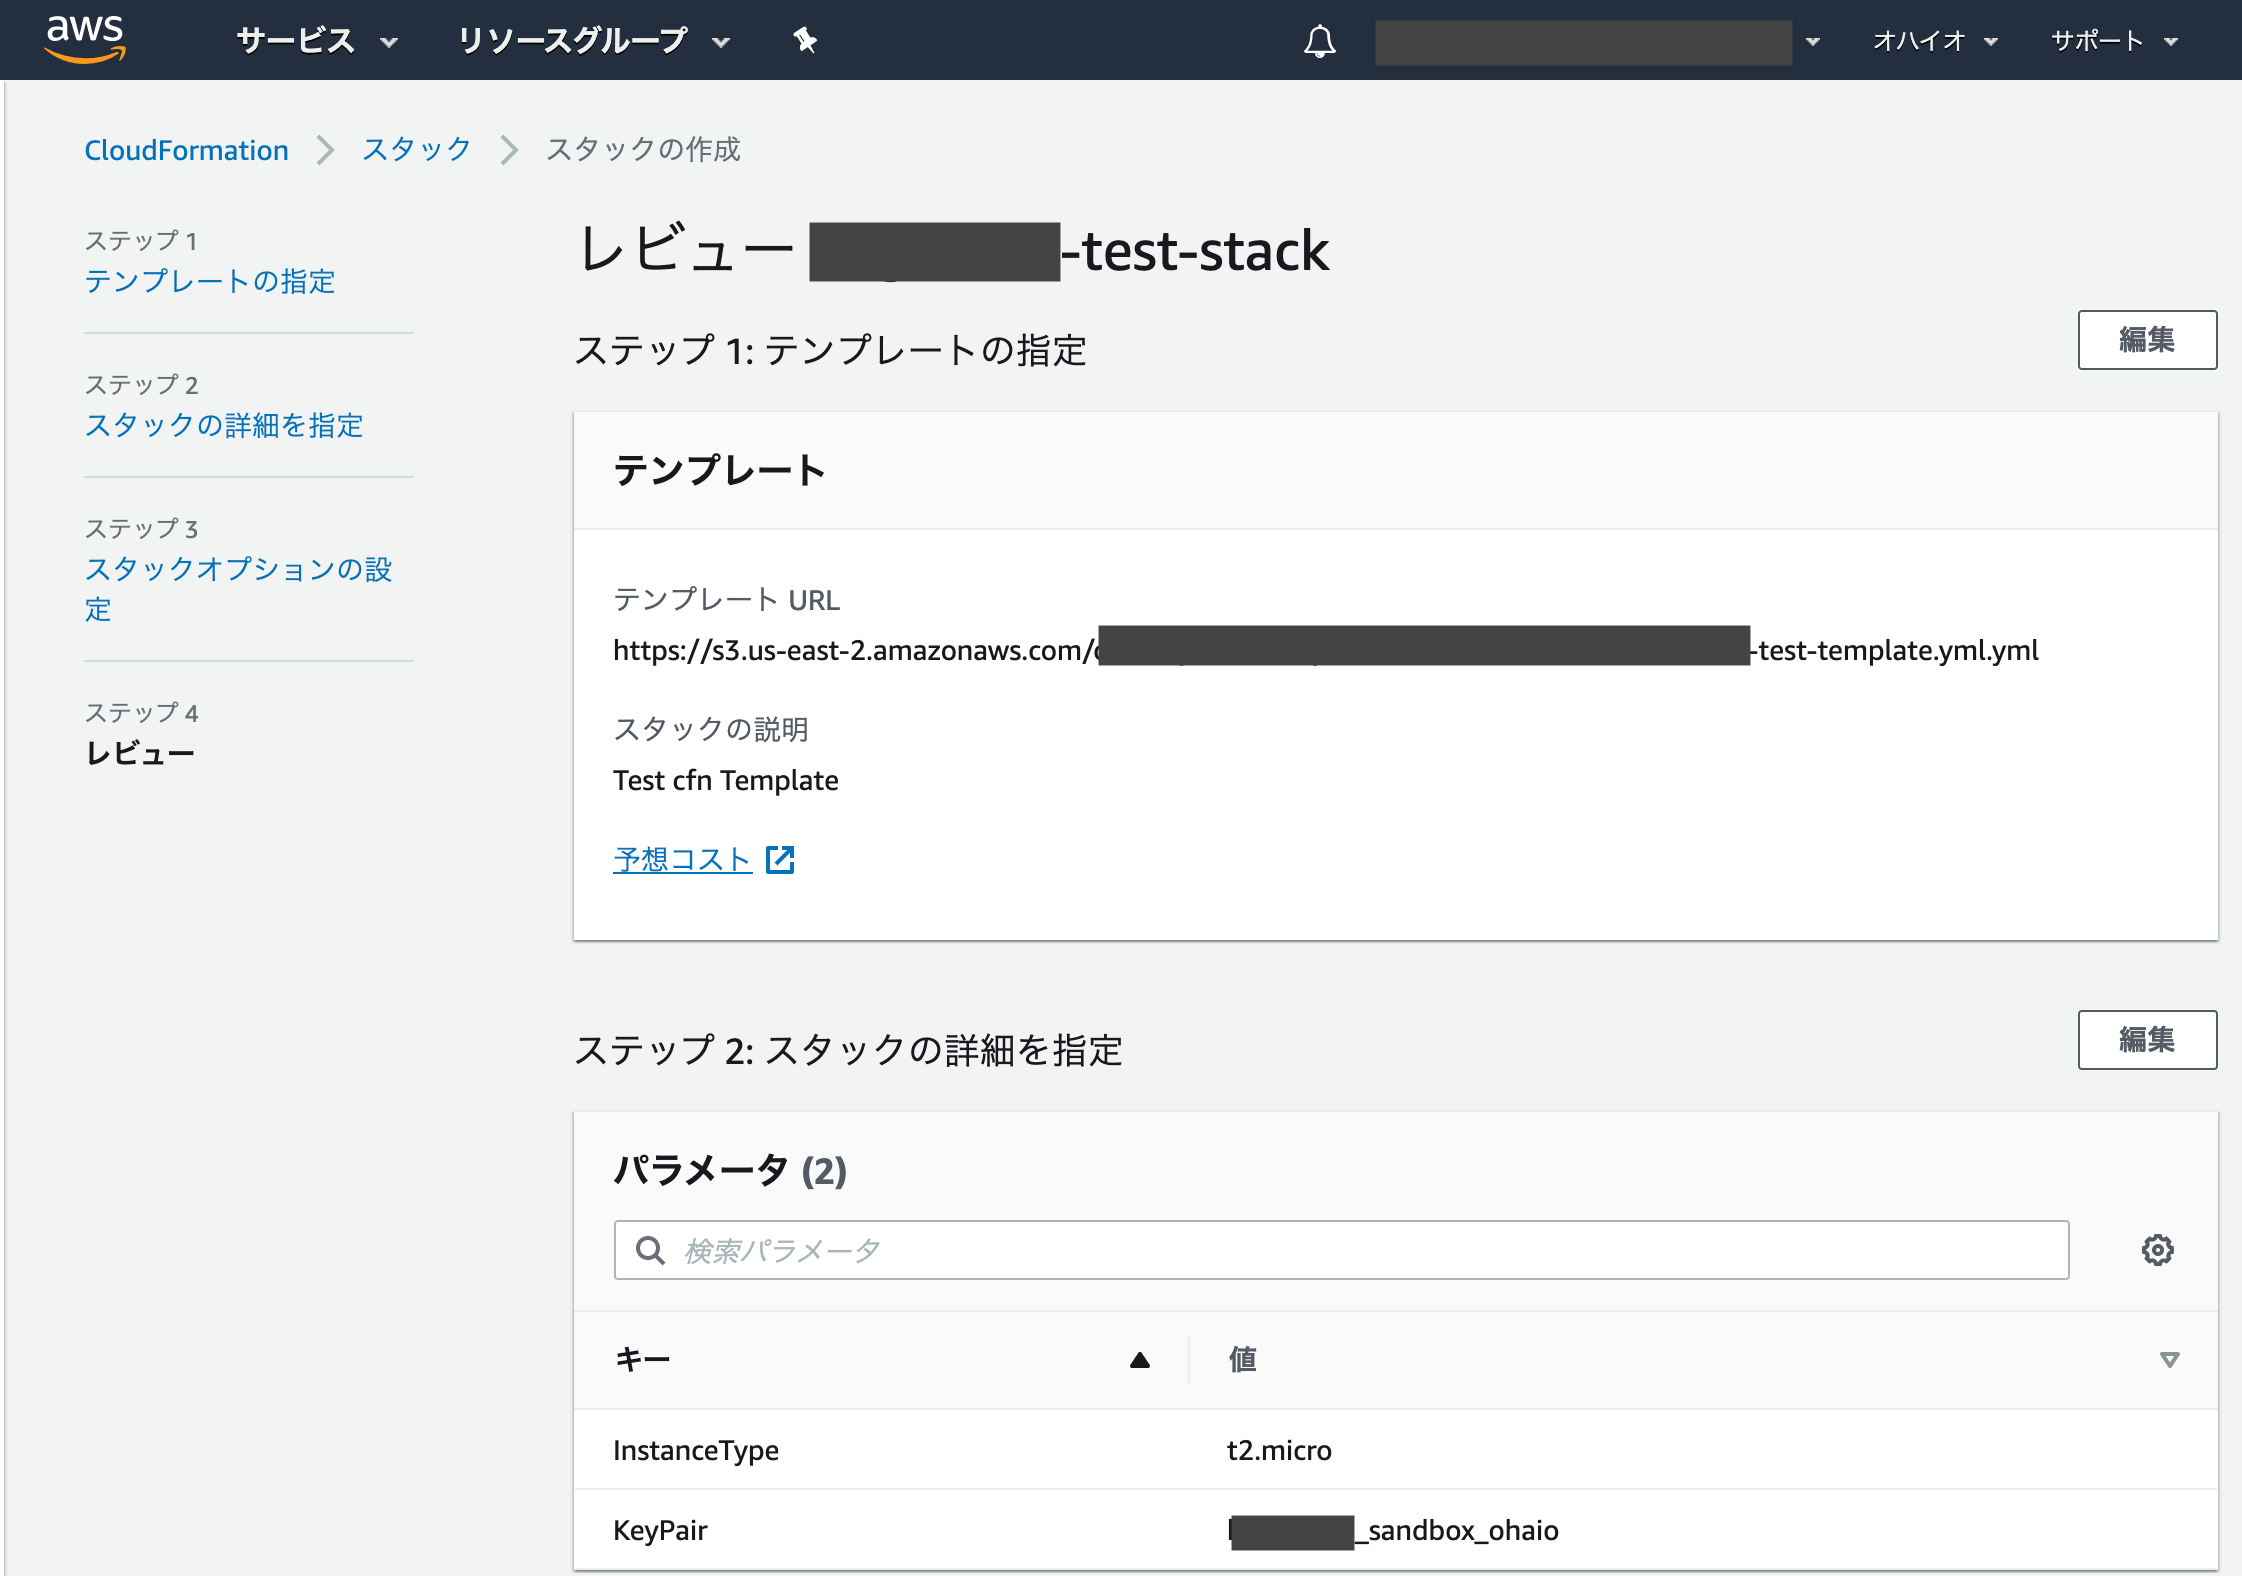
ステップ4:レビュー
1. 設定値に誤りがないか確認し、[スタックの作成] をクリック
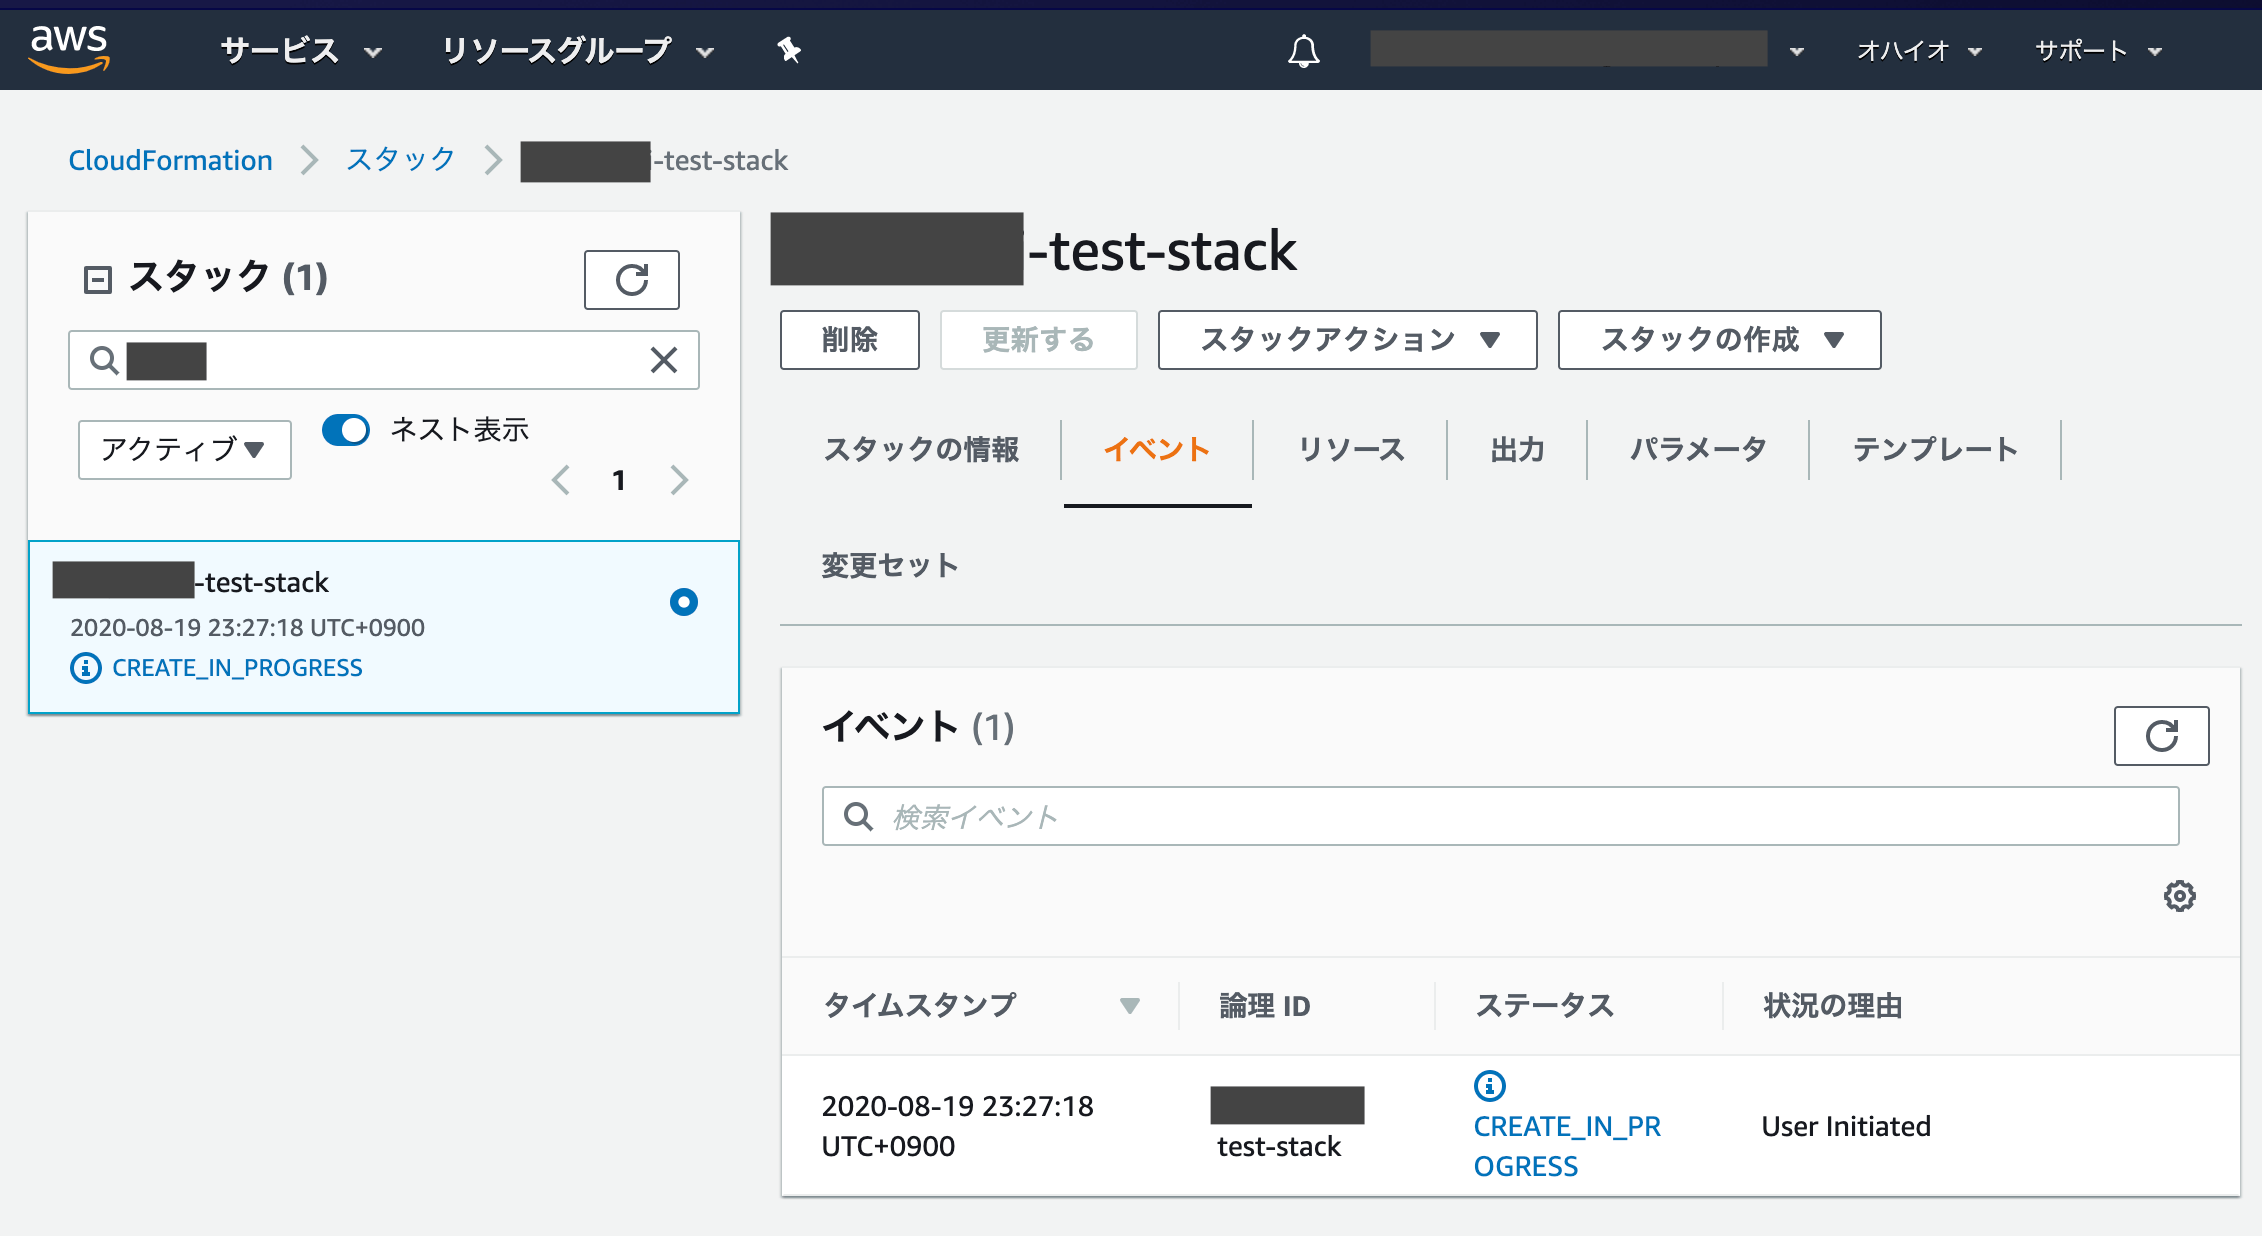
スタック作成中はこんな感じ
ステータスが[CREATE_COMPLETE] になれば完成です!
EC2インスタンスへのSSHログインもばっちり
以下のコマンドでSSHログインできます。
ssh -i [秘密鍵のパス] ec2-user@[EC2のIPv4パブリックIP]
今回作ったやつを全部消したいんだけど?
スタックごと削除すれば、全部消えます。
地道に削除していかなくていいのでべんり。
