「The Ultimate Guide to WKWebView」をSwiftUIで実装してみるの、
2つ目になります。
多少SwiftUIとWebViewに関係ない、というかiOS開発に関係ないコードも入っちゃってますが、
そういうのに触れるのも好きなので、そこら辺も混ぜ込んでます。
必要なところだけお読みください。
目次
シリーズ化していこうと思うので、全体の目次を置いておきます。
リンクが貼られていないタイトルは、記事作成中または未作成のものになります。
| # | タイトル |
|---|---|
| 01 |
Making a web view fill the screen (WebViewを画面に表示する) |
| 02 |
Loading remote content (リモートのコンテンツを読み込む) |
| 03 |
Loading local content (ローカルのコンテンツを読み込む) |
| 04 |
Loading HTML fragments (HTMLフラグメントの読み込み) |
| 05 |
Controlling which sites can be visited (訪問可能なサイトの制御) |
| 06 |
Opening a link in the external browser (外部ブラウザでリンクを開く) |
| 07 |
Monitoring page loads (ページの読み込みを監視する) |
| 08 |
Reading a web page’s title as it changes (Webページのタイトルの変化を読み取る) |
| 09 |
Reading pages the user has visited (ユーザーが閲覧したページを読み取る) |
| 10 |
Injecting JavaScript into a page (JavaScriptをページに注入する) |
| 11 |
Reading and deleting cookies (cookieの読み取りと削除) |
| 12 |
Providing a custom user agent (カスタムUser Agentを提供する) |
| 13 |
Showing custom UI (カスタムUIを表示する) |
| 14 | Snapshot part of the page (ページの一部のスナップショットを撮る) |
| 15 | Detecting data (データの探索) |
環境
【Xcode】13.1
【Swift】5.5
【iOS】15.0
【macOS】Big Sur バージョン 11.4
実現したいこと
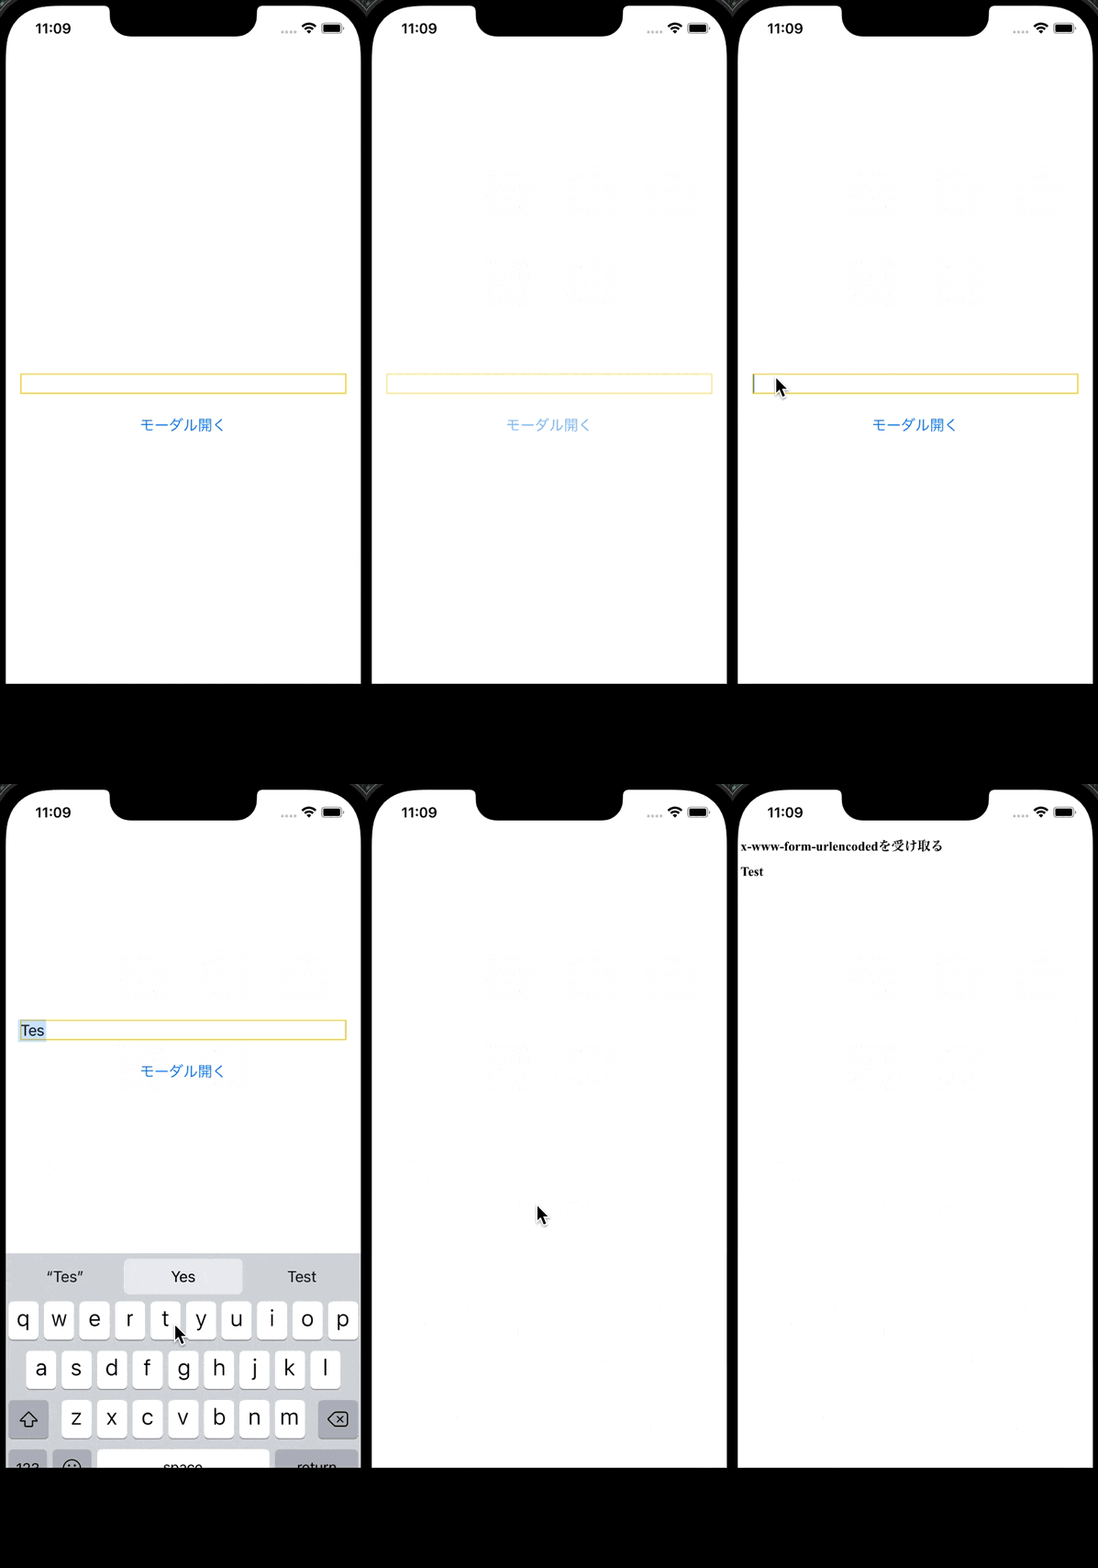
今回やることは
まずTextFieldに文字を入力します。
そしてサーバー側にその文字列を送ります。
サーバー側はその文字列を埋め込んだHTMLを返します。
クライアントはそのHTMLを取得し、WebViewで表示します。
こんな感じになりました。
(なぜかわからんが、画像の下が黒くなった・・・)
実現方法
まずWebViewです。
Hacking with Swiftの方では、URLRequest型のパラメータurlにURLを入れるだけでした。
でも最近やった例がそれだとダメなパターンだったので、記録がてらそっちを残しておきます。
import SwiftUI
import WebKit

struct WebView: UIViewRepresentable {
    let name: String

    func makeUIView(context: Context) -> WKWebView {
        return WKWebView()
    }

    func updateUIView(_ uiView: WKWebView, context: Context) {
        let request = HTMLRequest(parameters: ["name": name]).buildURLRequest()
        uiView.load(request)
    }
}
URLRequest(url: URL(String: "開きたいURL")!)だと
なぜダメだったかというと、
- HTTPメソッドが
POSTだった - Content-Typeが
x-www-form-urlencodedだった - 特定のデータをサーバーに送りたかった
があったためです。
なので、自分でそれに対応できるURLRequest型を自分で作ることになりました。
ちなみにこれは、WebViewとかSwiftUIとかあまり関係ない話です。
こういうことをやったよという自分の記録がてら、
あとシンプルな例にすると前回の#1の記事と内容が丸かぶりする
のでわざと別の例を持ってきてます。
というわけで、こんな感じにURLRequestを作ります。
import Foundation

class HTMLRequest {
    let baseURL = URL(string: "http://localhost:3000")!
    let method = "POST"
    let headers: [String: String] = ["Content-Type": "application/x-www-form-urlencoded"]
    var parameters = [String: String]()

    init(parameters: [String: String]) {
        self.parameters = parameters
    }

    func buildURLRequest() -> URLRequest {
        var urlRequest = URLRequest(url: baseURL)
        urlRequest.httpMethod = method
        headers.forEach { key, value in
            urlRequest.addValue(value, forHTTPHeaderField: key)
        }
        var components = URLComponents()
        components.queryItems = [URLQueryItem]()
        parameters.forEach {
            components.queryItems?.append(
                URLQueryItem(name: $0.key, value: $0.value)
            )
        }
        urlRequest.httpBody = components.query?.data(using: .utf8)
        return urlRequest
    }
}
最後に、WebViewを表示するViewです。
TextFieldが1つ、WebViewを開くためのボタンが1つあります。
import SwiftUI

struct ContentView: View {
    @State private var inputText = ""
    @State private var isShownWebView = false

    var body: some View {
        VStack {
            TextField("", text: $inputText)
                .border(.yellow)
                .padding()
            Button(action: {
                isShownWebView.toggle()
            }) {
                Text("モーダル開く")
            }
        }
        .fullScreenCover(isPresented: $isShownWebView) {
            WebView(name: inputText)
        }
    }
}

struct ContentView_Previews: PreviewProvider {
    static var previews: some View {
        ContentView()
    }
}
以上です。
全体のソースコードはこちらに上がっています。
その他調べたこと
WebViewやSwiftUI自体とは関係ないですが、調べたこと、やったことを書いておきます。
URLReqeustについて
実は今までURLRequest(url: URL(String: "開きたいURL")!)だと具体的にどんな
リクエストになるのか、ちゃんと見たことがなかったです・・・
まあGETだろう、くらいでしょうか。
なので今回は、lldbでpoして見てみました。
(ちなみにlldbは、「low-level debugger」のこと。poは、「print object」の略だそうです。後者は知ってたのですが、前者は知らなかった・・・)
まずURLRequest(url: URL(String: "https://www.apple.com")!)はこうなっていました。
(lldb) po request
▿ https://www.apple.com
  ▿ url : Optional<URL>
    ▿ some : https://www.apple.com
      - _url : https://www.apple.com
  - cachePolicy : 0
  - timeoutInterval : 60.0
  - mainDocumentURL : nil
  - networkServiceType : __C.NSURLRequestNetworkServiceType
  - allowsCellularAccess : true
  ▿ httpMethod : Optional<String>
    - some : "GET"
  - allHTTPHeaderFields : nil
  - httpBody : nil
  - httpBodyStream : nil
  - httpShouldHandleCookies : true
  - httpShouldUsePipelining : false
で、今回作ったURLRequestの方はというと、こうなっていました。
(lldb) po request
▿ http://localhost:3000
  ▿ url : Optional<URL>
    ▿ some : http://localhost:3000
      - _url : http://localhost:3000
  - cachePolicy : 0
  - timeoutInterval : 60.0
  - mainDocumentURL : nil
  - networkServiceType : __C.NSURLRequestNetworkServiceType
  - allowsCellularAccess : true
  ▿ httpMethod : Optional<String>
    - some : "POST"
  ▿ allHTTPHeaderFields : Optional<Dictionary<String, String>>
    ▿ some : 1 element
      ▿ 0 : 2 elements
        - key : "Content-Type"
        - value : "application/x-www-form-urlencoded"
  ▿ httpBody : Optional<Data>
    ▿ some : 9 bytes
      - count : 9
      ▿ pointer : 0x00007ffeec1b6b78
        - pointerValue : 140732859640696
      ▿ bytes : 9 elements
        - 0 : 110
        - 1 : 97
        - 2 : 109
        - 3 : 101
        - 4 : 61
        - 5 : 84
        - 6 : 101
        - 7 : 115
        - 8 : 116
  - httpBodyStream : nil
  - httpShouldHandleCookies : true
  - httpShouldUsePipelining : false
大体思ってた通りな感じかな?
前者はGETで
後者は、まあメソッド以外にも色々変わってます。(雑)
APIの用意
この↓条件にあてはまるAPIがそこらへんにあればそれを使おうと思っていたのですが
すぐに見つかりそうになかったので、今回はAPIも自分で用意しました。
- HTTPメソッドが
POSTだった - Content-Typeが
x-www-form-urlencodedだった - 特定のデータをサーバーに送りたかった
10行ほどで済んだのですが、しばらくJavaScript触ってなくて、地味に時間かかってまった・・・
Node.jsとExpressさまさまです。
const express = require("express");

const app = express();
app.use(express.urlencoded({ extended: true }));

app.post('/', (req, res) => {
  const param = req.body.name
  console.log(param)
  res.send(`<h1>x-www-form-urlencodedを受け取る</h1><h1>${param}</h1>`);
});

// ポート3000番でlistenする
app.listen(3000);
