はじめに
※この記事は、以下の記事の続編です。
【Mac不要】FlutterアプリにFirebase Crashlyticsを組み込んでiOSとAndroidに実機配備する手順 - Codemagic編
この記事ではその後、Flutterアプリから利用者のGoogle Photoにアクセスするための手順を説明しますが、この(前編)では、利用者のGoogleアカウントにアクセスできるまでの手順を説明します。
では早速始めてみましょう。
前提
この記事は、以下に当てはまる人向けの iOS/Android 対応アプリにGoogle Sign-in APIを組み込む手順を紹介します。
- 開発機はWindowsだ
- Macを持っていない
- Flutterで開発したい
- Apple Developer Programに既に登録している。
開発環境の前提
以下の3本の記事の手順に沿ってFlutterアプリをCodemagicでビルドし、さらに自身のiOS端末/Android端末のアプリの利用状況(Analytics)やクラッシュ情報(Crashlytics)がFirebaseに連携されている状態にしておいてください。
- 【Mac不要】開発中のFlutter製アプリをiOSとAndroidに実機配備する手順 - Codemagic編
- 【Mac不要】FlutterアプリにFirebase SDKを組み込んでiOSとAndroidに実機配備する手順 - Codemagic編
- 【Mac不要】FlutterアプリにFirebase Crashlyticsを組み込んでiOSとAndroidに実機配備する手順 - Codemagic編
ソースコードの公開
この記事の手順で作成したソースコードはGithubで公開しています。併せてご参照ください。
https://github.com/atsuteru/flutter_firebase_0507/tree/Qiita-GooglePhoto-v1.0
5/14 修正 Firebase認証を利用するように修正しました。
https://github.com/atsuteru/flutter_firebase_0507/tree/Qiita-GooglePhoto-v1.1
本文
自身のアプリに対しFirebase上でGoogle Photos Library APIを有効化する
Firebaseコンソールにサインインし、Photos Library APIのページを開きます。
ページ最上部の「Google APIs」のタイトルのすぐ右で、自身のFirebase Appを選択しましょう。そして「有効にする」ボタンをクリックしてください。
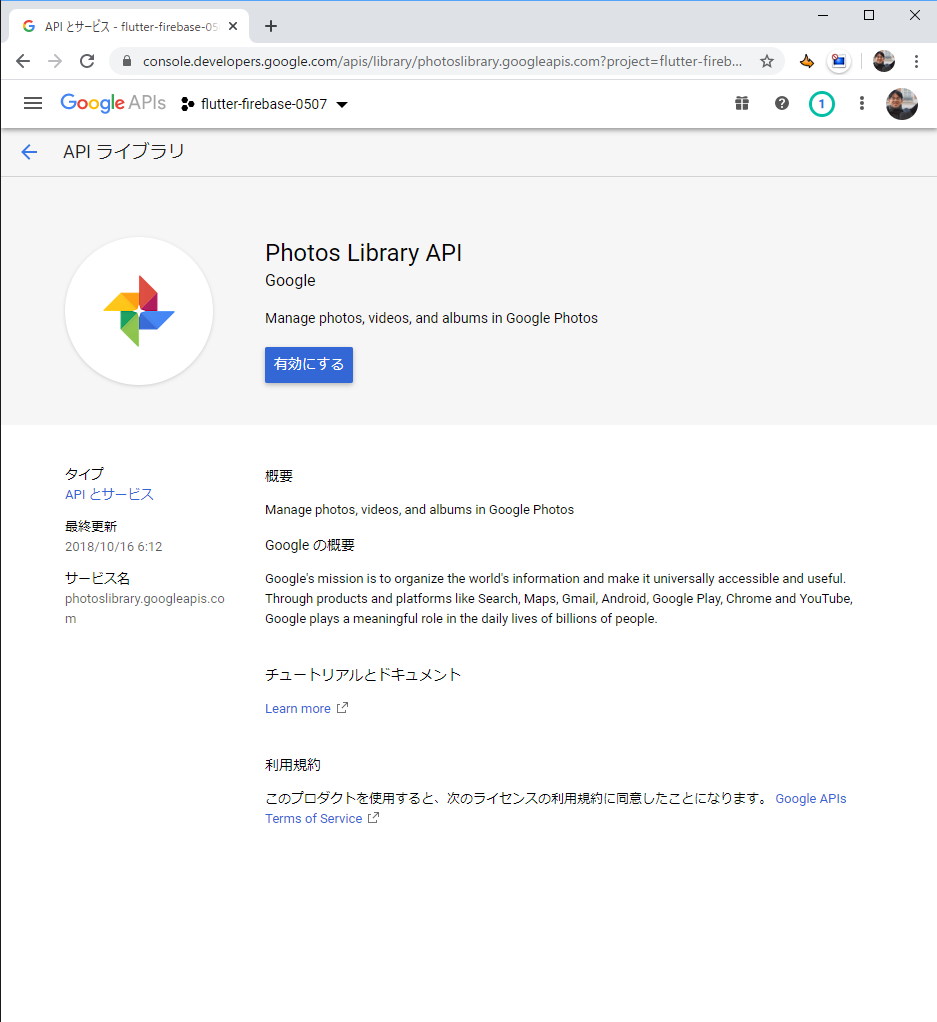
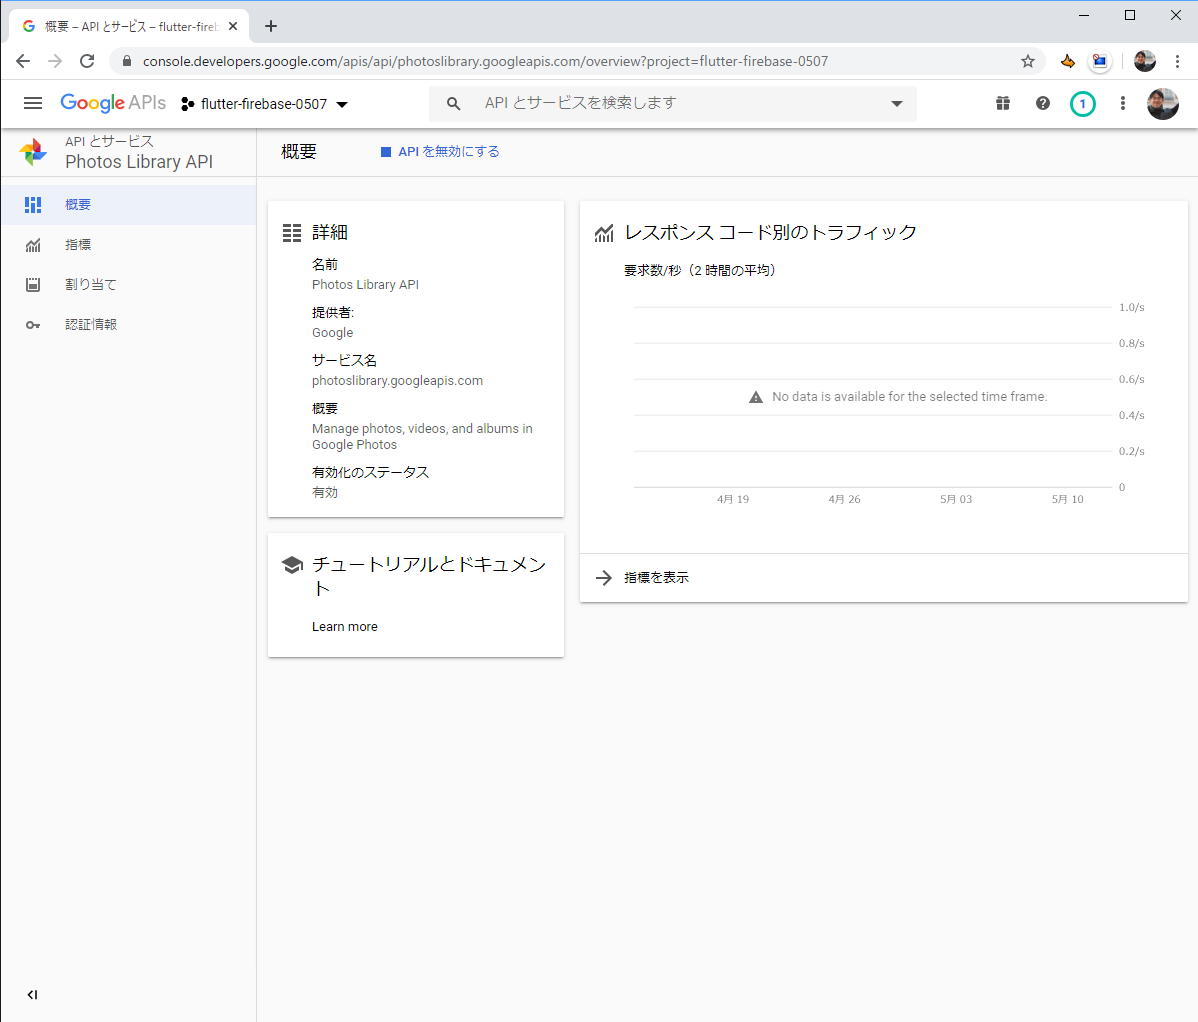
すると、以下の画面に切り替わります。これで有効化できました。
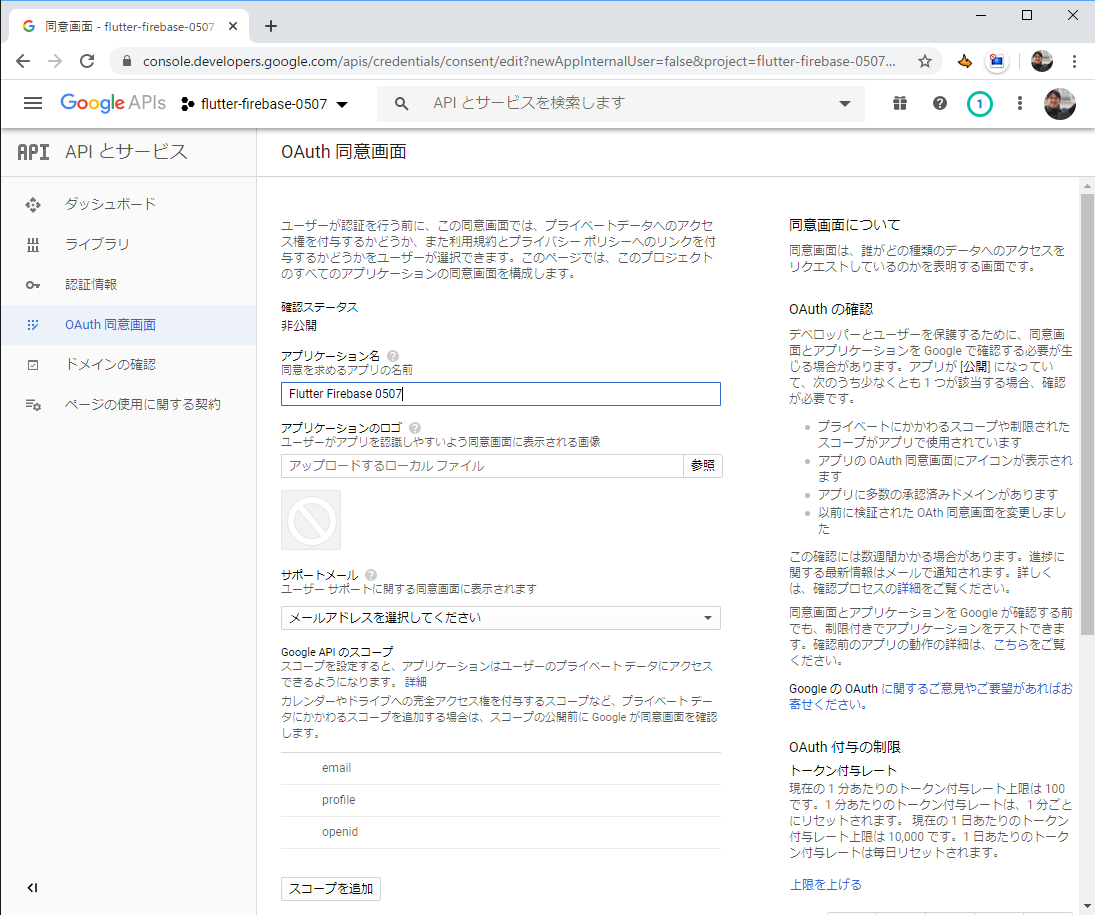
次に、OAuth同意画面の構成を行います。OAuth同意画面とは、アプリの利用者に対して表示する、「このアプリはこれらの権限を要求します」ことを通知する同意画面のことです。
ではページ左側のメニューから「認証情報」をクリックし、認証情報のページを開いてください。
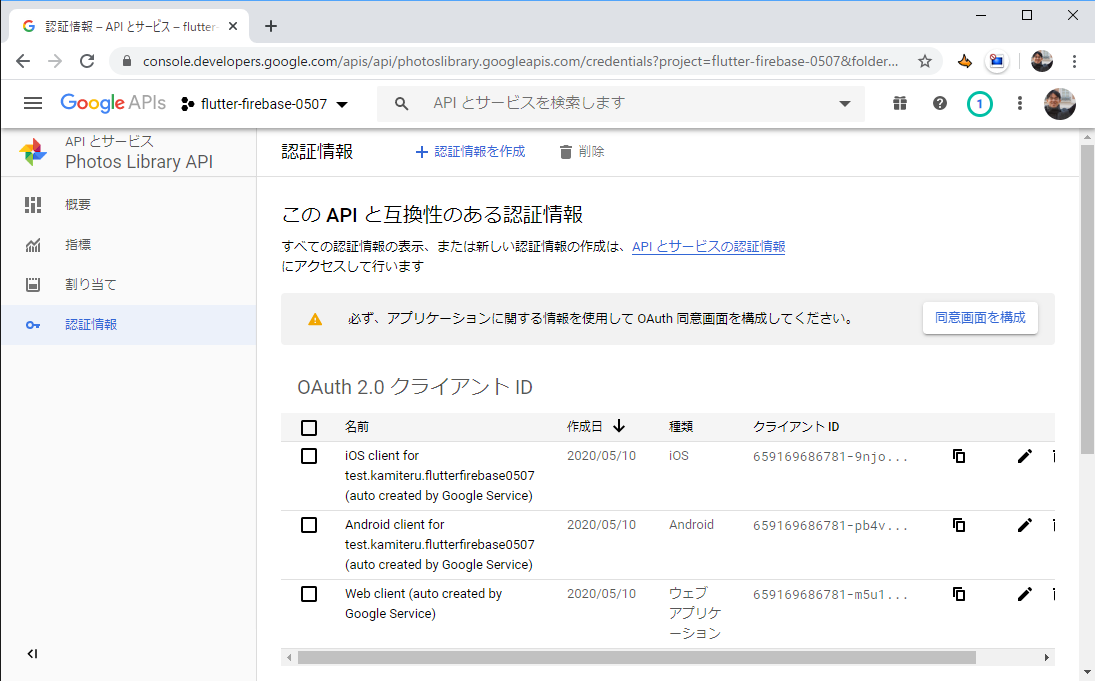
このページの右上付近「同意画面を構成」をクリックします。するとOAuth 同意画面の設定ウィザードが開きます。
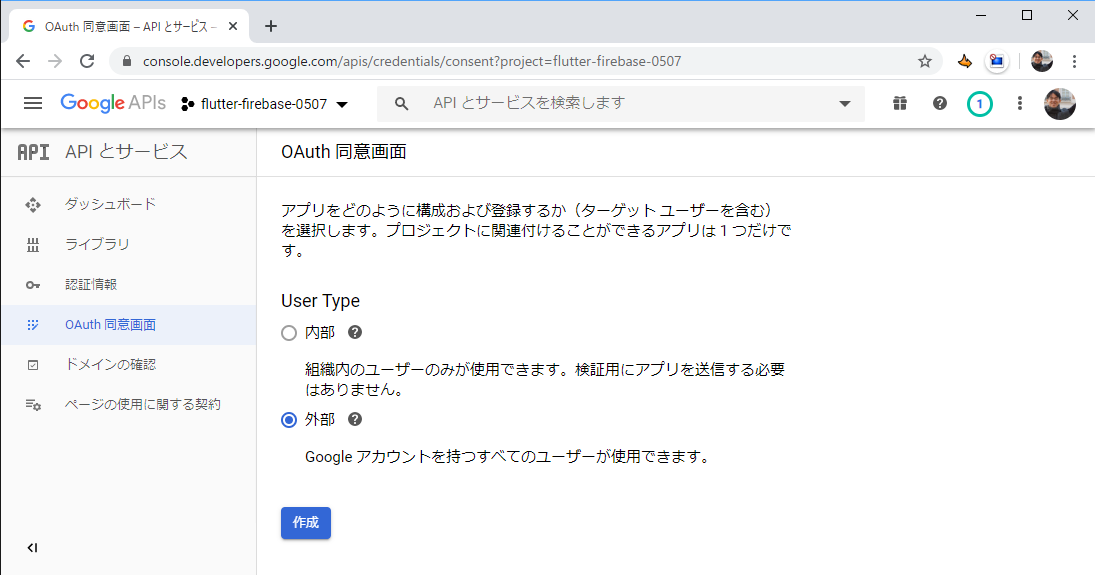
最初のページでは、この記事の場合はすべての利用者をターゲットとすので、「外部」を選択し、「作成」をクリックします。
次のページでは、最低限、アプリケーション名、サポートメールと、Google API のスコープを設定します(他の項目はリリースに向けて追々設定しましょう)。アプリケーション名を入力したら、「スコープの追加」ボタンを押してください。
するとスコープの追加画面が表示されます。ここで必要なスコープを選択するのですが、Google Photos APIのスコープはリストに用意されていないので、画面下部の「手動で貼り付け」のリンクをクリックします。
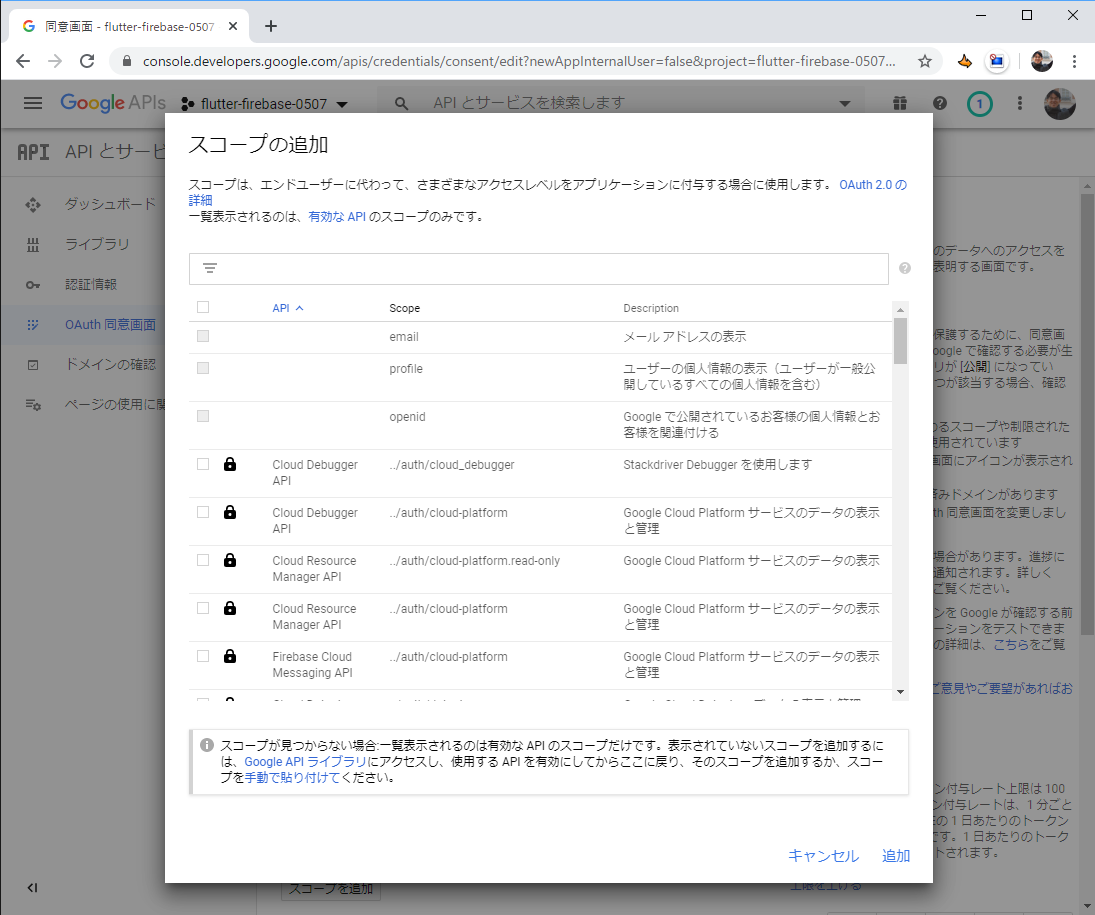
すると入力欄が出現しますので、以下を貼り付けてください。
https://www.googleapis.com/auth/photoslibrary
https://www.googleapis.com/auth/photoslibrary.sharing
貼り付けたら、画面下部の「追加」をクリックしましょう。すると「スコープの追加」ボタンの上に2行、photoslibraryが追加されているのが分かるはずです。
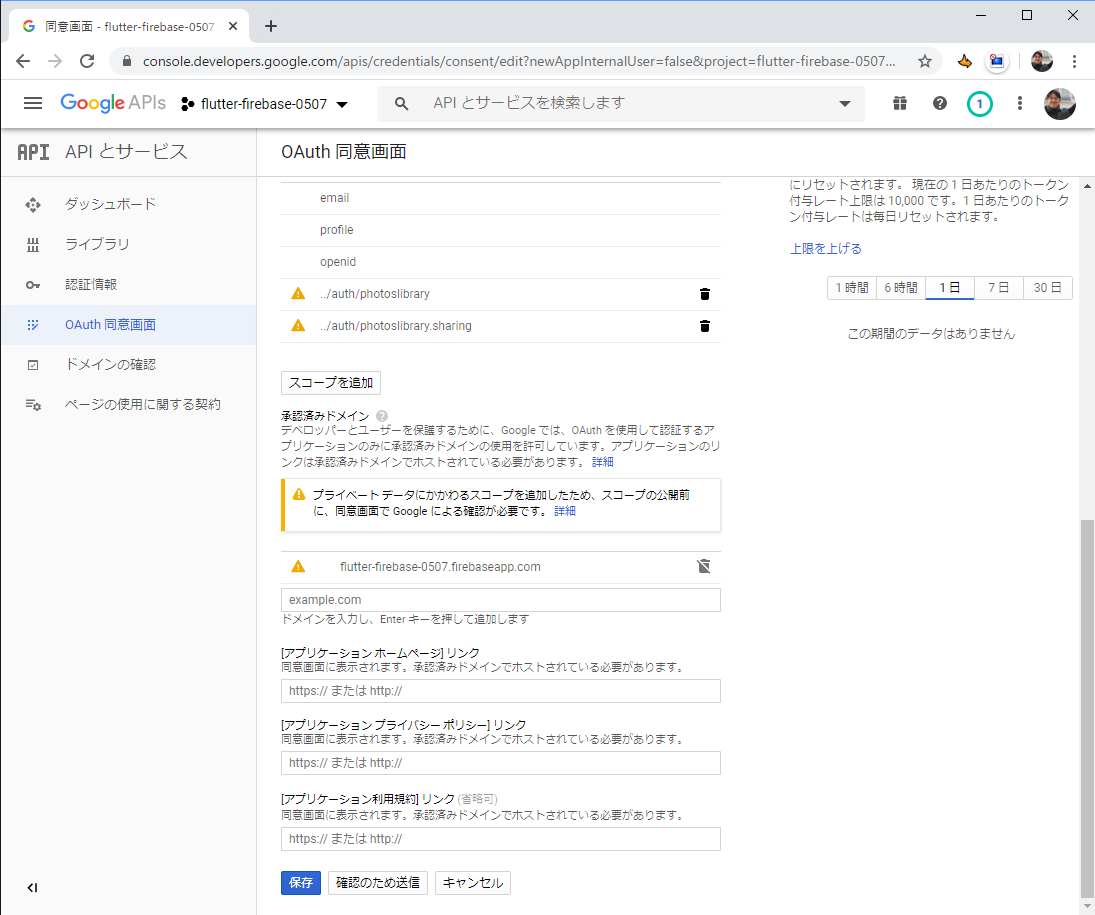
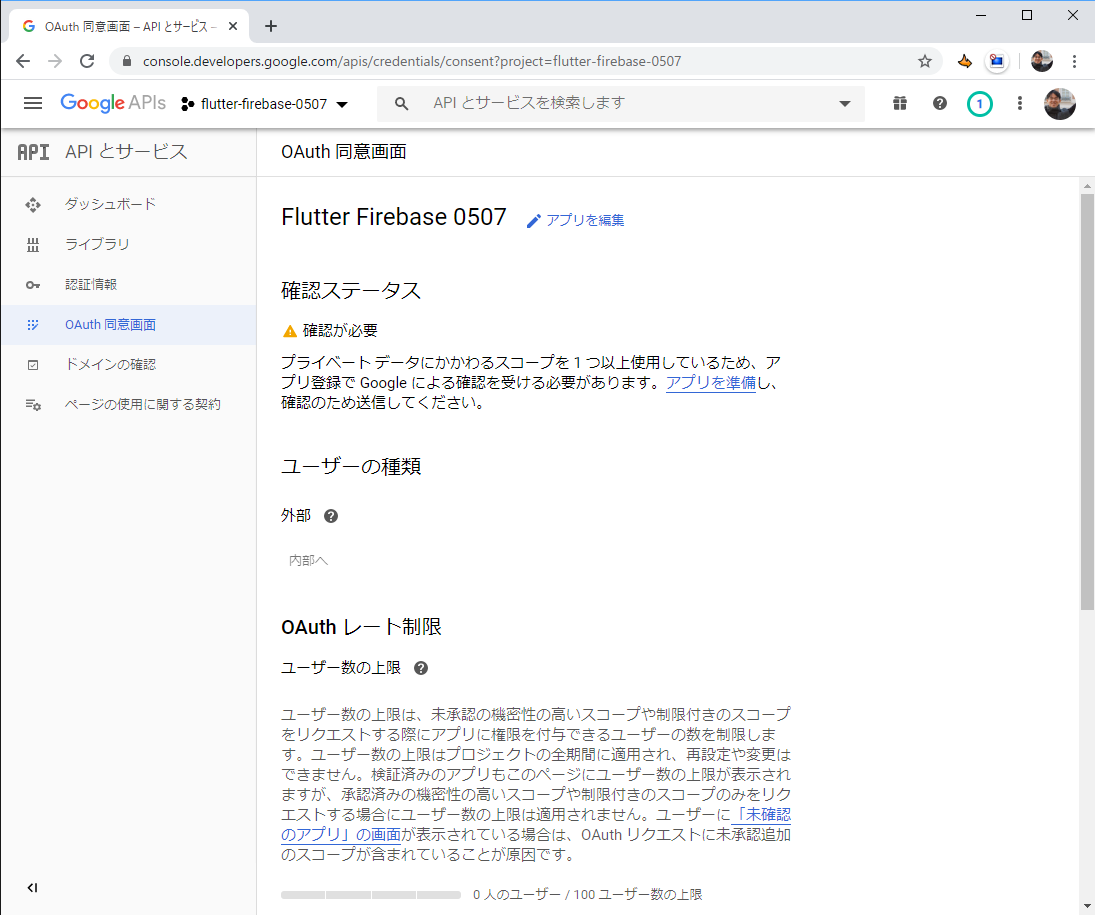
※ここで「プライベート データにかかわるスコープを追加したため、スコープの公開前に、同意画面で Google による確認が必要です」という警告が表示されます。これは開発段階のアプリではまだ不要なので、このままスキップして構いません。もしGoogleによる確認を受けたい場合は、このFAQページのVerification for appsを参考にご準備ください。
最後に保存を押せば、設定は完了です。
では続けて、アプリの準備に取り掛かりましょう。
Flutterアプリ側では、google_sign_inプラグインを利用します。google_sign_inプラグインのページを確認し、以下の手順を進めていきましょう。
Android向けの設定
以下、Android integrationのページより。
Android向けの追加の設定は不要です。
iOS向けの設定
以下、iOS integrationのページより。
iOS向けに、以下のファイルにGoogle Sign-in Sectionの設定を追加します。
<?xml version="1.0" encoding="UTF-8"?>
<!DOCTYPE plist PUBLIC "-//Apple//DTD PLIST 1.0//EN" "http://www.apple.com/DTDs/PropertyList-1.0.dtd">
<plist version="1.0">
<dict>
...(中略)...
    <!-- Google Sign-in Section -->
    <key>CFBundleURLTypes</key>
    <array>
      <dict>
        <key>CFBundleTypeRole</key>
        <string>Editor</string>
        <key>CFBundleURLSchemes</key>
        <array>
          <string>COPY_REVERSED_CLIENT_ID_HERE</string>
        </array>
      </dict>
    </array>
    <!-- End of the Google Sign-in Section -->
</dict>
上記を貼り付け後、COPY_REVERSED_CLIENT_ID_HEREの部分を、以下のファイルのkey=REVERSED_CLIENT_IDの値(string)に貼り換えましょう。※以下、マスクしてありますので、あなたのファイルの値を貼り付けてください
<?xml version="1.0" encoding="UTF-8"?>
<!DOCTYPE plist PUBLIC "-//Apple//DTD PLIST 1.0//EN" "http://www.apple.com/DTDs/PropertyList-1.0.dtd">
<plist version="1.0">
<dict>
	<key>CLIENT_ID</key>
	<string>***.apps.googleusercontent.com</string>
	<key>REVERSED_CLIENT_ID</key>
	<string>com.googleusercontent.apps.***-***</string>
...(中略)...
</dict>
iOS向けの追加の設定は以上です。
Flutterアプリの実装
以下、Exampleのページより。
コーディングは、説明しやすいように若干アレンジしています。
Google Sign-inライブラリを読み込む設定を追加する
pubspec.yamlのdependenciesに、google_sign_inの行を追加しましょう。
dependencies:
  flutter:
    sdk: flutter
  firebase_core: ^0.4.4+3
  firebase_crashlytics: ^0.1.3+3
  google_sign_in: ^4.0.7
アプリの実装にGoogle Sign-in処理を組み込む
本記事では説明しやすいように、あえてmain.dartのみで実装しました。実際はお好みのデザインパターンで実装されてください。
5/14 追記
Flutter1.7 (AndroidX対応)以降では、以下のコードでは不足があることが分かりました。
最新のコードはもう少し先にある「5/14 追加手順 Flutter1.7 (AndroidX対応)」の章をご利用ください。
import宣言の追加と、サインイン用のインスタンス生成
import 'dart:async';
import 'package:firebase_crashlytics/firebase_crashlytics.dart';
import 'package:flutter/material.dart';
// ▼▼▼ importの追加ココカラ ▼▼▼
import 'package:google_sign_in/google_sign_in.dart';
// ▲▲▲ importの追加ココマデ ▲▲▲

// ▼▼▼ サインイン用のインスタンス生成の追加ココカラ ▼▼▼
final GoogleSignIn _googleSignIn = GoogleSignIn(scopes: <String>[
  'profile',
  'https://www.googleapis.com/auth/photoslibrary',
  'https://www.googleapis.com/auth/photoslibrary.sharing'
]);
// ▲▲▲ サインイン用のインスタンス生成の追加ココマデ ▲▲▲

void main() {
  Crashlytics.instance.enableInDevMode = true;
  FlutterError.onError = Crashlytics.instance.recordFlutterError;
  runZoned<Future<void>>(() async {
    runApp(MyApp());
  }, onError: Crashlytics.instance.recordError);
Stateクラスへの変数とメソッドの追加
class _MyHomePageState extends State<MyHomePage> {
  int _counter = 0;
// ▼▼▼ 変数の追加ココカラ ▼▼▼
  GoogleSignInAccount _currentUser;
// ▲▲▲ 変数の追加ココマデ ▲▲▲

// ▼▼▼ メソッドの追加ココカラ ▼▼▼
  @override
  void initState() {
    super.initState();
    _googleSignIn.onCurrentUserChanged.listen((GoogleSignInAccount account) {
      setState(() {
        _currentUser = account;
      });
      if (_currentUser != null) {
        _handleGetContact();
      }
    });
    _googleSignIn.signInSilently();
  }

  Future<void> _handleGetContact() async {
  }

  Future<void> _handleSignIn() async {
    try {
      await _googleSignIn.signIn();
    } catch (e, s) {
      Crashlytics.instance
          .recordError(e, s, context: 'Google SignIn error');
    }
  }

  Future<void> _handleSignOut() => _googleSignIn.disconnect();
// ▲▲▲ メソッドの追加ココマデ ▲▲▲

  void _incrementCounter() {
    setState(() {
      _counter++;
    });
  }
サインインを実行するためのWidgetの追加
// ▼▼▼ Widget の追加ココカラ ▼▼▼
Widget _buildGoogleSignInBody() {
if (_currentUser != null) {
return Column(
mainAxisAlignment: MainAxisAlignment.spaceAround,
children: <Widget>[
ListTile(
leading: GoogleUserCircleAvatar(
identity: _currentUser,
),
title: Text(_currentUser.displayName ?? ''),
subtitle: Text(_currentUser.email ?? ''),
),
const Text("Signed in successfully."),
RaisedButton(
child: const Text('SIGN OUT'),
onPressed: _handleSignOut,
),
RaisedButton(
child: const Text('REFRESH'),
onPressed: _handleGetContact,
),
],
);
} else {
return Column(
mainAxisAlignment: MainAxisAlignment.spaceAround,
children: <Widget>[
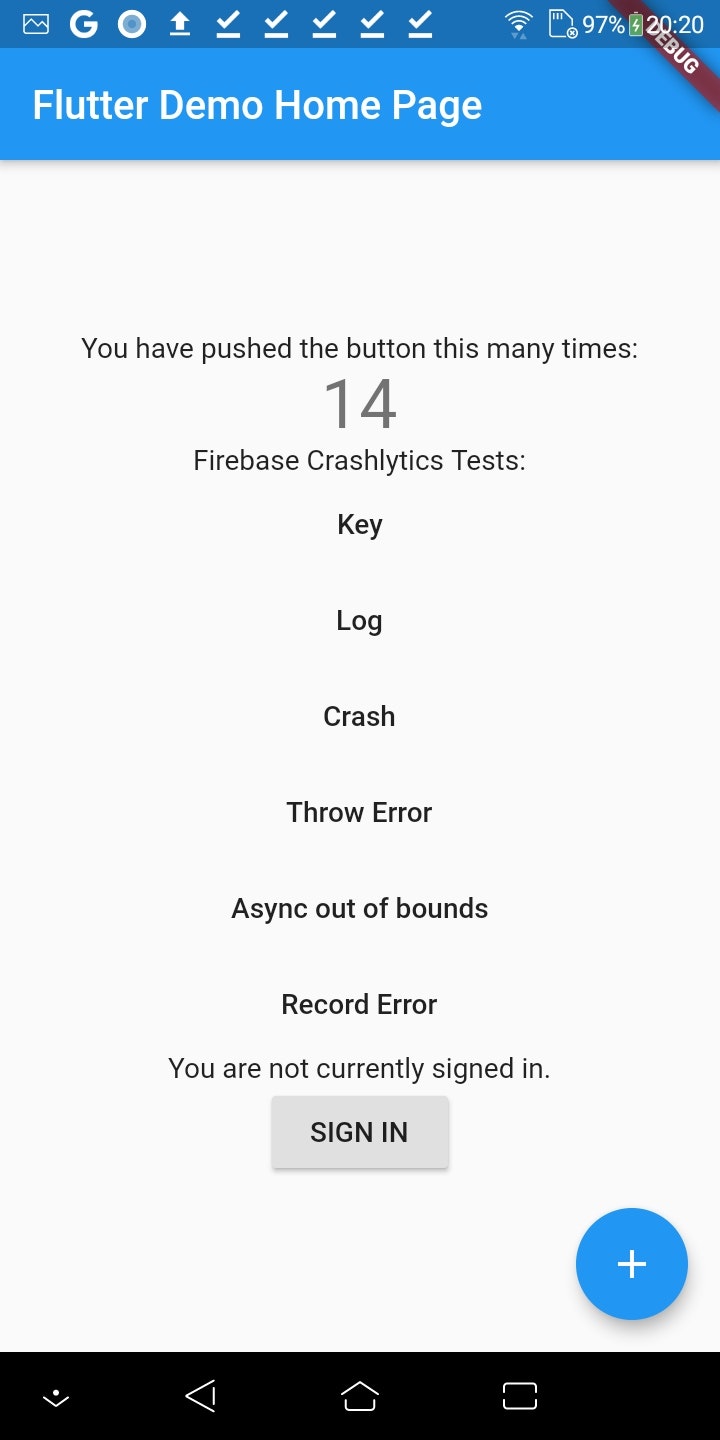
const Text("You are not currently signed in."),
RaisedButton(
child: const Text('SIGN IN'),
onPressed: _handleSignIn,
),
],
);
}
}
// ▲▲▲ Widget の追加ココマデ ▲▲▲
@override
Widget build(BuildContext context) {
return Scaffold(
appBar: AppBar(
title: Text(widget.title),
),
body: Center(
child: Column(
mainAxisAlignment: MainAxisAlignment.center,
children: <Widget>[
Text(
'You have pushed the button this many times:',
),
Text(
'$_counter',
style: Theme.of(context).textTheme.display1,
),
Text(
'Firebase Crashlytics Tests:',
),
FlatButton(
child: const Text('Key'),
onPressed: () {
Crashlytics.instance.setString('foo', 'bar');
}),
FlatButton(
child: const Text('Log'),
onPressed: () {
Crashlytics.instance.log('baz');
}),
FlatButton(
child: const Text('Crash'),
onPressed: () {
Crashlytics.instance.crash();
}),
FlatButton(
child: const Text('Throw Error'),
onPressed: () {
throw StateError('Uncaught error thrown by app.');
}),
FlatButton(
child: const Text('Async out of bounds'),
onPressed: () {
Future<void>.delayed(const Duration(seconds: 2), () {
final List<int> list = <int>[];
print(list[100]);
});
}),
FlatButton(
child: const Text('Record Error'),
onPressed: () {
try {
throw 'error_example';
} catch (e, s) {
// "context" will append the word "thrown" in the
// Crashlytics console.
Crashlytics.instance
.recordError(e, s, context: 'as an example');
}
}),
// ▼▼▼ Widget の呼び出しの追加ココカラ ▼▼▼
_buildGoogleSignInBody(),
// ▲▲▲ Widget の呼び出しの追加ココマデ ▲▲▲
],
),
),
floatingActionButton: FloatingActionButton(
onPressed: _incrementCounter,
tooltip: 'Increment',
child: Icon(Icons.add),
), // This trailing comma makes auto-formatting nicer for build methods.
);
}
動作確認
実装が完了したら、pushしてCodemagicのビルド結果を待ちましょう。
Codemagicから届いたビルド成功の通知メールから、再インストールしましょう。
※iOSアプリは、TestFlightの手順(記事:【Mac不要】開発中のFlutter製アプリを仲間のiOS端末に実機配備する手順 - Codemagic&TestFlight編)をすでに実施している場合は、TestFlightから「Update」することでこのバージョンをインストールしましょう。それ以外はの方はCodemagicから届くメールからインストールしてください。
Androidでの動作確認
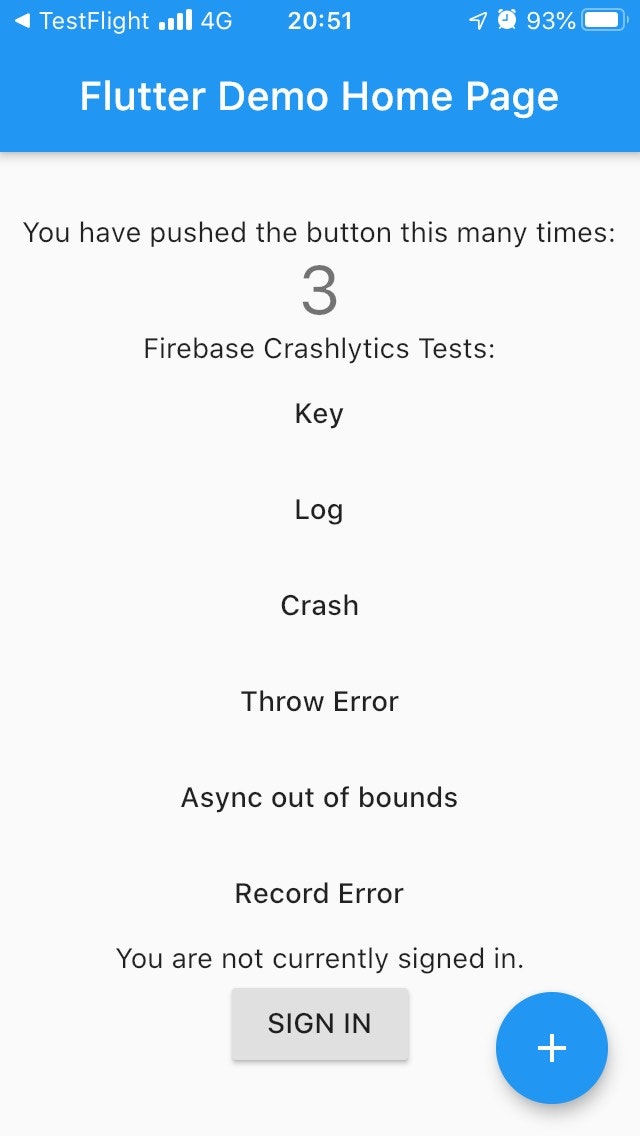
- SIGN INボタンが追加されていますね!早速押してみましょう。
 * Googleアカウントへのサインイン画面が表示されました!デバイスのアカウントでそのままサインインしてみます。
 * 次はGoogleアカウントに対してアプリに与えられる権限の確認が続きます。
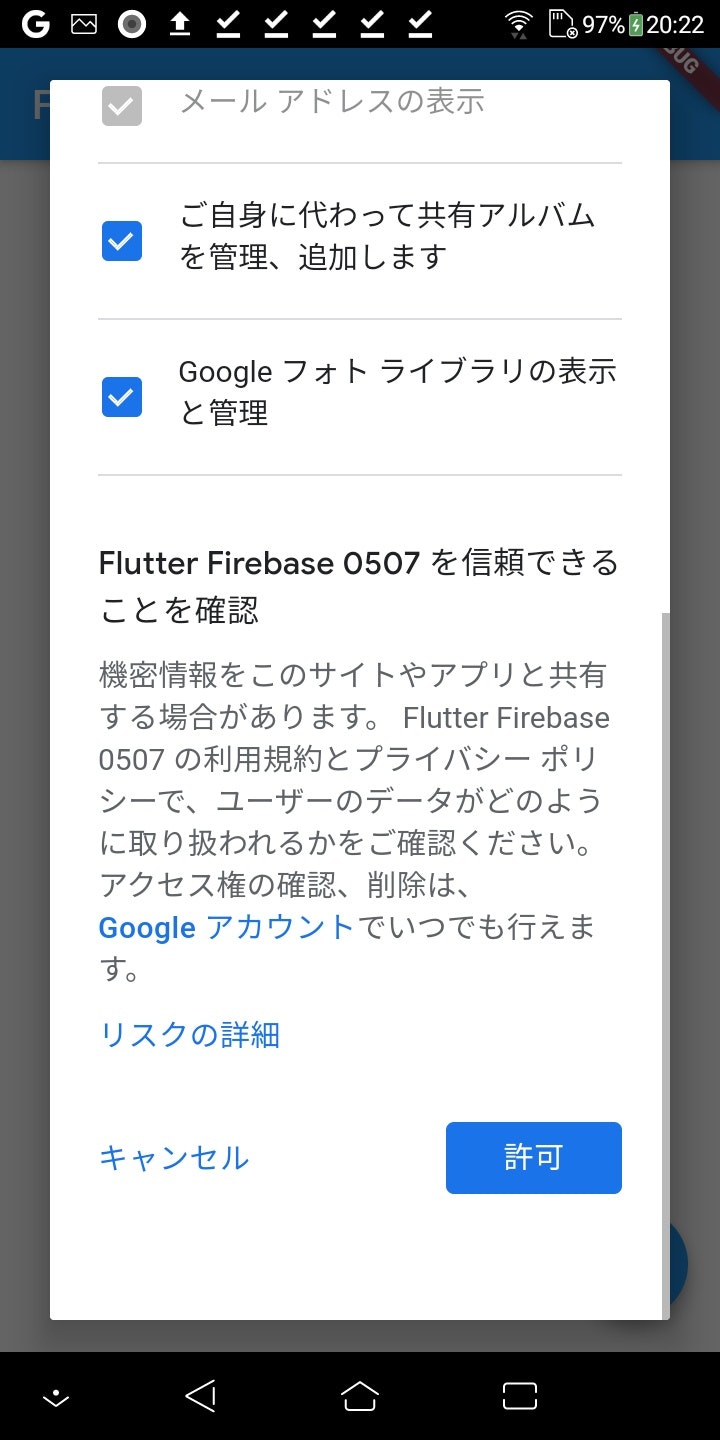
 * まだ権限の確認が続きます。最後に「許可」をクリックしましょう。
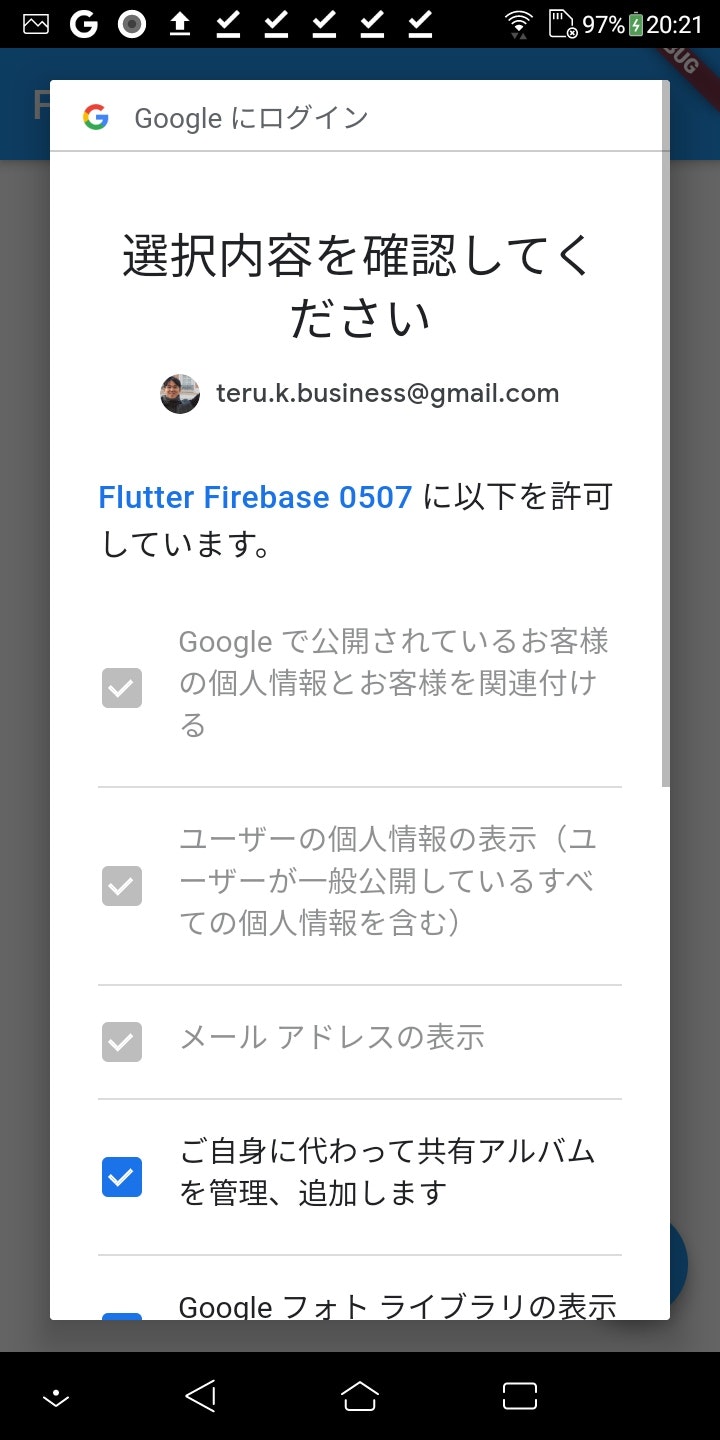
 * すると・・・サインインできましたね!
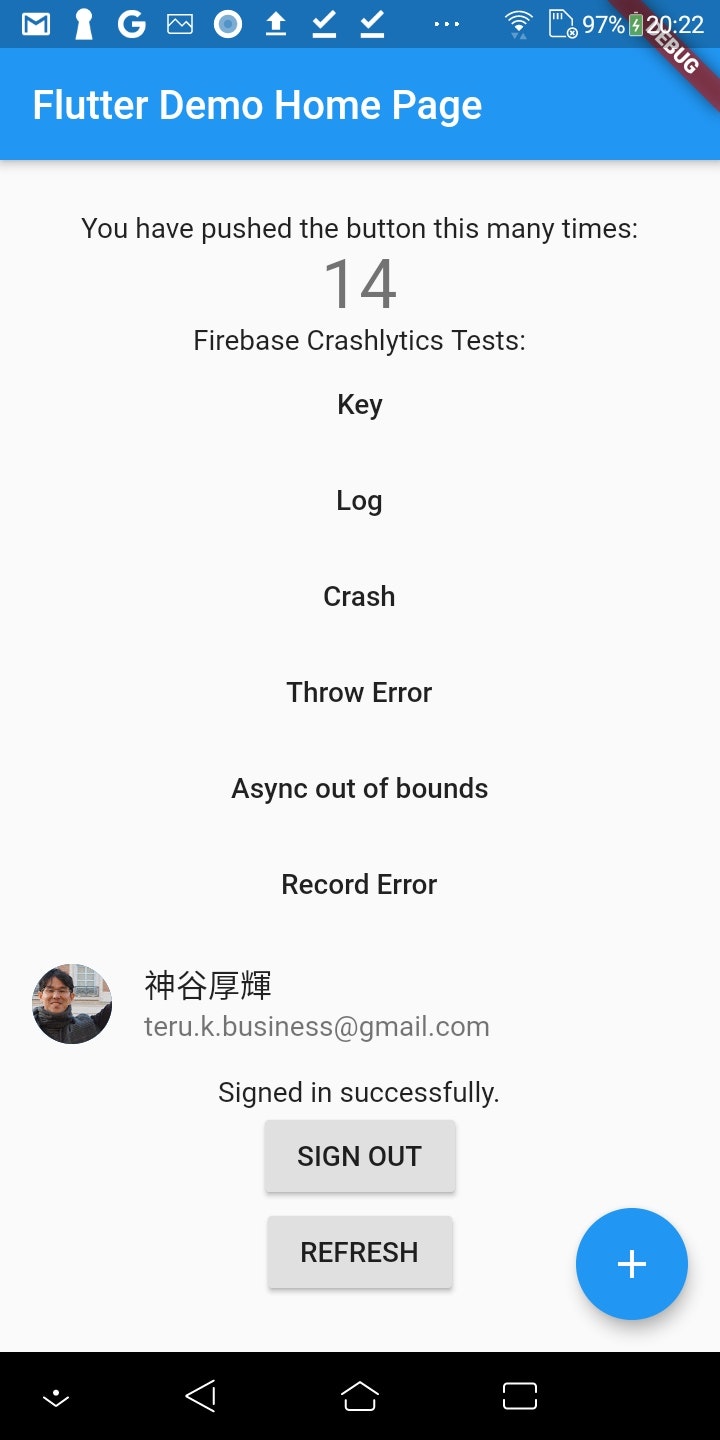
注記)上記はUSBデバッグにて確認を行いました。現在、CodemagicのビルドからインストールしたAndroidアプリでは、「SIGN INボタンクリック」→「アカウントの選択」の後、ホーム画面に戻ってしまう不具合が発生しており、解決方法は見つけられていません。。。どなたか、解決のヒントをお持ちであればご教授いただけると有難いです。
5/14追記 解決方法が見つかりました。この後に追加の手順を記載してありますので、お読みください。
iOSで確認
- SIGN INボタンが追加されていますね!早速押してみましょう。
 * するとiOSからの確認ダイアログが表示されます。続けましょう。
 * Googleアカウントへのサインイン画面が表示されました!入力していきましょう。
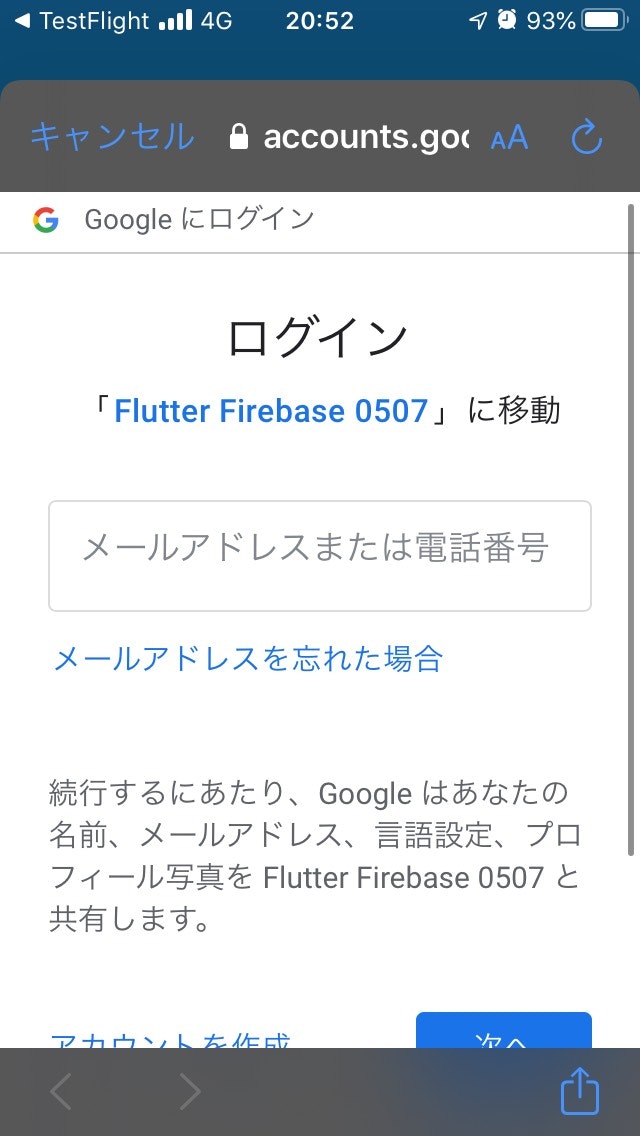
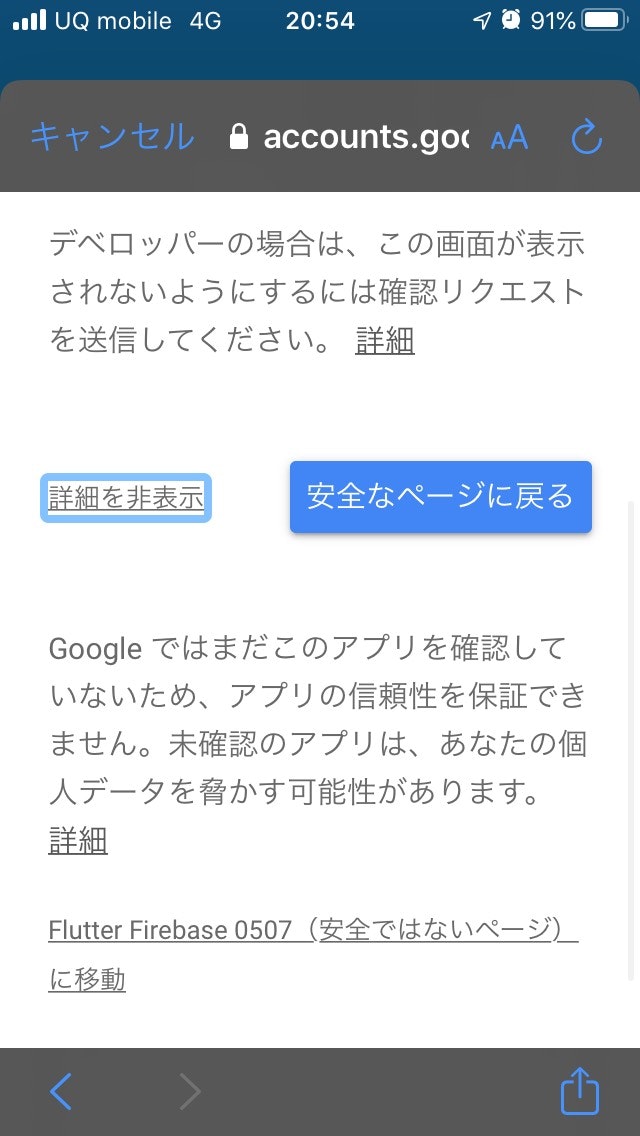
 * すると物騒な警告画面が表示されました。これは、**開発中のためGoogleによる確認をスキップしているから**です。`詳細`から`安全ではないページ委に移動`を行いましょう。
 * 次はGoogleアカウントに対してアプリに与えられる権限の確認が続きます。
 * まだ権限の確認が続きます。最後に「許可」をクリックしましょう。
 * すると・・・サインインできましたね!
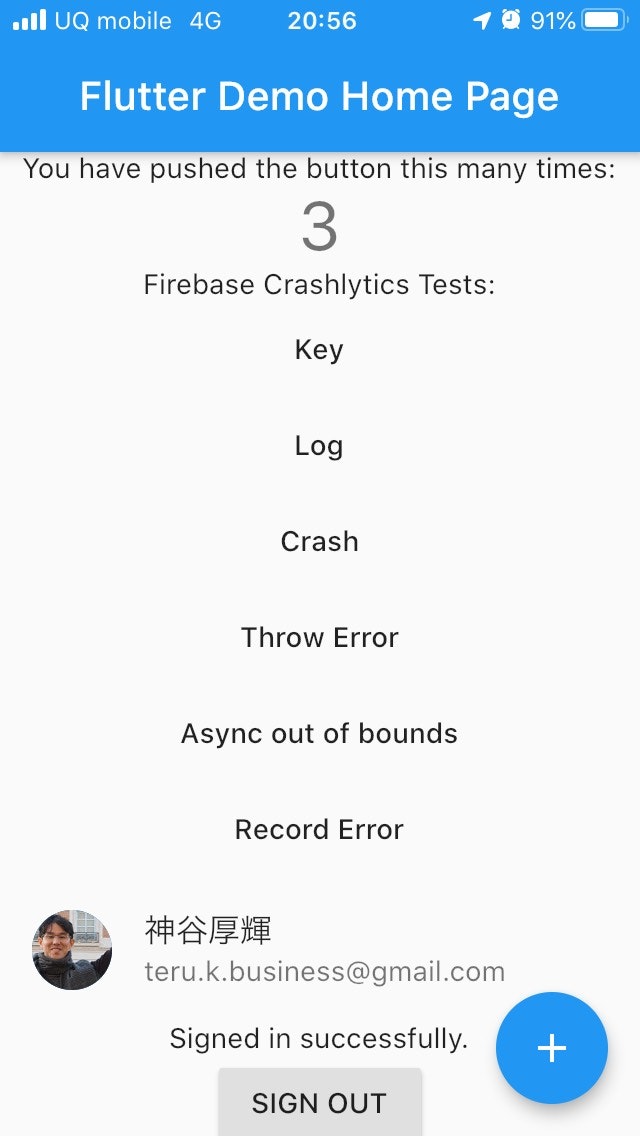
5/14 追加手順 Flutter1.7 (AndroidX対応)
ここまでの実装では、Android端末での実機の動作に問題がありました。原因は、Flutter1.7以降に必要な手順の漏れです。以下の記事から、Flutter1.7以降では、GoogleアカウントにサインインするためにはFirebase認証を経由しなければならなくなったことを知りました。
Flutter: Implementing Google Sign In
では早速その手順をすすめましょう。以下の手順は、次のサイトを参考にしています。
Firebase authentication & Google sign in using Flutter - Codemagic blog
Firebaseコンソール上でGoogleアカウントのAuthenticationを有効にする
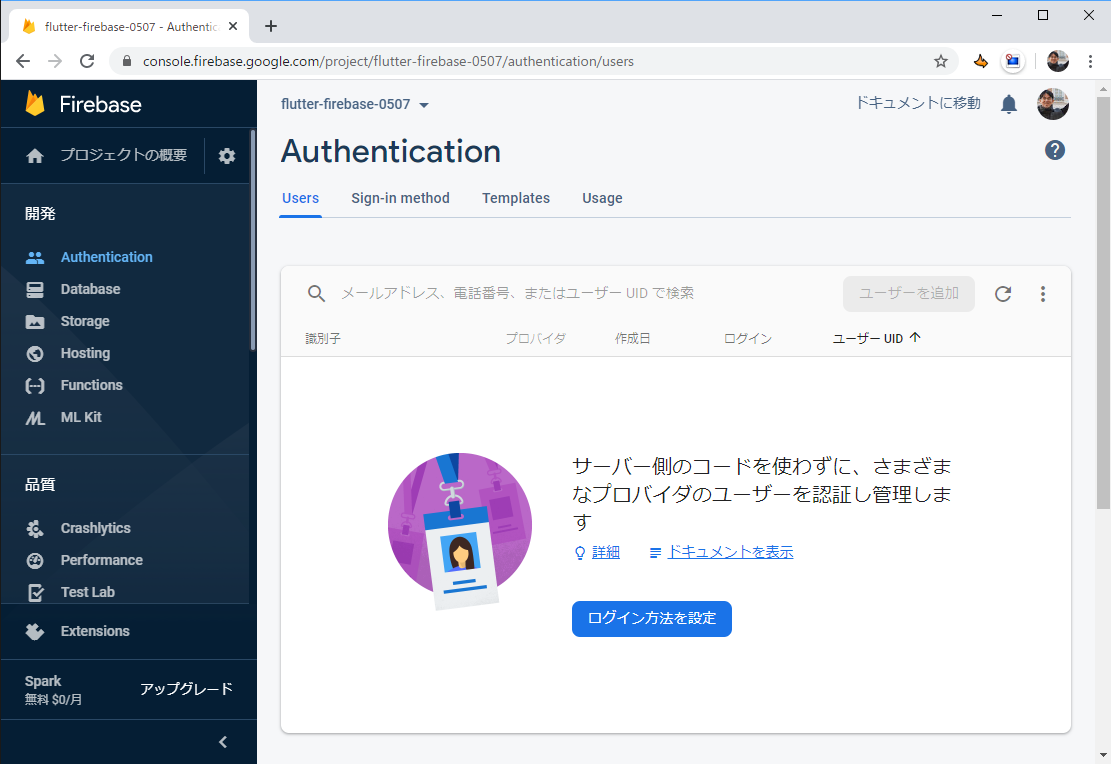
- Firebaseコンソールから、アプリのAuthenticationのページを開き、「ログイン方法の設定」ボタンをクリックしましょう。
- 対応しているログインプロバイダの一覧が表示され、その中の
Googleを選択します。
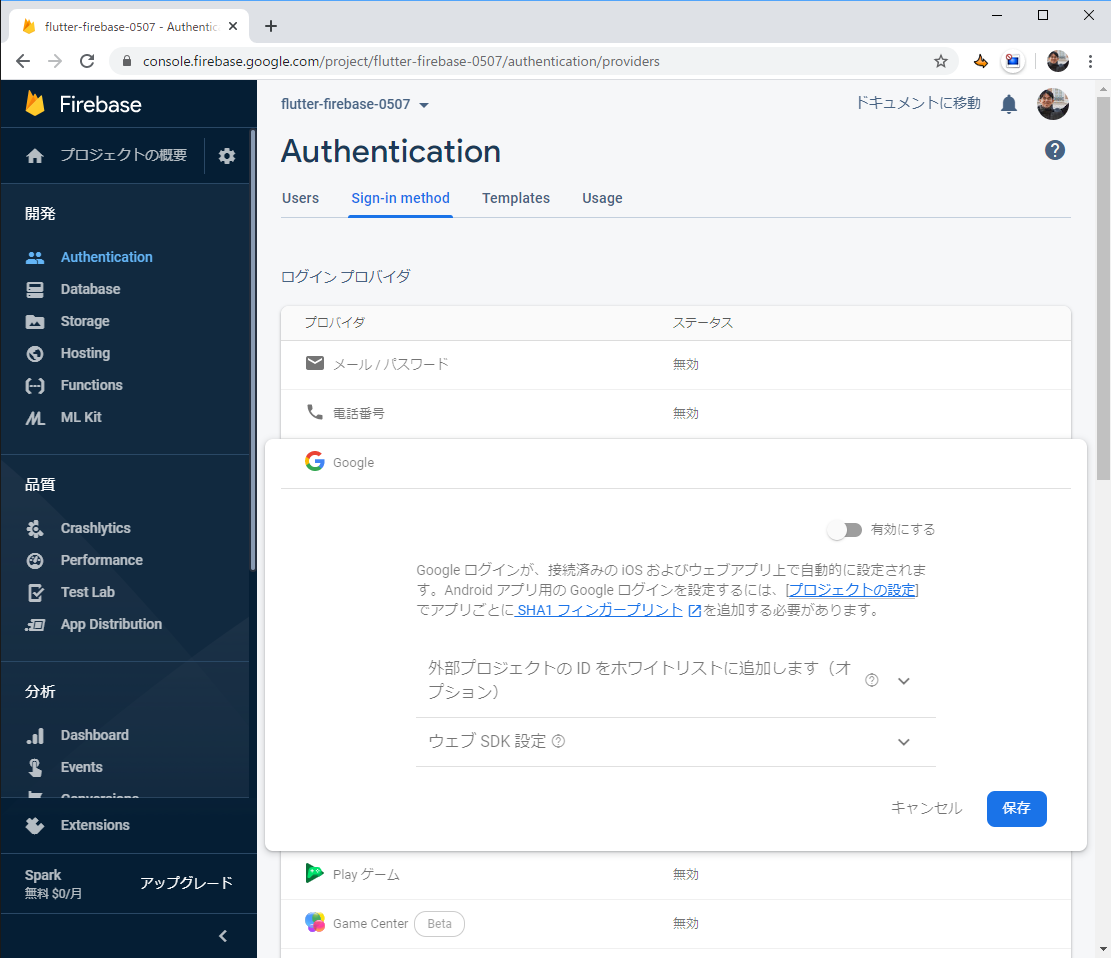
- 「有効にする」に切り替えたら、「保存」をクリックしましょう。手順は以上です。

FlutterアプリにFirebase Authenticationのライブラリを組み込む
pubspec.yamlにプラグインfirebase_authを追加します。最新のバージョンはfirebase_authプラグインのページで確認しましょう。
※ついでにgoogle_sign_inのバージョンも最新にしました。
dependencies:
  flutter:
    sdk: flutter
  firebase_core: ^0.4.4+3
  firebase_crashlytics: ^0.1.3+3
  firebase_auth: ^0.16.0
  google_sign_in: ^4.4.6
Flutterアプリの実装を、Firebase Authenticationを使う形に書き換える
以下、main.dartを編集していきます。
import宣言の追加と、サインイン用のインスタンス生成
import 'dart:async';
// ▼▼▼ importの追加ココカラ ▼▼▼
import 'package:firebase_auth/firebase_auth.dart';
// ▲▲▲ importの追加ココマデ ▲▲▲
import 'package:firebase_crashlytics/firebase_crashlytics.dart';
import 'package:flutter/material.dart';
// ▼▼▼ importの追加ココカラ ▼▼▼
import 'package:google_sign_in/google_sign_in.dart';
// ▲▲▲ importの追加ココマデ ▲▲▲

// ▼▼▼ サインイン用のインスタンス生成の追加ココカラ ▼▼▼
final FirebaseAuth _auth = FirebaseAuth.instance;
final GoogleSignIn _googleSignIn = GoogleSignIn(scopes: <String>[
  'profile',
  'https://www.googleapis.com/auth/photoslibrary',
  'https://www.googleapis.com/auth/photoslibrary.sharing'
]);
// ▲▲▲ サインイン用のインスタンス生成の追加ココマデ ▲▲▲

void main() {
  Crashlytics.instance.enableInDevMode = true;
  FlutterError.onError = Crashlytics.instance.recordFlutterError;
  runZoned<Future<void>>(() async {
    runApp(MyApp());
  }, onError: Crashlytics.instance.recordError);
Stateクラスへの変数とメソッドの追加
class _MyHomePageState extends State<MyHomePage> {
  int _counter = 0;
// ▼▼▼ 変数の追加ココカラ ▼▼▼
  FirebaseUser _currentUser;
// ▲▲▲ 変数の追加ココマデ ▲▲▲

// ▼▼▼ メソッドの追加ココカラ ▼▼▼
  @override
  void initState() {
    super.initState();
    new Future(() async{
      if (await _handleSignIn(await _googleSignIn.signInSilently())) {
        _handleGetContact();
      }
    });
  }

  Future<void> _handleGetContact() async {
  }

  Future<bool> _handleSignIn(GoogleSignInAccount googleSignInAccount) async {
    if (googleSignInAccount == null) {
      return false;
    }
    final GoogleSignInAuthentication googleSignInAuthentication = await googleSignInAccount.authentication;
    final AuthCredential credential = GoogleAuthProvider.getCredential(
      accessToken: googleSignInAuthentication.accessToken,
      idToken: googleSignInAuthentication.idToken,
    );
    final AuthResult authResult = await _auth.signInWithCredential(credential);
    final FirebaseUser user = authResult.user;
    if (user.isAnonymous) {
      return false;
    }
    if (await user.getIdToken() == null) {
      return false;
    }
    final FirebaseUser currentUser = await _auth.currentUser();
    if (user.uid != currentUser.uid) {
      return false;
    }
    setState(() {
      _currentUser = currentUser;
    });
    return true;
  }

  Future<void> _handleSignOut() async {
    await _googleSignIn.signOut();
    setState(() {
      _currentUser = null;
    });
  }
// ▲▲▲ メソッドの追加ココマデ ▲▲▲

  void _incrementCounter() {
    setState(() {
      _counter++;
    });
  }
サインインを実行するためのWidgetの追加
// ▼▼▼ Widget の追加ココカラ ▼▼▼
  Widget _buildGoogleSignInBody() {
    if (_currentUser != null) {
      return Column(
        mainAxisAlignment: MainAxisAlignment.spaceAround,
        children: <Widget>[
          Card(
            color: Colors.lightBlueAccent,
            child: ListTile(
              leading: CircleAvatar(
                backgroundImage: NetworkImage(
                  _currentUser.photoUrl,
                ),
                radius: 30,
                backgroundColor: Colors.transparent,
              ),
              title: Text(_currentUser.displayName ?? ''),
              subtitle: Text(_currentUser.email ?? ''),
            ),
          ),
          const Text("Signed in successfully."),
          RaisedButton(
            child: const Text('SIGN OUT'),
            onPressed: _handleSignOut,
          ),
        ],
      );
    } else {
      return Column(
        mainAxisAlignment: MainAxisAlignment.spaceAround,
        children: <Widget>[
          const Text("You are not currently signed in."),
          RaisedButton(
            child: const Text('SIGN IN'),
            onPressed: () async{
              if (await _handleSignIn(await _googleSignIn.signIn())) {
                _handleGetContact();
              }
            }
          ),
        ],
      );
    }
  }
// ▲▲▲ Widget の追加ココマデ ▲▲▲

  @override
  Widget build(BuildContext context) {
    return Scaffold(
      appBar: AppBar(
        title: Text(widget.title),
      ),
      body: Center(
        child: Column(
          mainAxisAlignment: MainAxisAlignment.center,
          children: <Widget>[
            Text(
              'You have pushed the button this many times:',
            ),
            Text(
              '$_counter',
              style: Theme.of(context).textTheme.display1,
            ),
            Text(
              'Firebase Crashlytics Tests:',
            ),
            FlatButton(
                child: const Text('Key'),
                onPressed: () {
                  Crashlytics.instance.setString('foo', 'bar');
                }),
            FlatButton(
                child: const Text('Log'),
                onPressed: () {
                  Crashlytics.instance.log('baz');
                }),
            FlatButton(
                child: const Text('Crash'),
                onPressed: () {
                  Crashlytics.instance.crash();
                }),
            FlatButton(
                child: const Text('Throw Error'),
                onPressed: () {
                  throw StateError('Uncaught error thrown by app.');
                }),
            FlatButton(
                child: const Text('Async out of bounds'),
                onPressed: () {
                  Future<void>.delayed(const Duration(seconds: 2), () {
                    final List<int> list = <int>[];
                    print(list[100]);
                  });
                }),
            FlatButton(
                child: const Text('Record Error'),
                onPressed: () {
                  try {
                    throw 'error_example';
                  } catch (e, s) {
                    // "context" will append the word "thrown" in the
                    // Crashlytics console.
                    Crashlytics.instance
                        .recordError(e, s, context: 'as an example');
                  }
                }),
// ▼▼▼ Widget の呼び出しの追加ココカラ ▼▼▼
            _buildGoogleSignInBody(),
// ▲▲▲ Widget の呼び出しの追加ココマデ ▲▲▲
          ],
        ),
      ),
      floatingActionButton: FloatingActionButton(
        onPressed: _incrementCounter,
        tooltip: 'Increment',
        child: Icon(Icons.add),
      ), // This trailing comma makes auto-formatting nicer for build methods.
    );
  }
これで対応は完了です。
おわりに
以上で(前編)は終わりです。
(後編)では、いよいよ、Google Photo APIをコールして、アルバムの情報などを取得していきたいと思います。乞うご期待!
最後に、この記事がFlutterを始められる方にとって少しでも助けになれば、幸いです。