追記
v0.9.1で動作させる方法をまとめました。
MacでUnity ML-Agentsの環境を構築する(v0.9.1対応) - Qiita
https://qiita.com/kai_kou/items/268ccf6f961f8ca8cba8
はじめに
Unityで機械学習を利用するML-Agentsというライブラリがありますが、2018/12/15にv0.6.0(beta)がリリースされていたので試してみました。v0.5.0と比較して、Brainの設定方法やモデルファイルの出力方法など、そこそこの変更が入っていました。
Release ML-Agents Beta 0.6.0 · Unity-Technologies/ml-agents
https://github.com/Unity-Technologies/ml-agents/releases/tag/0.6.0
ml-agents/Migrating.md at master · Unity-Technologies/ml-agents
https://github.com/Unity-Technologies/ml-agents/blob/master/docs/Migrating.md#migrating-from-ml-agents-toolkit-v05-to-v06
v0.5.0については下記にまとめています。
MacでUnity ML-Agentsの環境を構築する(v0.5.0対応) - Qiita
https://qiita.com/kai_kou/items/6478fa686ce1af5939d8
ML-Agentsについては下記が参考になります。
【Unity】Unityで機械学習する「ML-Agent」を色々と試して得た知見とか
http://tsubakit1.hateblo.jp/entry/2018/02/18/233000
Unityをまだインストールしていないという方は下記をご参考ください。
Macでhomebrewを使ってUnityをインストールする(Unity Hub、日本語化対応)
https://qiita.com/kai_kou/items/445e614fb71f2204e033
追記
2019/04/05
2019/02/28にML-Agentsのv0.7.0がリリースされました。
@kingyo222 さんが利用手順をまとめてくれています。(Win)
Unity:ML-Agents 2019年04月(ver0.7.0)での使い方 – 初心者向けUnity情報サイト
https://www.fast-system.jp/unity%ef%bc%9aml-agents-2019%e5%b9%b404%e6%9c%88ver0-7-0%e3%81%a7%e3%81%ae%e4%bd%bf%e3%81%84%e6%96%b9/
手順
基本的には公式のドキュメントに沿えばよい感じです。
ml-agents/Installation.md at master · Unity-Technologies/ml-agents
https://github.com/Unity-Technologies/ml-agents/blob/master/docs/Installation.md
ml-agents/Basic-Guide.md at master · Unity-Technologies/ml-agents
https://github.com/Unity-Technologies/ml-agents/blob/master/docs/Basic-Guide.md#setting-up-ml-agents-within-unity
Pythonをインストールする
現在、Python 3.6での動作がサポートされています。3.5、3.7はサポートされていないのでご注意ください。(2018/12/20現在)
In order to use ML-Agents toolkit, you need Python 3.6 along with the dependencies listed in the setup.py file.
We do not currently support Python 3.7 or Python 3.5.
お手元にPythonの環境がない方は下記をご参照ください。
MacでanyenvをつかってPython環境構築(bash、fish対応) - Qiita
https://qiita.com/kai_kou/items/f54931991a781b96bb9c
ML-Agentsリポジトリをダウンロード
適当なディレクトリにリポジトリをダウンロードする。
> mkdir 適当なディレクトリ
> cd 適当なディレクトリ
> git clone https://github.com/Unity-Technologies/ml-agents.git
必要なライブラリをインストールする
TensorFlowなどを利用するみたいなので、pipを利用してインストールします。
ここではPythonの仮想環境を作ってインストールします。
仮想環境?なにそれ?な方は下記をご参照(再掲
https://qiita.com/kai_kou/items/f54931991a781b96bb9c
> pyenv local 3.6.6
> python --version
Python 3.6.6

> python -m venv venv
> . venv/bin/activate

# fishな方はこちら
> . venv/bin/activate.fish

> cd ml-agents/ml-agents

> pip install .

Processing 適当なディレクトリ/ml-agents/ml-agents
Collecting tensorflow<1.8,>=1.7 (from mlagents==0.6.0)
(略)
Successfully installed MarkupSafe-1.1.0 Pillow-5.3.0 Send2Trash-1.5.0 absl-py-0.6.1 appnope-0.1.0 astor-0.7.1 atomicwrites-1.2.1 attrs-18.2.0 backcall-0.1.0 bleach-1.5.0 cycler-0.10.0 decorator-4.3.0 defusedxml-0.5.0 docopt-0.6.2entrypoints-0.2.3 gast-0.2.0 grpcio-1.11.1 html5lib-0.9999999 ipykernel-5.1.0 ipython-7.2.0 ipython-genutils-0.2.0ipywidgets-7.4.2 jedi-0.13.2 jinja2-2.10 jsonschema-2.6.0 jupyter-1.0.0 jupyter-client-5.2.4 jupyter-console-6.0.0jupyter-core-4.4.0 kiwisolver-1.0.1 markdown-3.0.1 matplotlib-3.0.2 mistune-0.8.4 mlagents-0.6.0 more-itertools-4.3.0 nbconvert-5.4.0 nbformat-4.4.0 notebook-5.7.4 numpy-1.14.5 pandocfilters-1.4.2 parso-0.3.1 pexpect-4.6.0 pickleshare-0.7.5 pluggy-0.8.0 prometheus-client-0.5.0 prompt-toolkit-2.0.7 protobuf-3.6.1 ptyprocess-0.6.0 py-1.7.0 pygments-2.3.1 pyparsing-2.3.0 pytest-3.10.1 python-dateutil-2.7.5 pyyaml-3.13 pyzmq-17.1.2 qtconsole-4.4.3 six-1.12.0 tensorboard-1.7.0 tensorflow-1.7.1 termcolor-1.1.0 terminado-0.8.1 testpath-0.4.2 tornado-5.1.1 traitlets-4.3.2 wcwidth-0.1.7 werkzeug-0.14.1 wheel-0.32.3 widgetsnbextension-3.4.2
はい。
Unityの起動とプロジェクトファイル読み込み
Unityを立ち上げます。
アプリが立ち上がったら「開く」ボタンからml-agents/ml-agents/UnitySDK フォルダを選択します。

Unityエディタのバージョンによって、再インポートするか、確認ダイアログが立ち上がります。
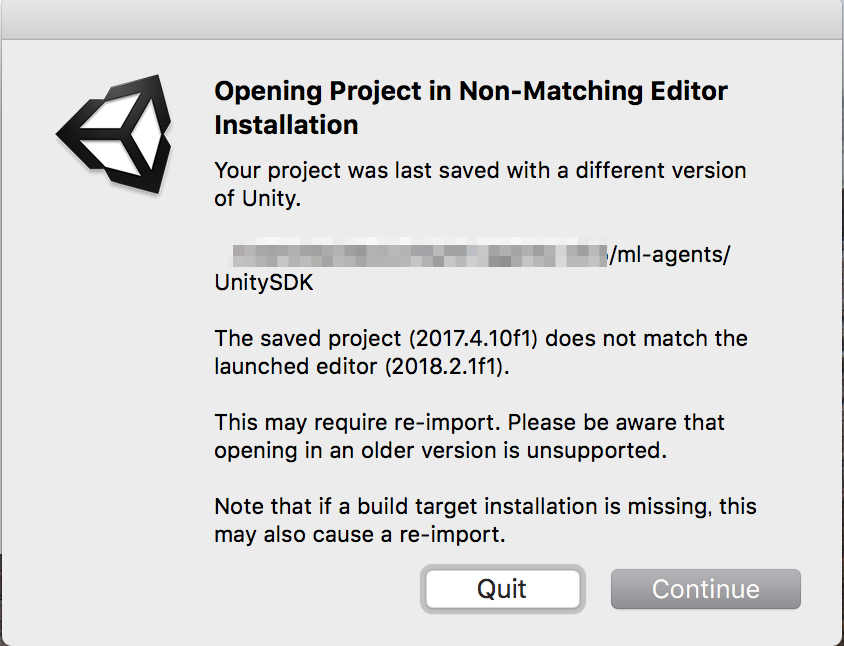
「Continue(続行)」ボタンをクリックして進めます。
再インポート処理に少し時間がかかります。

起動しました。
Scenes(シーン)が開くか確認する
サンプルが動作するか、Unityでプロジェクトを読み込み、動作させてみます。
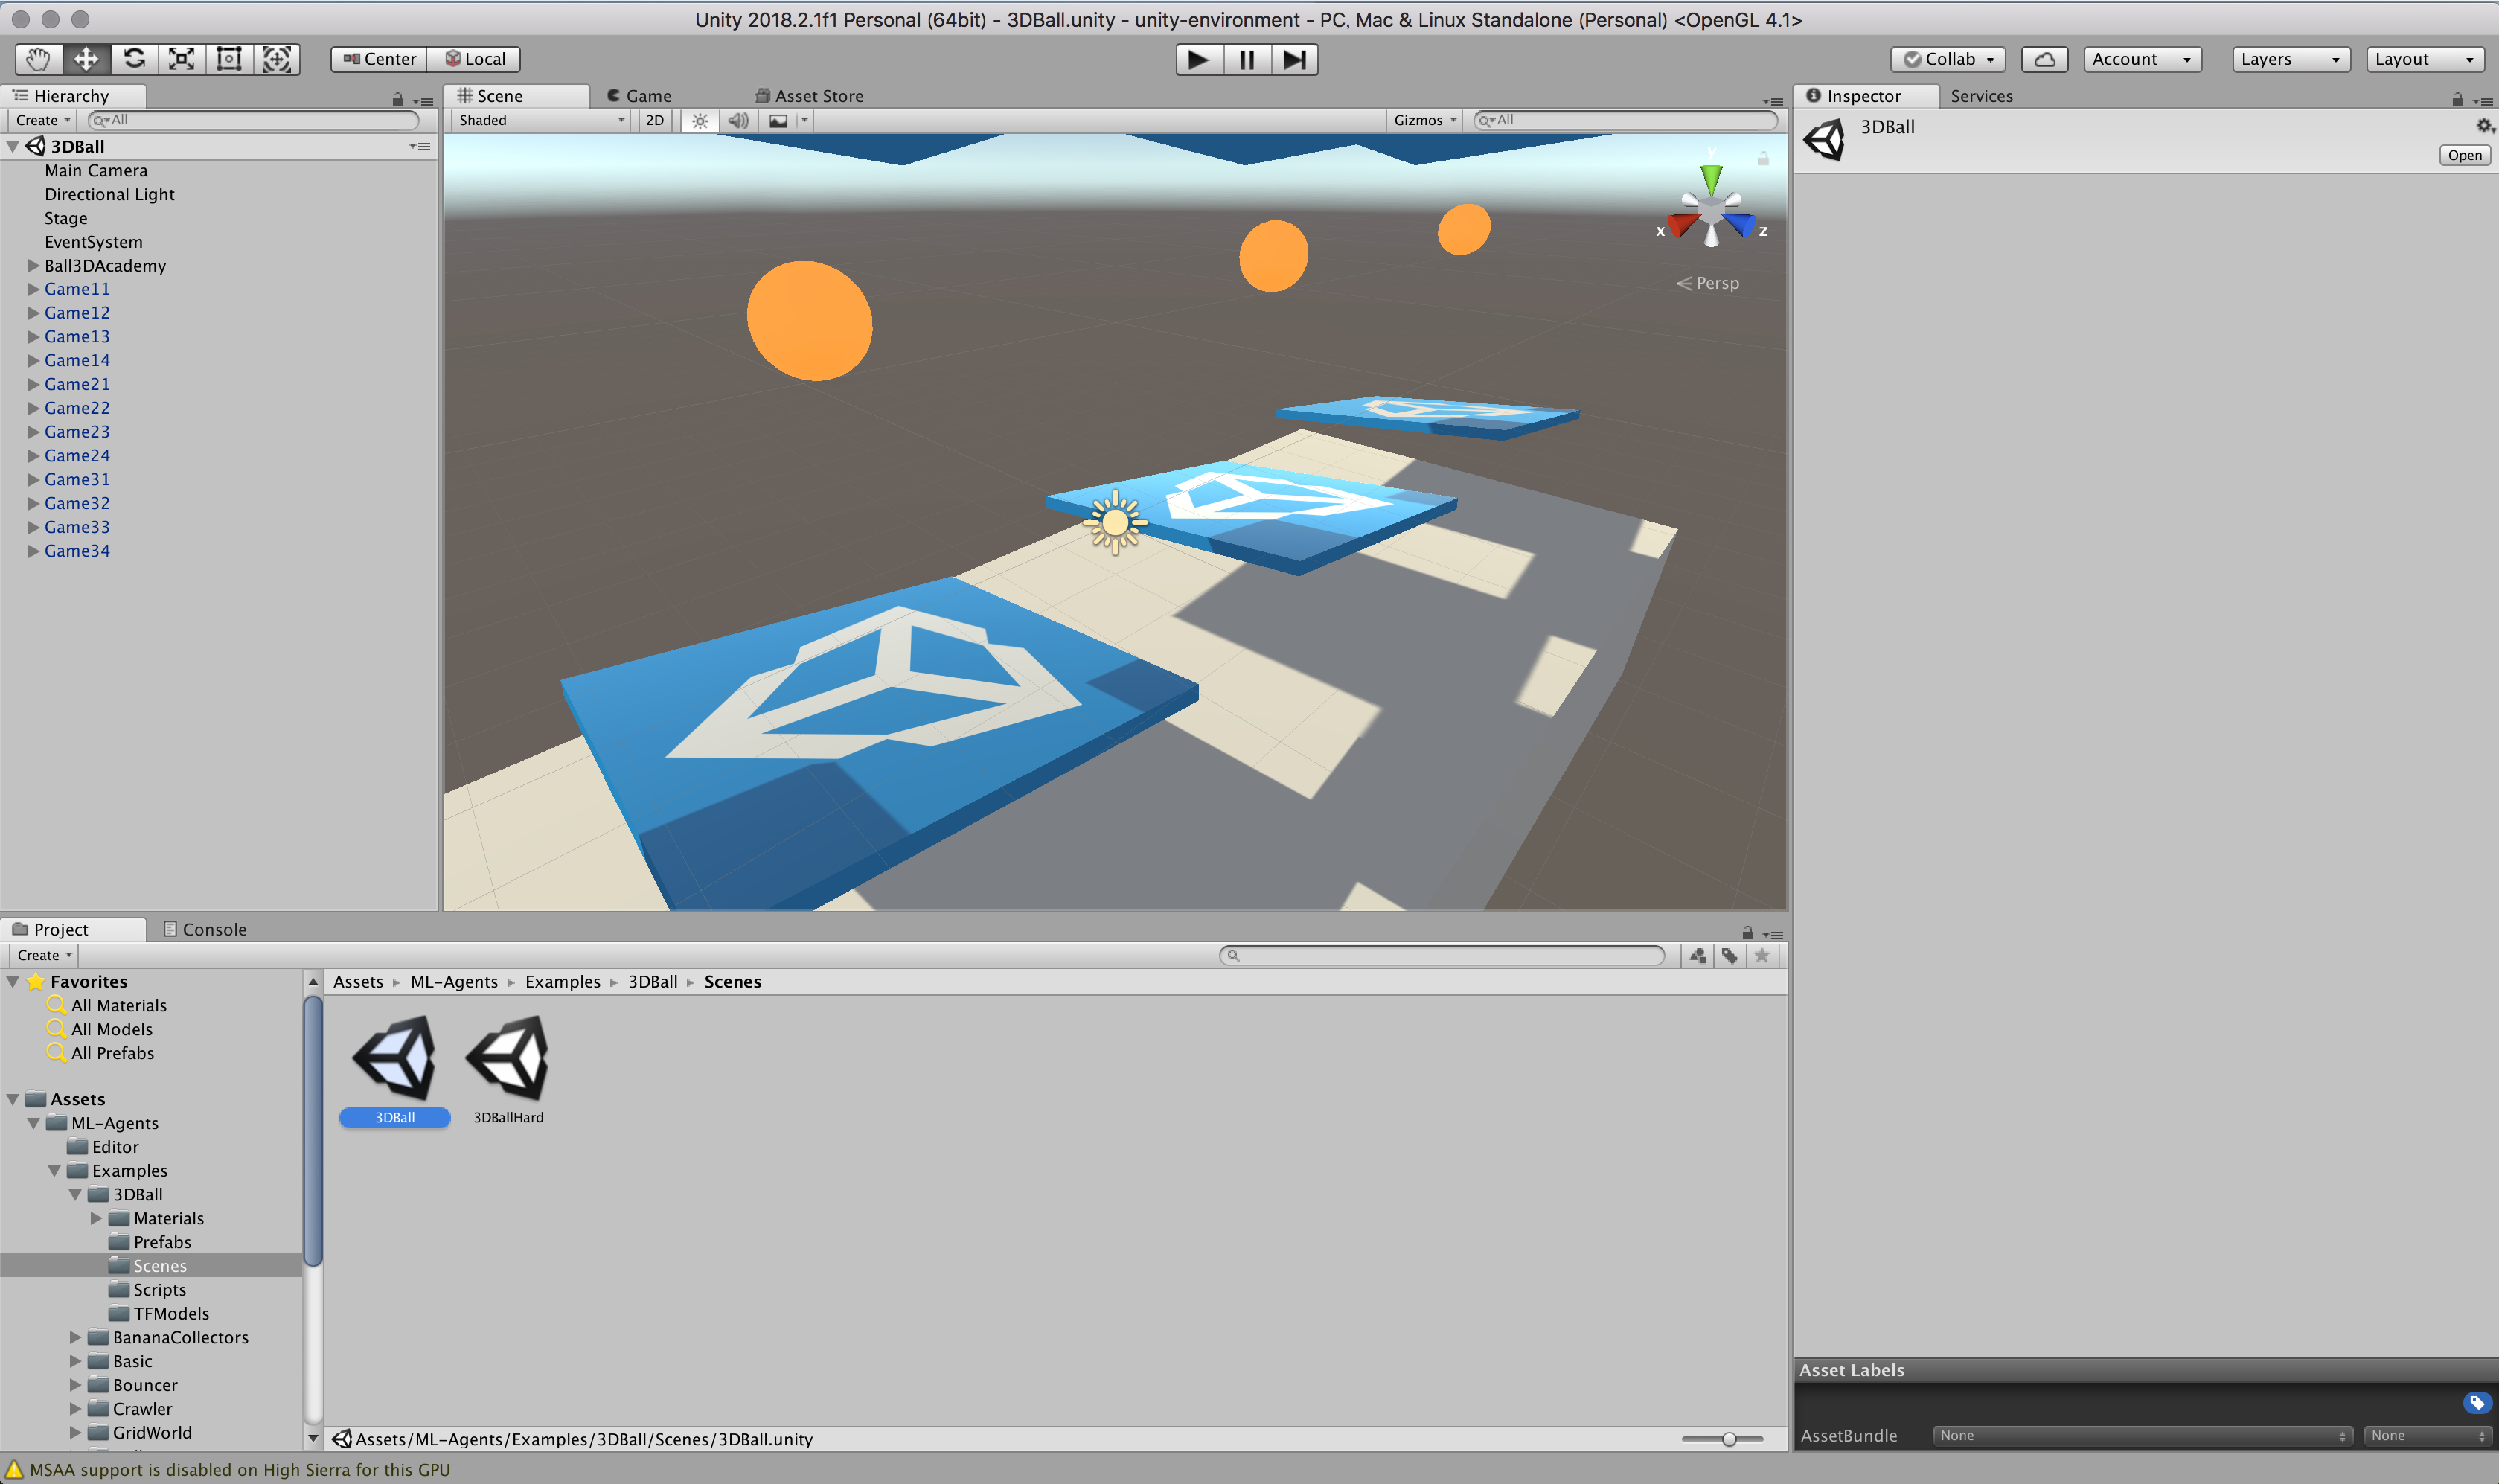
- Unityアプリの下パネルにある[Project]タブから以下のフォルダまで開く。
- [Assets] > [ML-Agents] > [Examples] > [3DBall] > [Scenes]
- 開いたら、[3DBall]ファイルがあるので、ダブルクリックして開く。

なんかでてきたー(感動)
Unityの上にある再生ボタンをクリックします。
なんかうごいたー(感動)
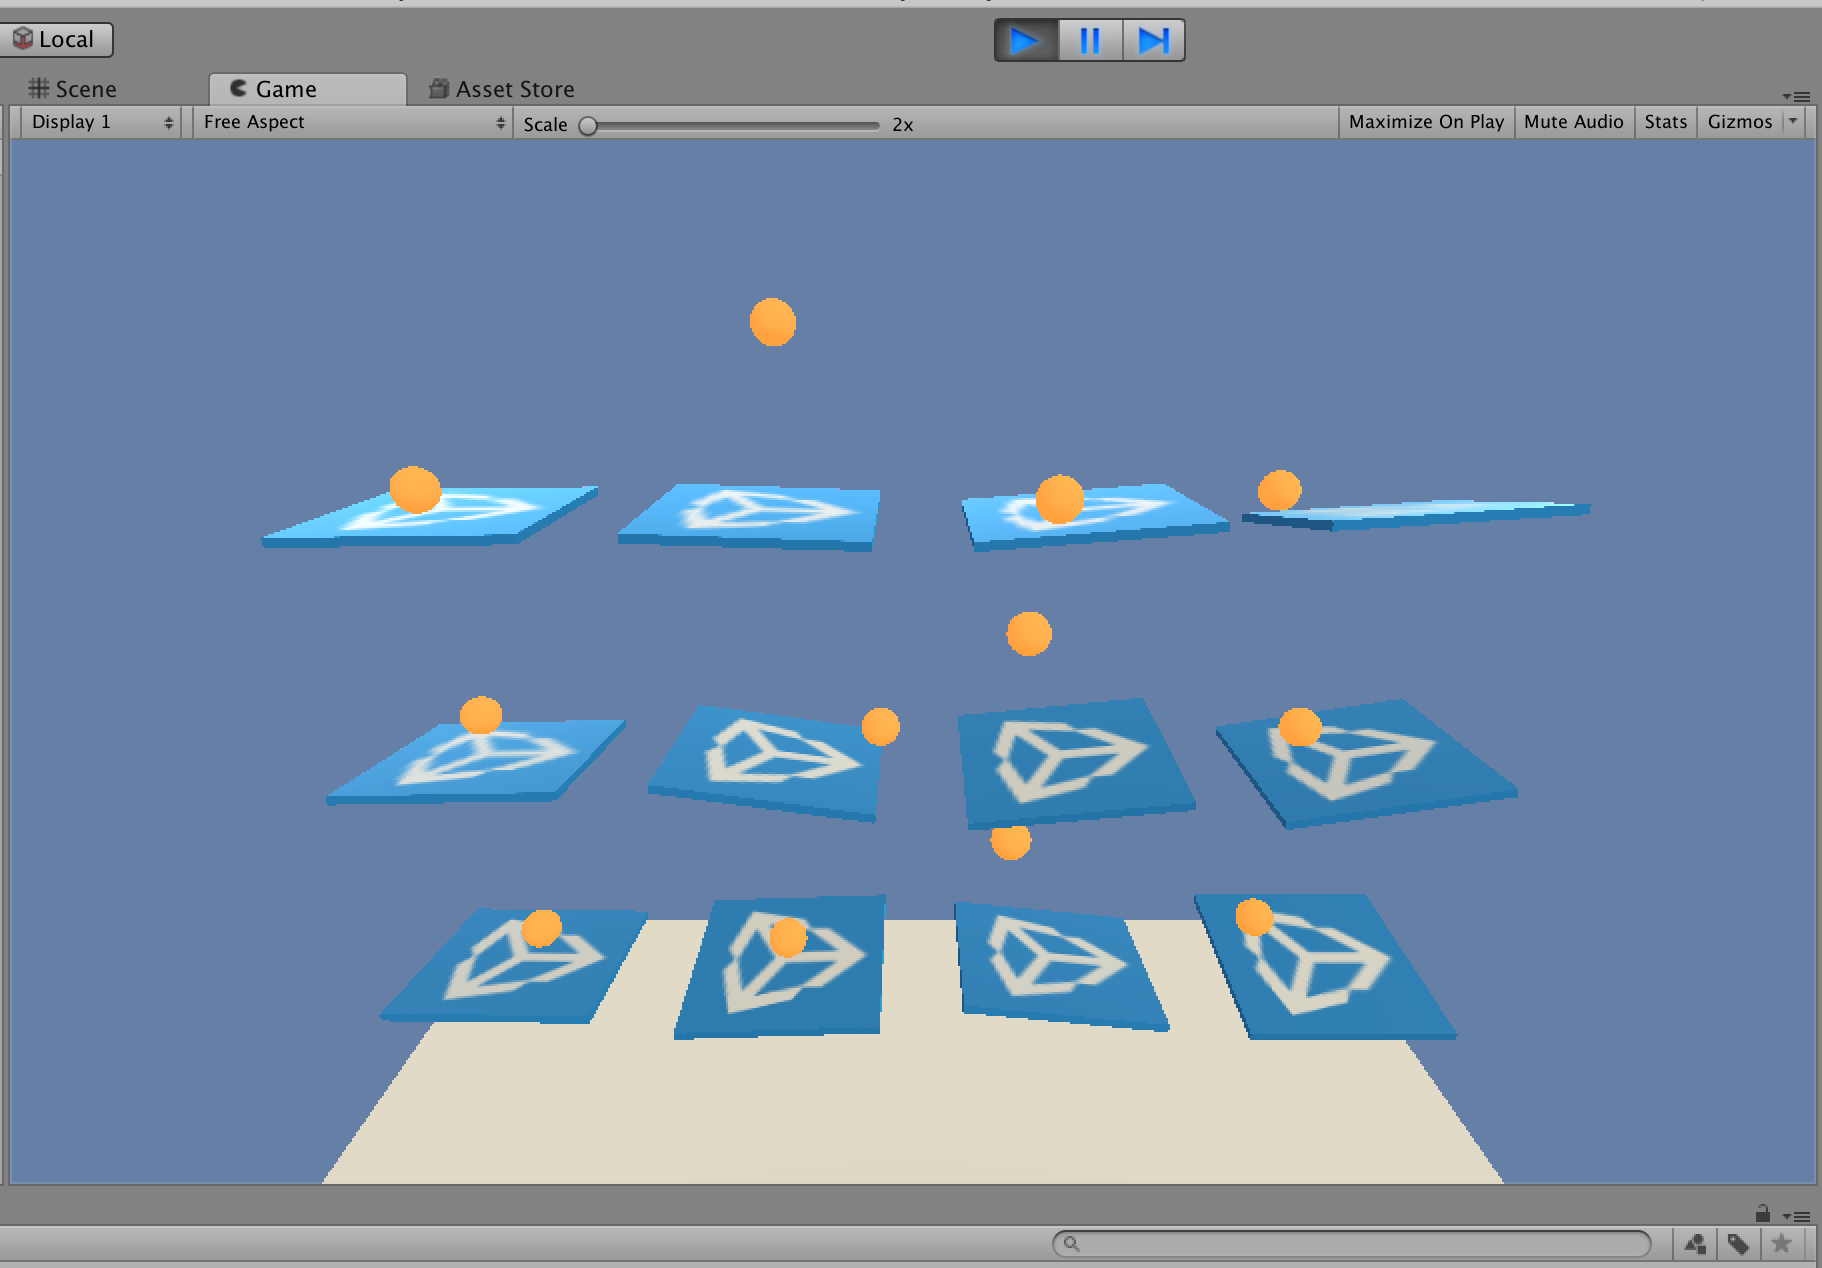
読み込んだサンプルが動作することが確認できました。
現時点ではボールが板からすぐに落ちてしまいます。これを機械学習させて、落とさないようにするわけです。
Scenes(シーン)の設定
ML-Agentsで学習させるための設定です。
- Unityアプリの[Edit]メニューから[Project Settings] > [Player]を開く

- [Inspector]パネルで以下の設定を確認する。
- [Resolution and Presentation]の[Run In Background]がチェックされている
- [Display Resolution Dialog]がDisableになっている

Prefabs(プレハブ)の設定
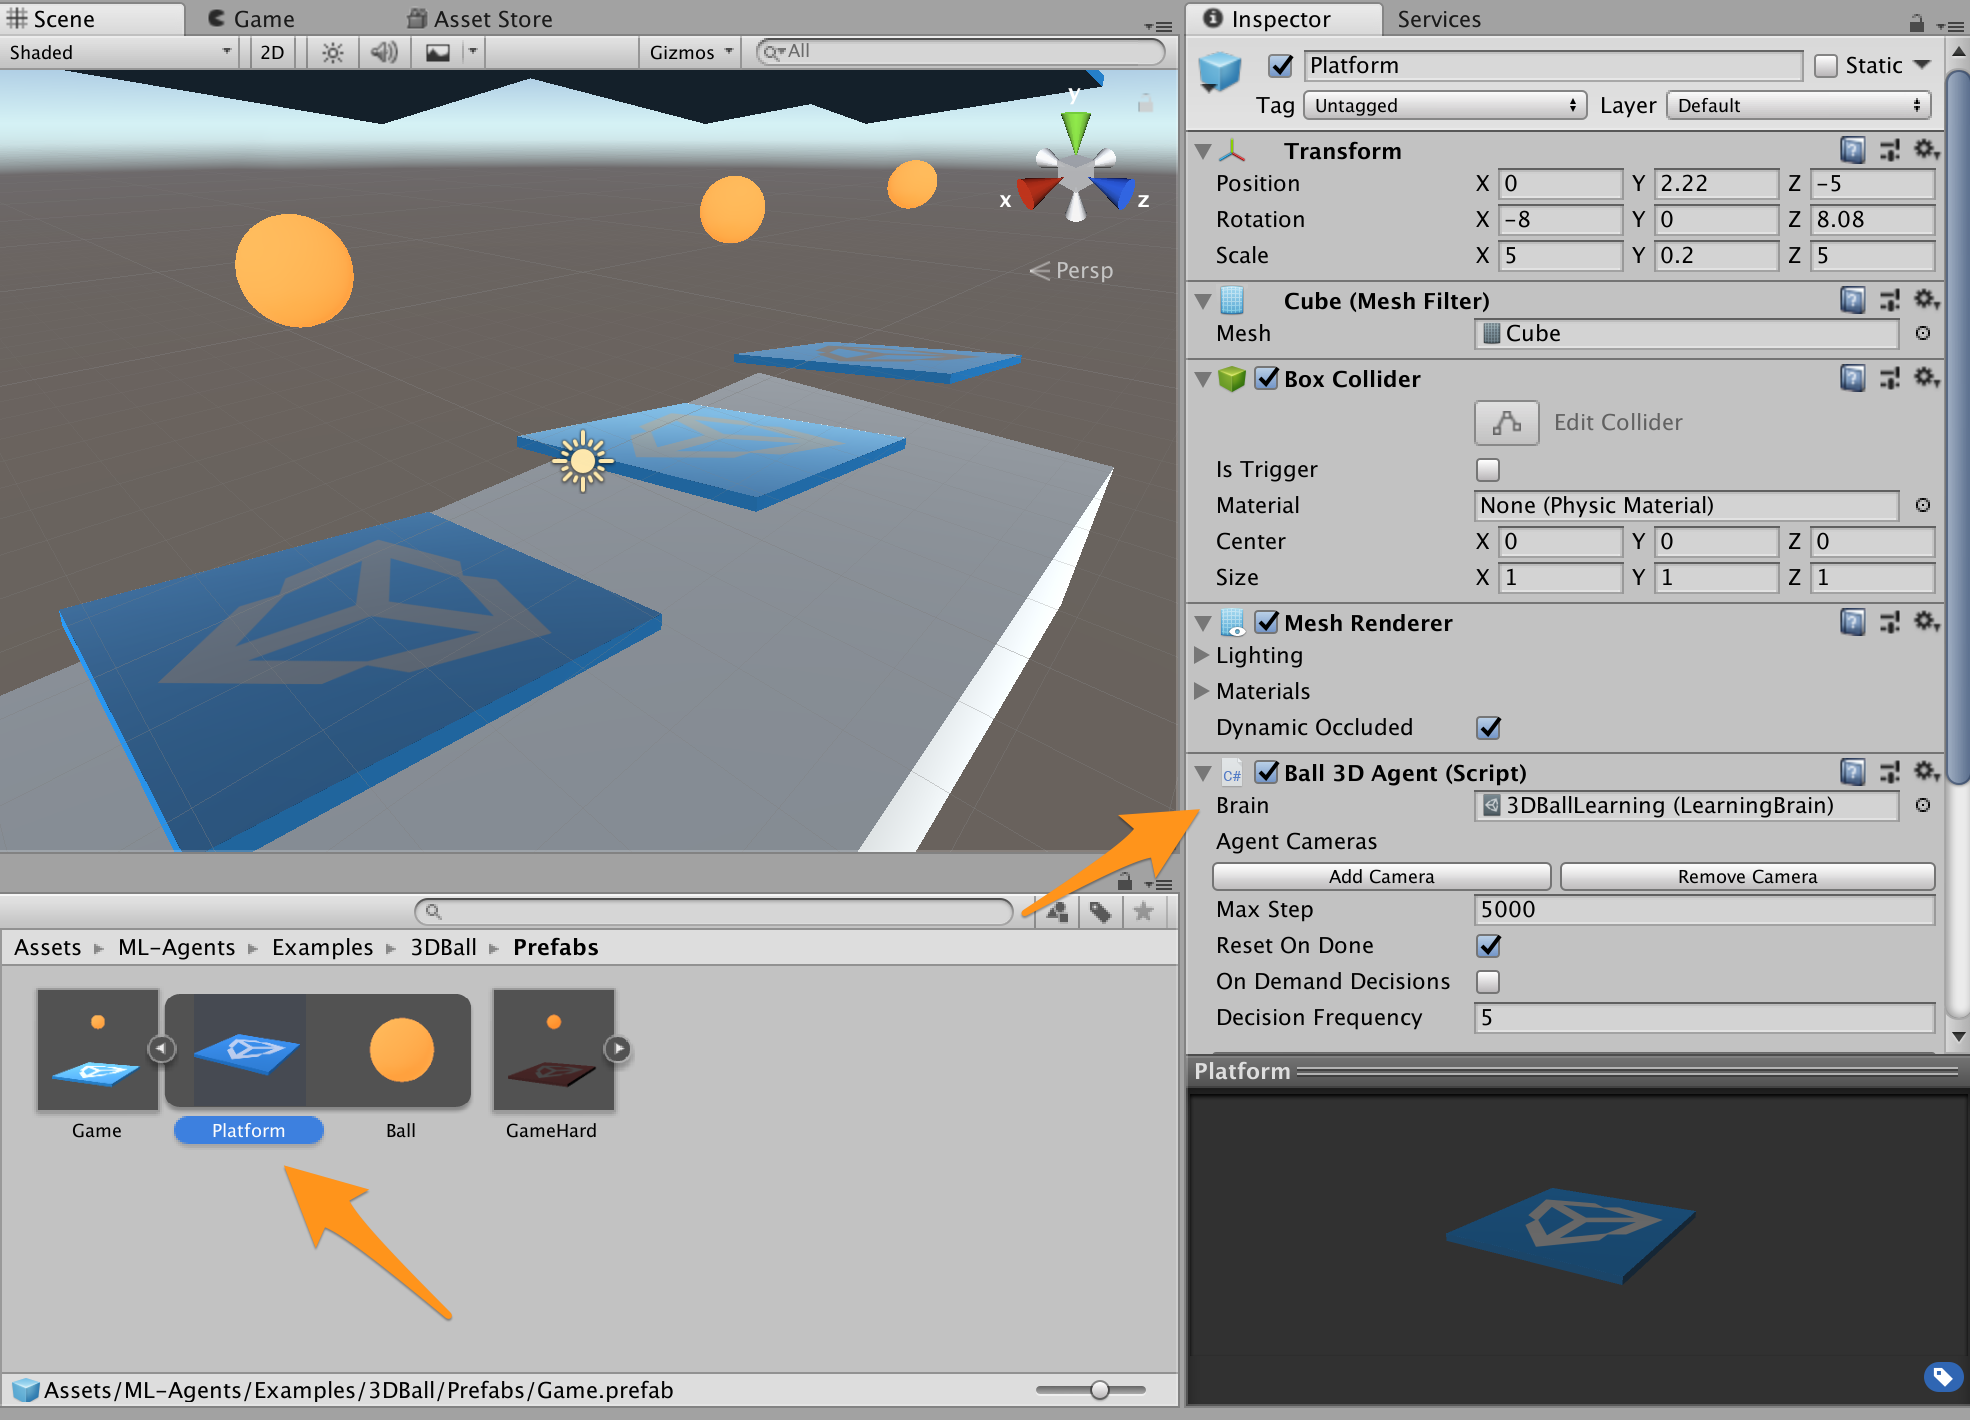
- Unityアプリの下にある[Project]タブから以下のフォルダまで開く
- [Assets] > [ML-Agents] > [Examples] > [3DBall] > [Prefabs]
- Prefabsフォルダ内の[Game]の[▶]ボタンをクリックして展開し、[Pratform]を選択する
- Unityアプリの右側にある[Insoector]パネルのBall 3D Agent(Script)にあるBrainを[3DBallLearning(LearningBrain)]に以下の手順で変更する
- [Project]タブから以下のフォルダまで開き、
- [Assets] > [ML-Agents] > [Examples] > [3DBall] > [Brains]
- [3DBallLearning]を[Insoector]パネルのBrainにドラッグ&ドロップする
- [Project]タブから以下のフォルダまで開き、
 - [Ctrl] + [s]キーでシーンを保存する
- 設定変更後、しっかりと保存しないと、ビルド時に設定が反映されなくてハマります。
- [Ctrl] + [s]キーでシーンを保存する
- 設定変更後、しっかりと保存しないと、ビルド時に設定が反映されなくてハマります。
Brainsの設定
- Unityアプリの左側にある[Hierarchy]パネルから[Ball3DAcademy]を選択する
- Unityアプリの右側にある[Inspector]パネルの[Broadcast Hub] > [Brains]に「3DBallLearning (LearningBrain)」が指定されていることを確認する
- 「3DBallLearning (LearningBrain)」横にある[Control]にチェックを入れる

※v0.5.0までは[Brain]に[Brain Type]という設定があったものが[Control]に変更されたみたいです。わかりにくくなりました。
学習させる
学習に必要な設定ができましたので、Unityアプリ上で学習させてみます。
コマンドの実行
コンソールに戻り、学習開始のコマンドを実行します。--run-id=firstRun のfirstRun は任意に決めてもらってOKです。
> cd 適当なディレクトリ/ml-agents/ml-agents
> mlagents-learn ../config/trainer_config.yaml --run-id=firstRun --train
(略)
INFO:mlagents.envs:Start training by pressing the Play button in the Unity Editor.
INFO:mlagents.envs:Start training by pressing the Play button in the Unity Editor. と出力されたら、Unityアプリの上部にある[▶]ボタンをクリックします。初期設定だと50,000ステップ実行するので少々時間がかかります。

(略)
INFO:mlagents.trainers: firstRun-0: 3DBallLearning: Step: 50000. Mean Reward: 100.000. Std of Reward: 0.000. Training.
INFO:mlagents.envs:Saved Model
INFO:mlagents.trainers:List of nodes to export for brain :3DBallLearning
INFO:mlagents.trainers: is_continuous_control
INFO:mlagents.trainers: version_number
INFO:mlagents.trainers: memory_size
INFO:mlagents.trainers: action_output_shape
INFO:mlagents.trainers: action
INFO:mlagents.trainers: action_probs
INFO:mlagents.trainers: value_estimate
INFO:tensorflow:Restoring parameters from ./models/firstRun-0/3DBallLearning/model-50001.cptk
INFO:tensorflow:Froze 20 variables.
Converted 20 variables to const ops.
学習結果をアプリに組み込む
学習が完了すると学習結果が.bytes ファイルに保存されます。
それをUnityでアプリに組み込むことができるようです。
TensorFlowSharpプラグインのインポート
学習結果を組み込むのに必要となるプラグインのインポートと設定を行います。
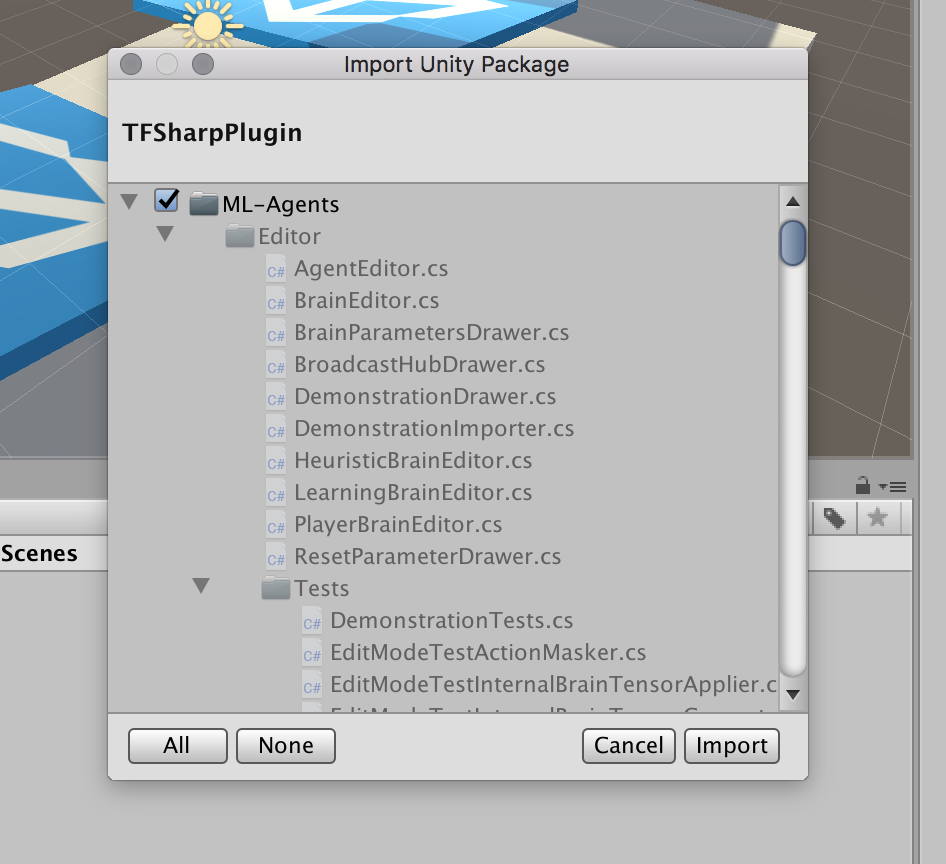
TensorFlowSharpプラグインをダウンロードしてインポートします。
https://s3.amazonaws.com/unity-ml-agents/0.5/TFSharpPlugin.unitypackage
プラグインをダウンロードしてファイルを開くと、UnityでImport確認ダイアログが表示されます。[Import]ボタンをクリックしてインポートします。こちらはv0.5.0から変わりないようです。
プラグインがインポートできたら、再度Playerの設定を行います。
- Unityアプリの[Edit]メニューから[Project Settings] > [Player]を選択する
- [Inspector]ビューの[Other Settings]欄で以下を設定する
- [Scripting Runtime Version]を[.Net 4.x Equivalent]にする
- [Scripting Defined Symbols]に
ENABLE_TENSORFLOWを入力する - [Allow 'unsafe' Code]にチェックを入れる
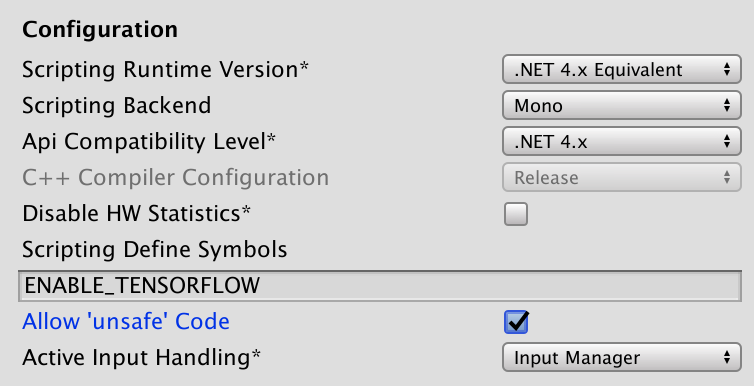
[Allow 'unsafe' Code]にチェックを入れないとエラーがでて実行できないのでご注意ください。
設定変更したらUnityアプリの[File] > [Save Project]で保存して、Unityアプリを再起動します。
学習結果ファイルの取り込み
ターミナルかFinderで学習結果を以下フォルダにコピーします。
- 学習結果ファイル:
models/firstRun-0/3DBallLearnig.bytes - 保存先:
UnitySDK/Assets/ML-Agents/Examples/3DBall/TFModels/
※すでに保存先に3DBallLearnig.bytes ファイルが存在していますので、リネームしてください。
> cp models/firstRun-0/3DBallLearnig.bytes ../UnitySDK/Assets/ML-Agents/Examples/3DBall/TFModels
- Unityアプリの[Project]パネルで以下ファイルを選択する
- [Assets] > [ML-Agents] > [Examples] > [3DBall] > [Brains] > [3DBallLearning]
- Unityアプリの[Project]パネルで以下フォルダを選択する
- [Assets] > [ML-Agents] > [Examples] > [3DBall] > [TFModels]
- Unityアプリの[Inspector]パネルにある[Model]という項目に[TFModels]フォルダ内の
3DBallLearning.bytesファイルをドラッグ&ドロップする
 - Unityアプリの[Hierarchy]パネルから以下を選択する
- [3DBall] > [Ball3DAcademy]
- Unityアプリの[Inspector]パネルにある[Brains] > [3DBallLearning(LearningBrain)]横の[Control]のチェックを外す
- Unity上部にある[▶]ボタンをクリックする
- Unityアプリの[Hierarchy]パネルから以下を選択する
- [3DBall] > [Ball3DAcademy]
- Unityアプリの[Inspector]パネルにある[Brains] > [3DBallLearning(LearningBrain)]横の[Control]のチェックを外す
- Unity上部にある[▶]ボタンをクリックする
これで、学習結果が組み込まれた状態でアプリが起動します。
50,000ステップ学習すると動きが穏やかで、もはやプロです。

サンプルは他にもあるので、いろいろとお試しあれ。
参考
MacでUnity ML-Agentsの環境を構築する(v0.5.0対応) - Qiita
https://qiita.com/kai_kou/items/6478fa686ce1af5939d8
【Unity】Unityで機械学習する「ML-Agent」を色々と試して得た知見とか
http://tsubakit1.hateblo.jp/entry/2018/02/18/233000
ml-agents/Installation.md at master · Unity-Technologies/ml-agents
https://github.com/Unity-Technologies/ml-agents/blob/master/docs/Installation.md
ml-agents/Basic-Guide.md at master · Unity-Technologies/ml-agents
https://github.com/Unity-Technologies/ml-agents/blob/master/docs/Basic-Guide.md#setting-up-ml-agents-within-unity
Using an Environment Executable
https://github.com/Unity-Technologies/ml-agents/blob/master/docs/Learning-Environment-Executable.md
Unityの公式サンプルml-agentsでAIを試す
http://am1tanaka.hatenablog.com/entry/2017/11/08/230525
Macでanyenvをつかってpython環境構築(bash、fish対応) - Qiita
https://qiita.com/kai_kou/items/f54931991a781b96bb9c
Macでhomebrewを使ってUnityをインストールする(Unity Hub、日本語化対応)
https://qiita.com/kai_kou/items/445e614fb71f2204e033