konippi さんによる、「GitHub App の秘密鍵を AWS KMS に閉じ込める」の記事を、Google Cloud上で再現していきます。
従来の秘密鍵そのものをワークフローで扱う方法の欠点や、この手法のメリットは上記記事を確認ください。
Google Cloud上で構築した場合でも、同じようなメリットがあります。
に、キーをkey vaultに入れて、sign onlyにするのがよいと書かれています。
それをGoogle Cloud上で実現します。
従来の方法では秘密鍵ファイルをGitHub Secretsなどに保存し、ワークフロー実行時にメモリや環境変数に展開して使用します。
本手法では秘密鍵はCloud KMSから外に出ることなく、署名処理のみをKMS APIで行います。
秘密鍵そのものを手元で管理する必要がなくなるため、流出リスクを大幅に低減できます。
- この記事は人の手 + AIで書かれています。AIでレビューし改善案を確認した上で採用しています
- コードはAIで書き、実際にデプロイした上で動作確認したものを掲載しています
- 図表はAI生成です
- まとめの項目は100%AI生成です
前提条件
- GitHub App を作成済みであること
- GitHub App をリポジトリにインストールしてあること
- GitHub App の秘密鍵が手元にあること
- Google Cloud プロジェクトが利用できること
- 他と独立したプロジェクトであることが望ましい
- 監査ログの分離や IAM の影響範囲の限定のため
流れ
GitHub App でリポジトリなどの操作をするには、 installation access token が必要です。
installation access token を発行するためには、 GitHub App の秘密鍵で署名された JWT を発行する必要があります。
大きな流れは以下の通りです。
https://docs.github.com/en/apps/creating-github-apps/authenticating-with-a-github-app/authenticating-as-a-github-app-installation や https://zenn.dev/tmknom/articles/github-apps-token に記載されている流れと同じです。
このうち、 JWT 発行 で使う秘密鍵を Cloud KMS に閉じ込め、 JWT の署名プロセスに KMS API を使います。
作成リソース
必要になるリソースは以下の通りです。
GitHub から Google Cloud への認証はなんでもいいのですが、今回は Workload Identity Federation(WIF) を利用します。
- Cloud KMS
- GitHub App の秘密鍵を保持するために使用
- Workload Identity Federation(WIF)
- GitHub Actions から Google Cloud にアクセスするために使用
Terraform 構成例
必要なAPIの有効化
resource "google_project_service" "cloud_kms" {
  project = var.google_project_id
  service = "cloudkms.googleapis.com"
}

resource "google_project_service" "iam" {
  project = var.google_project_id
  service = "iam.googleapis.com"
}

resource "google_project_service" "iam_credentials" {
  project = var.google_project_id
  service = "iamcredentials.googleapis.com"
}

resource "google_project_service" "sts" {
  project = var.google_project_id
  service = "sts.googleapis.com"
}
-
cloudkms.googleapis.com: KMSリソースの作成と鍵の署名操作に必要 -
iam.googleapis.com: WIFプールとプロバイダーの作成に必要。またWIFのトークン交換時のaudience URLにも使用される -
sts.googleapis.com: WIF認証のランタイムに必要。GitHub OIDCトークンをGoogle Cloudアクセストークンに交換する際に呼び出される -
iamcredentials.googleapis.com: WIFの動作に必要
KMS
KMS は以下の Terraform で作成しました。
の流れに沿って作成していきます。
resource "google_kms_key_ring" "github_app" {
  project    = var.google_project_id
  name       = "github-app"
  location   = var.google_region
  depends_on = [google_project_service.cloud_kms]
}

resource "google_kms_crypto_key" "github_app_private_key" {
  name     = "private-key"
  key_ring = google_kms_key_ring.github_app.id
  purpose  = "ASYMMETRIC_SIGN"

  import_only                   = true
  skip_initial_version_creation = true

  version_template {
    algorithm        = "RSA_SIGN_PKCS1_2048_SHA256"
    protection_level = "SOFTWARE"
  }

  lifecycle {
    prevent_destroy = true
  }
}
- 鍵を束ねるキーリングの作成
- 秘密鍵を保持する鍵の作成
- 実際の鍵はこのあとインポートするため、Terraformでは鍵の作成をしないように設定しています
-
prevent_destroy = trueにより、terraform destroyなどでの誤操作による削除を防いでいます
今回格納している鍵は秘密鍵なので、鍵の目的(purpose)には非対称署名(ASYMMETRIC_SIGN)を指定します。
JWT では alg として RS256 を使用しているため、RSA_SIGN_PKCS1のアルゴリズムを指定します。
GitHub からダウンロードできる秘密鍵は2048bitのRSA鍵なので、2048bitのアルゴリズムになります。
よって version_template の algorithm には RSA_SIGN_PKCS1_2048_SHA256 を指定します。
protection_level は https://docs.cloud.google.com/kms/docs/resource-hierarchy?hl=ja#protection_level に記載のあるものを使用します。
各レベルの違いは https://docs.cloud.google.com/kms/docs/protection-levels?hl=ja に記載があります。
保護レベルにより、FIPS 140-2の準拠レベルやコストが異なります。
今回は最も安価な SOFTWARE を指定しています。
HSM に格納してより強固なセキュリティを確保する必要があるのであれば HSM を指定してください。
保護レベルとコストについては https://cloud.google.com/kms/pricing?hl=ja を参照してください。
IAM
GitHub Actions からの Workload Identity Federation 認証を設定しています。
attribute_mapping に指定できる値の詳細は https://docs.github.com/en/actions/reference/security/oidc や https://docs.github.com/en/actions/concepts/security/openid-connect を確認ください。
attribute_condition でトークン交換を許可するCEL条件式を指定します。この設定で認証できるリポジトリやワークフローが決まるため、設定を間違えると誰でも認証できるようになってしまいます。注意してください。
ここでの設定は重要で、どのワークフローやリポジトリが Cloud KMS を使えるかを制御します。
承認が必須な environment を条件に加えることで、GitHub App の使用に承認フローを挟むことも可能です。
リポジトリには OIDC のトークンに含められるカスタムプロパティを指定できるので、その値を使った制御もできます。
variable "github_repos" {
  type = list(object({
    repo                = string
    attribute_condition = string
    pool_provider_name  = string
  }))
  default     = []
  description = "GitHub repos for WIF"
}

resource "google_iam_workload_identity_pool" "github" {
  project                   = var.google_project_id
  workload_identity_pool_id = "github-actions"
  display_name              = "GitHub Actions"
  depends_on                = [google_project_service.iam]
}

resource "google_iam_workload_identity_pool_provider" "github" {
  for_each = { for r in var.github_repos : r.repo => r }

  project                            = var.google_project_id
  workload_identity_pool_id          = google_iam_workload_identity_pool.github.workload_identity_pool_id
  workload_identity_pool_provider_id = each.value.pool_provider_name
  display_name                       = each.value.pool_provider_name

  attribute_mapping = {
    "google.subject"             = "assertion.sub"
    "attribute.repository"       = "assertion.repository"
    "attribute.repository_owner" = "assertion.repository_owner"
    "attribute.workflow_ref"     = "assertion.job_workflow_ref"
  }

  attribute_condition = each.value.attribute_condition

  oidc {
    issuer_uri = "https://token.actions.githubusercontent.com"
  }
}

resource "google_kms_crypto_key_iam_binding" "signer" {
  crypto_key_id = google_kms_crypto_key.github_app_private_key.id
  role          = "roles/cloudkms.signer"
  members = [
    for r in var.github_repos :
    "principalSet://iam.googleapis.com/${google_iam_workload_identity_pool.github.name}/attribute.repository/${r.repo}"
  ]
}
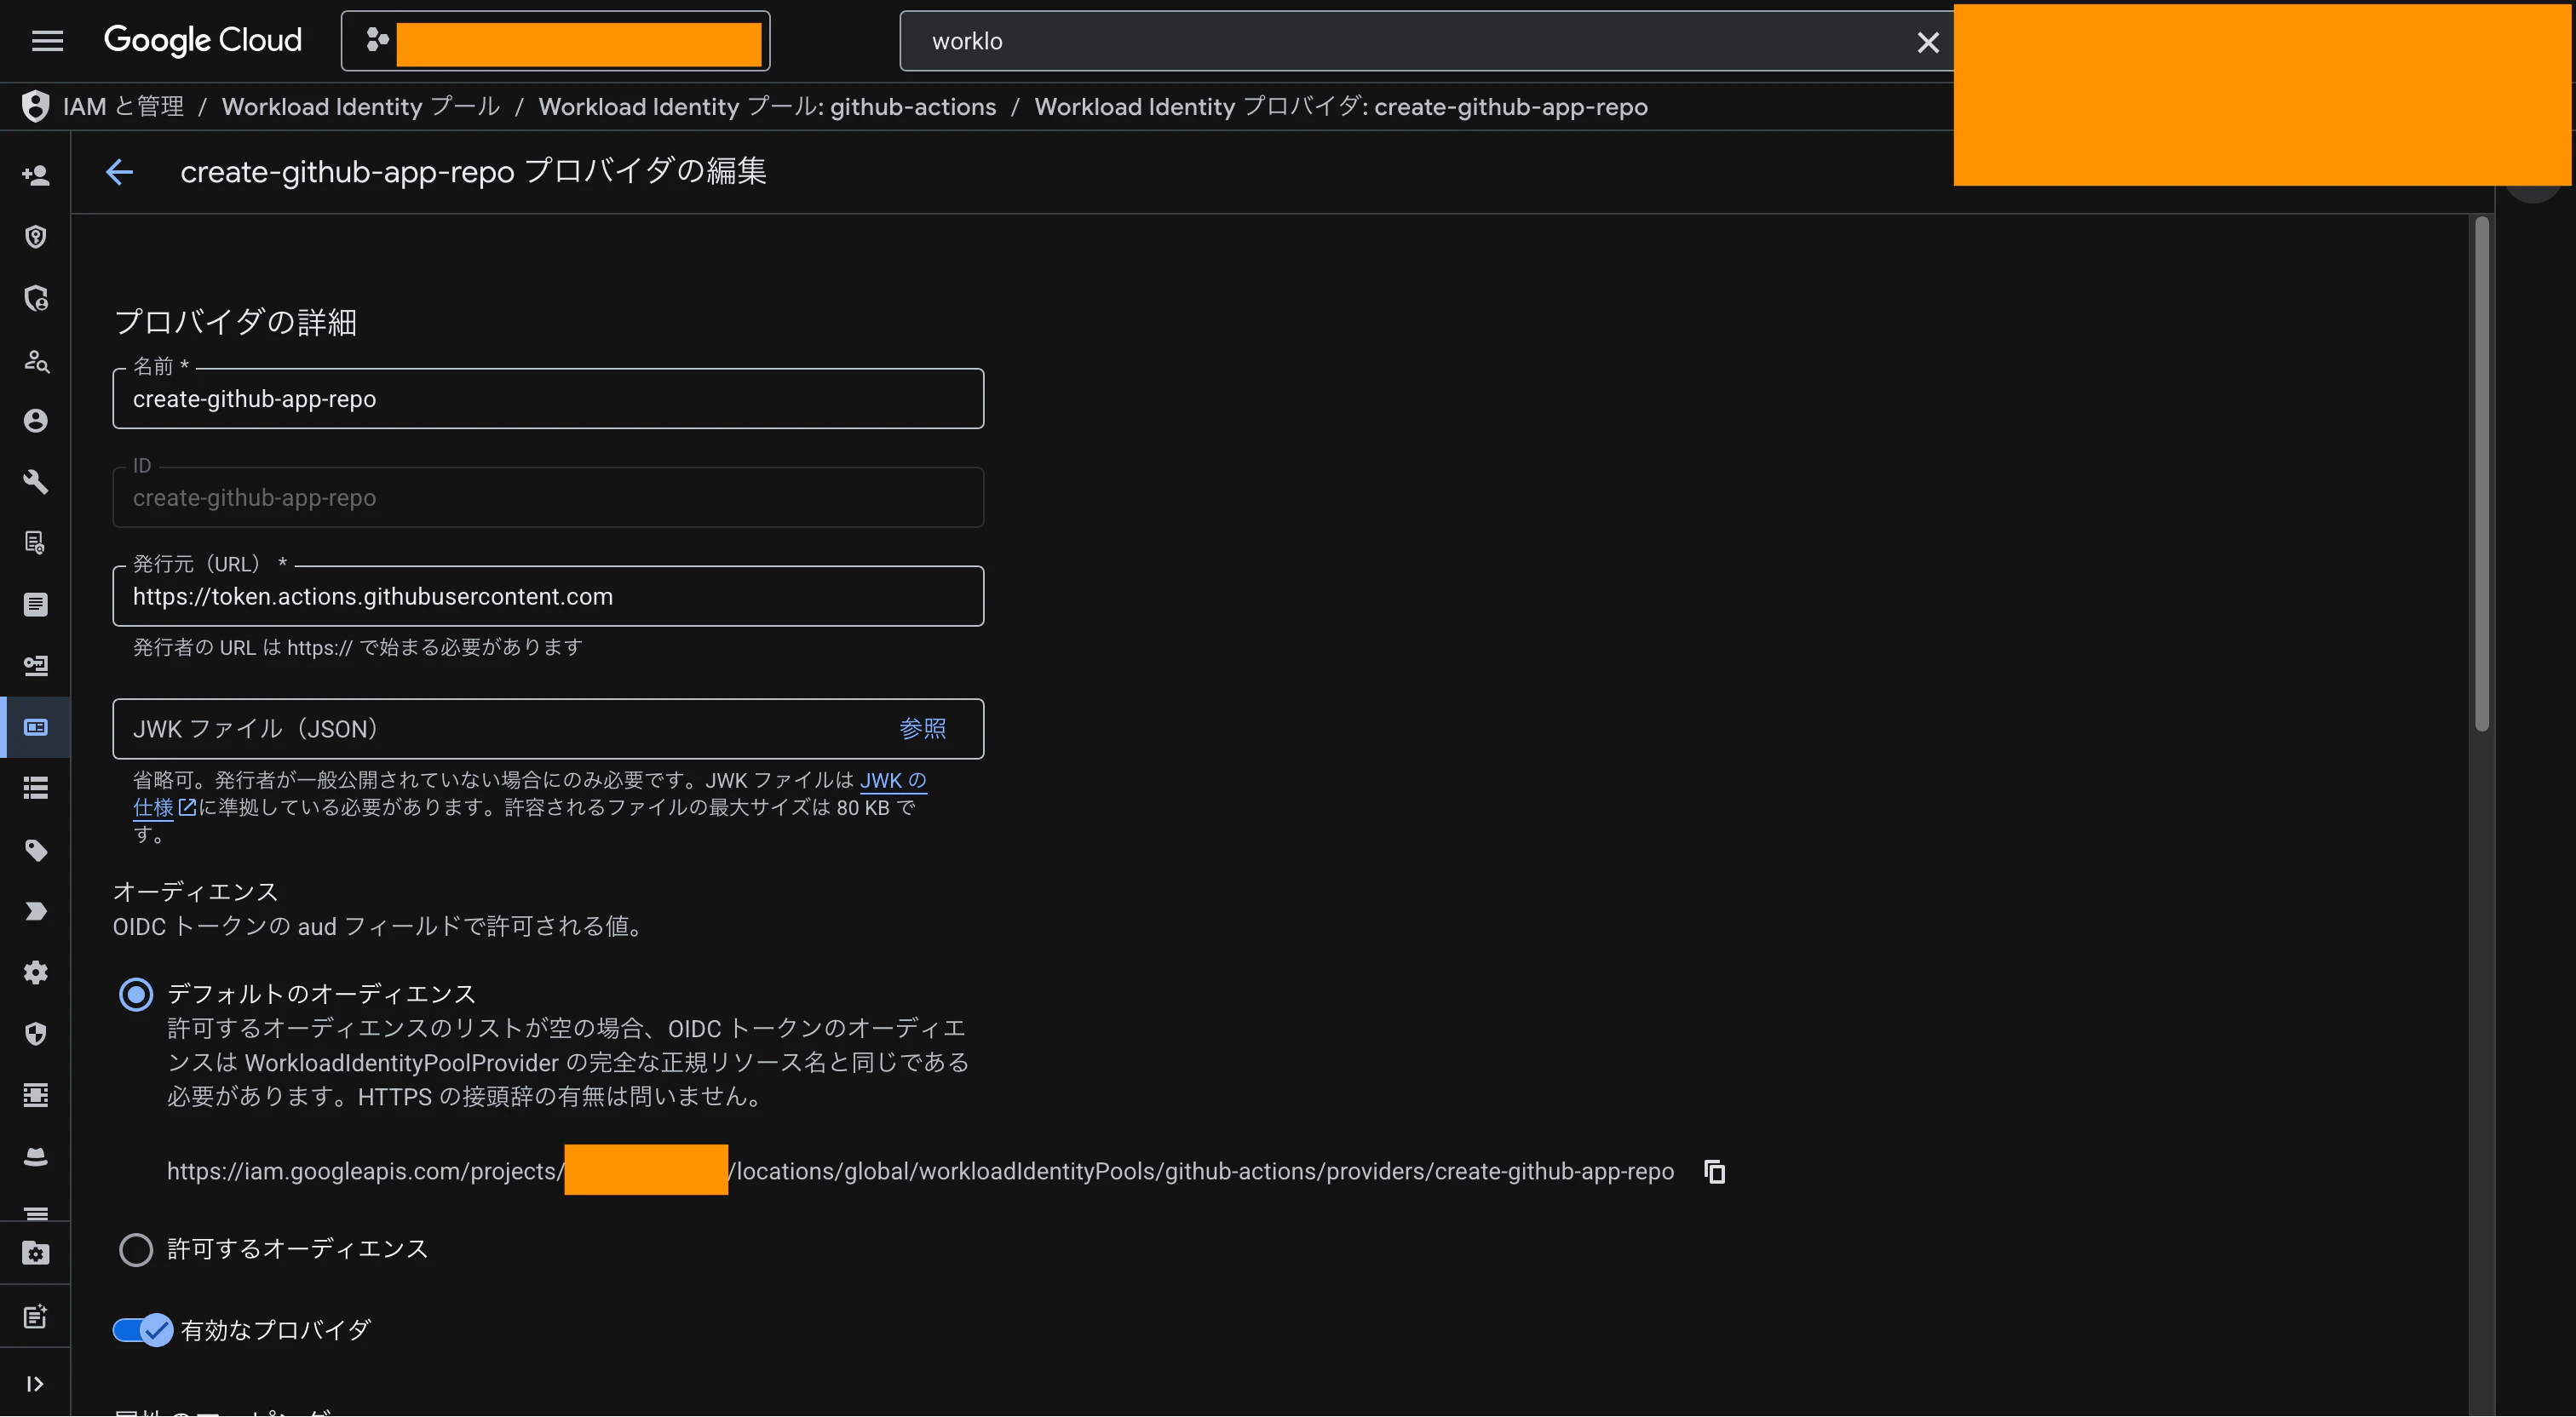
下図の通りに作成できます。
図中、「デフォルトのオーディエンス」の箇所にURLが表示されます。
この値からリソース名がわかるので、記録してください。
https://iam.googleapis.com/projects/PROJECT_NUMBER/locations/global/workloadIdentityPools/POOL/providers/PROVIDER の形式になっているので、 https://iam.googleapis.com/ の箇所を除いたものがリソース名です。
上記の Terraform では google_kms_crypto_key_iam_binding を使って権限を付与しています。
このリソースは作成した鍵に対する roles/cloudkms.signer のすべての権限を管理するものであり、コンソールなどTerraform外から作成された roles/cloudkms.signer の権限をすべて削除します。
この挙動が困る場合には google_kms_crypto_key_iam_member を使用してください。こちらであればTerraform外で付与された権限に影響ありません。
ログ設定
Google Cloud では AWS と異なり、デフォルトでは KMS 鍵の使用(データアクセス)はログ出力されません。
そのため明示的に KMS でのデータアクセスをログに出すように設定しておきます。
resource "google_project_iam_audit_config" "cloud_kms" {
  project = var.google_project_id
  service = "cloudkms.googleapis.com"

  audit_log_config {
    log_type = "DATA_READ"
  }

  audit_log_config {
    log_type = "DATA_WRITE"
  }
}
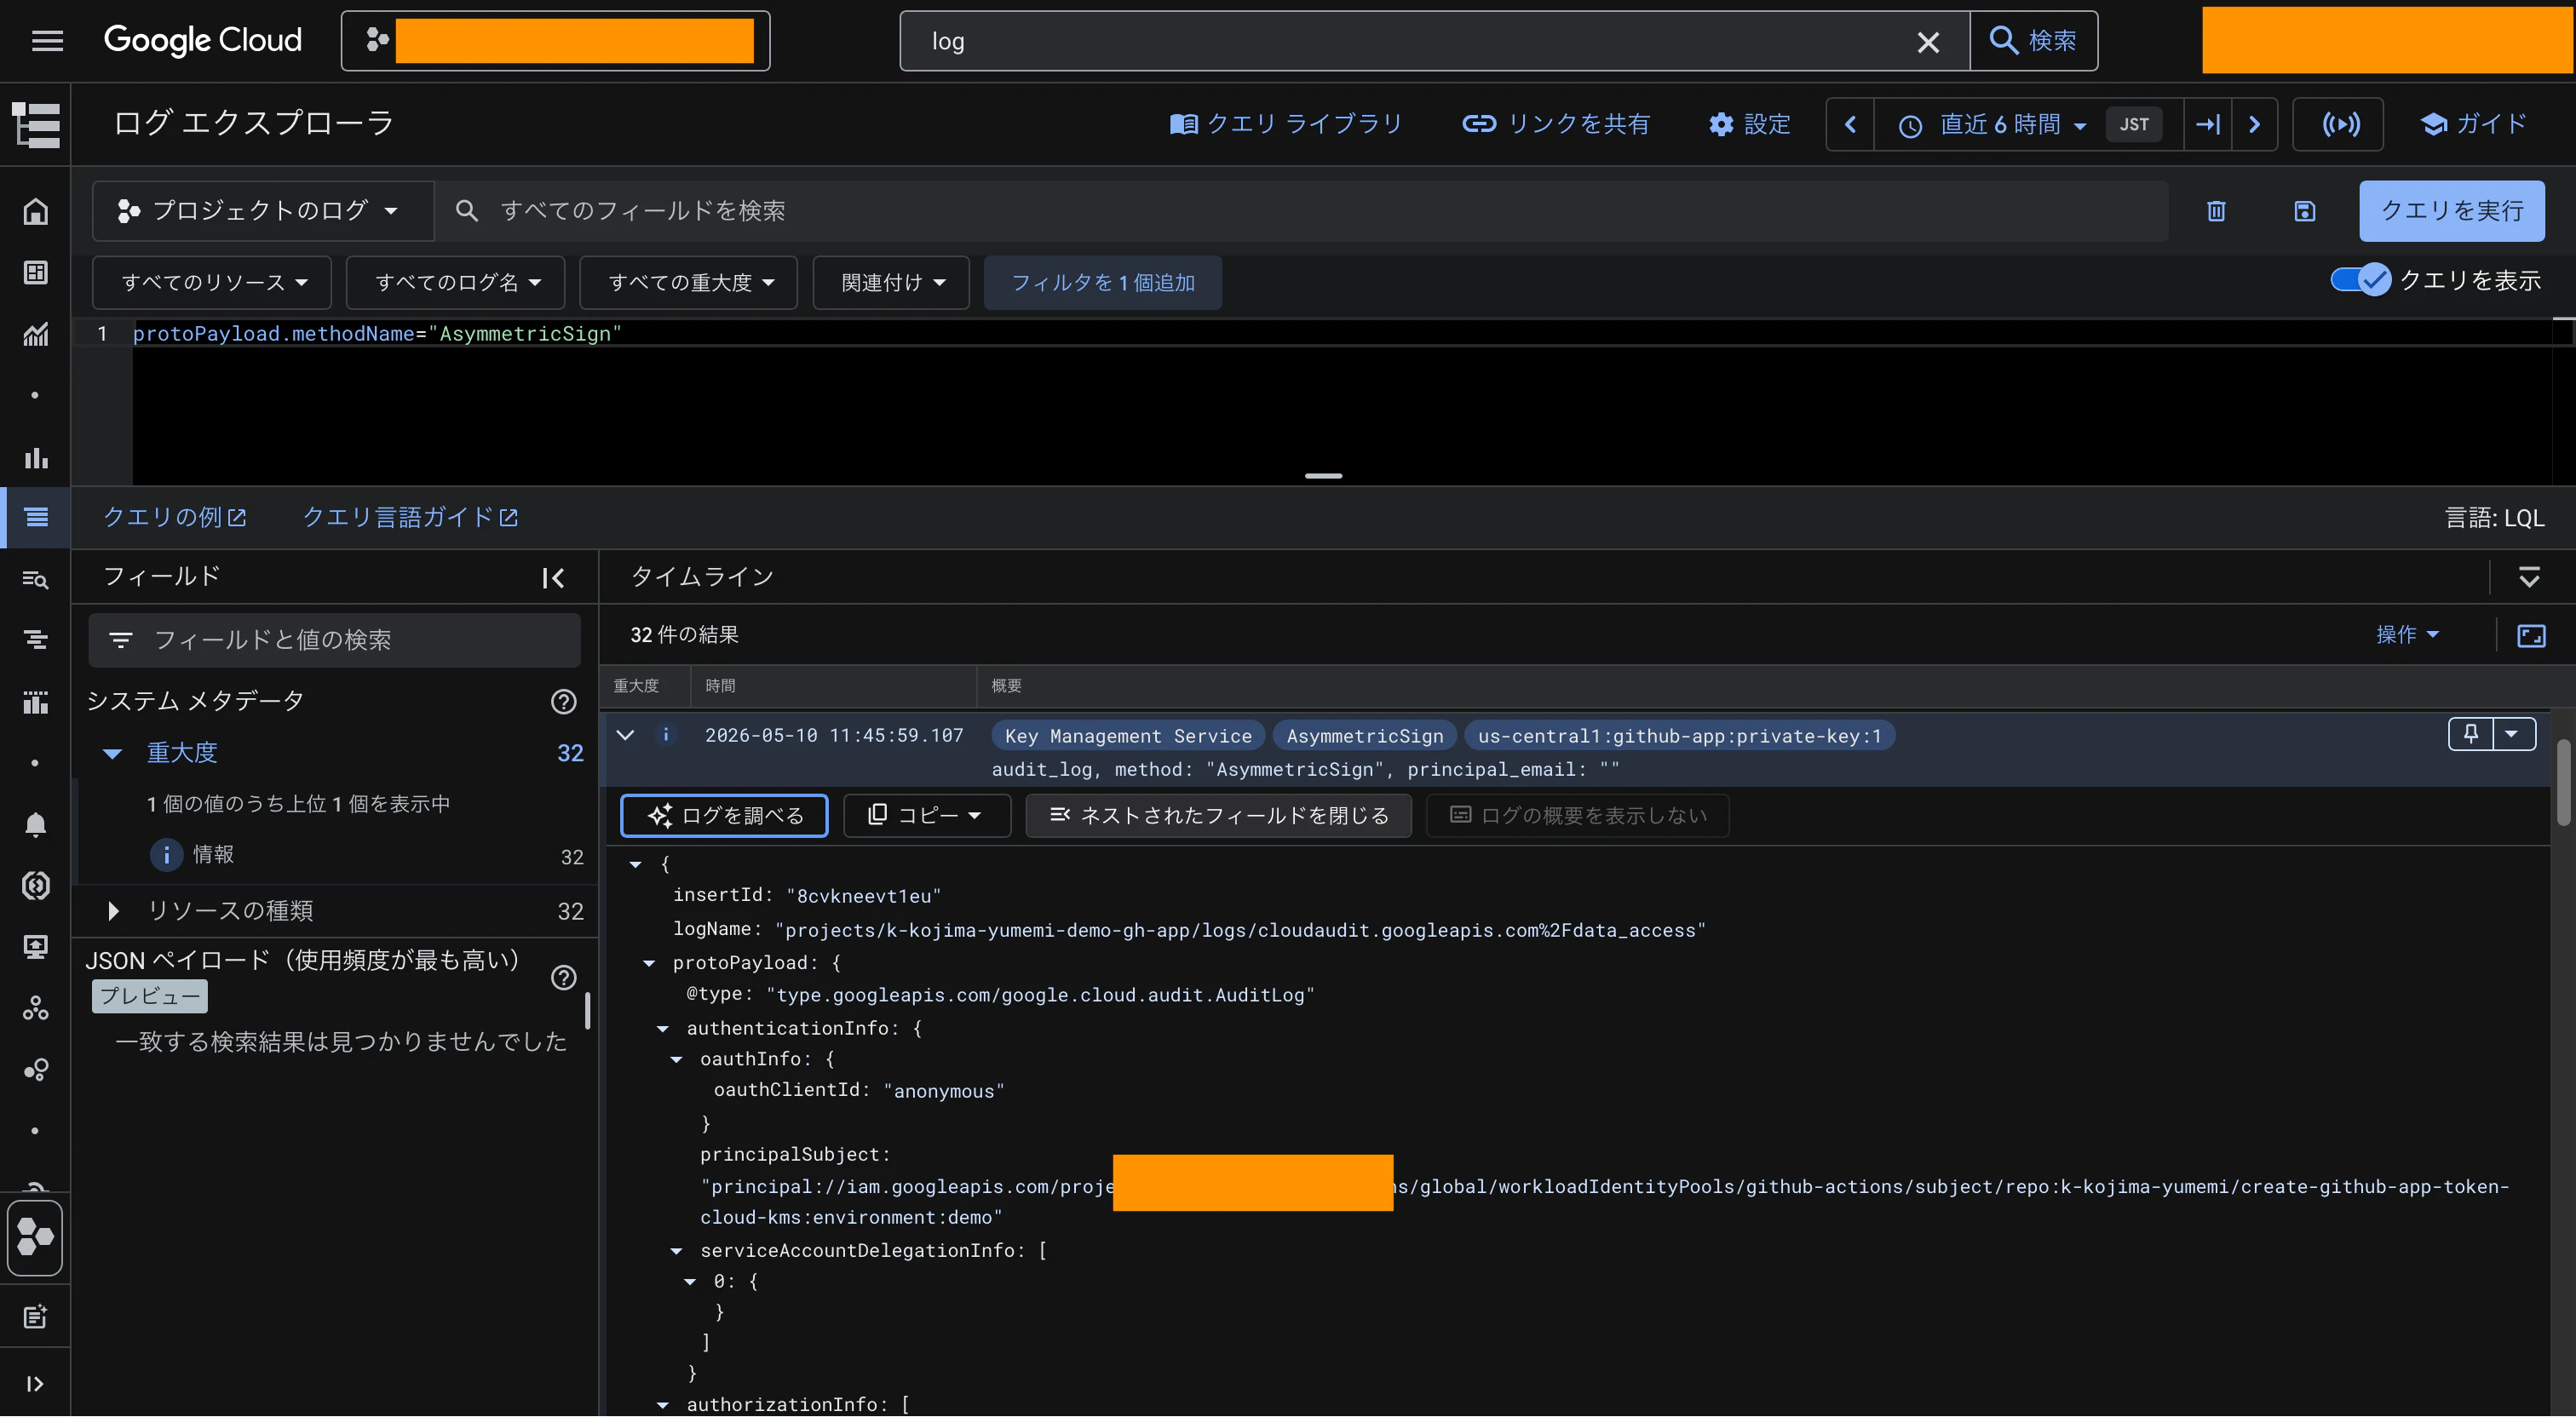
ログエクスプローラでは下記のようなクエリで鍵の使用を確認できます。
protoPayload.methodName="AsymmetricSign"
protoPayload.resourceName="projects/<プロジェクト名>/locations/<鍵のロケーション>/keyRings/github-app/cryptoKeys/private-key/cryptoKeyVersions/1"
protoPayload.resourceName は鍵のリソース名です。名前などは例として上記の設定で作成した場合を載せています。
OIDC で認証している場合 principal_email: "" と空っぽの値になりますが、 protoPayload.authenticationInfo.principalSubject の値を確認することでリポジトリがわかります。
実際のログは以下の感じになります。鍵のロケーションは us-central1 で作成しています。
{
  "protoPayload": {
    "@type": "type.googleapis.com/google.cloud.audit.AuditLog",
    "status": {},
    "authenticationInfo": {
      "serviceAccountDelegationInfo": [
        {}
      ],
      "principalSubject": "principal://iam.googleapis.com/projects/PROJECT_NUMBER/locations/global/workloadIdentityPools/github-actions/subject/repo:k-kojima-yumemi/create-github-app-token-cloud-kms:environment:demo",
      "oauthInfo": {
        "oauthClientId": "anonymous"
      }
    },
    "requestMetadata": {
      "callerIp": "172.214.200.167",
      "callerSuppliedUserAgent": "grpc-node-js/1.14.3,gzip(gfe)",
      "requestAttributes": {
        "time": "2026-05-10T02:45:59.122454257Z",
        "auth": {}
      },
      "destinationAttributes": {}
    },
    "serviceName": "cloudkms.googleapis.com",
    "methodName": "AsymmetricSign",
    "authorizationInfo": [
      {
        "resource": "projects/PROJECT_NAME/locations/us-central1/keyRings/github-app/cryptoKeys/private-key",
        "permission": "cloudkms.cryptoKeyVersions.useToSign",
        "granted": true,
        "resourceAttributes": {
          "service": "google.cloud.kms",
          "name": "projects/PROJECT_NAME/locations/us-central1/keyRings/github-app/cryptoKeys/private-key",
          "type": "cloudkms.googleapis.com/CryptoKey"
        },
        "permissionType": "DATA_READ"
      }
    ],
    "resourceName": "projects/PROJECT_NAME/locations/us-central1/keyRings/github-app/cryptoKeys/private-key/cryptoKeyVersions/1",
    "request": {
      "digest": {
        "sha256": "DIGEST"
      },
      "@type": "type.googleapis.com/google.cloud.kms.v1.AsymmetricSignRequest",
      "name": "projects/PROJECT_NAME/locations/us-central1/keyRings/github-app/cryptoKeys/private-key/cryptoKeyVersions/1"
    },
    "metadata": {},
    "resourceLocation": {
      "currentLocations": [
        "us-central1"
      ]
    }
  },
  "insertId": "8cvkneevt1eu",
  "resource": {
    "type": "cloudkms_cryptokeyversion",
    "labels": {
      "crypto_key_id": "private-key",
      "project_id": "PROJECT_NAME",
      "crypto_key_version_id": "1",
      "key_ring_id": "github-app",
      "location": "us-central1"
    }
  },
  "timestamp": "2026-05-10T02:45:59.107081397Z",
  "severity": "INFO",
  "logName": "projects/PROJECT_NAME/logs/cloudaudit.googleapis.com%2Fdata_access",
  "receiveTimestamp": "2026-05-10T02:46:00.236137525Z"
}
秘密鍵のインポート
の手順に沿って進めます。
この作業は秘密鍵のインポート時に一度だけ行います。
途中でエラーが発生した場合は、インポートジョブを新たに作成して再試行できます。
gcloud CLI, openssl のコマンドが使える環境で試しています。手っ取り早いのは Cloud Shell です。
gcloud CLIだと鍵のラッピングを自動でやってくれます。
PEMファイルを /tmp/github_app.pem においている前提です。
使用する変数は適宜設定してください。
KMS_GCLOUD_PROJECT=
KMS_LOCATION=
KMS_KEYRING=
KMS_IMPORT_JOB_NAME=

# 秘密鍵をDER形式に変換 (https://docs.cloud.google.com/kms/docs/formatting-keys-for-import?hl=ja#formatting_asymmetric_keys)
openssl pkcs8 -topk8 -nocrypt -inform PEM -outform DER -in /tmp/github_app.pem -out /tmp/github_app.der
# KMSへのインポートジョブを作成
gcloud kms import-jobs create "${KMS_IMPORT_JOB_NAME}" --project=$KMS_GCLOUD_PROJECT --location=$KMS_LOCATION --keyring=$KMS_KEYRING --import-method=rsa-oaep-3072-sha256-aes-256 --protection-level=software
# インポートジョブが有効になっていることを確認する。ACTIVEと出力されればOK
gcloud kms import-jobs describe "${KMS_IMPORT_JOB_NAME}" --project=$KMS_GCLOUD_PROJECT --location=$KMS_LOCATION --keyring=$KMS_KEYRING --format="value(state)"
# KMSに秘密鍵をインポートする
gcloud kms keys versions import --project=$KMS_GCLOUD_PROJECT --import-job=$KMS_IMPORT_JOB_NAME --location=$KMS_LOCATION --keyring=$KMS_KEYRING --key=private-key --algorithm=rsa-sign-pkcs1-2048-sha256 --target-key-file=/tmp/github_app.der
# KMSにインポートされた秘密鍵の情報を確認する
gcloud kms keys versions list --project=$KMS_GCLOUD_PROJECT --location=$KMS_LOCATION --keyring=$KMS_KEYRING --key=private-key

rm /tmp/github_app.pem /tmp/github_app.der
秘密鍵ファイルの削除は重要です。
KMSへのインポート完了後は手元に秘密鍵を残す理由がありません。
インポートできると以下のように表示されます。

図中の「リソース名をコピー」で、リソース名が取得できます。
使用方法
実際の使用例
のActionsを作成したので、こちらを使ってトークンの取得が可能です。
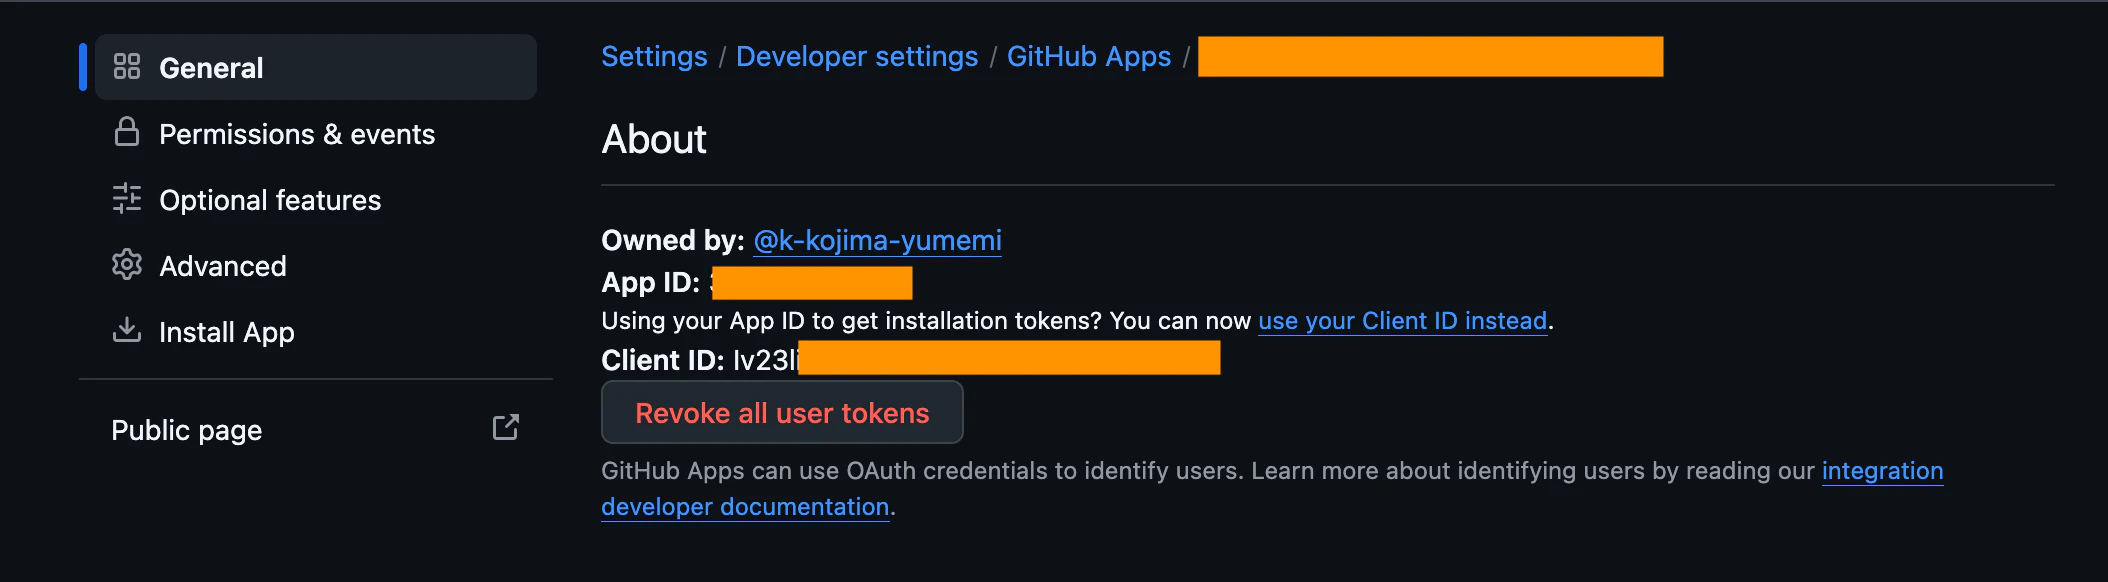
各変数の値は以下の場所から取得します。
-
APP_ID: GitHub Appの設定画面に表示される「App ID」か「Client ID」
下記の画面で取得できます。
-
KMS_KEY_NAME: Cloud KMSのCryptoKeyバージョンのリソース名- 例:
projects/PROJECT/locations/LOCATION/keyRings/KEYRING/cryptoKeys/KEY/cryptoKeyVersions/VERSION - 鍵のインポート後に
terraform refreshを実行することで、google_kms_crypto_key.github_app_private_key.primary[0].nameから取得できます - Terraform 構成例の箇所で紹介したコンソール画面からも取得できます
- 例:
-
WORKLOAD_IDENTITY_PROVIDER: WIFプロバイダーのリソース名- 例:
projects/PROJECT_NUMBER/locations/global/workloadIdentityPools/POOL/providers/PROVIDER -
google_iam_workload_identity_pool_provider.github["<repo>"].nameから取得できます - Terraform 構成例の箇所で紹介したコンソール画面からも取得できます
- 例:
action-test1:
  runs-on: ubuntu-slim
  timeout-minutes: 5
  steps:
    - uses: google-github-actions/auth@7c6bc770dae815cd3e89ee6cdf493a5fab2cc093 # v3.0.0
      with:
        workload_identity_provider: ${{ secrets.WORKLOAD_IDENTITY_PROVIDER }}
    - uses: k-kojima-yumemi/create-github-app-token-cloud-kms@5054b161cf2a31780158457b016c893e1684bd01 # v1.1.0
      id: create-token
      with:
        client-id: ${{ vars.APP_ID }}
        kms-key-name: ${{ secrets.KMS_KEY_NAME }}
    - run: |
        curl -sS -H "Authorization: Bearer ${TOKEN}" -H 'Accept: application/vnd.github+json' "https://api.github.com/repos/${repo}/contents/.terraform-version" \
          | jq -r '.content | @base64d'
      env:
        TOKEN: ${{ steps.create-token.outputs.token }}
        repo: ${{ github.repository }}
上記のコードは下記のステップに分かれています。
-
google-github-actions/authを使用し、Workload Identity Federationにて認証 -
k-kojima-yumemi/create-github-app-token-cloud-kmsを使用し、Cloud KMSを利用してGitHubのトークンを取得 - 取得したトークンを使用してGitHub APIを呼び出し
既にワークフローで google-github-actions/auth を使っている場合は、その認証をそのまま再利用してKMSの鍵を追加するだけなので、このオリジナルのアクションが適しています。
google-github-actions/auth を使わずにGoogle Cloud認証も含めて完結させたい場合は、minimalのアクションが使えます。
action-test2:
  runs-on: ubuntu-slim
  timeout-minutes: 5
  steps:
    - uses: k-kojima-yumemi/create-github-app-token-cloud-kms/minimal@5054b161cf2a31780158457b016c893e1684bd01 # v1.1.0
      id: create-token
      with:
        client-id: ${{ vars.APP_ID }}
        kms-key-name: ${{ secrets.KMS_KEY_NAME }}
        workload-identity-provider: ${{ secrets.WORKLOAD_IDENTITY_PROVIDER }}
    - run: |
        curl -sS -H "Authorization: Bearer ${TOKEN}" -H 'Accept: application/vnd.github+json' "https://api.github.com/repos/${repo}/contents/.terraform-version" \
          | jq -r '.content | @base64d'
      env:
        TOKEN: ${{ steps.create-token.outputs.token }}
        repo: ${{ github.repository }}
k-kojima-yumemi/create-github-app-token-cloud-kms/minimal は GitHub OIDC トークンを使った Google Cloud アクセストークンの取得を内包しているため、google-github-actions/auth が不要です。
このアクション専用に Google Cloud プロジェクトを新設する場合や、既存のワークフローに google-github-actions/auth を持ち込みたくない場合に適しています。
またminimalのパッケージは依存を最小限にしているためかオリジナルのアクションよりも実行時間が短いです。手元ではオリジナルが7秒、minimalが2秒でした。
概念実証
https://github.com/k-kojima-yumemi/create-github-app-token-cloud-kms のコードは下記の内容をベースにして実装しています。
図にすると以下の流れになります。
下記のスクリプトで動作確認しました。
少し長いですが、Google Cloudに認証し、installation access token を取得し、リポジトリのルートにある TARGET_FILE(.terraform-version) のファイルの内容を読み込むスクリプトです。
最後にトークンをRevokeしています。
import {createHash} from 'node:crypto';

function requireEnv(name) {
    const value = process.env[name];
    if (!value) throw new Error(`Environment variable ${name} is required`);
    return value;
}

const APP_ID = requireEnv('APP_ID');
const KMS_KEY_NAME = requireEnv('KMS_KEY_NAME');
const GITHUB_REPOSITORY = requireEnv('GITHUB_REPOSITORY');
const TARGET_FILE = '.terraform-version';
const repo = GITHUB_REPOSITORY.split('/')[1];
const USER_AGENT = `sign-with-github-app-private-key-action/1.0.0 ${GITHUB_REPOSITORY}`;

async function getGcpAccessToken() {
    if (process.env.GCP_ACCESS_TOKEN) {
        return process.env.GCP_ACCESS_TOKEN;
    }
    const workloadIdentityProvider = requireEnv('WORKLOAD_IDENTITY_PROVIDER');
    const oidcRes = await fetch(
        `${requireEnv('ACTIONS_ID_TOKEN_REQUEST_URL')}&audience=${encodeURIComponent(`https://iam.googleapis.com/${workloadIdentityProvider}`)}`,
        {headers: {Authorization: `bearer ${requireEnv('ACTIONS_ID_TOKEN_REQUEST_TOKEN')}`, 'User-Agent': USER_AGENT}},
    );
    if (!oidcRes.ok) throw new Error(`Failed to get OIDC token: ${oidcRes.status} ${await oidcRes.text()}`);
    const {value: oidcToken} = await oidcRes.json();

    const stsRes = await fetch('https://sts.googleapis.com/v1/token', {
        method: 'POST',
        headers: {'Content-Type': 'application/x-www-form-urlencoded', 'User-Agent': USER_AGENT},
        body: new URLSearchParams({
            grant_type: 'urn:ietf:params:oauth:grant-type:token-exchange',
            audience: `//iam.googleapis.com/${workloadIdentityProvider}`,
            scope: 'https://www.googleapis.com/auth/cloud-platform',
            subject_token_type: 'urn:ietf:params:oauth:token-type:jwt',
            subject_token: oidcToken,
            requested_token_type: 'urn:ietf:params:oauth:token-type:access_token',
        }),
    });
    if (!stsRes.ok) throw new Error(`Failed to exchange token: ${stsRes.status} ${await stsRes.text()}`);
    const {access_token} = await stsRes.json();
    return access_token;
}

const gcpAccessToken = await getGcpAccessToken();

// Build JWT
const header = Buffer.from(JSON.stringify({alg: 'RS256', typ: 'JWT'})).toString('base64url');
const now = Math.floor(Date.now() / 1000);
const payload = Buffer.from(JSON.stringify({iat: now - 60, exp: now + 180, iss: APP_ID})).toString('base64url');
const message = `${header}.${payload}`;

// Sign with GCP KMS REST API
const digest = createHash('sha256').update(message).digest('base64');
const kmsRes = await fetch(`https://cloudkms.googleapis.com/v1/${KMS_KEY_NAME}:asymmetricSign`, {
    method: 'POST',
    headers: {Authorization: `Bearer ${gcpAccessToken}`, 'Content-Type': 'application/json', 'User-Agent': USER_AGENT},
    body: JSON.stringify({digest: {sha256: digest}}),
});
if (!kmsRes.ok) throw new Error(`Failed to sign with KMS: ${kmsRes.status} ${await kmsRes.text()}`);
const {signature} = await kmsRes.json();
const jwt = `${message}.${Buffer.from(signature, 'base64').toString('base64url')}`;

const githubHeaders = {
    Accept: 'application/vnd.github+json',
    'X-GitHub-Api-Version': '2022-11-28',
    'User-Agent': USER_AGENT,
};
const jwtHeaders = {...githubHeaders, Authorization: `Bearer ${jwt}`};

// Get installation id for the repo
const installRes = await fetch(`https://api.github.com/repos/${GITHUB_REPOSITORY}/installation`, {headers: jwtHeaders});
if (!installRes.ok) throw new Error(`Failed to get installation: ${installRes.status} ${await installRes.text()}`);
const {id: installationId} = await installRes.json();
console.log(`Installation ID: ${installationId}`);

// Get scoped access token
const tokenRes = await fetch(`https://api.github.com/app/installations/${installationId}/access_tokens`, {
    method: 'POST',
    headers: jwtHeaders,
    body: JSON.stringify({repositories: [repo], permissions: {contents: 'read'}}),
});
if (!tokenRes.ok) throw new Error(`Failed to create token: ${tokenRes.status} ${await tokenRes.text()}`);
const {token, expires_at} = await tokenRes.json();
console.log(`Token expires at: ${expires_at}`);

const tokenHeaders = {...githubHeaders, Authorization: `token ${token}`};

// Verify the token can access the repo
const verifyRes = await fetch(`https://api.github.com/repos/${GITHUB_REPOSITORY}`, {headers: tokenHeaders});
if (!verifyRes.ok) throw new Error(`Token verification failed: ${verifyRes.status}`);
const {full_name, private: isPrivate} = await verifyRes.json();
console.log(`Verified access to: ${full_name} (private: ${isPrivate})`);

// Read TARGET_FILE via contents API
const contentsRes = await fetch(`https://api.github.com/repos/${GITHUB_REPOSITORY}/contents/${TARGET_FILE}`, {headers: tokenHeaders});
if (!contentsRes.ok) throw new Error(`Failed to read ${TARGET_FILE}: ${contentsRes.status}`);
const {content, encoding} = await contentsRes.json();
const fileContent = Buffer.from(content, encoding).toString('utf-8').trim();
console.log(`${TARGET_FILE}: ${fileContent}`);

// Revoke the installation access token
const revokeRes = await fetch('https://api.github.com/installation/token', {method: 'DELETE', headers: tokenHeaders});
if (!revokeRes.ok) throw new Error(`Failed to revoke token: ${revokeRes.status} ${await revokeRes.text()}`);
console.log('Token revoked');
ローカルで呼び出す場合は、 gcloud CLIにログインした状態で
KMS_KEY_NAME='<KMSの名前>' APP_ID='<GitHub AppのID>' GCP_ACCESS_TOKEN=$(gcloud auth print-access-token) GITHUB_REPOSITORY="<対象のリポジトリ>" node create-token.mjs
で実行できます。
この時CLIにログインしているプリンシパルに、鍵に対する roles/cloudkms.signer の権限が必要です。Owner 権限は署名に必要な権限を含むため、付与されていれば問題ありません。
GitHub Actionsから呼び出す場合は以下のようになります。
GITHUB_REPOSITORY はGitHub Actionsで自動的に注入されるため設定不要です。
スクリプトの内部で google-github-actions/auth のactionと同じような認証をしているので、 google-github-actions/auth の呼び出しは不要です。
name: Test Cloud KMS Token

on:
  workflow_dispatch:

permissions:
  contents: read
  id-token: write

jobs:
  test:
    runs-on: ubuntu-slim
    timeout-minutes: 5
    steps:
      - uses: actions/checkout@de0fac2e4500dabe0009e67214ff5f5447ce83dd # v6.0.2
      - uses: actions/setup-node@48b55a011bda9f5d6aeb4c2d9c7362e8dae4041e # v6.4.0
        with:
          node-version: '24'
      - run: node create-token.mjs
        env:
          APP_ID: ${{ vars.APP_ID }}
          KMS_KEY_NAME: ${{ secrets.KMS_KEY_NAME }}
          WORKLOAD_IDENTITY_PROVIDER: ${{ secrets.WORKLOAD_IDENTITY_PROVIDER }}
まとめ
GitHub App の秘密鍵を Cloud KMS にインポートし、署名処理を委ねることで以下のメリットが得られました。
- セキュリティの向上: 秘密鍵をワークフロー環境に露出させることなく、セーフティにトークンを発行できる
- 権限管理の厳密化: Workload Identity Federation と組み合わせることで、特定のリポジトリ・環境のみに署名を許可できる
- 監査ログの取得: 「誰がいつ鍵を使ったか」を Google Cloud 側で確実に記録できる
「鍵そのものを管理する」リスクから解放されるため、Google Cloud を利用している環境では非常におすすめの構成です。
参考
概要
- https://zenn.dev/aws_japan/articles/b311c3710826a6
- https://docs.github.com/en/apps/creating-github-apps/authenticating-with-a-github-app/managing-private-keys-for-github-apps
流れ
- https://zenn.dev/tmknom/articles/github-apps-token
- https://docs.github.com/en/apps/creating-github-apps/authenticating-with-a-github-app/authenticating-as-a-github-app-installation
- https://docs.github.com/en/apps/creating-github-apps/authenticating-with-a-github-app/generating-a-json-web-token-jwt-for-a-github-app
KMS
- https://docs.cloud.google.com/kms/docs/create-encryption-keys?hl=ja
- https://docs.cloud.google.com/kms/docs/resource-hierarchy?hl=ja
- https://docs.cloud.google.com/kms/docs/protection-levels?hl=ja
IAM
- https://docs.cloud.google.com/iam/docs/workload-identity-federation?hl=ja
-
https://docs.cloud.google.com/iam/docs/reference/rest/v1/projects.locations.workloadIdentityPools.providers#WorkloadIdentityPoolProvider.FIELDS.attribute_condition
-
attribute_conditionの記述についての説明
-
- https://docs.cloud.google.com/iam/docs/workload-identity-federation-with-deployment-pipelines?hl=ja
- https://docs.github.com/en/actions/reference/security/oidc
- https://docs.github.com/en/actions/concepts/security/openid-connect