Node-RED は、機能ごとのノードをドラグ&ドロップで結びつけることでさまざまなフローを実現できるオープンソースソフトウェアです。 Node-RED を使えば、簡単にオンラインサービス、API、IoT 機器を繋ぐデータフローを構築できます。
概要
今回はオンプレDB からSaaS、NoSQL をデータソースにREST API 化してしまうAPI Server という製品を部品につかって、SaaS からSaaS へのデータ連携をNode-Red で行います。この記事ではSalesforce に新しい顧客を追加や更新を行うと自動的にクラウド会計のSaaS であるQuickBooks のCustomer に追加を行うフローを作ってみます。 今回はSalesforce とQuickBooks ですが、CData が対応する80を超えるデータソースをそれぞれNode-RED のフローで使うことが可能です。
Node-Red のNode-RED のインストール
Node-RED を利用するにはNode.js が必要です。Node.js Website で詳細を確認してください。 Node.js のインストールが完了したら、Node-RED をインストールする一番簡単な方法は npm (下記参照)を使う方法です。
sudo npm install -g --unsafe-perm node-red
CData API Server のセットアップ
まずは80を超えるデータソースをNode-RED で使用可能にするためにAPI Server をインストールします。 次に今回利用するSaaS であるSalesforce とQuickBooks Online とAPI Server との接続を確立します。 下の手順で設立を確立するとSalesforce およびQuickBooks Online のOData エンドポイントが構築できます。 Node-RED ではOData エンドポイントを部品として使うことができます。
API Server のダウンロード
こちらからAPI Server をダウンロードします。30日の試用は無償です。
http://www.cdata.com/jp/apiserver/
API Server は簡単にMicrosoft Azure、Amazon EC2、および Heroku に配布して利用することが可能です。もちろんグローバルIP を持つオンプレミスへの配布もIIS, Java サーバーで簡単に行えます。
Salesforce への接続
API Server の[設定]→[接続]をクリックして、Salesforce のロゴをクリックすると接続画面が開きます。 必要とされる認証情報を入力(OAuth かUser+Password+SecurityToken での認証のどちらかが可能)です。 [テスト接続]で接続kを確認後、設定を保存します。
必要とされる認証情報を入力します。Salesforce ではOAuth、Login、SSO の複数の認証種類が利用できます。 Login メソッドでは、username、password、Security Token を入力して認証します。
username およびpassword での認証を希望しない場合には、OAuth 認証が可能です。
QuickBooks への接続
同様にAPI Server の管理コンソールで、[設定]→[接続]をクリックしてQuickBooks Online を接続します。 接続先にQuickBooks Online のロゴが表示されない場合には、CData ADO.NET Data Provider かJDBC Driver のインストールを行うと下部のリストに表示されます。
QuickBooks Online はOAuth 認証を使います。OAuth はブラウザへのログインが必要です。 OAuth 認証では、OAuthClientId、OAuthClientSecret、およびCallBackURL の入力が必要です。 もしくは、自分で登録したIntuit 登録アプリを使うことも可能です。
エンドポイントの作成
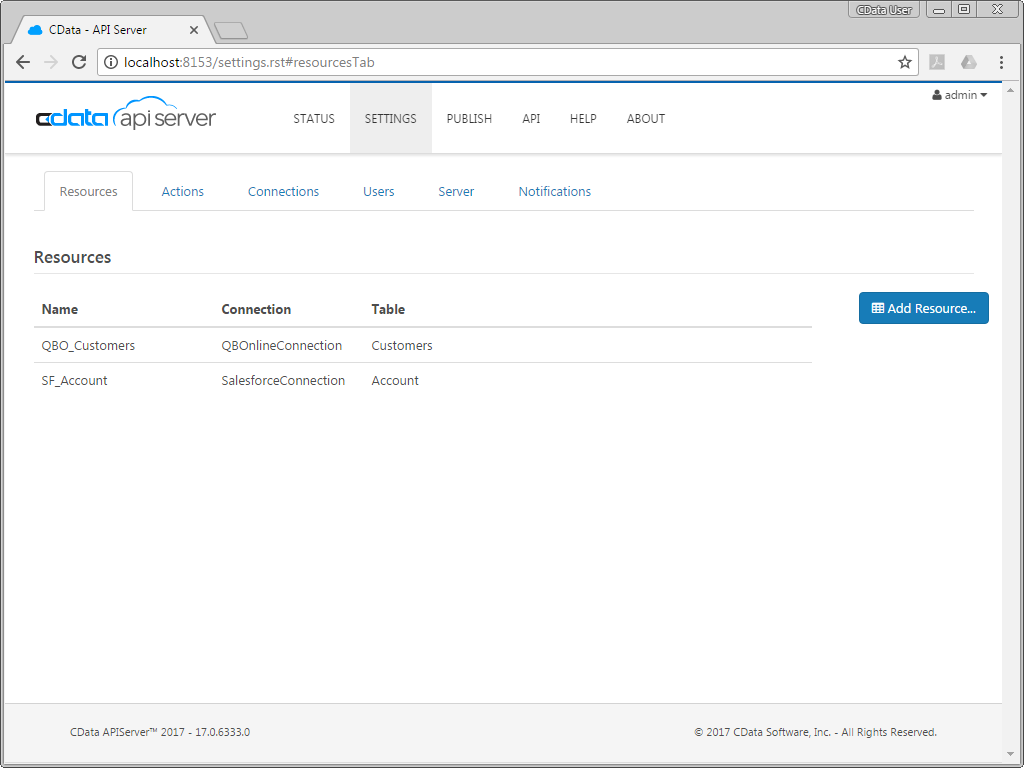
接続設定が完了したら、次はSalesforce、およびQuickBooks Online のエンティティからAPI Server のエンドポイントとして公開するものを設定します。 [設定]→[リソース]をクリックして、Salesforce の[Account]エンティティとQuickBooks Online の[Customers]エンティティをそれぞれ選択します。これだけでそれぞれのOData エンドポイントが自動生成されます。
Node-RED フローの作成
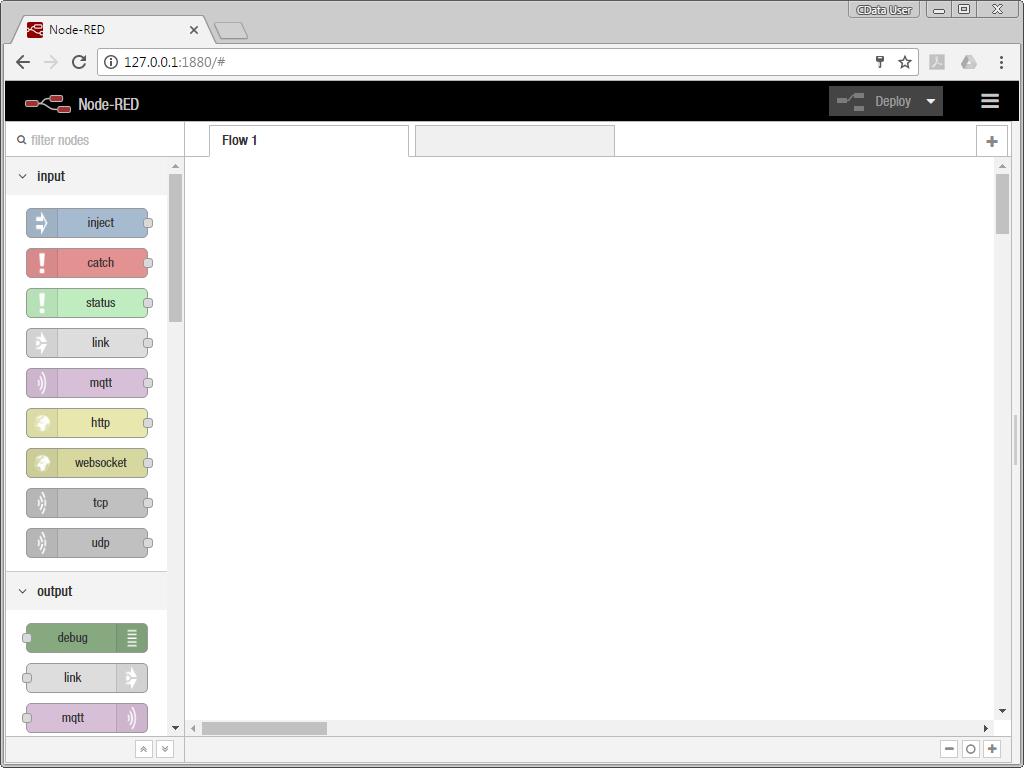
Node-RED でAPI Server で作ったエンドポイントをフローに仕立てるのはドラグ&ドロップだけで実施できます。 Node-RED はコマンドラインで node-red を呼び出すと開きます。
次のステップでフローを作成します。サンプルノードのダウンロードはこちらhttp://www.cdata.com/jp/kb/articles/apiserver-node.zip
Salesforce Account データの取得
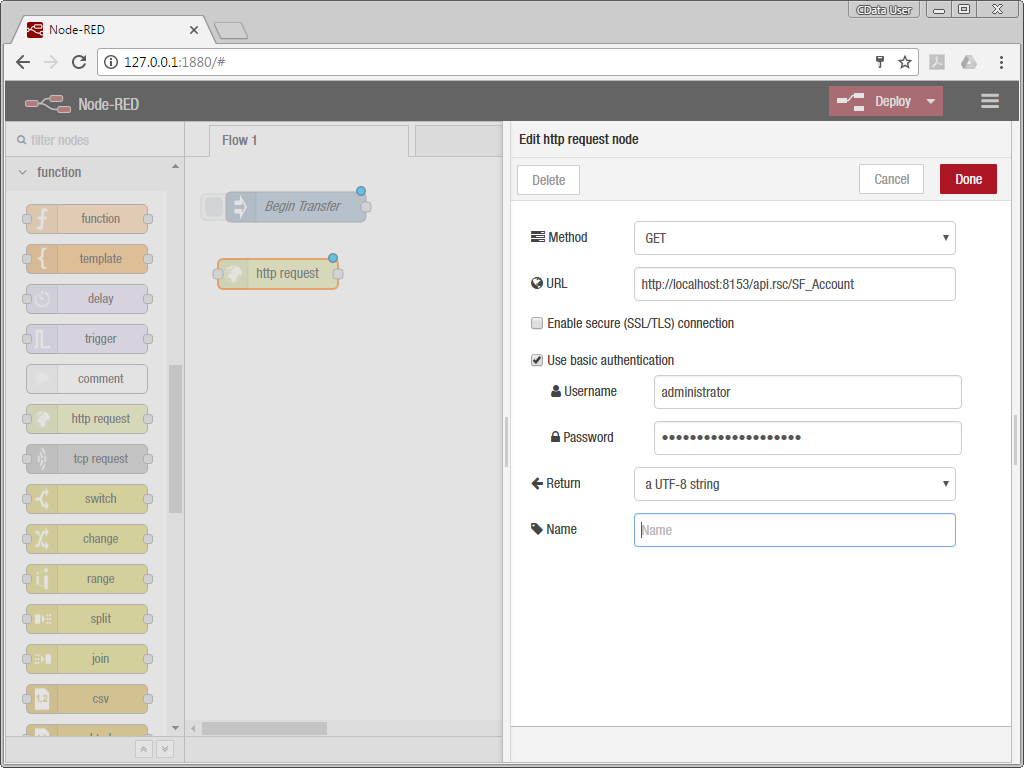
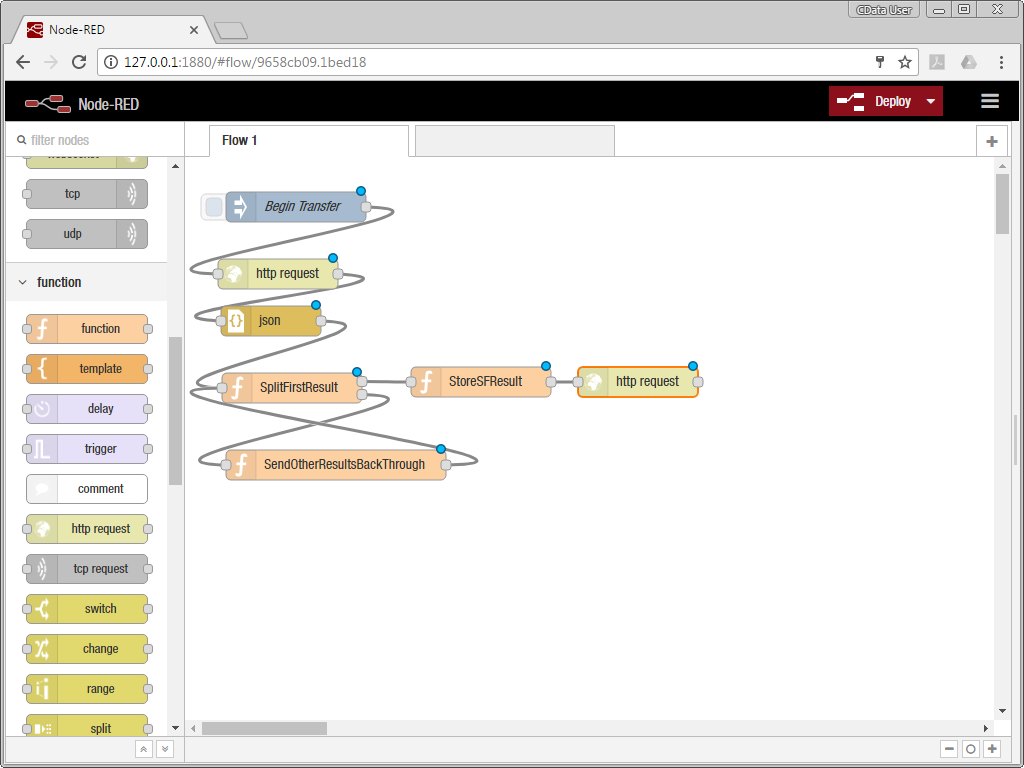
ワークスペースにnode をドラッグします。このnode からフローを始めます。 node をダブルクリックして、名前を付けます。次に[http request node]をワークスペースに追加します。 このnode がAPI Server にリクエストを送り、Salesforce Account データを取得します。 node をダブルクリックして、プロパティを設定します。node がHTTP GET リクエストをSalesforce Account リソースに送ります。 差分更新には、$filter パラメータをURL で使うだけです。 セキュリティにはベーシック認証を使います。API Server の[設定]→[ユーザー]でAPI Server にアクセスできるユーザーを作成し、Auth トークンを取得します。 node のプロパティ設定が終わったら、二つのnode を線でつなぎます。
Salesforce アカウント処理の登録
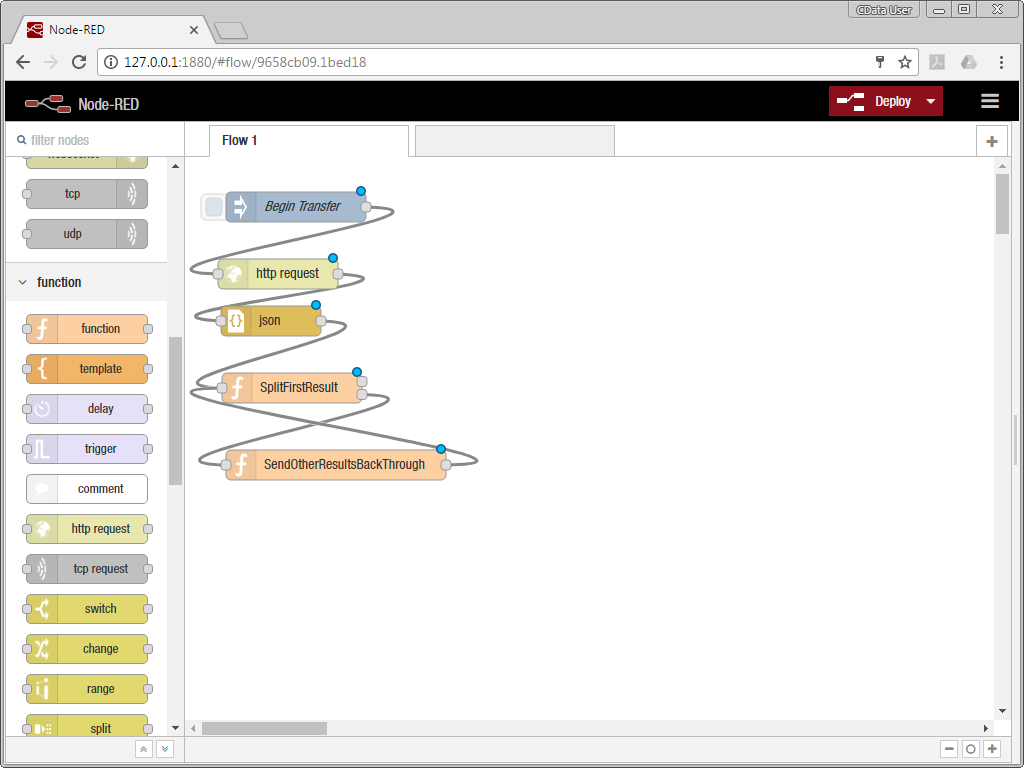
次にjson node とfunction node を2つドロップします。json node はAPI Server からのレスポンスをJSON オブジェクトにパースする役目です。 2つのfunction node はHTTP リクエストの結果をそれぞれフローにプッシュします。
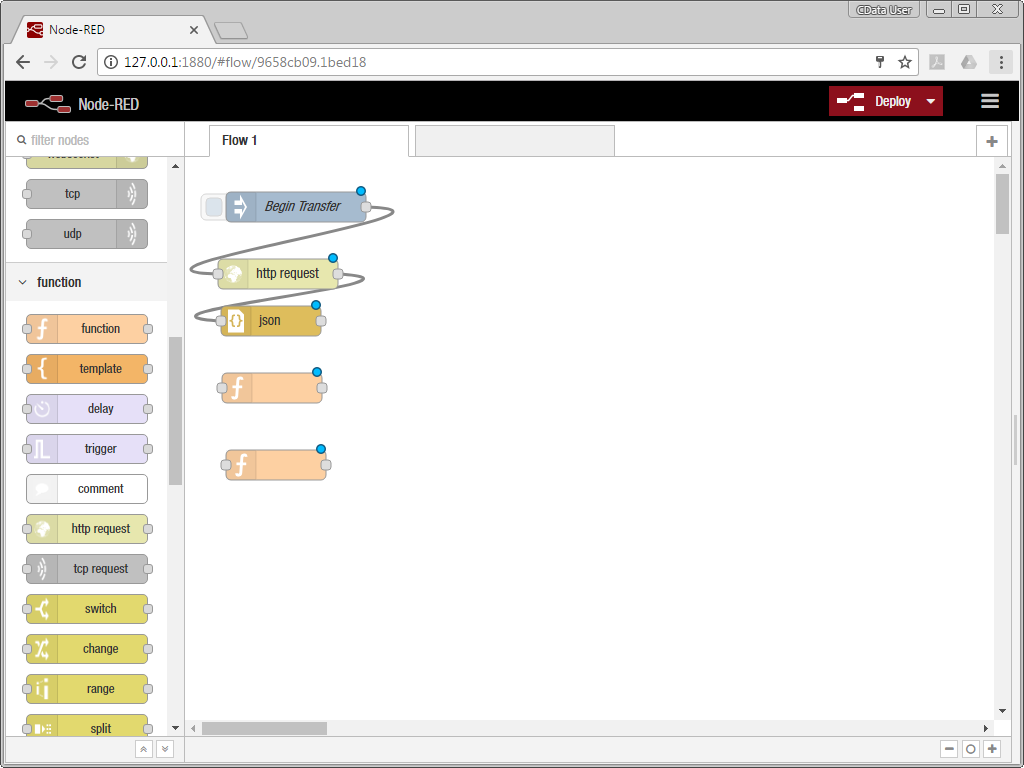
はじめのfunction node は2つのアウトプットがあります: 1つはmsg.payload からのの配列(account name HTML エスケープ)、もう1つは残りの値を含む配列です。 node をダブルクリックして、次のJavaScript をfunction に入力します:
var arrLen = msg.payload.value.length;
if(arrLen > 1) {
    msg2 = {};
    msg2.payload = msg.payload.value.slice(1,arrLen);
    msg.payload = msg.payload.value[0];
    msg.escapedName = escape(msg.payload.Name);
    return [msg,msg2];
} else if (arrLen == 1) {
    msg.payload = msg.payload.value[0];
    msg.escapedName = escape(msg.payload.Name);
    //remove API Server response headers
    msg.headers = {};
    return [msg, null];
}
return [null, null];
次のfunction は残りの値の配列をその前のfunction のインプットにマッチするメッセージにリファクタリングします。 これにより、それぞれのSalesforce account からのHTTP リクエスト結果をひとつづつ扱うことができるようになります。 node をダブルクリックして、次のJavaScript をfunction に入力します:
var payload = msg.payload;
msg.payload = {}
msg.payload.value = payload;
return msg;
それぞれのnode を線でつなぎます。json node のアウトプットを1つめのfunction node(SplitFirstResut)に 2つめのSplitFirstResult のアウトプットを2つめのfunction node(SendOtherResultsBackThrough)に、そしてSendOtherResultsBackTrhough のアウトプットをSplitFrirstResult のインプットにつなぎます。
QuickBooks Online で既存顧客をチェック
もう1つずつfunction node とhttp request node をワークスペースに追加します。 function node はSalesforce Account のデータをmsg.payload からmsg.salesforceResult に動かします。 次のJavaScript をコピーして、function に入力します:
msg.headers = {};
msg.salesforceResult=msg.payload;
return msg;
http request node はQuickBooks Online の既存のcustomers からSalesforce account と同じ名前を持っている顧客を探します。 node のURL をQuickBooks Online customers エンドポイントにします。 OData $filter を使って、既存の顧客を探します(escapedName フィルタのtriple-bracket に注意)。 同様にユーザー名とパスワードで認証を通します。
http://localhost:8153/api.rsc/QBO_Customers/?$filter=(DisplayName eq '{{{escapedName}}}')
SplitFirstResutl function のはじめのアウトプットから新しいfunction (StoreSFResult)のインプットに線をつなぎ、StoreSFResult は SplitFirstResult ファンクションへのはじめのアウトプットを当たら良いファンクション (StoreSFResult) に私、StoreSFResult のアウトプットから新しいhttp request node につなぎます。
レコードを追加するか更新するかの判断
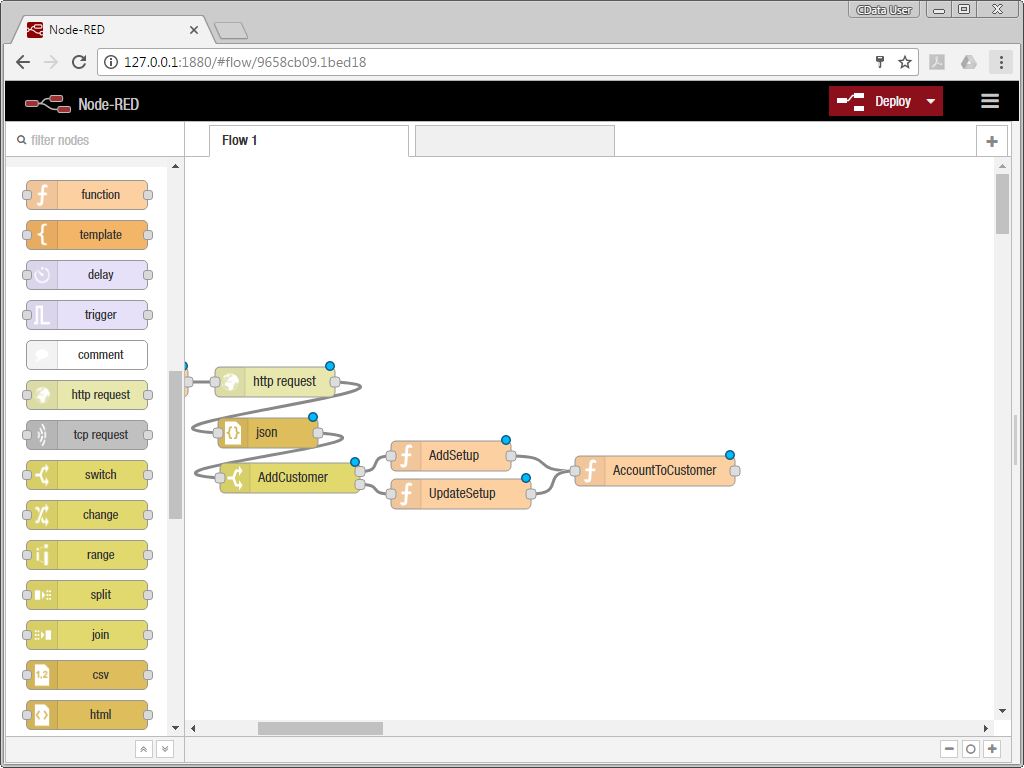
json node、switch node、2つのあたらししfunction node をワークスペースに追加します。 json node はAPI Servere からのレスポンスをパースして、switch がQuickBooks Online にすでに顧客が存在するかでフローを分岐させます。
あたらしいfunction node(AddSetup)では、次のHTTP リクエストの為にヘッダーを除き、追加を指示するフラグにtrue を設定します。 次のJavaScript をfunction に入力します:
if (msg.salesforceResult) {
msg.headers = {};
msg.add = true;
return msg;
}
return null;
次のfunction node(UpdateSetup)では、既存のヘッダーを外し、既存顧客のIF を保管し、追加を指示するフラグにfalse を設定します。 次のJavaScript をfunction に入力します:
if (msg.salesforceResult &&
(typeof msg.payload.value[0].Id == 'string')) {
msg.headers = {};
msg.customerId = msg.payload.value[0].Id ;
msg.add = false;
return msg;
}
return null;
http request node のアウトプットからjson node に線をつなぎます。json node のアウトプットからはAddCustomer swithch node のインプットに線をつなぎます。 output 1 とAddCustomer のoutput 2 からは、AddSetup およびUpdateSetup のインプットにそれぞれ線をつなぎます。
Salesforce Account からQuickBooks Online Customer へのマッピング
function node をワークスペースに追加します。このfunction はSalesforce Account からQuickBooks Online のCustomer にデータをマッピングします。 顧客が新しい場合には、DisplayName が含まれ、そうでない場合には無視されます。 次のJavaScript をあたらしいfunction node(AccountToCustomer)にコピーして入力します:
var customer = {};
var account = msg.salesforceResult;

if (account.Name && (msg.add))
customer.DisplayName = account.Name;

if (account.Active__c)
customer.Active = account.Active__c;
if (account.BillingCity)
customer.BillAddr_City = account.BillingCity;
if (account.BillingCountry)
customer.BillAddr_Country = account.BillingCountry;
if (account.BillingState)
customer.BillAddr_CountrySubDivisionCode = account.BillingState;
if (account.BillingLatitude)
customer.BillAddr_Lat = account.BillingLatitude;
if (account.BillingStreet)
customer.BillAddr_Line1 = account.BillingStreet;
if (account.BillingLongitude)
customer.BillAddr_Long = account.BillingLongitude;
if (account.BillingPostalCode)
customer.BillAddr_PostalCode = account.BillingPostalCode;
if (account.CurrencyIsoCode)
customer.CurrencyRef = account.CurrencyIsoCode;
if (account.fax)
customer.Fax_FreeFormNumber = account.fax;
if (account.Phone)
customer.PrimaryPhone_FreeFormNumber = account.Phone;
if (account.ShippingCity)
customer.ShipAddr_City = account.ShippingCity;
if (account.ShippingCountry)
customer.ShipAddr_Country = account.ShippingCountry;
if (account.ShippingState)
customer.ShipAddr_CountrySubDivisionCode = account.ShippingState;
if (account.ShippingLatitude)
customer.ShipAddr_Lat = account.ShippingLatitude;
if (account.ShippingStreet)
customer.ShipAddr_Line1 = account.ShippingStreet;
if (account.ShippingLongitude)
customer.ShipAddr_Long = account.ShippingLongitude;
if (account.ShippingPostalCode)
customer.ShipAddr_PostalCode = account.ShippingPostalCode;
if (account.Website)
customer.WebAddr_URI = account.Website;

msg.payload = customer;
return msg;
AddSetup のアウトプットおよびUpdateSetup のアウトプットからAccountToCustomer のインプットに線をつなぎます:
新しい顧客の作成と既存顧客の更新
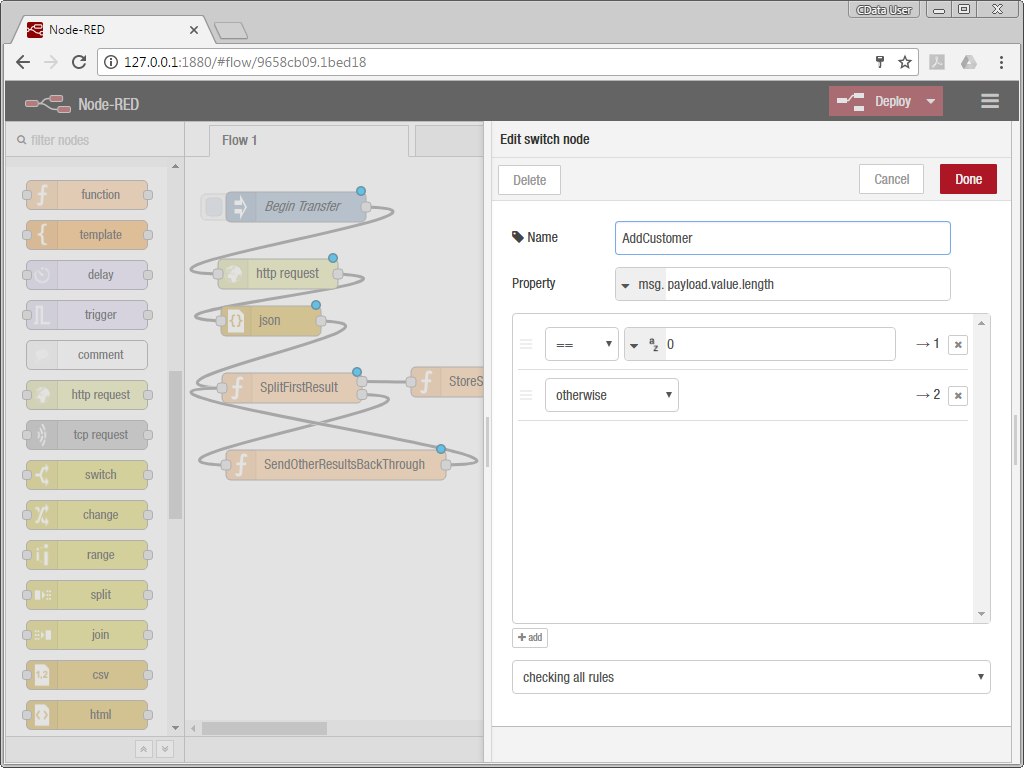
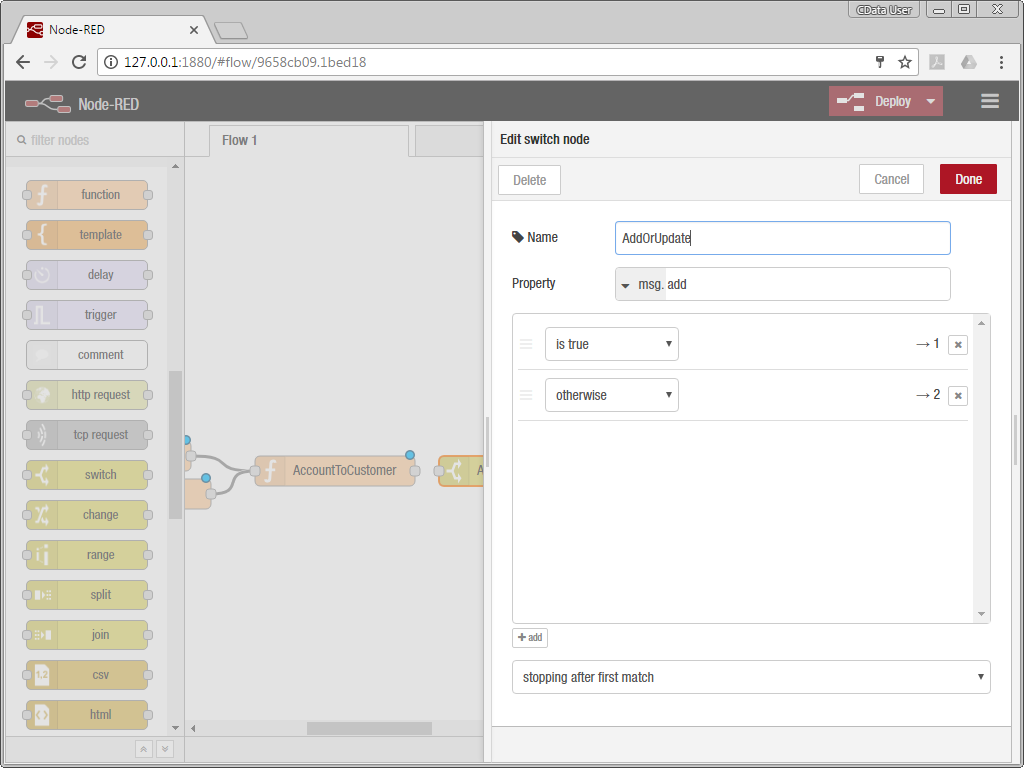
あたらしいswitch node とhttp request node を2つワークスペースに追加します。 switch node は、フローがAPI Server にHTTP リクエストを送ってQuickBooks Online customr に新しい顧客を追加するか、HTTP リクエストで既存顧客を更新するかを指定します。
追加か更新かを決定するには、switch node をmsg.add をベースに設定します:
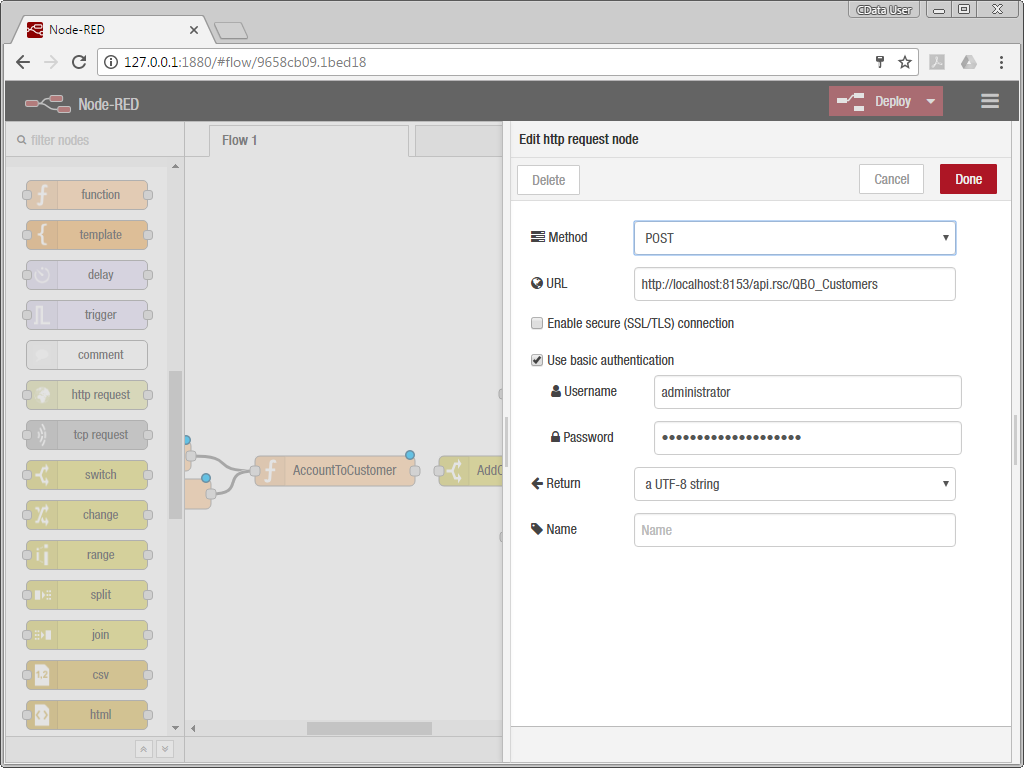
はじめのhttp request node はQuickBooks Online への顧客追加を行います。 API Server のQuickBooks Online Customer エンドポイントにHTTP POST リクエストをmsg.payload をリクエストボディにして投げます。
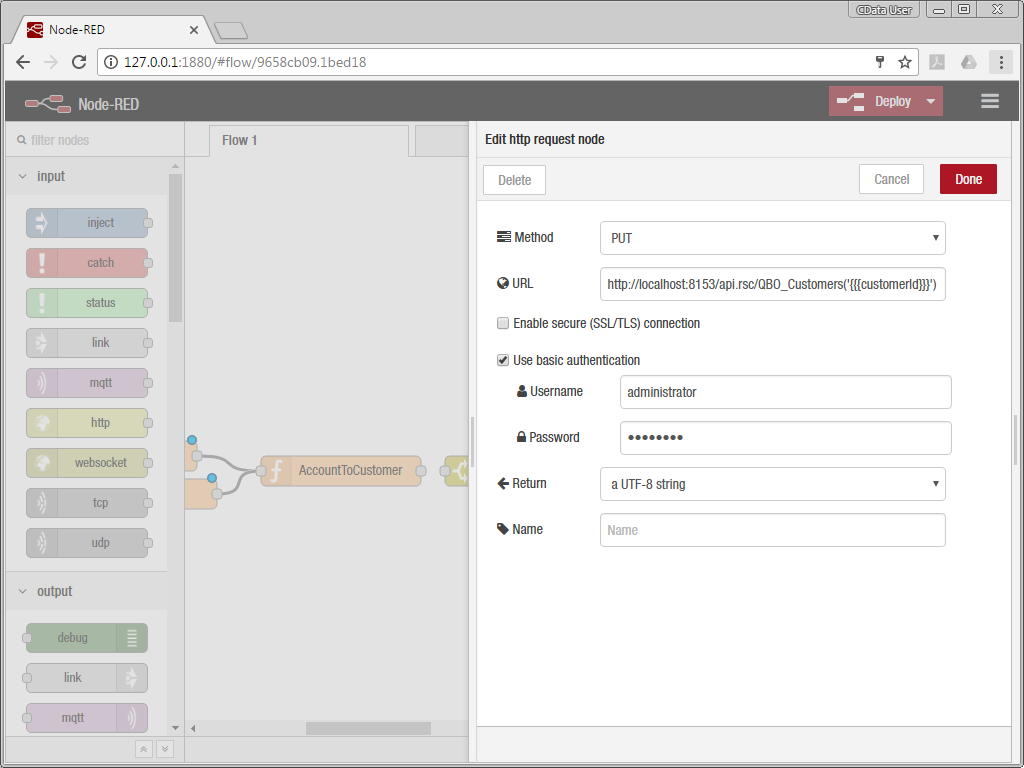
API Server のQuickBooks Online customer の更新には、エンドポイントにHTTP PUT リクエストをmsg.payload をリクエストボディにして投げます。
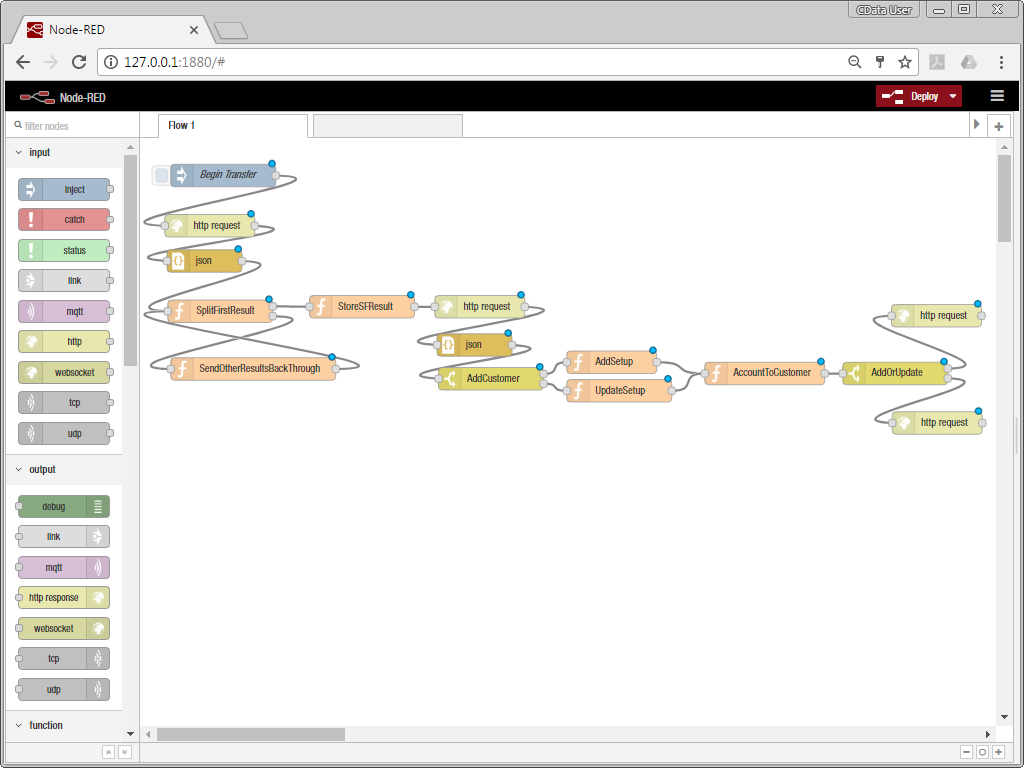
AccountToCustomer のアウトプットとADdOrUpdate のインプット、AddOrUpdate とhttp request node の追加の分、2つ目のAddOrUpdate とhttp request node の更新分とをつなぎます。 これでフローが完成しました。
CData API Server が扱える他のデータソースを使ったフローを少しのカスタマイズで作ることができます。
