ATOM Matrixに心拍センサを繋ぐでは、センサを追加して、LED Matrixで表現してみましたが、やっぱりM5系はWi-Fi、ネットに繋いでこそ!と思ったので、無料で簡単に始められるセンサデータの可視化サービスAmbientに繋いでみました。
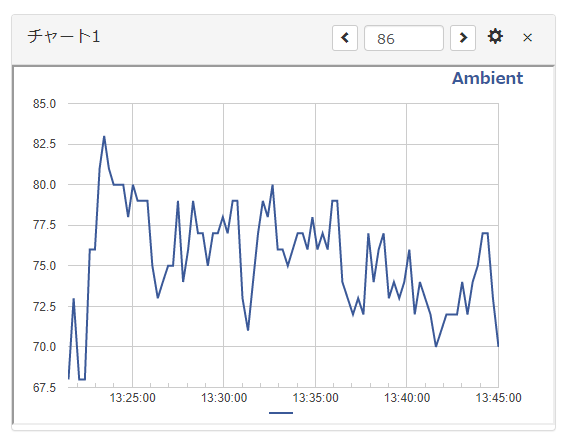
こんな感じで、センサーの値をストアしてグラフ化してくれます。
Ambient
Ambientについては、Wio LTE用Ambientライブラリの記事でも触れているので、そちらを参考にしてください。
プログラム
AmbientオフィシャルにM5StackのArduino環境のチュートリアルがあるので、それを参考にしました。
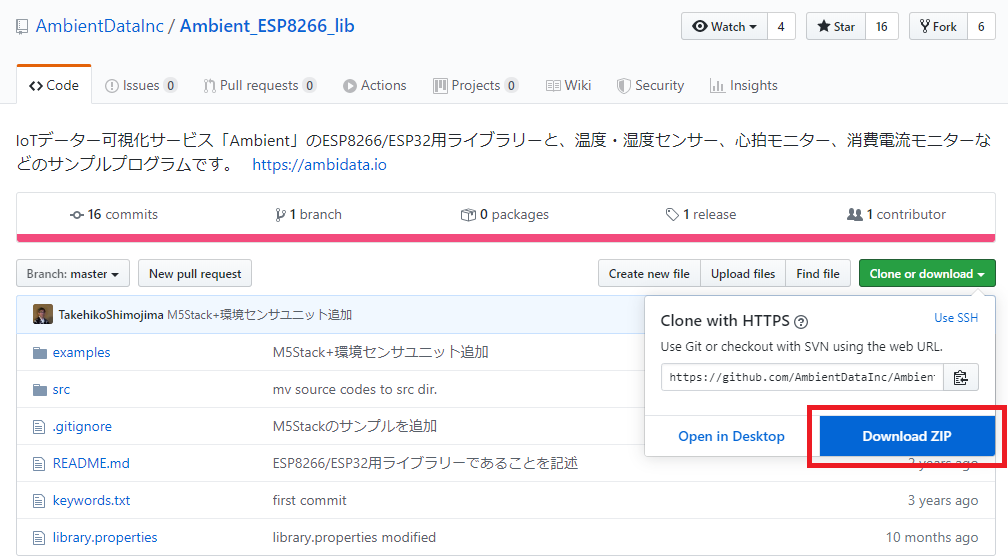
準備は、GitHubにESP32/ESP8266用のライブラリがあるので、それをZIP形式でダウンロードしてArduinoIDEでインストールするだけです。
ZIP形式でダウンロード
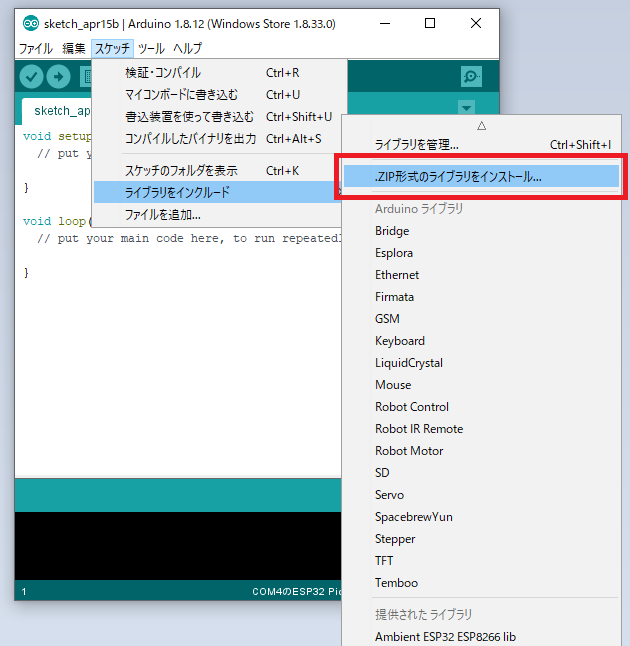
ArduinoIDEでインストール
プログラムはATOM Matrixに心拍センサを繋ぐで作ったものにWi-Fiに接続するための処理とAmbientの処理を追加しました。Wi-FiのSSID、パスワードとAmbientのチャンネルIDとライトキーは、環境に合わせて設定してください。
(前回記事でうまく動かなかったのは、入力割込みの中でAmbientへ送るためのデータをセットしていたためでした、細かい原因は追ってませんが、これをloop()の中に移したらうまく動きました)
# include "M5Atom.h"
# include "Ambient.h"
# include <WiFi.h>

WiFiClient client;
Ambient ambient;

unsigned char counter;
unsigned long temp[21];
unsigned long sub;
bool data_effect = true;
bool set_data = false;

unsigned int heart_rate = 60;
const int max_heartpluse_duty = 2000;

// Wi-FiのSSID
const char* ssid = "ssid";
// Wi-Fiのパスワード
const char* password = "pass";

// AmbientのチャネルID
unsigned int channelId = 100;
// Ambientのライトキー
const char* writeKey = "write key";

float count = 0.0;

const unsigned char image_tmp[152] =
{
  /* width  010 */ 0x0a,
  /* height 005 */ 0x05,
  /* Line   000 */ 0x00, 0x00, 0x00, 0xff, 0x00, 0x7f, 0x00, 0x00, 0x00, 0xff, 0x00, 0x7f, 0x00, 0x00, 0x00, 0x00, 0x00, 0x00, 0x00, 0x00, 0x00, 0x00, 0x00, 0x00, 0x00, 0x00, 0x00, 0x00, 0x00, 0x00, //
  /* Line   001 */ 0xff, 0x00, 0x7f, 0x00, 0x00, 0x00, 0xff, 0x00, 0x7f, 0x00, 0x00, 0x00, 0xff, 0x00, 0x7f, 0x00, 0x00, 0x00, 0xff, 0x00, 0x7f, 0x00, 0x00, 0x00, 0xff, 0x00, 0x7f, 0x00, 0x00, 0x00, //
  /* Line   002 */ 0xff, 0x00, 0x7f, 0x00, 0x00, 0x00, 0x00, 0x00, 0x00, 0x00, 0x00, 0x00, 0xff, 0x00, 0x7f, 0x00, 0x00, 0x00, 0xff, 0x00, 0x7f, 0xff, 0x00, 0x7f, 0xff, 0x00, 0x7f, 0x00, 0x00, 0x00, //
  /* Line   003 */ 0x00, 0x00, 0x00, 0xff, 0x00, 0x7f, 0x00, 0x00, 0x00, 0xff, 0x00, 0x7f, 0x00, 0x00, 0x00, 0x00, 0x00, 0x00, 0x00, 0x00, 0x00, 0xff, 0x00, 0x7f, 0x00, 0x00, 0x00, 0x00, 0x00, 0x00, //
  /* Line   004 */ 0x00, 0x00, 0x00, 0x00, 0x00, 0x00, 0xff, 0x00, 0x7f, 0x00, 0x00, 0x00, 0x00, 0x00, 0x00, 0x00, 0x00, 0x00, 0x00, 0x00, 0x00, 0x00, 0x00, 0x00, 0x00, 0x00, 0x00, 0x00, 0x00, 0x00, //
};

void setup() {
  M5.begin(true, false, true);
  Serial.begin(115200);

  WiFi.begin(ssid, password);  //  Wi-Fi APに接続
  while (WiFi.status() != WL_CONNECTED) {  //  Wi-Fi AP接続待ち
      delay(500);
      Serial.print(".");
  }
  Serial.print("WiFi connected\r\nIP address: ");
  Serial.println(WiFi.localIP());

  ambient.begin(channelId, writeKey, &client);

  pinMode(32, INPUT_PULLUP);              // Grove G32 pin
  attachInterrupt(32, interrupt, RISING); // Grove G32 pin
  M5.dis.displaybuff((uint8_t*)image_tmp, 0, 0);
}

void loop() {
  unsigned long wait = (unsigned long)(500.0 * (60.0 / (float)heart_rate));
  M5.dis.displaybuff((uint8_t*)image_tmp, 0, 0);
  delay(wait);
  M5.dis.displaybuff((uint8_t*)image_tmp, 5, 0);
  delay(wait);

  // 心拍が更新されたAmbientに送信
  if(set_data){
    ambient.set(1, (float)heart_rate);
    ambient.send();
    set_data = false;
  }
}

/*Function: calculate the heart rate*/
void sum()
{
  if (data_effect) {
    heart_rate = 1200000 / (temp[20] - temp[0]); //60*20*1000/20_total_time
    Serial.print("Heart_rate_is:\t");
    Serial.println(heart_rate);

    // 心拍の更新フラグを立てる
    set_data = true;
  }
  data_effect = 1; //sign bit
}

/*Function: Interrupt service routine.Get the sigal from the external interrupt*/
void interrupt()
{
  temp[counter] = millis();
  Serial.println(counter, DEC);
  Serial.println(temp[counter]);

  switch (counter) {
    case 0:
      sub = temp[counter] - temp[20];
      Serial.println(sub);
      break;
    default:
      sub = temp[counter] - temp[counter - 1];
      Serial.println(sub);
      break;
  }
  //set 2 seconds as max heart pluse duty
  if (sub > max_heartpluse_duty) {
    data_effect = 0; //sign bit
    counter = 0;
    Serial.println("Heart rate measure error,test will restart!" );
    arrayInit();
  }
  if (counter == 20 && data_effect) {
    counter = 0;
    sum();
  } else if (counter != 20 && data_effect) {
    counter++;
  } else {
    counter = 0;
    data_effect = 1;
  }
}

/*Function: Initialization for the array(temp)*/
void arrayInit()
{
  for (unsigned char i = 0; i < 20; i ++) {
    temp[i] = 0;
  }
  temp[20] = millis();
}
動作確認
プログラムを書き込み、心拍がAmbient送信されてグラフ化れることが確認できました。
動作不良
ハートマーク表示の処理は、前回と変えていないのですが、以下のように表示にノイズが出るようになりました。

処理を減らして確認したところ、どうもWi-FiをAPに繋ぐだけでこの現象が起こるらしく、ライブラリやベースプログラムのどこかに原因があると思います。
実はM5Stack系やESP32は初心者なので、そもそも下層の処理でどう動いているのか理解してないので、これを機会に調べてみようと思います。
最初はPCから電源を取っているため、そのせいかと思いましたが、余裕のある電源に繋いでも変わらないので、そうでもなさそうです。(回路は調べてないですが・・。)
あとがき
ちょっと問題はありますが、気軽にネットにアップロードできるプログラムが作れるのは良いですね。
もっとIoT的なこともやってみたいと思います。
(Pelionに繋ぎたいけど、Armコアじゃないからクライアントのポーティングはえらい大変かな・・。)