前回、BLEの受信をするセントラルを作りました。このデータをグラフィック・ディスプレイに表示をします。
AdafruitのST7789
利用したのは、1.47インチ、高密度250 ppiの172 x 320ピクセル フルカラーTFTディスプレイです。
ST7789搭載 Adafruit 1.47インチ 320x172 角丸 カラーIPS TFTディスプレイ
Adafruitには、外形の異なるST7789コントローラを用いたTFTディスプレイはほかにもあります。
接続
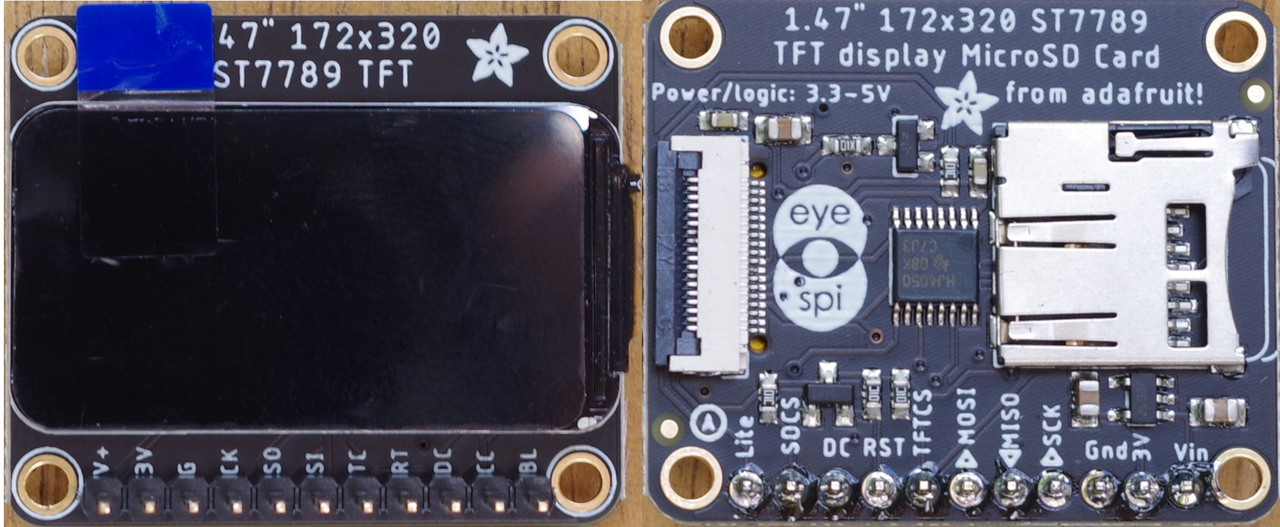
| ST7789表示器 | Feather nRF52840 Sense |
|---|---|
| Vin | Vin(3.3V) |
| 3V | - |
| GND | GND |
| SCK | SCK |
| MISO | - |
| MOSI | MOSI |
| TFTCS | 5 |
| RST | 6 |
| DC | 9 |
| SDCS | - |
| Lite | - |
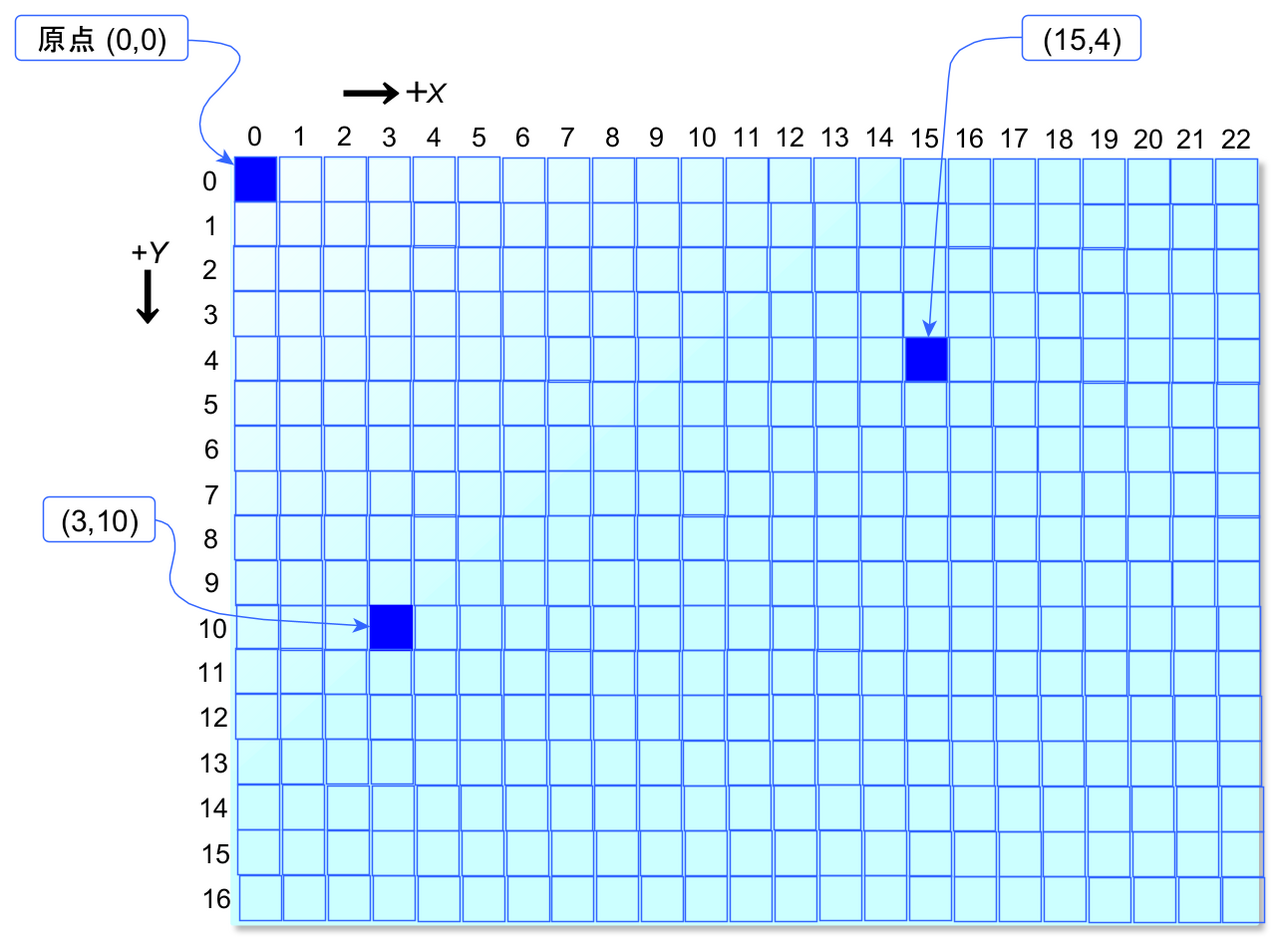
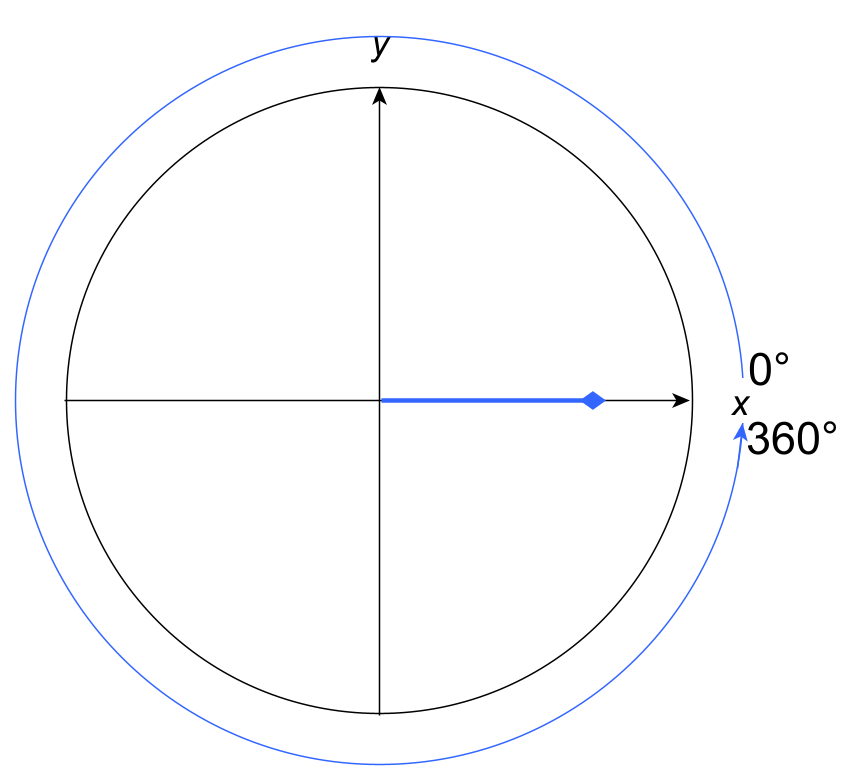
座標
左上が物理的に(0.0)です。
ライブラリadafruit_display_textには、Groupクラスが含まれています。サブGroupを作って入れ子にできます。
グループにアイテムを追加するのはappendです。
最初のGroupを作ります。
plot_group = displayio.Group(scale=1, x=80, y=80)
(80,80)の座標を原点にします。

参考;CircuitPython 10行プログラミング Step9 (6) SPIとグラフィック・ディスプレイ <その3>
プログラム
初期設定
# SPDX-FileCopyrightText: 2020 Mark Raleson
# SPDX-License-Identifier: MIT
from SwitchBot import SensorService
from adafruit_ble import BLERadio
from adafruit_ble.advertising.standard import ProvideServicesAdvertisement
import time
import board
import terminalio
import displayio
from busio import SPI
from adafruit_display_text import label
from adafruit_bitmap_font import bitmap_font
from adafruit_st7789 import ST7789
from adafruit_display_shapes.circle import Circle
from adafruit_display_shapes.line import Line
import math
import gc

displayio.release_displays()  # Release any resources currently
spi = SPI(clock=board.SCK, MOSI=board.MOSI)
tft_cs  = board.D5
tft_dc  = board.D9
tft_rst = board.D6

display_bus = displayio.FourWire(spi, command=tft_dc, chip_select=tft_cs, reset=tft_rst)
display = ST7789(display_bus, width=320, height=170, colstart=35, rotation=90)
座標をプロットするエリアの描画
円や線分を描画するモジュールは、adafruit_display_shapesです。なぜかadafruit_display_textとは独立しています。
plot_groupに円や線分を追加していきます。このような記述が正しいのかは不明です。なんかめんどいです。
plot_group = displayio.Group(scale=1, x=80, y=80)

color_bitmap = displayio.Bitmap(display.width, display.height, 1)
color_palette = displayio.Palette(1)
color_palette[0] = 0x111111  # Moss Green
bg_sprite = displayio.TileGrid(color_bitmap, pixel_shader=color_palette, x=0, y=0)
circle80 = Circle(0, 0, 80, fill=0x444422, outline=0xaa00FF)
line0=Line(-80,0,80,0,0xaaaaaa)
line1=Line(0,-80,0,80,0xaaaaaa)
circle0 = Circle(-78, 0, 3, fill=0xee0000)
plot_group.append(bg_sprite)
plot_group.append(circle80)
plot_group.append(line0)
plot_group.append(line1)
plot_group.append(circle0)
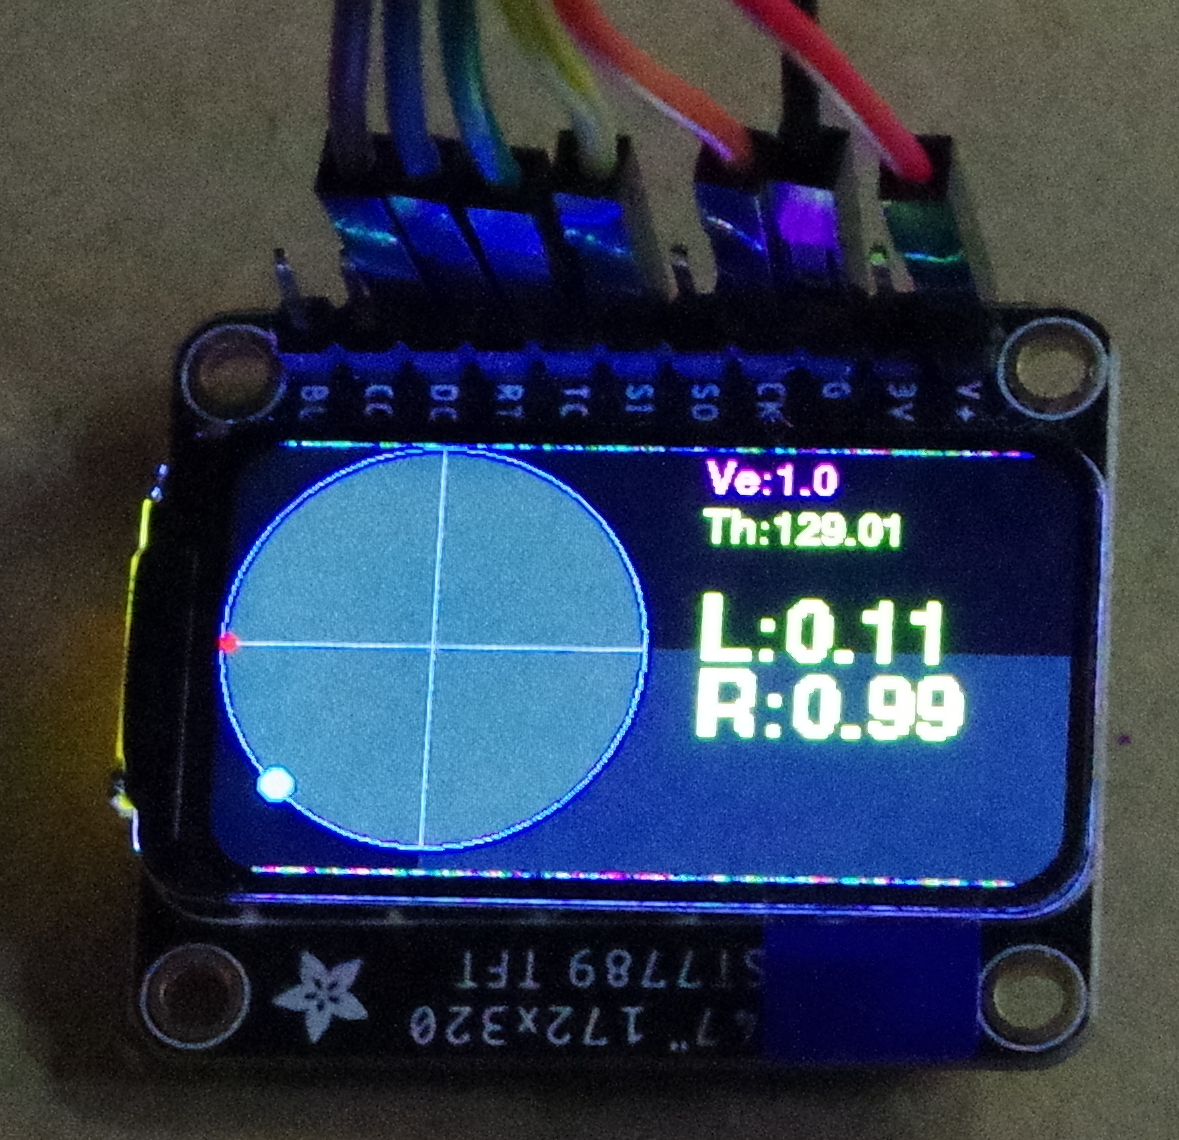
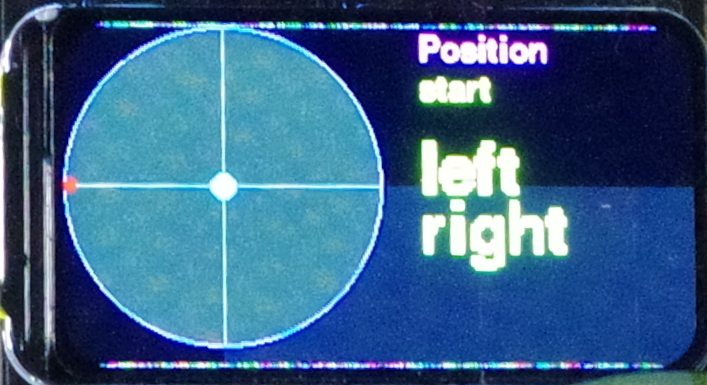
右側にデータ類を表示します。
テキストを描画するグループを作り、ベースのグループplot_groupに追加していきます。テキストオブジェクトはadafruit_display_textモジュールに入っていて、関数Groupのもつ変数、x、y、textを操作できます。位置を指定するx,yは、初期のままで、text変数に測定値を代入しています。
color = 0xffffff
circle_radius = 6
posx=0
posy=0
leftSpeed=0
rightSpeed=0

plotG = displayio.Group(scale=1, x=2, y=2)
circle = Circle(posx, posy, circle_radius, fill=0x00FF00, outline=0x5555FF)
plot_group.append(circle)

text_group = displayio.Group(scale=1, x=100, y=-70)
text = "Position"
font = bitmap_font.load_font("/Helvetica-Bold-16.bdf")
text_area1 = label.Label(font, text=text, color=0xFF00FF)
text_group.append(text_area1)  # Subgroup for text
plot_group.append(text_group)

text_group = displayio.Group(scale=1, x=100, y=-50)
text = 'start'
text_area2 = label.Label(font, text=text, color=0xFFFF00)
text_group.append(text_area2)  # Subgroup for text
plot_group.append(text_group)

text_group = displayio.Group(scale=2, x=100, y=-10)
text = 'left'
text_area3 = label.Label(font, text=text, color=0xFFFF00)
text_group.append(text_area3)  # Subgroup for text
plot_group.append(text_group)

text_group = displayio.Group(scale=2, x=100, y=20)
text = 'right'
text_area4 = label.Label(font, text=text, color=0xFFFF00)
text_group.append(text_area4)  # Subgroup for text
plot_group.append(text_group)

display.show(plot_group)
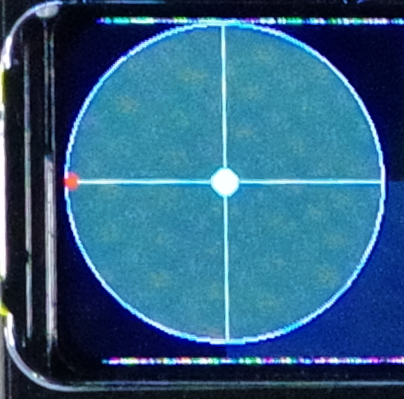
座標
一般的なx-yの座標です。
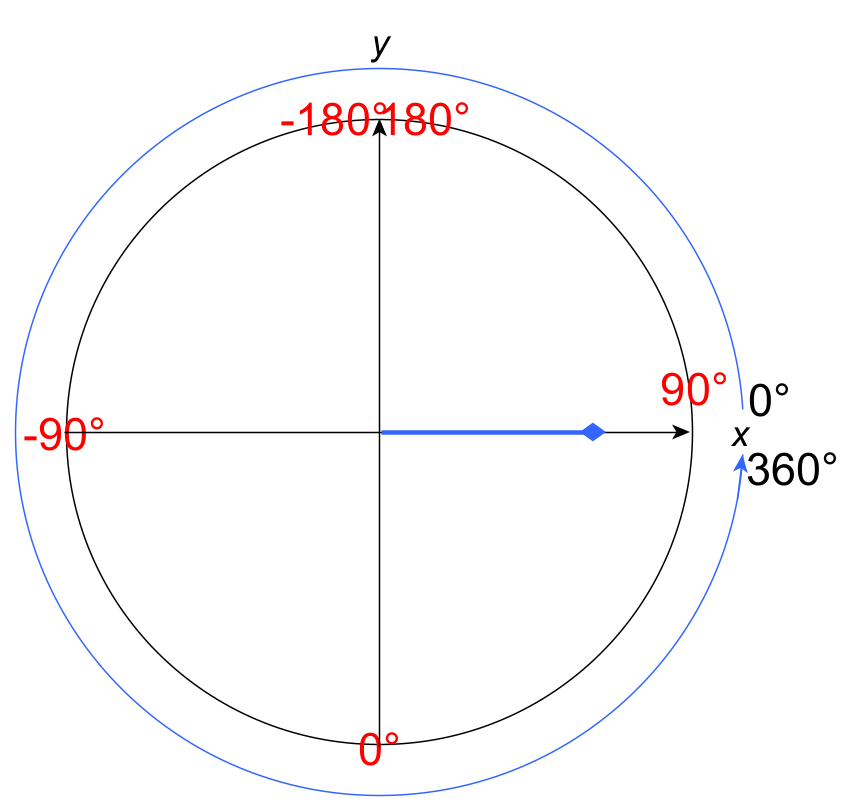
送ってくるThetaは、次のように変な座標(赤色)になっています。
表示をするループです。
def circlePlot(Theta,Vector,color):
    x=Vector*80*math.cos(Theta*3.14/180)
    y=Vector*80*math.sin(Theta*3.14/180)
    print('x:  {:.4f} y: {:.4f}'.format(x,y))
    circle.x=int(x)
    circle.y=int(y)

ble = BLERadio()
ble.name ="Feather nRF52840 Express"
connection = None

while True:
    if not connection:
        print("Scanning")
        for adv in ble.start_scan(ProvideServicesAdvertisement):
            addr = adv.address
            s = ProvideServicesAdvertisement.matches
            #address = str(addr)[9:26]
            #print(address, adv)
            if SensorService in adv.services:
                connection = ble.connect(adv)
                print("Connected")
                break
            print(".")
        ble.stop_scan()
        print("stopped scan")
        if connection and connection.connected:
            service = connection[SensorService]
            while connection.connected:
                Theta = service.sensorsTheta
                Vector = service.sensorsVector
                if Vector>1:
                    Vector = 1.0
                print('Theta:  {:.1f} Vector: {:.2f}'.format(Theta,Vector))
                Theta = Theta * -1
                circlePlot(Theta,Vector,0xff0000)
                text_area1.text = 'Ve:'+str(round(Vector,2))
                text_area2.text = 'Th:'+str(round(Theta,2))
                print("")

                leftSpeed  = Vector * math.cos(Theta-3.14/4.0)
                text_area3.text = 'L:'+str(round(leftSpeed,2))
                rightSpeed = Vector * math.sin(Theta-3.14/4.0)
                text_area4.text = 'R:'+str(round(rightSpeed,2))
                time.sleep(0.1)
                gc.collect()
座標を変更
0~180、-180~0の座標を0~360に修正します。90°の位置が車の進行方向で赤いぽっちを描画しています。
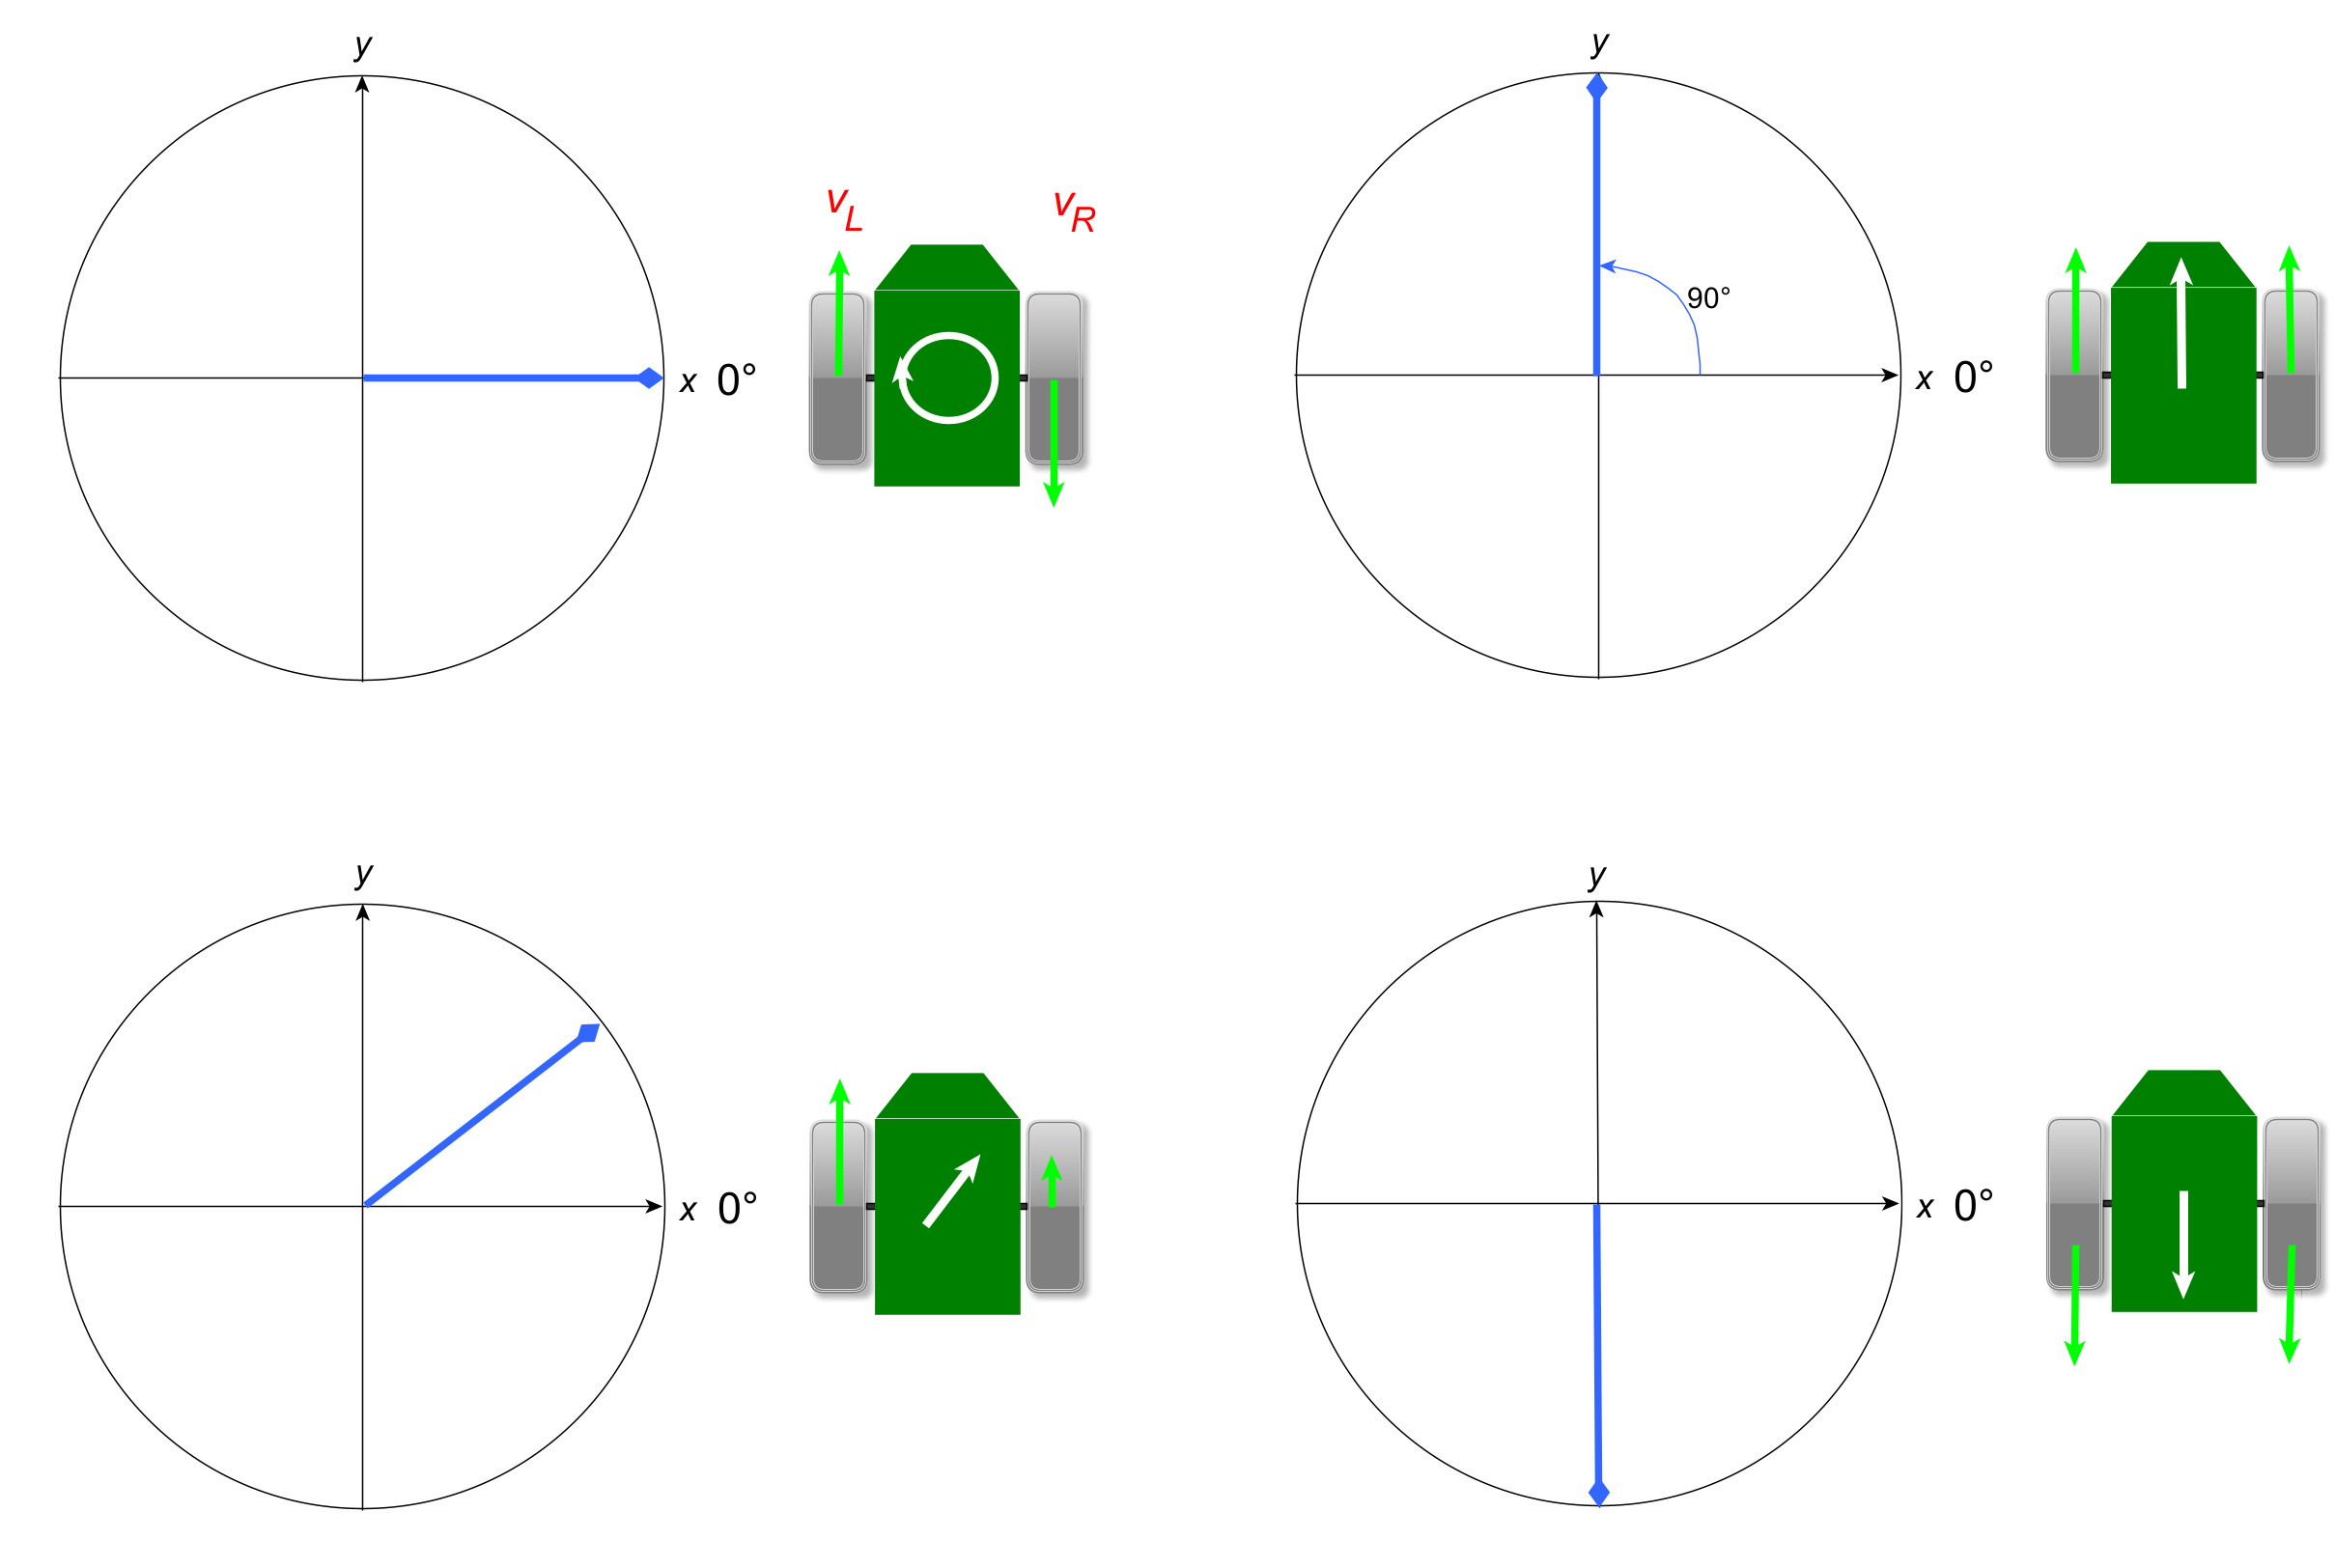
修正した後、右と左のモータの推進力(0~1)を次の式で計算します。参考
$v_{R} = $sin$(θ - \frac{\pi}{4})$
$v_{L} = $cos$(θ - \frac{\pi}{4})$
ひとつ前のプログラムの置き換えです。
def circlePlot(Theta,Vector,color):
    x=Vector*80*math.cos(Theta*3.14/180)
    y=Vector*80*math.sin(Theta*3.14/180)
    print('x:  {:.4f} y: {:.4f}'.format(x,y))
    circle.x=int(x)
    circle.y=int(y)

ble = BLERadio()
ble.name ="Feather nRF52840 Express"
connection = None

while True:
    if not connection:
        print("Scanning")
        for adv in ble.start_scan(ProvideServicesAdvertisement):
            addr = adv.address
            s = ProvideServicesAdvertisement.matches
            #address = str(addr)[9:26]
            #print(address, adv)
            if SensorService in adv.services:
                connection = ble.connect(adv)
                print("Connected")
                break
            print(".")
        ble.stop_scan()
        print("stopped scan")
        if connection and connection.connected:
            service = connection[SensorService]
            while connection.connected:
                Theta = service.sensorsTheta
                Vector = service.sensorsVector
                if Vector>1:
                    Vector = 1.0
                #print('Theta:  {:.1f} Vector: {:.2f}'.format(Theta,Vector))
                Theta = Theta * -1
                circlePlot(Theta,Vector,0xff0000)
                #print('Theta::  {:.1f} Vector: {:.2f}'.format(Theta,Vector))

                if -180 <= Theta < -90:
                    Theta = -1*Theta -90
                elif -90 <= Theta < 0:
                    Theta = -1*Theta + 270
                elif 0 <= Theta < 180:
                    Theta = -1*Theta + 270

                print('Theta=  {:.1f} Vector= {:.2f}'.format(Theta,Vector))
                text_area1.text = 'Ve:'+str(round(Vector,2))
                text_area2.text = 'Th:'+str(round(Theta,2))
                print("")
                Theta = Theta*3.14/180  # dgree to radians
                print('radians Theta:  {:.1f}'.format(Theta))

                leftSpeed  = Vector * math.cos(Theta-3.14/4.0)
                text_area3.text = 'L:'+str(round(leftSpeed,2))
                rightSpeed = Vector * math.sin(Theta-3.14/4.0)
                text_area4.text = 'R:'+str(round(rightSpeed,2))
                time.sleep(0.1)
                gc.collect()
ガベージ・コレクションは自動で行われますが、ここでは明示的に処理gc.collect()を組み込みました。ただ遅くなっているだけかもしれません。