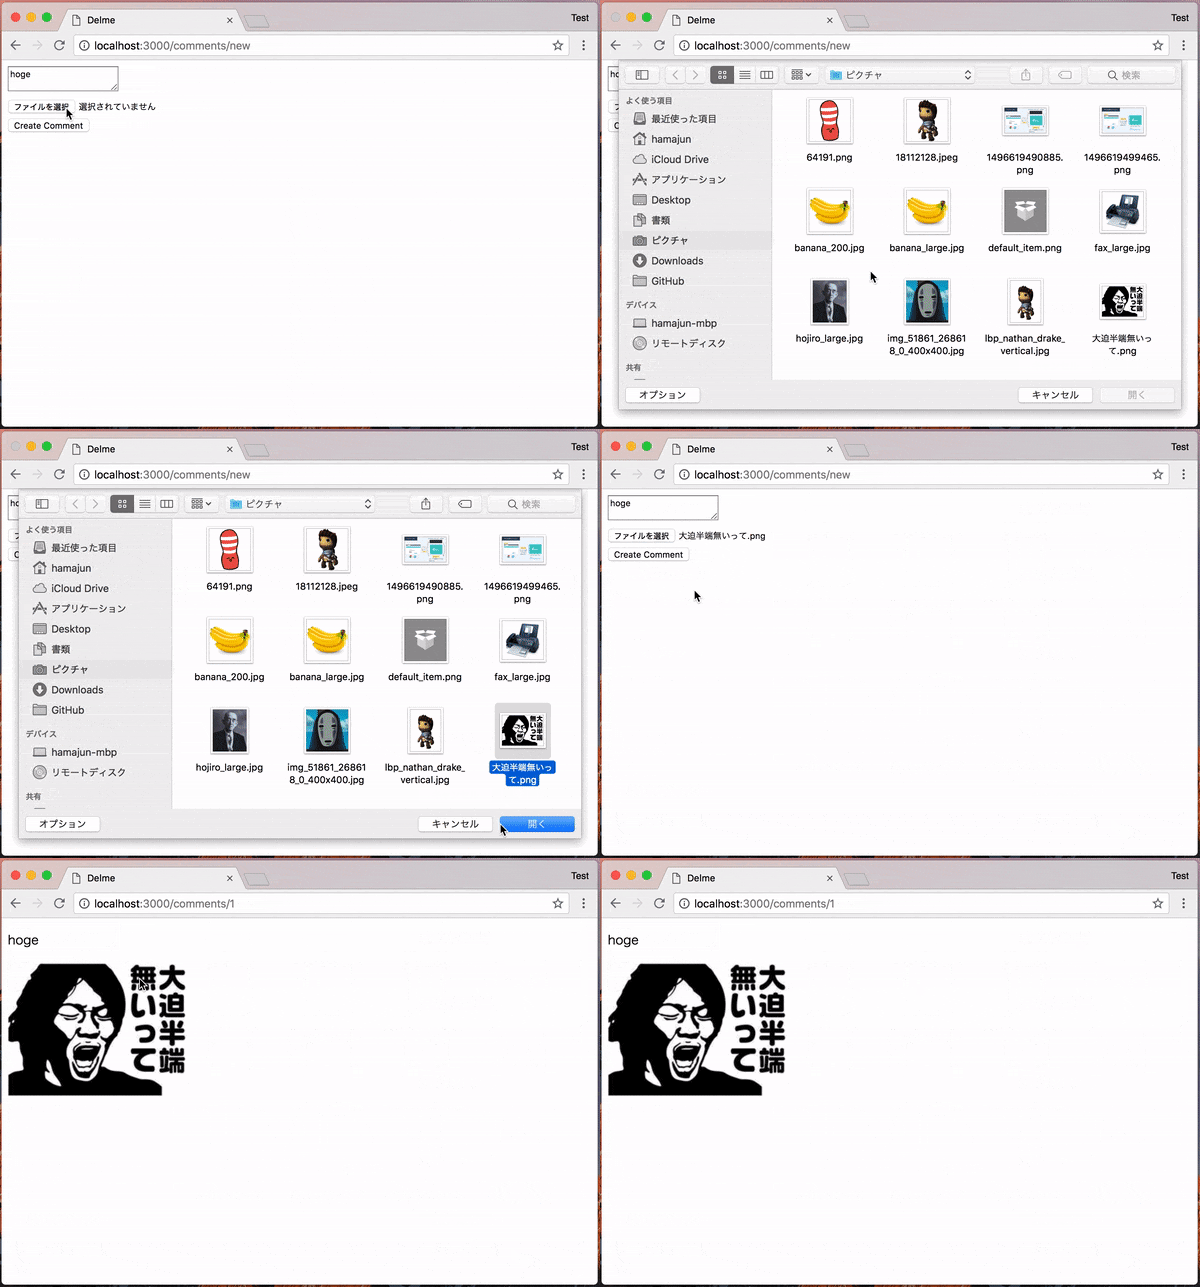
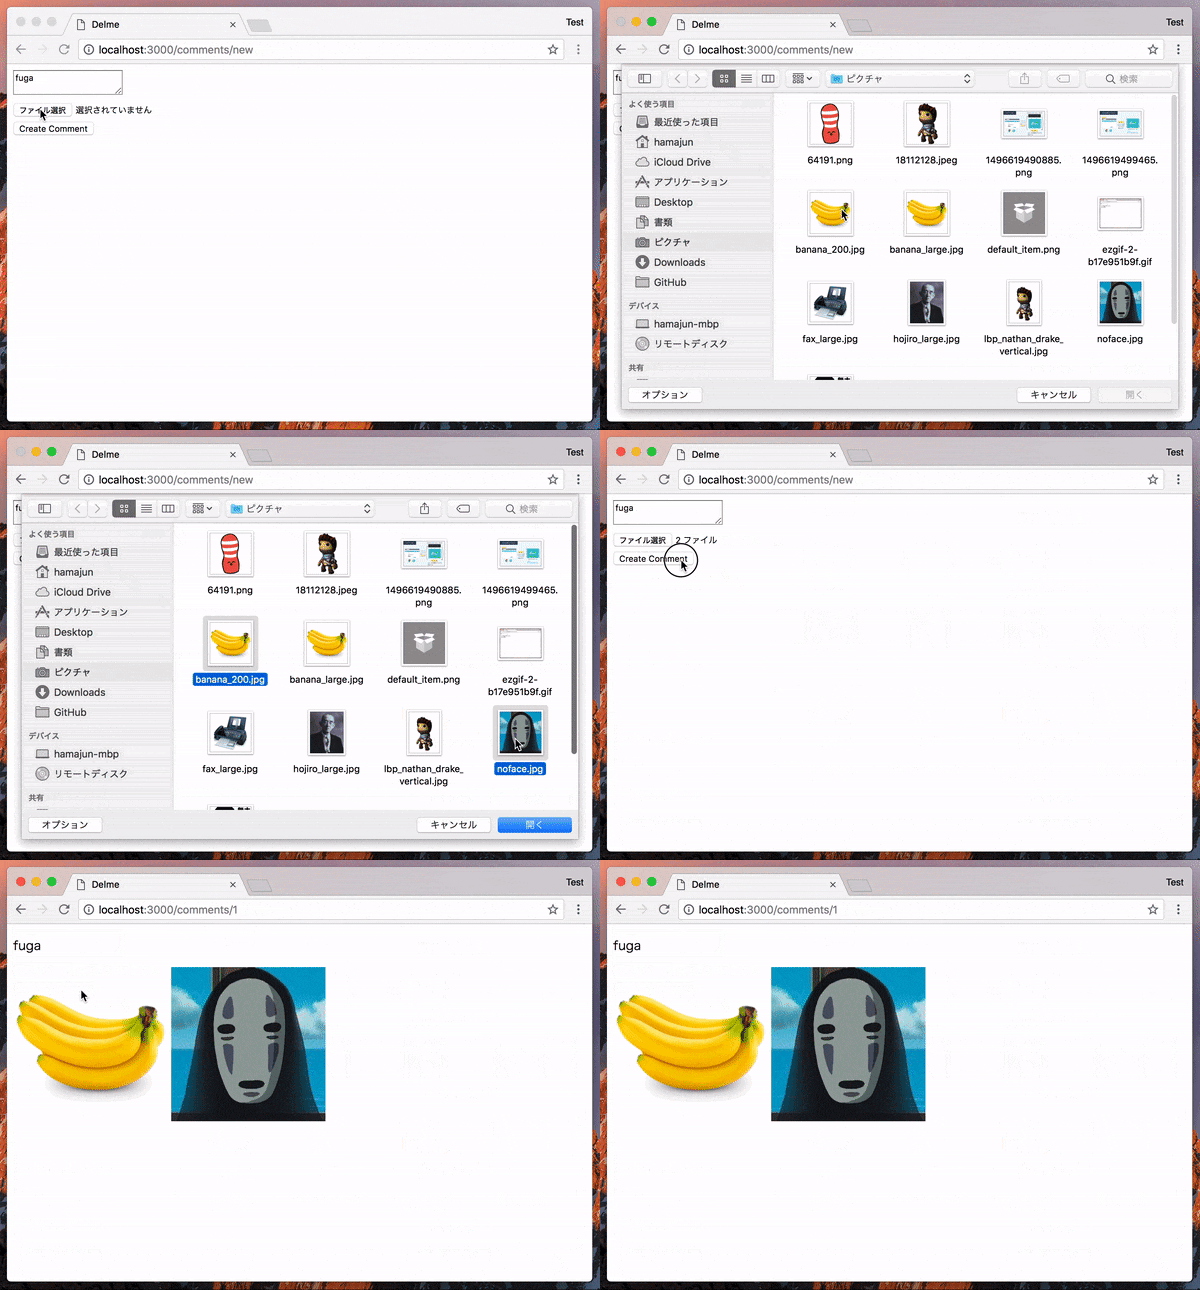
Active Storageについて調べると、「軽く触ってみた」ノリの記事ばかりで、特に複数のファイルを扱う方法などがなかなか見つからなかったので、使い方のまとめ記事を作りました。![]()
Active Storage とは
Active Storageは、Rails5.2で追加された、ファイルアップロードを行うための機能です。これを使えば、フォームで画像の投稿機能などが簡単に作れます。また、Amazon S3, Google Cloud Storage, Microsoft Azure Storageなどのクラウドストレージサービスに対するファイルのアップロードを簡単に行うことができます。クラウドストレージの他に、ローカルディスクにファイルを保存することもできます。
Paperclip, Carrierwave, Dragonflyなどのgemの代わりになるとされていますが、現時点ではバリデーションとキャッシュ関連の機能は残念ながら備えていません。使うにはRails 5.2以上にアップグレードする必要があります。
Active Storage を使えるようにする
$ rails active_storage:install
$ rails db:migrate
ここは気になる方だけ読んでいただければ大丈夫なのですが、このマイグレーションによってactive_storage_blobsとactive_storage_attachmentsという名前のテーブルが2つ生成されます。これらのテーブルはBlobとAttachmentの2つのモデルが使います。Blobはファイル名、ファイルの種類、バイト数、誤り検出符号などのメタデータを保持するモデルで、Attachmentモデルは、BlobオブジェクトとActive Recordオブジェクトを紐付けるための中間テーブルです。なお、Active Storageを使う際、直接BlobとAttachmentモデルに触れる必要はありません。(時間返せ)
Active Record モデルを用意する
コメントに1枚、もしくは、複数枚の画像を添付できるようにしたいとしましょう。まずはCommentモデルを用意する必要があります。generate resourceコマンドで基本的なルートと、モデル、空のコントローラを生成しましょう。
$ rails g resource comment content:text
$ rails db:migrate
ここで、画像用のカラムを用意する必要がない点もActive Storageの特徴の一つです。
1つの添付ファイルの場合
Commentモデルに1つの画像を添付するには、has_one_attachedを使います。
class Comment < ApplicationRecord
  has_one_attached :image
end
:imageはファイルの呼び名で、:photo、:avatar、:hogeなど、ファイルの用途に合わせて好きなものを指定してください。ここで、Imageモデルなどを作る必要はないです。Active Storageは裏側でBlobとAttachmentモデルを使って、こそこそとcomment.imageを使えるようにしてくれます。(有能すぎ)
では、コントローラとビューの中身を書きましょう。
class CommentsController < ApplicationController
  def new
    @comment = Comment.new
  end

  def create
    @comment = Comment.create params.require(:comment).permit(:content, :image) # POINT
    redirect_to @comment
  end

  def show
    @comment = Comment.find(params[:id])
  end

  def edit
    @comment = Comment.find(params[:id])
  end

  def update
    @comment = Comment.find(params[:id])
    @comment.update params.require(:comment).permit(:content, :image) # POINT
    redirect_to @comment
  end
end
<%= form_with model: @comment, local: true  do |form| %>
  <%= form.text_area :content %><br>
  <%= form.file_field :image %><br>
  <%= form.submit %>
<% end %>
<% if @comment.image.attached? %>
  <%= image_tag @comment.image %>
<% end %>
ほとんど典型的なコードですね。ポイントはcreateとupdateアクションのところで、このようにして、imageがあたかもCommentのカラムであるかのように扱うことで、フォームのfile_fieldで選択された画像をCommentオブジェクトと紐付けます。これも、Active Storageの特徴の一つです。
createとupdateアクションを使えない場合は、@comment.image.attach(params[:comment][:image])で画像を後からCommentオブジェクトと紐付けることもできます。
例えば、画像の選択を任意にしたい場合は以下のようなコードになります。
@comment = Comment.create params.require(:comment).permit(:content)
if image = params[:comment][:image]
  @comment.image.attach(image)
end
画像を表示するにはimage_tagに @comment.imageを渡すだけです。
複数の添付ファイルの場合
複数の添付ファイルを使いたい場合は、上記のコードを少しだけ変更します。
-
has_one_attachedの代わりにhas_many_attachedを使う -
comment.imageの代わりにcomment.imagesを使う -
file_fieldにmultiple: trueを追記して、複数ファイルの選択を許可
class Comment < ApplicationRecord
  has_many_attached :images
end
class CommentsController < ApplicationController
  def new
    @comment = Comment.new
  end

  def create
    @comment = Comment.create params.require(:comment).permit(:content, images: [])
    redirect_to @comment
  end

  def show
    @comment = Comment.find(params[:id])
  end

  def edit
    @comment = Comment.find(params[:id])
  end

  def update
    @comment = Comment.find(params[:id])
    @comment.update params.require(:comment).permit(:content, images: [])
    redirect_to @comment
  end
end
<%= form_with model: @comment, local: true  do |form| %>
  <%= form.text_area :content %><br><br>
  <%= form.file_field :images, multiple: true %><br>
  <%= form.submit %>
<% end %>
<% if @comment.images.attached? %>
  <% @comment.images.each do |image| %>
    <%= image_tag image %> <br>
  <% end %>
<% end %>
一枚の時同様、@comment.images.attach(params[:comment][:images])も使えます。
ファイルの保存先の変更
ファイルの保存先は、各環境の設定ファイルに記載します。
まずは、 config/environments/development.rb と production.rb の中身を覗いてみましょう。
  # ...

  # Store uploaded files on the local file system (see config/storage.yml for options)
  config.active_storage.service = :local

  # ...
  # ...

  # Store uploaded files on the local file system (see config/storage.yml for options)
  config.active_storage.service = :local

  # ...
初期状態では、開発環境(development)、本番環境(production)ともに保存先は :local に設定されています。
この local とは、 config/storage.yml で定義された保存先の名前です。
これを変更するには、:local のところを :amazon, :google, :microsoft のいづれかと置き換え、config/storage.ymlの方に、必要な認証情報などの値を入力します。
今度は、config/storage.ymlの中身を覗いてみましょう。
test:
  service: Disk
  root: <%= Rails.root.join("tmp/storage") %>

local:
  service: Disk
  root: <%= Rails.root.join("storage") %>

# Use rails credentials:edit to set the AWS secrets (as aws:access_key_id|secret_access_key)
# amazon:
#   service: S3
#   access_key_id: <%= Rails.application.credentials.dig(:aws, :access_key_id) %>
#   secret_access_key: <%= Rails.application.credentials.dig(:aws, :secret_access_key) %>
#   region: us-east-1
#   bucket: your_own_bucket

# Remember not to checkin your GCS keyfile to a repository
# google:
#   service: GCS
#   project: your_project
#   credentials: <%= Rails.root.join("path/to/gcs.keyfile") %>
#   bucket: your_own_bucket

# Use rails credentials:edit to set the Azure Storage secret (as azure_storage:storage_access_key)
# microsoft:
#   service: AzureStorage
#   storage_account_name: your_account_name
#   storage_access_key: <%= Rails.application.credentials.dig(:azure_storage, :storage_access_key) %>
#   container: your_container_name
先ほど見た保存先の local は、使用するサービスが Disk (ローカルディスク)に設定れていて、railsアプリ直下の/storageディレクトリがファイルの保存先に指定されています。
あと、親切に、コメントがたくさんついてますね。この中から適切なところのコメントを解除することで、好きなストレージサービスを使うことができます。
また、お使いのサービスのgemをGemfileに追記する必要があります。これは、aws-sdk-s3, google-cloud-storage, azure-storageのいづれかになります。
なお、アクセスキーは、セキュリティ上、Rails Credentialsを使って入力するのが好ましいです。
これは、APIキーなどの機密情報を暗号化して保存するための機能で、実はこれもRails 5.2で追加された新機能です。これまでのsecrets.ymlの代わりになります。
<%= Rails.application.credentials.dig(...) %>の部分は、まさにCredentialsに入力されたデータを読み込んでいますのでコメントをそのまま使いましょう。
- Credentialsにデータを入力・編集するには
$ rails credentials:editと叩きます。
エラーが出た場合は、$ EDITOR=vim rails credentials:editで、お使いのエディターを指定してください。例:vim,emacs,atom,code,subl - 入力した内容は
config/master.keyを用いて暗号化され、config/credentials.yml.encが生成されます。 - 復号された中身は
$ rails credentials:showで確認できます。
Amazon S3 を使う場合
S3は基本的に、ファイルをアップロードし、そのURLを取得できる、AWSのストレージサービスです。
🔰 Amazon S3でバケットを用意する方法
バケットは画像などのファイルをアップロードできる入れ物です。
AWSコンソール → サービス → ストレージ → S3 → 「バケットを作成する」
| 項目 | 入力・選択 |
|---|---|
| パケット名 | 例: my-rails-app-bucket |
| リージョン | 例: ap-northeast-1 (東京) |
| パブリックアクセス許可を管理する | このバケットに読み取りアクセス権限をする |
| 上記以外 | 全部デフォルトのまま |
🔰 Amazon S3でアクセスキーを作る方法
AWSコンソール → サービス → セキュリティ → IAM → 「ユーザー」 → 「ユーザーを追加」
| 項目 | 入力・選択 |
|---|---|
| ユーザー名 | 例: s3user |
| アクセスの種類 | プログラムによるアクセス |
「既存のポリシーを直接アタッチ」 → 「S3」で検索 → 「AmazonS3FullAccess」を選択 → 「次へ」 → 「ユーザーの作成」
表示された「アクセスキー ID」と「シークレットアクセスキー」 をメモ帳などにコピペして保管する。(一度しか表示されません)
保存先をAmazon S3に指定する
まず最初に必要なAWS S3のGemをインストールします。
gem "aws-sdk-s3", require: false
Gemfile変更後、$ bundle installと叩きます。
次に、保存先をAmazon S3に指定します。
# 本番環境(production)の保存先を:localから:amazonに変更

config.active_storage.service = :amazon
# 開発環境(development)でAmazon S3の動作を確認したい場合はこちらの方も変更しましょう

config.active_storage.service = :amazon
# 以下の部分をコメント解除する
amazon:
  service: S3
  access_key_id: <%= Rails.application.credentials.dig(:aws, :access_key_id) %>
  secret_access_key: <%= Rails.application.credentials.dig(:aws, :secret_access_key) %>
  # 以下の2行を変更
  region: ap-northeast-1 #東京の場合
  bucket: my-rails-app-bucket #自分で作成したS3のバケットの名前
前にも述べましたが、<%= Rails.application.credentials.dig(...) %>の部分は、Credentialsの情報を読み込んでいます。早速、CredentialsにAmazon S3へのアクセスキーを入力しましょう。
$ EDITOR=vim rails credentials:edit
上の例ではVimが開きます。Atomをお使いの場合、EDITOR=atomとしてください。
VSCodeなら、EDITOR=code、SublimeTextならEDITOR=subl。
aws:
 access_key_id: 123 #ここに自分のアクセスキーIDをコピペ
 secret_access_key: 456 #ここに自分のシークレットアクセスキーをコピペ
![]() Vim:
Vim: iで入力開始、esc → ZZで終了
入力した内容は$ rails credentials:showで確認できます。
以上で保存先をAmazon S3に変更できました。![]()
 重要
重要
Credentialsをお使いの場合は、config/credentials.yml.encの中身を復号化するために必要なconfig/master.keyファイルを本番環境にも配置する必要があります。しかし、master.keyはセキュリティ上、Gitで管理してはいけないため、標準で .gitignore されてあり、PaaSなどのGitリポジトリをそのままデプロイする本番環境(Herokuなど)の場合は、master.key の中身をコピーして、環境変数 RAILS_MASTER_KEY として用意する必要があります。
ちなみに、Herokuをお使いの場合は $ heroku config:set RAILS_MASTER_KEY=123で環境変数を用意できます。
参考
https://www.engineyard.com/blog/active-storage
https://qiita.com/yatmsu/items/08b95e837ac7f24fb443
https://afreshcup.com/home/2017/07/06/introduction-to-active-storage-part-3-google-cloud-storage

