はじめに
OpenWeatherMapのWeatherAPIとGoogleのgeolocationAPIを使い現在地の天気を取得します。ちなみに、どちらのAPIも無料で利用できます!
WeatherAPI Keyを取得する
OpenWeatherからアカウントを作成し、APIキーを取得しましょう。
以下の手順でアカウントを作成できます。
①サインイン画面へ

②「Create an Account.」をクリックし、アカウントを作成する。

③アカウント作成後、下記の画像のように「My API keys」を選択する。そうするとAPIキーが表示されます。

GoogleのgeolocationAPIを取得する
位置情報を取得するためGeolocation APIを使用します。
このAPIは、Google Cloud Platformから取得できます。
この記事ではAPIの取得方法は割愛しますので、下の記事を参考にGeolocation APIを有効にしてください。
※以下の記事ではGeocoding APIとMaps JavaScript APIを有効にしていますが、今回はGeolocation APIのみを有効にします。
Google Mapを利用する 【Rails6】【Geocoder】【heroku】
現在地の天気と気温を取得する
<div id="weather"></div>

<script>
const API_KEY = "<%= ENV['WeatherAPI'] %>"

window.onload = function() {
  weather_search()
};

# 現在地の緯度経度を取得
navigator.geolocation.getCurrentPosition(function (position) {
     latitude = position.coords.latitude;
    longitude = position.coords.longitude;

  });
const wheather_select = document.querySelector('#wheather-select');
const options = document.querySelectorAll("#wheather-select option");
const weather_search = function () {

const url = 'https://api.openweathermap.org/data/2.5/forecast?lat=' + latitude + '&lon=' + longitude  + '&units=metric&appid=' + API_KEY;

  fetch(url).then((data) => {
    return data.json();
  }).then((json) => {
    let insertHTML = "";
    let today = 0
    let weather = document.querySelector('#weather')
    insertHTML += buildHTML(json, today);
    weather.innerHTML = insertHTML
  }).catch(error => {
    console.error(error);
  });
};

wheather_select.addEventListener('change', weather_search);

function buildHTML(data, i) {
  let Week = new Array("(日)","(月)","(火)","(水)","(木)","(金)","(土)");
  let date = new Date();
  date.setHours(date.getHours() );
  let month = date.getMonth()+1;
  let day = month + "月" + date.getDate() + "日" + Week[date.getDay()] + date.getHours() + ":00";
  let icon = data.list[i].weather[0].icon;
  let main = weatherJavaneseConversion(data.list[i].weather[0].main);

  let html =
  '<div class="weather-report">' +
    '<h2>現在の天気は'+ '<span>' +main + '</span>' +'です!</h2>' +
    '<img src="https://openweathermap.org/img/w/' + icon + '.png">' +
    '<div class="weather-date">' + day + '</div>' +
    '<div class=main>' + '気温:' + Math.round(data.list[i].main.temp) + '℃' + '</div>' +
  '</div>'
    ;
  return html
}

function weatherJavaneseConversion(name) {
  switch (name) {
    case "Clear":
      return "晴れ"
    case 'Clouds':
      return "曇り"
    case "Rain":
      return "雨"
    case "Snow":
      return "雪"
    default:
      console.log(name)
      return name
  }
}
</script>
<script src="https://maps.googleapis.com/maps/api/js?key=<%= ENV['Geolocation_API_KEY'] %>&callback"async defer>
</script>
APIキーの非公開
gemの追加
Gemfileに.envファイル(後述)を利用するためのgemを追記します。
gem 'dotenv-rails'
続いて、ターミナルでbundle installを実行します。
bundle install
.envファイルの作成
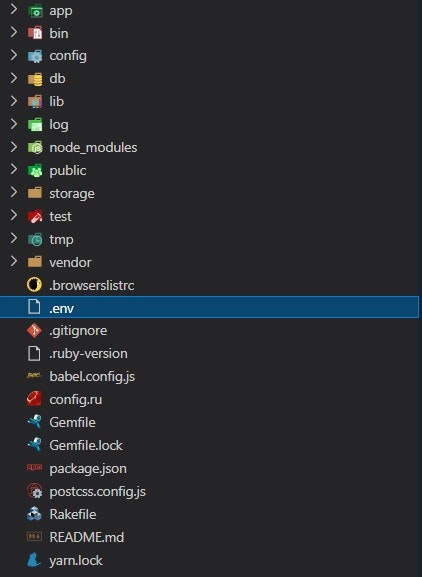
.envというファイルをアプリケーションディレクトリ(appやdbやGemfileがあるディレクトリ)に自分で作成します。

そして、.envファイルに以下の2行を追記します。
WeatherAPI=取得したWeatherAPI APIのAPIキーを書く
Geolocation_API_KEY=取得したGeolocation APIのAPIキーを書く
公開しないように.gitignoreファイルに以下一行を記述します。(.gitignoreファイルがない場合は、アプリケーションディレクトリに自分で作成します。)
/.env
完成
参考
Rails/ES6/OpenWeatherMapで天気予報を表示してみた
【Rails / Google Map API】APIを用いて位置情報を取得する
