本投稿はAWS Containers Advent Calendar 2021の9日目の記事です
ECS on FargateでもWindowsコンテナのサポートが始まりました。コンテナ関連テクロジーのアップデート速度は本当に速いですね。
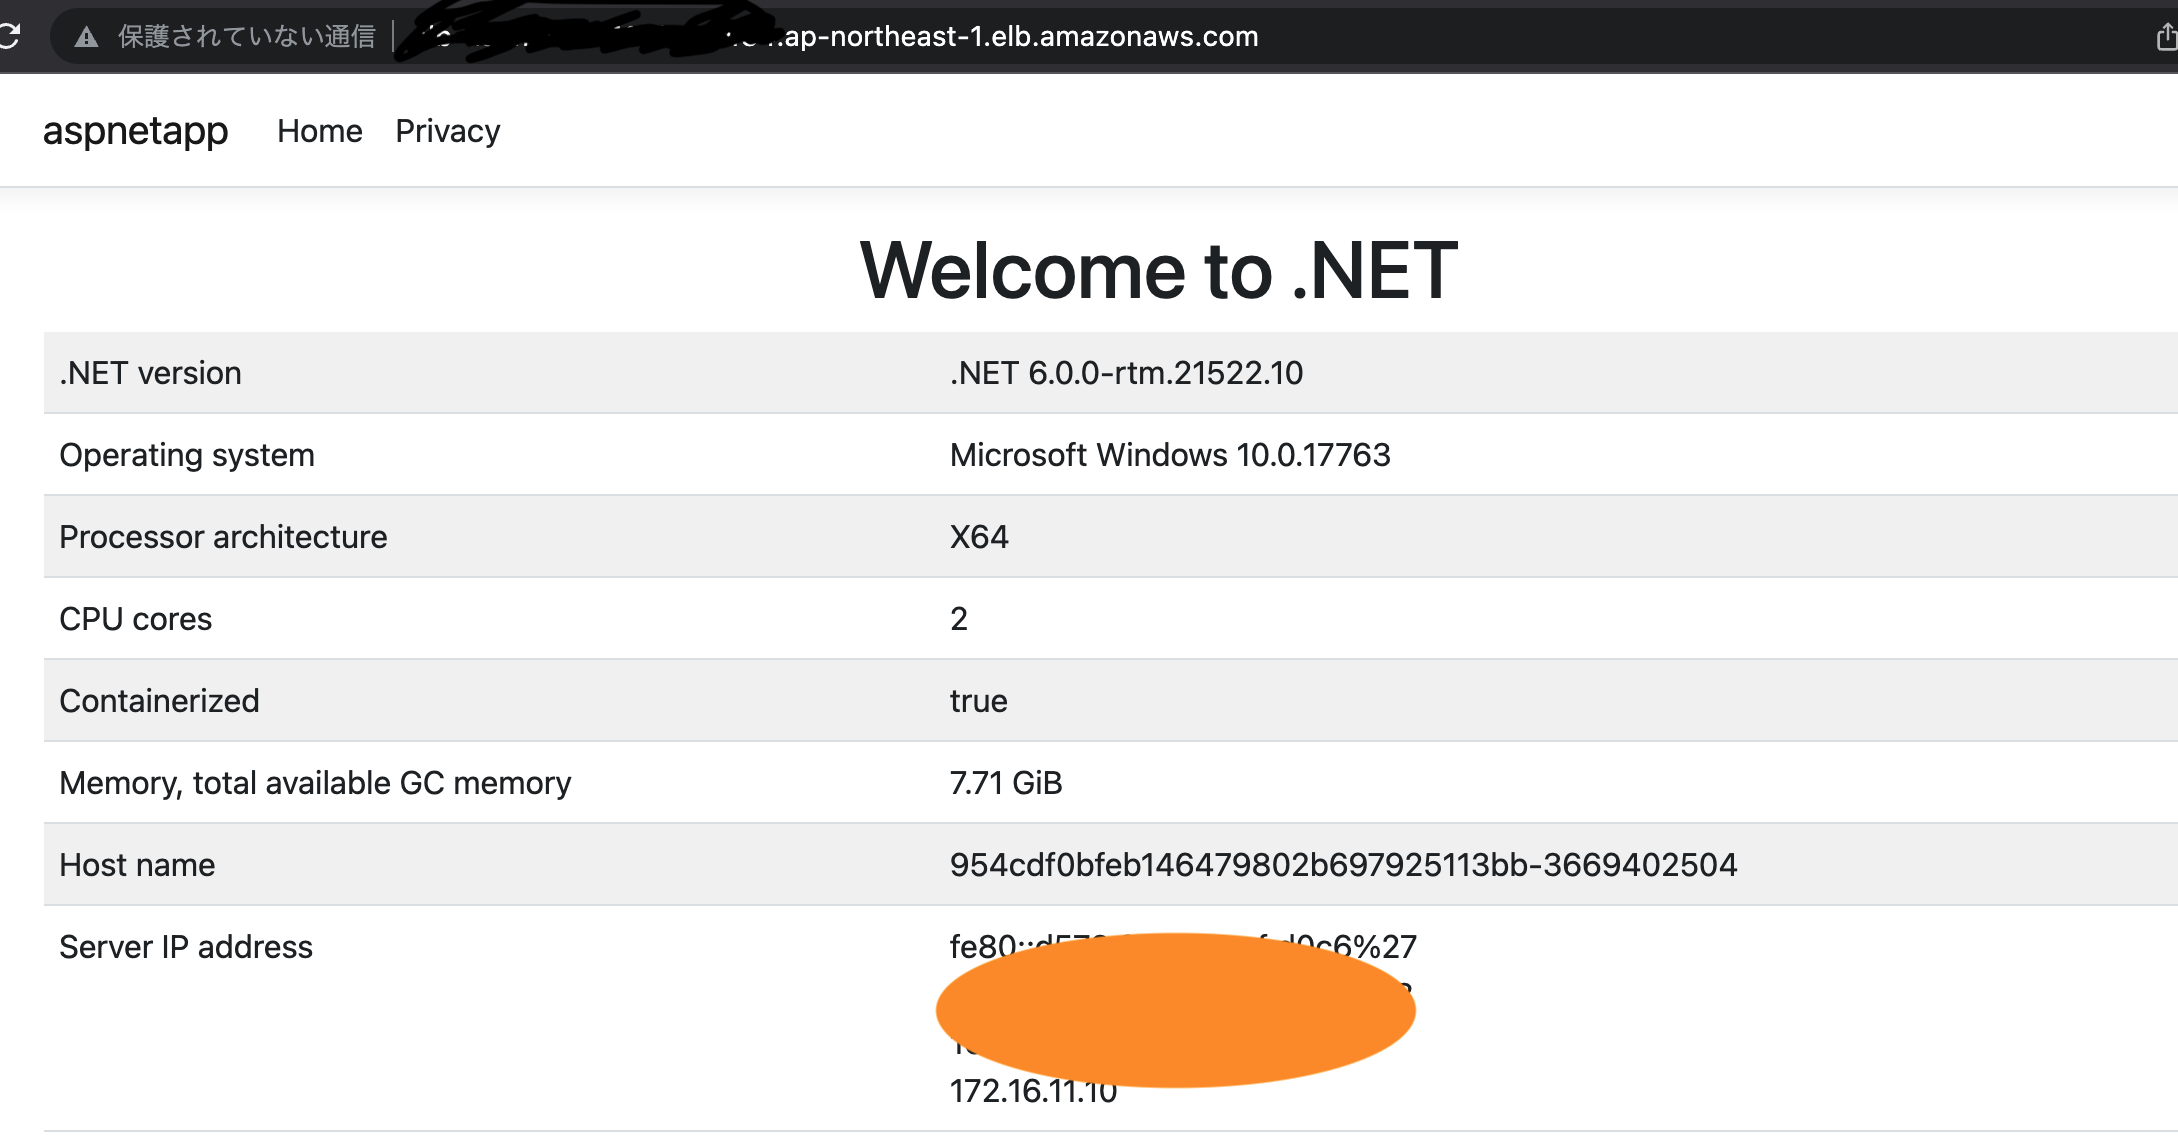
こちらの投稿では、Windowsコンテナを始める一歩として、サンプルアプリを使ってWindowsコンテナをビルドし、Fargate + ALBで起動させる所まで試してみたいと思います
Windows Containers with Amazon ECS on AWS Fargate
リリース時に出ているAWSブログ(英語)では、マネージメントコンソール上からの操作でWindowsコンテナを起動する流れが説明されています。手っ取り早くWindowsコンテナ試してみたい方は、そちらをみてみてください。
ブログ記事の中でも触れられていますが、 Windows コンテナ on Fargateで現在サポートされているWindows Serverファミリーとしては、以下の2パターンです。
- Windows Server 2019 Core
- Windows Server 2019 Full
先ほどのブログ記事でも触れられているのですが、Windowsコンテナが起動するホスト側のOS環境とコンテナ側のOS環境は一致させておく必要がある為、
例えば、Windows Server 2022のコンテナイメージをFargate上で起動させることはできません。その為、Windows Server 2016やWindows Server 2022の Windows コンテナを利用したい場合は、EC2を利用する必要がありますね。
Windows コンテナの基本のあれこれ
Isolation方式
Windowsコンテナのそもそもの仕組みとして、コンテナ化方式は以下のパターンがあります。
- Process Isolation (プロセス分離モード)
- Hyper-V Isolation Mode (Hyper-V分離モード)
Process Isolationは規定のIsolationモードであり、コンテナホストのOSのカーネルを共有しながら、ユーザモードプロセスとしてWindowsコンテナを稼働させます。つまり、コンテナホストOSとコンテナ上のOSのバージョンが一致している必要があることになります。一方、Hyper-V分離モードは、その言葉通り、Hyper-Vハイパーバイザーを利用してContainer毎のisolationを実現しています。その為、Hyper-V分離モードの場合はコンテナホストOSとバージョンが一致していないWindowsコンテナを起動することができます。
利用可能なベースOSイメージ
WindowsコンテナはベースOSイメージが提供されています。ベースOSイメージに加えて、.NETアプリ向けなどの用途向けなどがあり、要件にあわせて使い分けていく必要がありそうです。高機能なイメージはイメージサイズも比較的増える傾向にある様です。
- Nano Server
- mcr.microsoft.com/windows/nanoserver:1809
- .Net Coreアプリケーション向けのベースOSイメージ
- 手元の環境で257MBほど
- Windows Server Core
- mcr.microsoft.com/windows/servercore:ltsc2019
- LTSC/SACのServer CoreベースのOSイメージ。IISも利用可能
- 手元の環境で5.74GBほど
- Windows
- mcr.microsoft.com/windows:1809
- Server CoreベースOSイメージでも不足している依存関係がある場合に利用するもの
- 手元の環境で15.1GBほど。。。
それではやってみよう
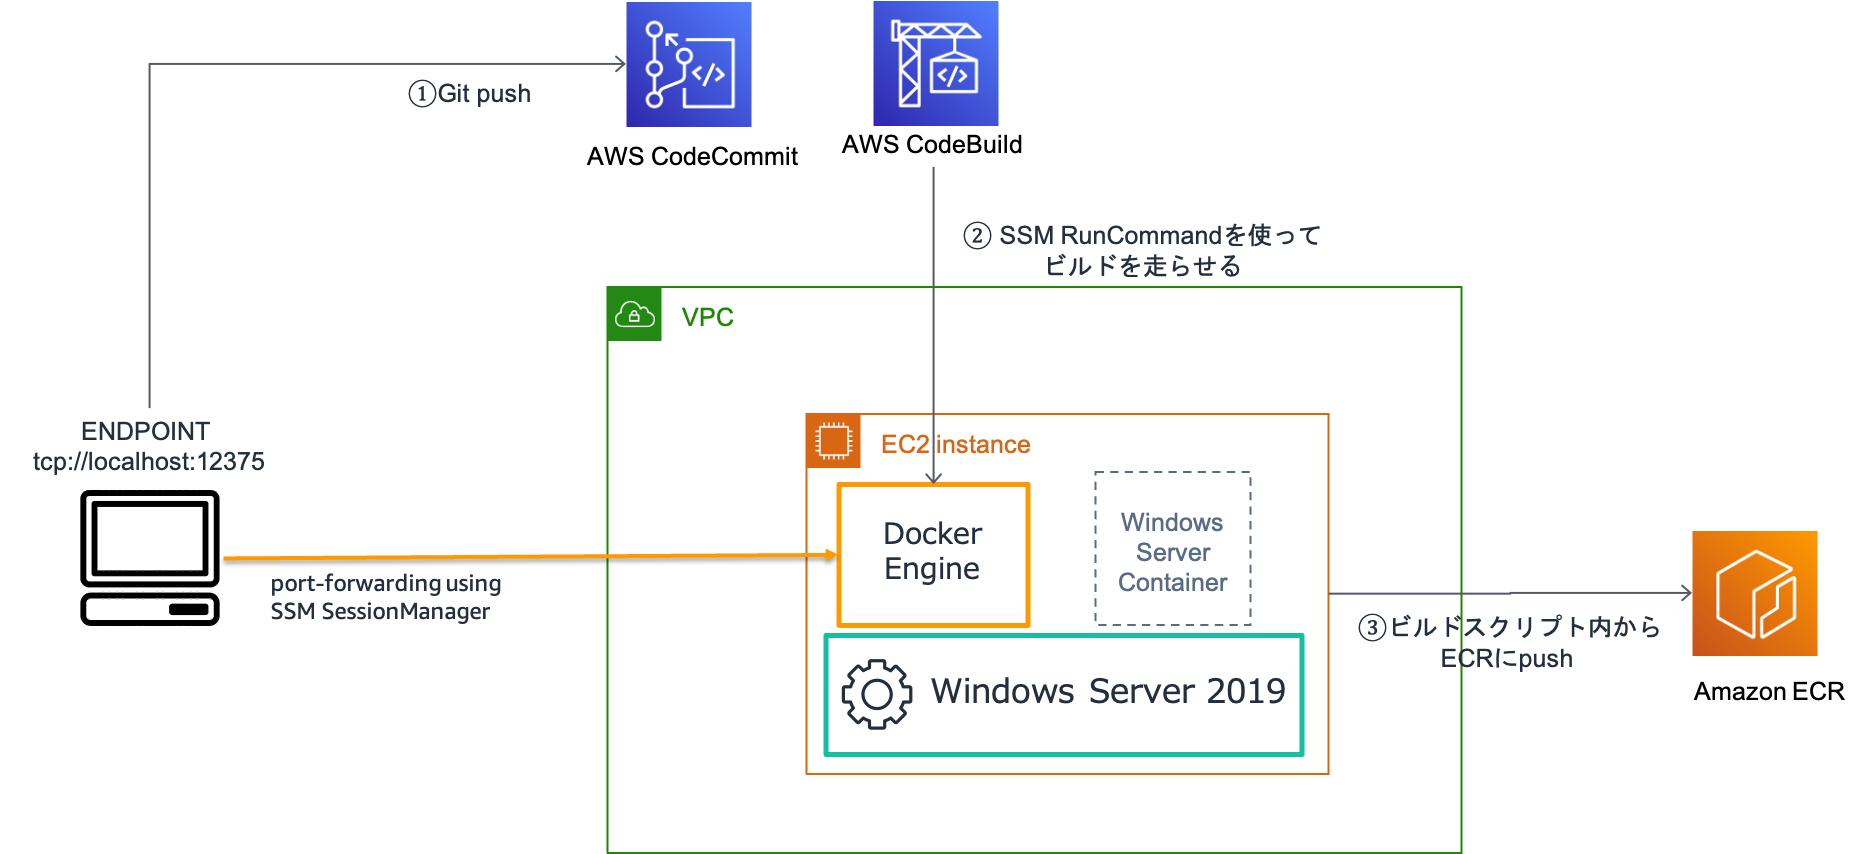
今回はこんな環境を作って遊んでみました。そもそも手元の環境がMacなので、EC2インスタンスとしてWindows Server2019を作りました。
BuildServerを作った意図としては、
- イメージのサイズが大きいので、Buildの際はキャッシュを効かせたい
- コンテナホストのOSバージョンとコンテナイメージのOSバージョンを明示的にコントロールしたい
といったあたりです。
参考にしたアプリ
GitHubで公開されているこちらを利用しました。リポジトリ内のsamples/aspnetapp/Dockerfile.windowsservercore-iis-x64がIISを利用したASP.NETアプリのDockerファイルになっています。
こちらのDockerファイルはWindows Server 2022ベースになっている為、Fargate上で動かす場合、利用するコンテナイメージをWindows Server 2019ベースに変更する必要があります。具体的には、以下の2箇所を修正すると、Fargateで起動することができる様になります。オリジナルなファイルの全体はこちらから確認してみてください。
diff --git a/samples/aspnetapp/Dockerfile.windowsservercore-iis-x64 b/samples/aspnetapp/Dockerfile.windowsservercore-iis-x64
index 27a4ad09..9e85175f 100644
--- a/samples/aspnetapp/Dockerfile.windowsservercore-iis-x64
+++ b/samples/aspnetapp/Dockerfile.windowsservercore-iis-x64
@@ -1,7 +1,7 @@
 # escape=`

 # https://hub.docker.com/_/microsoft-dotnet
-FROM mcr.microsoft.com/dotnet/sdk:6.0-windowsservercore-ltsc2022 AS build
+FROM mcr.microsoft.com/dotnet/sdk:6.0.100-windowsservercore-ltsc2019 AS build
 WORKDIR /source

 # copy csproj and restore as distinct layers
@@ -15,7 +15,7 @@ WORKDIR /source/aspnetapp
 RUN dotnet publish -c release -o /app --no-restore

 # final stage/image
-FROM mcr.microsoft.com/dotnet/aspnet:6.0-windowsservercore-ltsc2022
+FROM mcr.microsoft.com/dotnet/aspnet:6.0.0-windowsservercore-ltsc2019

 # Only needed for this sample because the sample project is targeting .NET 5
 ENV DOTNET_ROLL_FORWARD=LatestMajor

--
CodeBuildの設定
CodeBuildは、ソースコードリポジトリにあるbuildspec.ymlの内容に応じてビルド処理を実行してくれます。今回は、CodeBuildからSSMのRunCommandを実行してビルドサーバ上でイメージを作成する様にしてみました。buildフェーズでは、RunCommandのJob IDをもとに、ビルドが完了するまで、RunCommandのステータスをチェックする様にしています。
version: 0.2

phases:
  pre_build:
    commands:
      - echo "codeRepoName ${codeRepoName}"
      - echo "imageRepoName ${imageRepoName}"
      - echo "awsAccountId ${awsAccountId}"
      - echo "buildInstance ${buildInstanceId}"
  build:
    commands:
      - echo Build started on `date`
      - echo Building the Docker image using by SSM RunCommand
      - |
        sh_command_id=$(aws ssm send-command \
          --instance-ids ${buildInstanceId} \
          --document-name "AWS-RunRemoteScript" \
          --parameters '{"sourceType":["S3"],"sourceInfo":["{\"path\":\"https://s3.amazonaws.com/<bucket_name>/imageBuild.ps1\"}"],"commandLine":["imageBuild.ps1 '"${codeRepoName} ${imageRepoName} ${awsAccountId}"'"]}' \
          --output text --query "Command.CommandId" \
          --region ap-northeast-1)
      - |
        while true; \
          do \
            sh_command_status=$(aws ssm list-command-invocations \
              --command-id $sh_command_id \
              --details \
              --output text --query "CommandInvocations[0].Status" \
              --region ap-northeast-1); \
            echo "CommandStatus $sh_command_status"; \
            if [ $sh_command_status = "Success" -o $sh_command_status = "Failed" ]; then \
              break; \
            fi \
            sleep 5; \
          done
  post_build:
    commands:
      - echo Build completed on `date`
      - echo Pushing the Docker image...
実に雑ですね。真似しちゃいけない。
RunCommandで実行しているスクリプト
RunCommandでは、S3上にあるスクリプトを指定すると、実行時にスクリプトをダウンロードして実行してくれます。単にソースコードを持ってきて、イメージ作成&pushを行なっています。
こちらもまた雑な内容です。
$codeRepoName= $Args[0]
$imageRepoName=$Args[1]
$awsAccountId=[String] $Args[2]

$codeRepoURI = "https://git-codecommit.ap-northeast-1.amazonaws.com/v1/repos/" + $codeRepoName
$imageRegistry = $awsAccountId + ".dkr.ecr.ap-northeast-1.amazonaws.com"
$imageRepoURI = $imageRegistry + "/" + $imageRepoName

Write-Output ("codeRepoURI: " + $codeRepoURI)
Write-Output ("imageRepoURI: " + $imageRepoURI)
Write-Output ("imageRegistry: " + $imageRegistry)


Set-Location "C:\"
$PATH="C:\" + $codeRepoName
If(!(test-path $PATH))
{
	git config --global credential.helper "!aws codecommit credential-helper $@"
	git config --global credential.UseHttpPath true
	git clone $codeRepoURI
    If(!($?)){
        exit 1
    }
}
Set-Location $PATH
if(!($?)){
    exit 2
}
git pull

Set-Location "samples\aspnetapp"
aws ecr get-login-password --region ap-northeast-1 | docker login --username AWS --password-stdin $imageRegistry
if(!($?)){
    exit 3
}
docker build -t "$($imageRepoName):latest" -f Dockerfile.windowsservercore-iis-x64 .
if(!($?)){
    exit 4
}
docker tag "$($imageRepoName):latest" "$($imageRepoURI):latest"
docker push "$($imageRepoURI):latest"
if(!($?)){
    exit 5
}

exit 0
Faragetにデプロイ!
ここまでくると、いつもの手順でTask定義上で、ECR上にカスタムのWindowsコンテナイメージを指定するだけです。
最後に
SystemManagerすげー


