1.概要・目的
1.1 目的
①昨今市中には文字認識(OCR)サービスが多くあるが、Azureベースのシステムへの組み込みも意識して、今回はAzure単体で、レシートから出費をどのように集計できるか試す。
②集計の際に出費の分類を入力することが手間であるため、Azure OpenAIで自動的に推測させる。
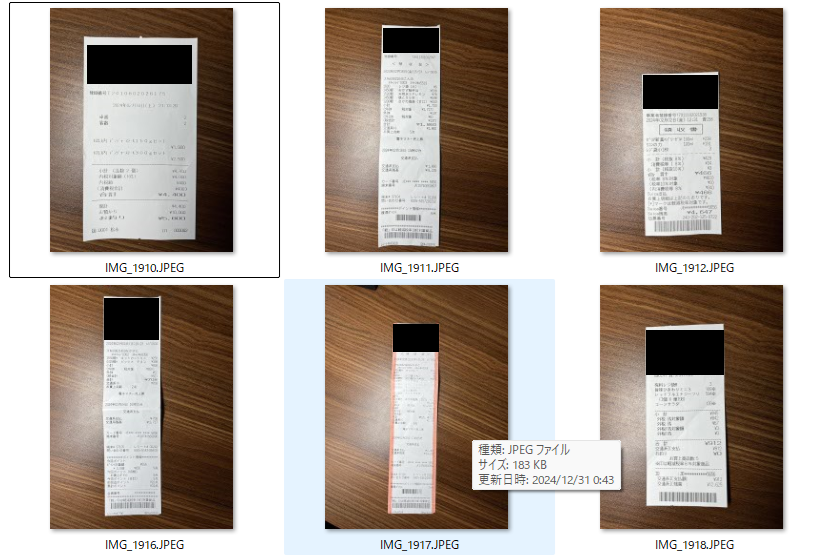
今回は最終的に、以下のようなレシート画像33枚から、自動的にデータをDBに蓄積して、Excelファイルを出力する。
- レシートの画像例
- 最終的に出力されたExcelファイル

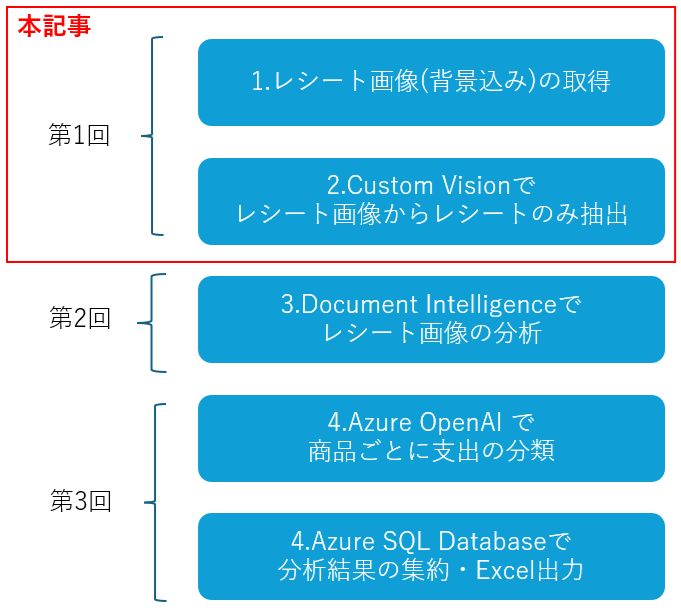
※なお今回は記事が長いため、3回程度に分けて投稿する。
1.2 今回主に取り扱うこと
- Azure Custom Visionを利用した、画像からレシートの切り抜き
- Azure AI Document Intelligenceのレイアウトモデル、事前構築済みモデル、カスタムモデルの簡単な操作
- Azure Open AIでの商品ジャンルの推測
- Azure SQL Databaseの簡単な操作
- 上記を達成するためのPythonプログラム
1.3 今回取り扱わないこと
- 運用を考慮した構成
- セキュリティを考慮した構成
- エラーハンドリング
- DBの詳細な設計・設定
- GUI
- 各サービスの精度向上
2.構成
2.1.システム構成
今回は以下図の構成とする

主要な構成要素は以下の通り
①レシート:レシートの画像、Webカメラからの撮影プログラムも作成したが、手持ちのWebカメラでは綺麗に撮影できないため、今回はiPhoneで撮影した画像で代用する。
②レシート抽出プログラム:レシート画像は背景も写り込んでいるため、Azure Custom Visionでレシートそのものを抽出する。
③レシート分析プログラム:Azure AI Document Intelligenceでレシートの文字情報と構造を分析して、集計に必要な情報のみを抽出する。また抽出した商品名からAzure OpenAIで出費を分類(食費、遊行費など)する。最後に全ての結果をAzure SQL Databaseに格納する。
④レシート分析結果Excel抽出プログラム:DBに格納されたデータをExcelに抽出する。Excelのセルサイズやフォント等を細かく指定できるライブラリもあるが、今回は時間の都合によりPandas経由でExcelへ出力する。
2.2.ディレクトリ構成
今回は以下のディレクトリ構成とする
/ プログラム本体とAzureへの接続情報を格納したiniファイル
┣anotated_pdf/ Azure AI Document Intelligenceの推論結果を画像にプロットしたもの
┃┣prebuilt-layout/
┃┗prebuilt-receipt/
┣captured_image/ Webカメラで撮影した画像(今回は良い画像が取れないため使わない)
┣config/ 設定ファイルの保存(今回はプロンプトのみ)
┣cropped_error/ Azure Custom Visionで切り取った結果の画像(推論失敗)
┣cropped_image/ Azure Custom Visionで切り取った結果の画像
┣log/ Azure AI Document Intelligenceの推論結果やSQLの実行ログ
┃┣prebuilt-layout/
┃┣prebuilt-receipt/
┃┗sql/
┣taken_images_from_phone/ iPhoneで撮影したレシート画像(今回は臨時で作成)
┗temp/ 処理中に生成される一時的なファイル
3.レシート抽出プログラムの作成
3.1.画像取得プログラムの作成
※本プログラム実装の結果、解析に耐えられる画像が撮影できなかったため、今回はiphoneカメラで代用する
今回は以下のようにOpenCVを使って画像を取得する。
以下のプログラムの場合caputured_imageに画像が格納されるため、cv2.imwriteでファイルに保存する
import cv2
# WEBカメラから画像を取得
camera =  cv2.VideoCapture(0)
camera.set(cv2.CAP_PROP_FRAME_WIDTH, 1280)
camera.set(cv2.CAP_PROP_FRAME_HEIGHT, 720)
ret, caputured_image = camera.read()
そのまま実行するとWebカメラの起動までに1分程度かかる。調べたところ以下の2行を追加するとすぐに起動するようになる。(詳細不明)
import os
os.environ["OPENCV_VIDEOIO_MSMF_ENABLE_HW_TRANSFORMS"] = "0"
最終的に以下のプログラムが完成する。
# レシート画像をカメラから読み込む
import datetime
import os
os.environ["OPENCV_VIDEOIO_MSMF_ENABLE_HW_TRANSFORMS"] = "0"
import cv2

# WEBカメラから画像を取得
camera =  cv2.VideoCapture(0)
camera.set(cv2.CAP_PROP_FRAME_WIDTH, 1280)
camera.set(cv2.CAP_PROP_FRAME_HEIGHT, 720)
ret, caputured_image = camera.read()

# ファイル名用のYYYYMMDD_HHmmss
current_datetime = datetime.datetime.now()
current_datetime_string = current_datetime.strftime('%Y%m%d_%H%M%S')
# ファイル名用のシーケンスナンバー
sequence_number = 0
# ファイル名を決定:シーケンスナンバーはゼロ埋め4桁
filename_string = current_datetime_string + '_' + format(sequence_number,'04') + '.png'

# ファイルのフルパスを決定
receipt_dir_path = 'captured_image'
receipt_file_path = os.path.join(receipt_dir_path, filename_string)

# ファイル名が重複しなくなるまでシーケンスナンバーをインクリメント
while(os.path.isfile(receipt_file_path)):
    sequence_number = sequence_number + 1
    filename_string = current_datetime_string + '_' + format(sequence_number,'04') + '.png'
    receipt_file_path = os.path.join(receipt_dir_path, filename_string)

# WEBカメラで取得した画像をファイルパスへ出力
cv2.imwrite(receipt_file_path, caputured_image)
3.2.Azure Custom Visionによるレシートの切り取り
今回は以下のような2024年2月のレシート画像33枚を準備した。
このままでは背景が分析の邪魔になるため、背景を削除してレシートだけの画像を作成する。
3.2.1.Azure Custom Visionリソースの作成
今回はAzureのカスタマイズ可能は画像系AIである、Custom Visionを利用する。
①Custom Visionのリソースを作成するとCustom Visionのリソースと推論用のリソースが作成される。

②Custom Visionのリソースを開くと[概要]タブに[Custom Visionポータル]のリンクがあるため、選択する。

③Custom Visionポータルより、プロジェクトを作成する。Domainsは以下公式ページの表より「General[A1]」が最も近いため、[General[A1]]を選択する。

※参考:Select a domain for a Custom Vision project
https://learn.microsoft.com/en-us/azure/ai-services/custom-vision-service/select-domain

④Custom Visionポータルの[Traning Images]タブにレシート画像をアップロードしてタグ付けする。画像を選択するとアノテーション用の画面が表示されるため、レシートを四角で囲ってタグ「receipt」を付ける
※適切な学習用の画像については以下の「Custom Vision のモデルを改善する方法」に記載されているが、今回は画像が少ないため、手元にあるものをすべて学習させる。
https://learn.microsoft.com/ja-jp/azure/ai-services/custom-vision-service/getting-started-improving-your-classifier


⑤全ての画像にタグ付けできたらCustom Visionポータル右上の[Train]ボタンを選択してトレーニングする。

⑥Traning Typeは、今回は[Quick Traning]とするが、[Adcanced Traning]を選択すると学習時間を設定できる。

⑥トレーニングが終わると自動的に選択されたテスト画像に対して、再現率(Recall)と適合率(Precision)が表示される。

※しかしながら学習画像が少ないため、レシートと関係ない画像を推論させたところ、レシートを誤検知する確率が高かった。
⑦学習済みのモデルをAPIで使えるように公開する。トレーニング結果画面から[publis]を選択するとモデルを公開できる。

⑧モデル名と予測に使うリソースを選択する。Prediction ResourceはCustom Visionのリソースを作成した時にデプロイされたものを利用する。

⑨Published asの後ろに記載された名前(今回はIteration1)がプログラムで使用するパブリッシュ名となるので控えておく。

3.2.2.Azure Custom Visionでレシートの切り取りをするプログラム
3.1.1章で作成したCustomVisionをAPIで呼び出す。
①APIキーはCusitonmisionを作成した時に生成された末尾「~Prediction」のほうを使用する。Predictionリソースの「キーとエンドポイント」画面より、キーとエンドポイントを確認して控えておく。

②Custom Visionポータルの右上の歯車からプロジェクトの設定画面を開き、「Project Id」と「Recource Id」を控える

※ソースコードはMicrosoft公式より、「クイックスタート: Custom Vision クライアント ライブラリまたは REST API を使って画像分類プロジェクトを作成する」を参考とする。
https://learn.microsoft.com/ja-jp/azure/ai-services/custom-vision-service/quickstarts/image-classification?tabs=windows%2Cvisual-studio&pivots=programming-language-python
③ソースコードは、3.2.1章⑨で控えた「パブリッシュ名」、3.2.2①で控えた「エンドポイント」、「キー」、3.2.2②で控えた「リソースID」、「プロジェクトID、」を定義する。今回はセキュリティの都合により、一部環境変数から呼び出ししている。
# 環境変数からサービスに接続する値を取得
# Azure Custom Visionキー
ENDPOINT = os.environ["CUSTOM_VISION_ENDPOINT_RECEIPT"]
# Azure Custom Vision Predictionエンドポイント
prediction_key = os.environ["CUSTOM_VISION_KEY_RECEIPT"]
# Azure Custom Vision リソースID
prediction_resource_id = os.environ["CUSTOM_VISON_RECEIPT_RESOURCE_ID"]

project_id = os.environ["CUSTOM_VISION_RECEIPT_PROJECT_ID"]

iteration_id = "Iteration1"
④以下のコードで画像への推論を実行すると結果の座標や確度が返却される。
results = predictor.detect_image(project_id, iteration_id, image_contents.read())
{
    "id": "0558f743-aeed-45ec-ac85-585e47ec47d5",
    "project": "5bebe336-ecd2-4e8b-b51f-a2c86ebdd9e0",
    "iteration": "2c530a3c-56b2-4a7a-a401-6e1378e2fcdb",
    "created": "2024-12-31T04:21:41.300Z",
    "predictions": [
        {
            "probability": 0.9999862,
            "tag_id": "3ab5f635-f387-4a0e-b850-af918770bfd3",
            "tag_name": "receipt",
            "bounding_box": {
                "left": 0.1868192,
                "top": 0.13595109,
                "width": 0.52891755,
                "height": 0.76262563
            },
            "tag_type": "Regular"
        }
    ]
}
⑤座標は相対座標であるため、画像のサイズを取得して絶対値を求める。
※今回は確度が低い場合は予測エラーフォルダに振り分ける。
        # 確度が0.9以上の場合は切り取り処理を実行
        if float(probability) >= 0.9 :
            left = bounding_box.left
            top = bounding_box.top
            width = bounding_box.width
            height = bounding_box.height

            # 画像の幅と高さを取得
            image_height, image_width, _ = image.shape

            # bounding boxの座標(相対値)を画像のピクセル座標に変換
            left_pixel = int(left * image_width)
            top_pixel = int(top * image_height)
            right_pixel = int((left + width) * image_width)
            bottom_pixel = int((top + height) * image_height)

            # 画像の切り取り
            cropped_image = image[top_pixel:bottom_pixel, left_pixel:right_pixel]
            # 宛先ディレクトリに画像を保存
            cv2.imwrite(image_dst_filepath, cropped_image)
        # 確度が0.9未満の場合はエラーフォルダへ格納
        else:
            cv2.imwrite(image_dst_filepath, image)
⑥プログラム全体は以下のようになる。
from azure.cognitiveservices.vision.customvision.prediction import CustomVisionPredictionClient
from msrest.authentication import ApiKeyCredentials
import os
import cv2

# 環境変数からサービスに接続する値を取得
# Azure Custom Visionキー
ENDPOINT = os.environ["CUSTOM_VISION_ENDPOINT_RECEIPT"]
# Azure Custom Vision Predictionエンドポイント
prediction_key = os.environ["CUSTOM_VISION_KEY_RECEIPT"]
# Azure Custom Vision リソースID
prediction_resource_id = os.environ["CUSTOM_VISON_RECEIPT_RESOURCE_ID"]

project_id = os.environ["CUSTOM_VISION_RECEIPT_PROJECT_ID"]

iteration_id = "Iteration1"

# src_directoryのフォルダのimage_filenameの画像に対して、CustomVisionの予測に従って画像を切り抜き、dst_directoryに同名で保存する関数
def crop_image(src_directory, dst_directory, image_filename):
    # Custom Visionの予測エンドポイントへ接続する
    prediction_credentials = ApiKeyCredentials(in_headers={"Prediction-key": prediction_key})
    predictor = CustomVisionPredictionClient(ENDPOINT, prediction_credentials)

    # 画像の読み取り元を定義
    image_src_filepath = os.path.join (src_directory, image_filename)
    # 画像の保存先を定義
    image_dst_filepath = os.path.join (dst_directory, image_filename)
    #テスト画像に対して予測を実行し、結果をresultに格納
    with open(image_src_filepath, "rb") as image_contents:
        try:
            results = predictor.detect_image(project_id, iteration_id, image_contents.read())
            #予測結果から値を取得
            prediction = results.predictions[0]
            # probability(確度)値を取得
            probability = prediction.probability
            # bounding_boxの数値(相対値)を取得
            bounding_box = prediction.bounding_box
            # 切り取り処理用にCV2で画像を読み込み
            image = cv2.imread(image_src_filepath)

        #予測に失敗した場合はcropped_errorへ格納
        except:
            error_dir = "cropped_error"
            error_dst_filepath = os.path.join (error_dir, image_filename)
            image = cv2.imread(image_src_filepath)
            cv2.imwrite(error_dst_filepath, image)
            return

        # 確度が0.9以上の場合は切り取り処理を実行
        if float(probability) >= 0.9 :
            left = bounding_box.left
            top = bounding_box.top
            width = bounding_box.width
            height = bounding_box.height

            # 画像の幅と高さを取得
            image_height, image_width, _ = image.shape

            # bounding boxの座標(相対値)を画像のピクセル座標に変換
            left_pixel = int(left * image_width)
            top_pixel = int(top * image_height)
            right_pixel = int((left + width) * image_width)
            bottom_pixel = int((top + height) * image_height)

            # 画像の切り取り
            cropped_image = image[top_pixel:bottom_pixel, left_pixel:right_pixel]
            # 宛先ディレクトリに画像を保存
            cv2.imwrite(image_dst_filepath, cropped_image)
        # 確度が0.9未満の場合はエラーフォルダへ格納
        else:
            cv2.imwrite(image_dst_filepath, image)

if __name__ == "__main__":
    # 画像の元フォルダ
    src_directory = "taken_images_from_phone"
    # 画像の保存先フォルダ
    dst_directory = "cropped_image"
    # 元フォルダ内の全ファイル名をリスト化
    image_list = [filename for filename in os.listdir(src_directory) if not filename.startswith('.')]
    # 全てのリストの要素(ファイル名)に対してcrop_image関数を実行
    for image_name in image_list:
        crop_image(src_directory, dst_directory, image_name)
⑦プログラムを実行した結果、画像は以下のようにレシート部分だけになる。
