KongのMCP Proxy Pluginにはmodeがあり、conversion-listener、passthrough-listener、conversion-only、listener の4種類がある。
これらのうち前者2つは1MCPサーバにつき1エンドポイントを提供するような機能だが、後者2つは複数のMCPサーバを1エンドポイントで提供することが出来るような機能を持っている。
今回はこのconversion-only、listenerの2つのモードについて、役割や用途を解説する。
conversion-onlyとlistener
listenerとついているものはMCP用のエンドポイントを公開する、という役割がある。
またconversionとついているものはREST APIをMCPツール定義に変換する、という役割がある。
なので、conversion-listenerは変換とエンドポイント公開の両方を行うスタンドアロン型のモードであるのに対し、conversion-onlyは変換だけを行い、エンドポイント公開はlistenerで行うのがconversion-only・listenerとconversion-listenerの違いである。
イメージ的には以下のような感じで、複数のAPIを1エンドポイントで捌くことが出来るようになる。MCP利用時のtools/listではconversion-onlyが生成したそれぞれのツール定義が見えるようになり、listenerはそれを集約してクライアントに提供する。
動作検証
ここでは天気API(https://wttr.in)とニュースAPI(https://jsonplaceholder.typicode.com ※実際は適当なレスポンスを返すAPI)を例に、conversion-onlyとlistenerの組み合わせでMCPエンドポイントを公開する設定例を紹介する。
以下のdeck用のYAMLを適用して検証する。
deck.yaml (クリックして全表示)
_format_version: "3.0"

services:
  - name: mcp-listener-service
    protocol: https
    host: dummy.dummy
    routes:
      - name: mcp-listener-route
        paths:
          - /mcp
        plugins:
          - name: ai-mcp-proxy
            config:
              mode: listener
              server:
                tag: mcp-tools
  - name: weather-service
    protocol: https
    host: wttr.in
    port: 443
    routes:
      - name: weather-route
        paths:
          - /weather
        plugins:
          - name: ai-mcp-proxy
            tags:
              - mcp-tools
            config:
              mode: conversion-only
              tools:
                - name: get-weather
                  description: Get current weather for a specified city in JSON format.
                  method: GET
                  path: /weather/{city}
                  annotations:
                    title: Get Weather
                    read_only_hint: true
                    idempotent_hint: true
                  parameters:
                    - name: city
                      in: path
                      required: true
                      description: The city name (e.g. Tokyo, London, New York).
                      schema:
                        type: string
                    - name: format
                      in: query
                      description: Response format. Use j1 for JSON.
                      schema:
                        type: string
                        default: j1

  - name: news-service
    protocol: https
    host: jsonplaceholder.typicode.com
    port: 443
    routes:
      - name: news-route
        paths:
          - /news
        plugins:
          - name: ai-mcp-proxy
            tags:
              - mcp-tools
            config:
              mode: conversion-only
              tools:
                - name: get-articles
                  description: Get a list of news articles. Optionally filter by userId.
                  method: GET
                  path: /news/posts
                  annotations:
                    title: Get Articles
                    read_only_hint: true
                    idempotent_hint: true
                  parameters:
                    - name: userId
                      in: query
                      description: Filter articles by author ID.
                      schema:
                        type: integer
                - name: get-article-by-id
                  description: Get a single news article by its ID.
                  method: GET
                  path: /news/posts/{id}
                  annotations:
                    title: Get Article by ID
                    read_only_hint: true
                    idempotent_hint: true
                  parameters:
                    - name: id
                      in: path
                      required: true
                      description: The article ID.
                      schema:
                        type: integer
記載内容を解説する。
まず、以下はlistenerモードのプラグイン設定である。
services:
  - name: mcp-listener-service
    protocol: https
    host: dummy.dummy
    routes:
      - name: mcp-listener-route
        paths:
          - /mcp
        plugins:
          - name: ai-mcp-proxy
            config:
              mode: listener
              server:
                tag: mcp-tools
/mcpに対してMCPのリクエストを受け付けられるようにするための設定である。
これ自体はServiceを利用せず、conversion-onlyモードのプラグインで定義したServiceを叩くため、ホストに関してはダミーの値を設定している。
重要なのはconfig.server.tagの値で、これと同じタグを持つconversion-onlyモードのプラグインが生成したツール定義を集約して提供する、という役割がある。
この例ではmcp-toolsというタグを設定しているので、同じタグを持つconversion-onlyモードのプラグインが生成したツール定義がこのlistenerに集約されることになる。
以降はconversion-onlyモードのプラグイン設定となる。
最初は天気API(https://wttr.in)の設定である。
  - name: weather-service
    protocol: https
    host: wttr.in
    port: 443
    routes:
      - name: weather-route
        paths:
          - /weather
        plugins:
          - name: ai-mcp-proxy
            tags:
              - mcp-tools
            config:
              mode: conversion-only
              tools:
                - name: get-weather
                  description: Get current weather for a specified city in JSON format.
                  method: GET
                  path: /weather/{city}
                  annotations:
                    title: Get Weather
                    read_only_hint: true
                    idempotent_hint: true
                  parameters:
                    - name: city
                      in: path
                      required: true
                      description: The city name (e.g. Tokyo, London, New York).
                      schema:
                        type: string
                    - name: format
                      in: query
                      description: Response format. Use j1 for JSON.
                      schema:
                        type: string
                        default: j1
ポイントは、タグにmcp-toolsを設定している点で、タグの付け方は他のエンティティとかと同じで特別な付け方がある訳ではないので、通常のタグと同様に複数設定することも可能である。
このタグがlistenerのconfig.server.tagと一致することで、このツール定義がlistenerに集約されることになる。
あとは、通常のREST APIをMCPツール定義に変換するための設定を行う。
この例では、/weather/{city}というエンドポイントを呼び出すためのツール定義を作成している。
同様に、ニュースAPI(https://jsonplaceholder.typicode.com)の設定も行う。
設定は天気APIとほぼ一緒なので説明は割愛する。
動作確認する。
まず、各APIがAPIとして動作するか確認する。天気APIは/weather/{city}、ニュースAPIは/news/postsに対してリクエストを投げてみる。
最初に天気APIを呼び出す。以下のように、/weather/Tokyoにクエリformat=j1を付与してリクエストを投げると、東京の天気情報がJSON形式で返ってくる。
curl -s localhost:8000/weather/Tokyo?format=j1
{
  "current_condition": [
    {
      "FeelsLikeC": "16",
      "FeelsLikeF": "61",
 ...
次にニュースAPIを呼び出す。以下のように、/news/postsにリクエストを投げると、ニュースではないけどJSONであるダミーデータが返ってくる。
curl -s localhost:8000/news/posts
[
  {
    "userId": 1,
    "id": 1,
    "title": "sunt aut facere repellat provident occaecati excepturi optio reprehenderit",
  ...
APIとしては問題なそうだ。
今度はこれをMCPクライアントから呼び出してみる。
今回はMCP Inspectorを利用して/mcpにに接続し、ツール定義が正しく集約されているか、またツール呼び出しが正しく動作するかを確認する。
接続してtools/listを取得したのが以下の結果である。
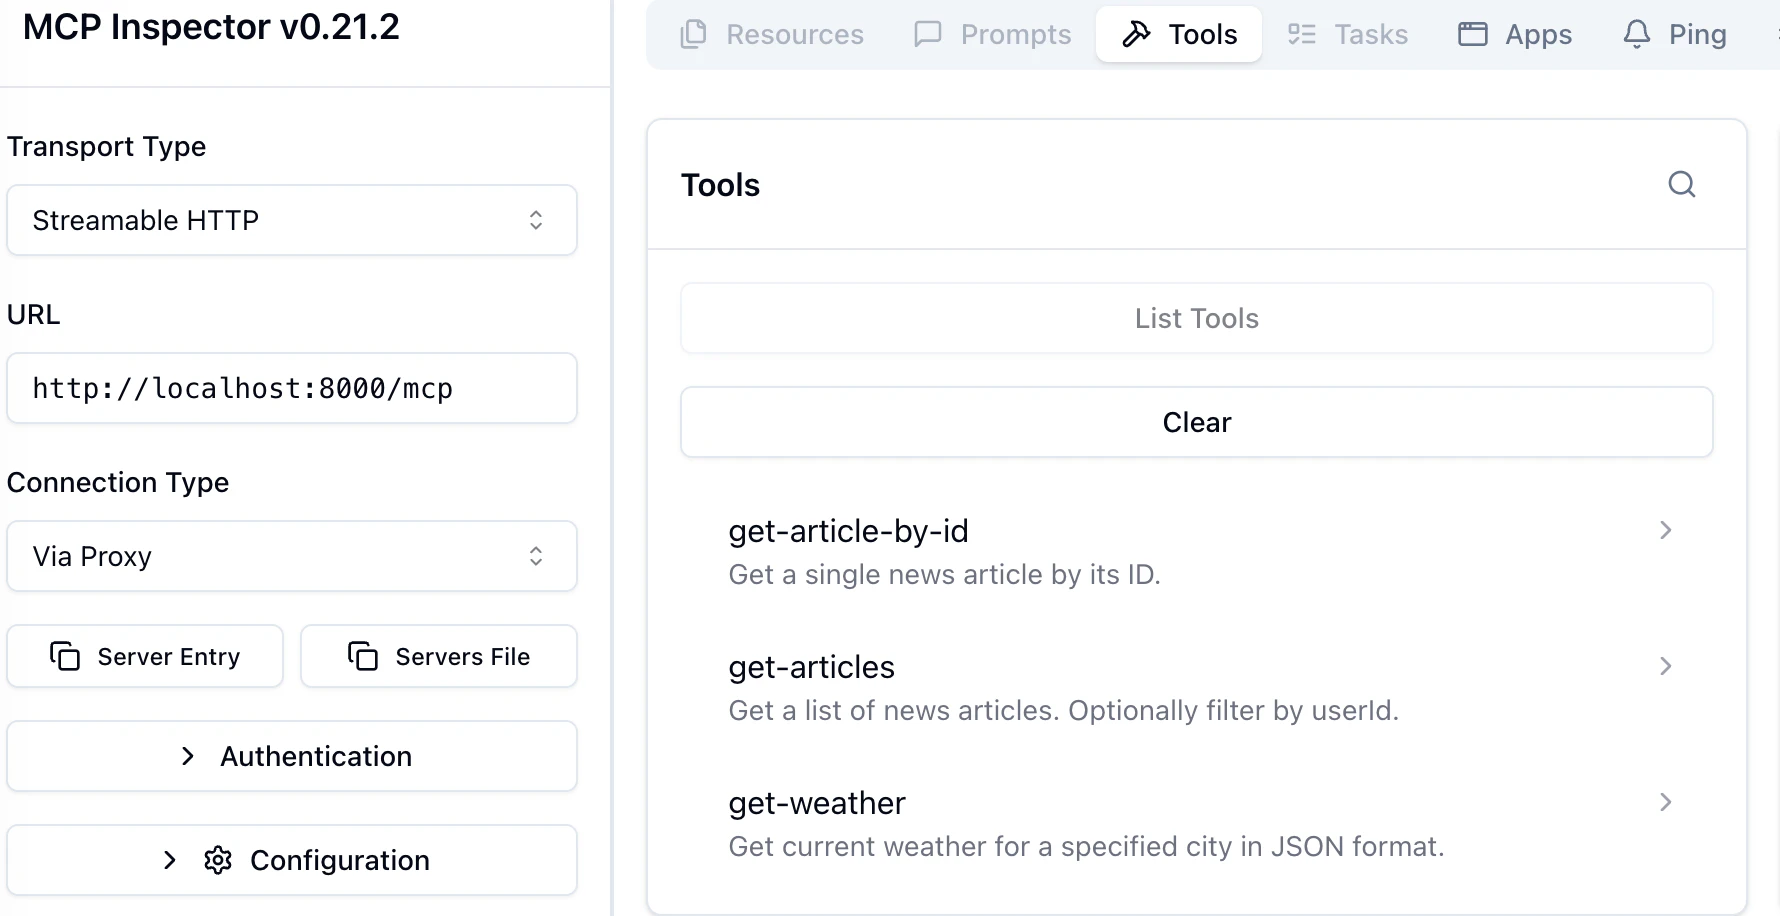
ニュースAPIの方で定義したarticle関連のtoolや天気APIのget-weatherが取れている事が分かる。
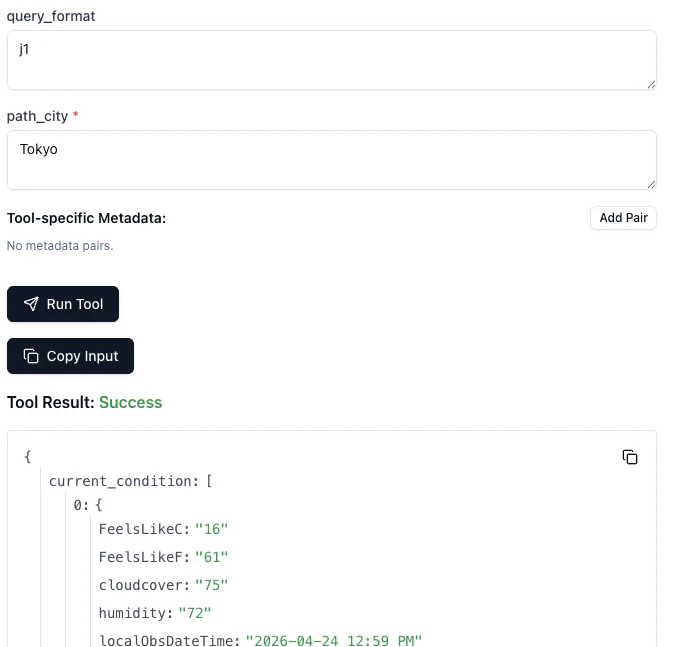
以下、get-weatherを実行した結果となる。
またget-articlesを実行した結果はこちら。

2種類のツールを1つのエンドポイントに集約できていることが確認できた。
まとめ
conversion-listenerでAPIをMCP化すると、特にAPIが多い場合はAgentは複数のMCPサーバに接続する必要が出てくるが、conversion-only + listener なら、Agentは1つのエンドポイントだけ知っていれば済む。
また、conversion-only + listener は、チームごとに自分のAPIだけ管理できるという運用上のメリットがあり、例えば今回の例で言うと
- 天気チーム → weather-service の conversion-only だけ管理
- ニュースチーム → news-service の conversion-only だけ管理
- プラットフォームチーム → listener だけ管理(集約・ACL・ポリシー適用)
みたいな運用の棲み分けが可能で、各チームは他チームの設定を知らなくてよく、mcp-tools タグを付けるだけで自動的に集約することができる。
使い方次第ではかなり使える機能だと思うので、APIのMCP化の際には利用を検討するといいと思う。