NetOps Coding 第一回のネタです。
30分でコードからRest APIを作成し、仮想ルータにdescriptionの設定を入れてみます。
description設定して何になるかって?descriptionが設定できれば、あとは何でも設定できるのです ![]()
なお、今回使用したサンプルコードはこちらに上げています。
さあ、それでは始めましょう♪
用意するもの
- 仮想ルータ 今回はvSRX(旧firefly)を使用
- 仮想マシン 今回はIDCFクラウドのVMを使用
- 言語 今回はRuby
- Webアプリ 今回はSinatra(Webrick)
- テストツール DHC、Postman
- DB 今回はMariaDB(Cent6の場合はMySQL)
vSRXのインストール、設定方法はこちらを参照
開発環境のセットアップはこちらを参照
DHCやPostmanはChromeでREST APIをテストするならDeveloperツールです。
開発するならおすすめです ![]()
やること
- rubyでNetconfを使って仮想ルータ(vSRX)に設定を入れてみる
- ソフトウェアの強みを活かして沢山入れてみる
- DBにルータの設定情報を入れ込む
- APIを作成して、APIを叩いて仮想ルータに設定を投入する
前置き(コードからルータに設定を入れる方法)
コードからネットワーク機器に設定を入れる方法は大きく3つあると思います。
- RestAPI
- Netconf
- telnet&expect駆使
1.のRestAPIがコードを書く上では一番やり易いですが、RestAPIをサポートしているネットワーク機器は少ない。F5のBIG-IP(ver11.5以降)、Arista、Cumulusなどはあるが、まだ少ない
ちなみにBIG-IPのRestAPIはこんな感じ
2.のNetconfはLibraryが提供されていれば使えるが、まともに出ているものは少ない ![]()
Juniperルータに関してはjuniper/netconfというのがあったので、これを使った。
しかしこれも2013年以降アップデートがなく、成熟度は高くないように思われる。
また、メーカさんからしてみれば当然なのでしょうが、他のメーカの機種ではこれを使うことはまずできない ![]()
今回の勉強会を通して、ネットワークエンジニアがコードをどんどん書いていって、メーカの方々もソフトウェアで機器を扱いやすいようなLibraryどんどんを作って、それをforkして、といったサイクルが回っていくことを切に願っています![]()
rubyでNetconfを使って仮想ルータ(vSRX)に設定を入れてみる
まず、ただただ、interface ge-0/0/0.1にvlan 1, description netops1030を入れる設定をやってみる。
設定
require "net/netconf"

Netconf::SSH.new(target: ENV['ROUTER_IP'], username: ENV['ROUTER_USER'], password: ENV['ROUTER_PASSWORD']) do |device|
  puts device.rpc.lock(:candidate)
  puts device.rpc.edit_config {|x|
    x.configuration {
      x.interfaces {
        x.interface {
          x.name "ge-0/0/0"
          x.unit {
            x.name "1"
            x.description "description_netops1030"
            x.send("vlan-id",1)
          }
        }
      }
    }
  }
  puts device.rpc.validate(:candidate)
  puts device.rpc.commit
  puts device.rpc.unlock :candidate
end
実行してみる ![]()
# ruby set_ifdescription.rb
<ok/>
<ok/>
<commit-results>
</commit-results>
<ok/>
<ok/>
vSRX側の確認
# show | compare rollback 1
[edit interfaces ge-0/0/0]
+    unit 1 {
+        description description_netops1030;
+        vlan-id 1;
+    }
バッチリ ![]()
振り返って確認
sshでnetconfでログインして、
Netconf::SSH.new(target: ENV['ROUTER_IP'], username: ENV['ROUTER_USER'], password: ENV['ROUTER_PASSWORD']) do |device|
lockして、
puts device.rpc.lock(:candidate)
editモードになって
puts device.rpc.edit_config {|x|
設定情報流し込んで
    x.configuration {
      x.interfaces {
        x.interface {
          x.name "ge-0/0/0"
          x.unit {
            x.name "1"
            x.description "description_netops1030"
            x.send("vlan-id",1)
validateして
puts device.rpc.validate(:candidate)
commitして
puts device.rpc.commit
unlockしている。
puts device.rpc.unlock :candidate
rubyでは**"-"(ハイフン)は特別な文字扱いをされてしまうため、vlan-idのようなものはsend("vlan-id")といった形でsend()で囲ってやる**必要がある
やったらx.hogehogeといったものを記述しているが、netconfではXML形式で情報を投げるため、そのためにこんな記述になっているのであろう ![]()
Juniperの場合はshow interfaces | display xmlなどとすると、下記な感じでxml形式での情報が表示されるので、コード書くときにはかなり参考になる。ここら辺がJuniperの良いところ ![]()
# show interfaces | display xml
<rpc-reply xmlns:junos="http://xml.juniper.net/junos/15.1X49/junos">
    <configuration junos:changed-seconds="1446099446" junos:changed-localtime="2015-10-29 15:17:26 JST">
            <interfaces>
                <interface>
                    <name>ge-0/0/0</name>
                    <flexible-vlan-tagging/>
                    <native-vlan-id>0</native-vlan-id>
                    <unit>
                        <name>0</name>
                        <vlan-id>0</vlan-id>
                        <family>
                            <inet>
                                <dhcp>
                                </dhcp>
                            </inet>
                        </family>
                    </unit>
                    <unit>
                        <name>1</name>
                        <description>description_netops1030</description>
                        <vlan-id>1</vlan-id>
                    </unit>
                </interface>
                <interface>
                    <name>ge-0/0/1</name>
                    <flexible-vlan-tagging/>
                    <native-vlan-id>0</native-vlan-id>
                    <unit>
                        <name>0</name>
                        <vlan-id>0</vlan-id>
                        <family>
                            <inet>
                                <dhcp>
                                </dhcp>
                            </inet>
                        </family>
                    </unit>
                </interface>
                <interface>
                    <name>fxp0</name>
                    <unit>
                        <name>0</name>
                        <family>
                            <inet>
                                <address>
                                    <name>10.6.0.33/21</name>
                                </address>
                            </inet>
                        </family>
                    </unit>
                </interface>
            </interfaces>
    </configuration>
    <cli>
        <banner>[edit]</banner>
    </cli>
</rpc-reply>
設定確認
Netconf::SSH.new(target: ENV['ROUTER_IP'], username: ENV['ROUTER_USER'], password: ENV['ROUTER_PASSWORD']) do |device|
  show = device.rpc.get_interface_information( :interface_name => "ge-0/0/0.1", :detail => true )
  name = show.xpath("//name")
  desc = show.xpath("//description")
  show_summary = name + desc
  puts show_summary
end
実行
# ruby get_interface.rb
<name>
ge-0/0/0.1
</name>
<description>
description_netops1030
</description>
削除
消したい部分で**("operation"=>"delete")**を入れる
Netconf::SSH.new(target: ENV['ROUTER_IP'], username: ENV['ROUTER_USER'], password: ENV['ROUTER_PASSWORD']) do |device|
  puts device.rpc.lock(:candidate)
  puts device.rpc.edit_config {|x|
    x.configuration {
      x.interfaces {
        x.interface {
          x.name "ge-0/0/0"
          x.unit("operation"=>"delete"){
            x.name "1"
          }
        }
      }
    }
  }
  puts device.rpc.validate(:candidate)
  puts device.rpc.commit
  puts device.rpc.unlock :candidate
end
ソフトウェアの強みを活かして沢山入れてみる
単にfor文回せば良い。
ただし、どこにfor入れるかはちょっと注意が必要 ![]()
interface ge-0/0/0.1~10に設定
(本当は1000個くらい入れたかったんですが、vSRXが重すぎるので断念。。 ![]() )
)
まとめて削除
require "net/netconf"

Netconf::SSH.new(target: ENV['ROUTER_IP'], username: ENV['ROUTER_USER'], password: ENV['ROUTER_PASSWORD']) do |device|
  puts device.rpc.lock(:candidate)
  for i in 1..10
  puts device.rpc.edit_config {|x|
    x.configuration {
      x.interfaces {
        x.interface {
          x.name "ge-0/0/0"
          x.unit("operation"=>"delete"){
            x.name "#{i}"
          }
        }
      }
    }
  }
  end
  puts device.rpc.validate(:candidate)
  puts device.rpc.commit
  puts device.rpc.unlock :candidate
end
set形式での記述
xml形式で記述するのシンドイ!!!と思ってたら、フツーに入れる方法もありました ![]()
ただしrequire "net/netconf/jnpr"が必要
rpcの記述も変える必要があります。
sampleはここらへん参照
さっきの長ったらしい記述がたったこれだけ!且つ見慣れたCLI ![]()
先に言えよ!って感じですよね ![]()
require "net/netconf"
require "net/netconf/jnpr"

Netconf::SSH.new(target: ENV['ROUTER_IP'], username: ENV['ROUTER_USER'], password: ENV['ROUTER_PASSWORD']) do |device|
  puts device.rpc.lock_configuration
  puts device.rpc.load_configuration( :format => 'set' ) {
    "set interfaces ge-0/0/0 unit 1 vlan-id 1 description netopscoding1_cli"
  }
  puts device.rpc.check_configuration
  puts device.rpc.commit_configuration
  puts device.rpc.unlock_configuration
end
複数行まとめて設定する場合も"\n"を付けてやればよいだけ ![]()
Netconf::SSH.new(target: ENV['ROUTER_IP'], username: ENV['ROUTER_USER'], password: ENV['ROUTER_PASSWORD']) do |device|
  puts device.rpc.lock_configuration
  puts device.rpc.load_configuration( :format => 'set' ) {
    "set interfaces ge-0/0/0 unit 1 vlan-id 1 description netopscoding1_cli\n
    set interfaces ge-0/0/0 unit 2 vlan-id 2 description netopscoding2_cli"
  }
  puts device.rpc.check_configuration
  puts device.rpc.commit_configuration
  puts device.rpc.unlock_configuration
end
for文もより自由な形で記述できます ![]()
require "net/netconf"
require "net/netconf/jnpr"

config = ""
for i in 1..10
  config << "set interfaces ge-0/0/0 unit #{i} vlan-id #{i} description netopscoding#{i}_cli\n"
end

Netconf::SSH.new(target: ENV['ROUTER_IP'], username: ENV['ROUTER_USER'], password: ENV['ROUTER_PASSWORD']) do |device|
  puts device.rpc.lock_configuration
  puts device.rpc.load_configuration( :format => 'set' ) {
    config
  }
  puts device.rpc.check_configuration
  puts device.rpc.commit_configuration
  puts device.rpc.unlock_configuration
end
DBにルータの設定情報を入れ込む
次はDB作成です。既に随分長い資料になってしまいました ![]()
MariaDB [(none)]> create database netops_codings;
Query OK, 1 row affected (0.00 sec)

MariaDB [(none)]> use netops_codings
Database changed
table作成
※Rubyではtable名をスネークケース且つ複数形に指定されるので、table名はnetops_codingsとしておく。
create table netops_codings (
    -> id INT UNSIGNED NOT NULL AUTO_INCREMENT,
    -> unit INT NOT NULL,
    -> vlan INT NOT NULL,
    -> description VARCHAR(255) NOT NULL,
    -> created_at DATETIME NOT NULL,
    -> updated_at DATETIME NOT NULL,
    -> PRIMARY KEY(id)
    -> );
Query OK, 0 rows affected (0.00 sec)
サンプルデータ投入
insert into netops_codings values(1, 1, 1, "netops1", now(), now());
insert into netops_codings values(2, 2, 2, "netops2", now(), now());
insert into netops_codings values(3, 3, 3, "netops3", now(), now());
insert into netops_codings values(4, 4, 4, "netops4", now(), now());
insert into netops_codings values(5, 5, 5, "netops5", now(), now());

MariaDB [netops_codings]> select * from netops_codings ;
+----+------+------+-------------+---------------------+---------------------+
| id | unit | vlan | description | created_at          | updated_at          |
+----+------+------+-------------+---------------------+---------------------+
|  1 |    1 |    1 | netops1     | 2015-10-29 21:15:13 | 2015-10-29 21:15:13 |
|  2 |    2 |    2 | netops2     | 2015-10-29 21:16:02 | 2015-10-29 21:16:02 |
|  3 |    3 |    3 | netops3     | 2015-10-29 21:16:02 | 2015-10-29 21:16:02 |
|  4 |    4 |    4 | netops4     | 2015-10-29 21:16:02 | 2015-10-29 21:16:02 |
|  5 |    5 |    5 | netops5     | 2015-10-29 21:16:02 | 2015-10-29 21:16:02 |
+----+------+------+-------------+---------------------+---------------------+
5 rows in set (0.00 sec)
プログラムからDBにアクセスするためにdatabase.ymlを作成
development:
  adapter: mysql2
  database: netops_codings
  host: localhost
  username: <%= ENV['DB_USER'] %>
  password: <%= ENV['DB_PASSWORD'] %>
  encoding: utf8
APIを作成して、APIを叩いて仮想ルータに設定を投入する
それでは、いよいよ、Web APIでjsonでidを渡して、DBのIDから設定を引っ張ってきて、ルータに設定を入れるプログラムを作ってみます。
require "active_record"
require "mysql2"
require "sinatra"
require "sinatra/reloader"
require "net/netconf"
require "net/netconf/jnpr"
require "erb"

database = File.read("database.yml")

# DB設定ファイルの読み込み
# 環境変数付きのymlファイルをそのままload_fileすることはできないので、ERBに渡して環境変数を取り出してからloadする必要がある。
ActiveRecord::Base.configurations = YAML.load(ERB.new(database).result)
ActiveRecord::Base.establish_connection(:development)

# クラス作成
class SetInterface
  def initialize(id)
    @id = id
  end

# これがスネークケースの複数形(netops_codings)になり、table名と一致していないといけない
  class NetopsCoding < ActiveRecord::Base
  end

  def set_interface
    value = NetopsCoding.find_by id: (@id)
    id = value.id
    unit = value.unit
    vlan = value.unit
    description = value.description


Netconf::SSH.new(target: ENV['ROUTER_IP'], username: ENV['ROUTER_USER'], password: ENV['ROUTER_PASSWORD']) do |device|
      puts device.rpc.lock(:candidate)
      puts device.rpc.load_configuration( :format => "set" ) {
        "set interfaces ge-0/0/0 unit #{unit} vlan-id #{vlan} description #{description}"
      }
      puts device.rpc.validate(:candidate)
      puts device.rpc.commit
      puts device.rpc.unlock :candidate
    end
  end
end

post "/set_interface" do
  # HTTP Request解析
  reqData = JSON.parse(request.body.read.to_s)
  id = reqData["id"]
  set_config = SetInterface.new(id)
  set_config.set_interface
  status 202
end

get "/" do
  "Hello NetOps Coding#1"
end
最期にsinatraを起動させて、APIを受け付けられるようにします。
デフォルトでは4567ポートを使うので、とりあえず80に変更。あと外部からsinatraに接続させるためには"-o 0.0.0.0"が必要となります。
(本当はsupervisordとか使ってdaemon化した方が良いんでしょうけど割愛 ![]() )
)
ruby network_api.rb -p 80 -o 0.0.0.0
こんな感じでDHCを使って、POSTで/set_interfaceにアクセスし、JSONで"id": "1"を渡してやります。
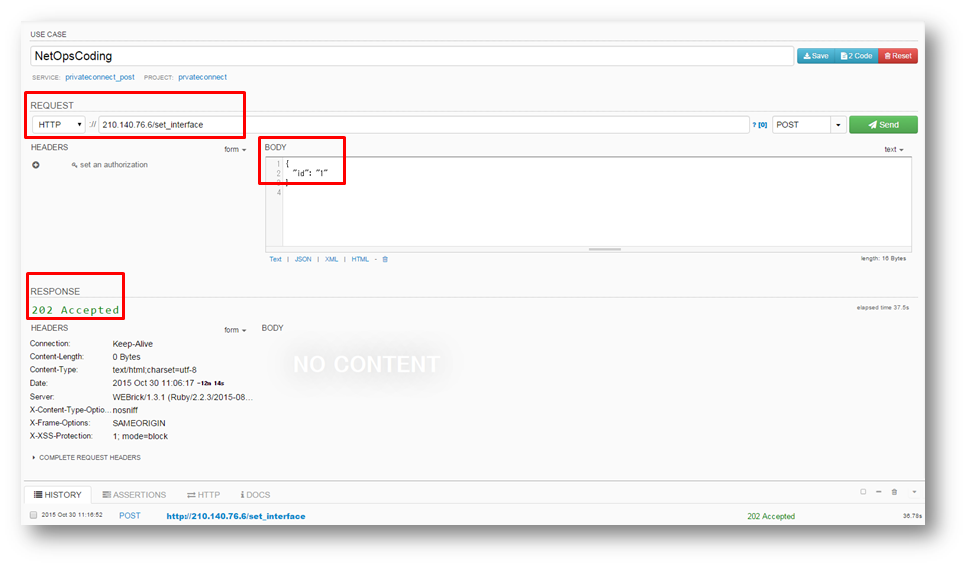
無事202 Acceptedが返ってきて・・
netops# show | compare rollback 1
[edit interfaces ge-0/0/0]
+    unit 1 {
+        description netops1;
+        vlan-id 1;
+    }

[edit]
ルータに設定も反映されています ![]()
設定削除や、show関連の確認、DBへのレコード追加などもSinatraを使えば同じようにできます ![]()
今回はこれで以上です
長時間お付き合いいただきありがとうございました ![]()